
Prologue
This article guides you through a one-time MongoDB migration to Couchbase. You will learn how to export from the MongoDB data structure, import to Couchbase, and do some basic transformation on those documents.
All code from this blog is available in the following Git repository: mongodb-to-couchbase
Prerequisites
This article uses the sample mflix dataset that has been loaded to a MongoDB cluster. I am using MongoDB Atlas but the information in this article applies to non-Atlas installs of MongoDB also. If you need to load the sample dataset to MongoDB refer to the instructions here.
MongoDB Compass is used to export the dataset and this article assumes it is already configured to connect to the MongoDB cluster where the sample mflix dataset resides.
You will also need a Couchbase Server Enterprise Edition (EE) 6.5 cluster with the Data, Index, Query, and Eventing services enabled (NOTE: Index and Query are used in a future article). I am using a single node local install of Couchbase Sever EE but the information in this article applies to any Couchbase Server EE cluster.
If you do not have an existing Couchbase Server EE cluster, the following links will get you up and running quickly:
- Download Couchbase Sever EE 6.5
- Install Couchbase Server EE
- Provision a single-node cluster (NOTE: use the default values for cluster configuration.)
JSON, BSON, and Extended JSON
MongoDB and Couchbase are both document databases and both store JSON documents. However, MongoDB represents JSON documents in binary-encoded format called BSON. JSON can only represent a subset of the types supported by BSON. To preserve type information, MongoDB uses Extended JSON which includes extensions to the JSON format. Refer to the MongoDB Extended JSON specification for full details on the different Extended JSON types and conventions.
Here are some examples of how MongoDB represents different types of information:
- ObjectId: “_id”:{“$oid”:”573a1390f29313caabcd4135″}
- Integer: “runtime”:{“$numberInt”:”1″}
- Date: “released”:{“$date”:{“$numberLong”:”-2418768000000″}}
- Double: “rating”:{“$numberDouble”:”6.2″}
While Couchbase can store this information, it is easier to work with documents that do not use the Extended JSON format. Using the above examples, the values would look like this:
- ObjectId: “_id”:”573a1390f29313caabcd4135″
- Integer: “runtime”:1
- Date: “released”:-2418768000000
- Double: “rating”:6.2
Export Data from MongoDB
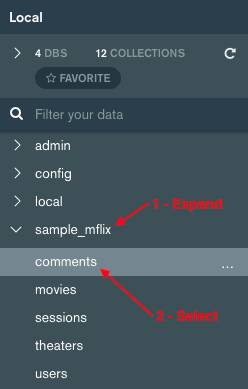
Use MongoDB Compass to export the movies and comments collections from the sample_mflix database. In Compass, expand the sample_mflix database item and then select comments.
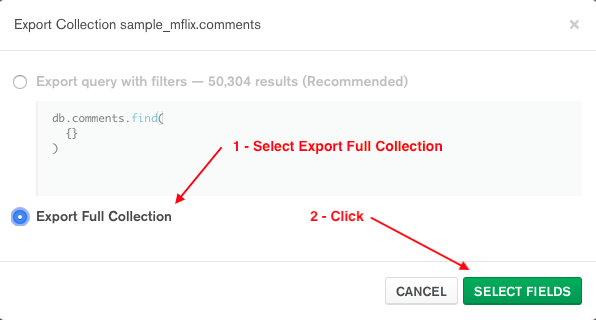
Choose the Collection -> Export Collection menu item. Select Export Full Collection and click SELECT FIELDS.
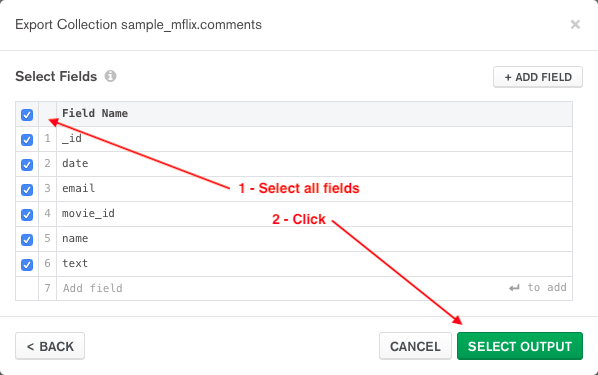
Select all fields and click SELECT OUTPUT.
Select JSON export file type, specify the Output file, and click EXPORT.

Do the same for the movies collection.
Import Data to Couchbase
Next, import the MongoDB collection data into Couchbase. As mentioned above, the exported data is in Extended JSON Format so the Couchbase Eventing service is used to do some minor transformations on the data in real time as the documents are imported into Couchbase.
At a high level, the flow is as follows:
- Use the cbimport utility to import the JSON documents into the incoming bucket.
- As documents are written to the incoming bucket, an Eventing function will transform the documents.
- If the transformation is successful, the transformed document with be written to the sample_mflix bucket.
- If there are any errors, the original document is written to the error bucket. An error attribute in the document will contain the error message.
Create Buckets
Create the three buckets mentioned above. Refer to the documentation on creating a bucket for full details on the different settings and considerations for setting the values.
The incoming bucket will temporarily store the documents as they are imported into Couchbase. This is an ephemeral bucket since we don’t require any persistent storage for these documents. An Eventing function will transform them and write them to either the sample_mflix or error bucket.
Since the documents do not need to remain in the bucket after they are transformed, the bucket is configured with a Time To Live (TTL) of 900 seconds (15 minutes). The documents are automatically deleted by Couchbase when the TTL expires.
To create the incoming bucket, click on Buckets and then ADD BUCKET.
![]()
Configure the incoming bucket as follows and click Add Bucket.
- Name: incoming
- Memory Quota: 256 MB (NOTE: Ephemeral buckets do not persist to disk so you must ensure there is enough memory allocated to the bucket to accommodate the entire data set being imported. The total size of the comments and movies collections used in this example is about 50 MB so 256 MB is more than enough to accommodate this data set.)
- Bucket Type: Ephemeral
- Advanced Bucket Settings -> Bucket Max Time-To-Live: 900 seconds (NOTE: The documents are transformed in real time as they are written to Couchbase so this value can be set relatively low. 15 minutes (900 seconds) is used in the case. If the value is set too low, the document could expire before it is processed.)

The sample_mflix bucket is used to store the transformed document. This is a Couchbase bucket since we require persistent storage for these documents. Configure it as follows:
- Name: sample_mflix
- Memory Quota: 256 MB (NOTE: Couchbase buckets persist all documents to disk so the memory quota will determine how many documents can be stored in the integrated caching layer at any time. The total size of the comments and movies collections used in this example is about 50 MB so 256 MB is more than enough to accommodate this data set.)
- Bucket Type: Couchbase

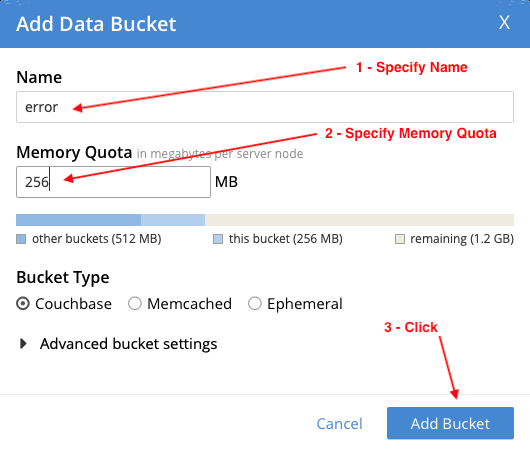
The error bucket is used to store any documents that could not be transformed. Configure it as follows:
- Name: error
- Memory Quota: 256 MB
- Bucket Type: Couchbase
Data Transformation with Eventing
Eventing is used to transform the data in real time as it is imported into Couchbase. There are a few things to configure to use this feature.
First, create a metadata bucket that is used by Eventing to store system data. Configure it as follows:
- Name: metadata
- Memory Quota: 256 MB
- Bucket Type: Couchbase

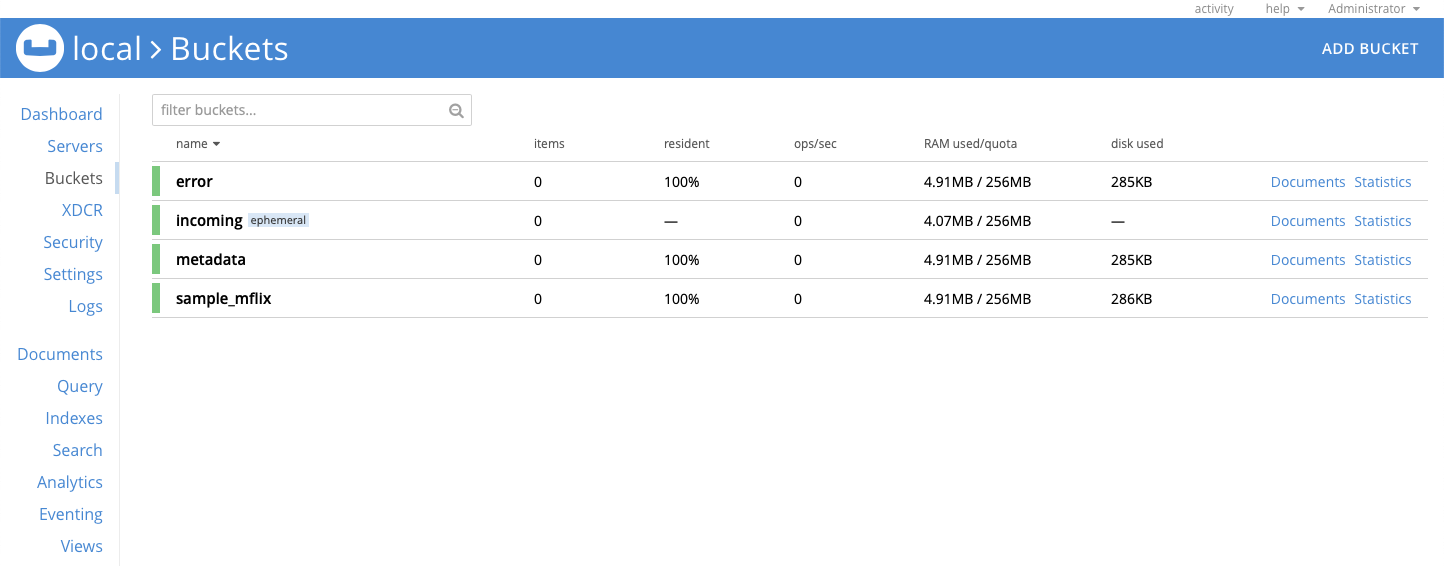
The Buckets section now lists the 4 buckets you created: error, incoming, metadata, & sample_mflix:
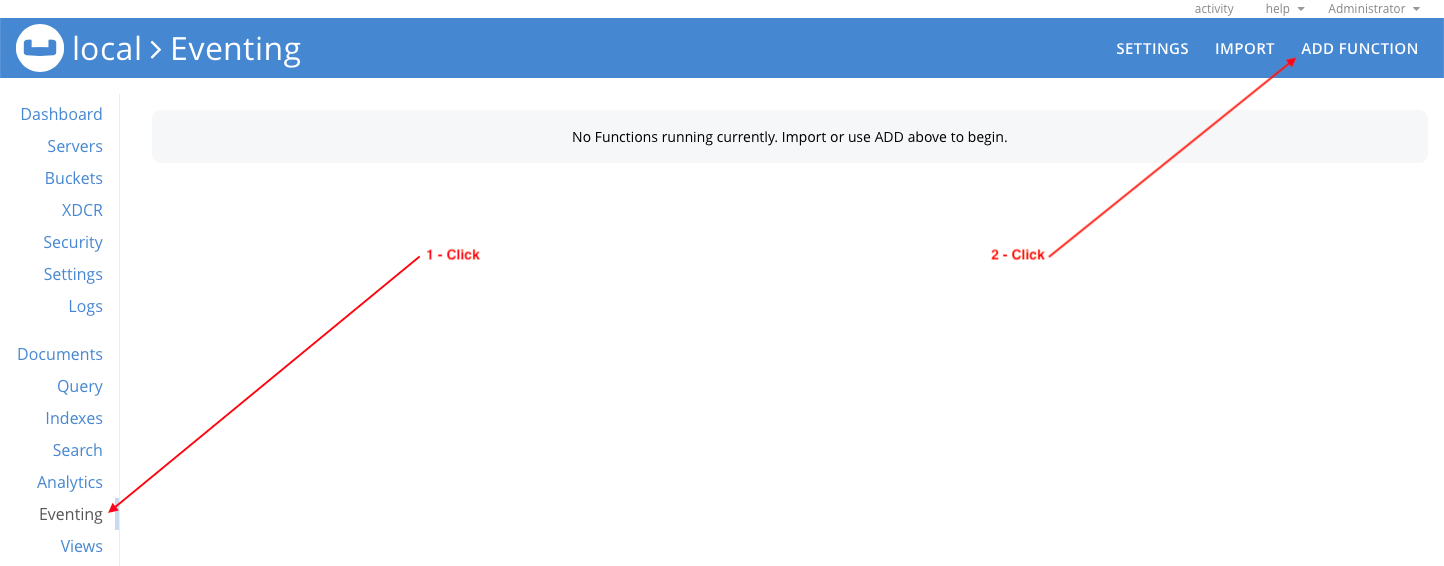
Click on Eventing and then click ADD FUNCTION to configure the function that is used to transform the data in real time as it is being imported into Couchbase.
Configure the function as follows:
- Source Bucket: incoming (This bucket temporarily stores the documents as they are imported into Couchbase)
- Metadata Bucket: metadata (This bucket is used to store system data)
- Function Name: transform
- Description: Transform MongoDB export
- Bindings (Click the + icon to add a second binding)
- binding type: bucket alias
- alias name: target (alias used in function to refer to bucket)
- bucket: sample_mflix (name of the bucket in the cluster)
- access: read and write
- binding type: bucket alias
- alias name: error (alias used in function to refer to bucket)
- bucket: error (name of the bucket in the cluster)
- access: read and write
![]()
Click Next: Add Code to add the JavaScript code for the transform function.
On the transform function screen, replace the boilerplate code with the code below.
The function includes log() statements to log the original document, transformed document, and any errors. Feel free to change these as necessary. The entries Eventing log file is eventing.log can be found in the @eventing application log. See this link for more information on the name of the log file and how to view them.
You can easily extend the capability of this function to perform other transformations by adding the necessary code in the transformValues() function. If you need to make any changes to the function, you will need to pause or undeploy it, edit the JavaScript, and then resume or deploy it again.
|
1 2 3 4 5 6 7 8 9 10 11 12 13 14 15 16 17 18 19 20 21 22 23 24 25 26 27 28 29 30 31 32 33 34 35 36 37 38 39 40 41 42 43 44 45 46 47 48 49 50 51 52 53 54 55 56 57 58 59 60 61 62 63 64 65 66 67 68 69 70 71 72 73 74 75 76 77 78 79 80 81 82 83 84 85 86 87 88 89 90 91 92 93 94 95 96 97 98 99 100 101 102 103 104 105 106 107 108 109 110 111 112 113 114 115 116 117 118 119 120 121 122 123 124 |
function OnUpdate(doc, meta) { log(“original document: “, doc); try { // transform document var newDoc = transformValues(null, “”, doc); // add a type attribute based on the document ID (available in meta.id) newDoc[“type”] = getTypeFromId(meta.id); // generate a document ID for the transformed document based on the type and the _id attribute value var id = generateId(newDoc); log(“transformed document (id = “ + id + “): “, newDoc); // write transformed document to target bucket with generated ID target[id] = newDoc; } catch (e) { log(“error transforming document “ + meta.id + “. See error bucket for more details.”); // if there are any errors, store error message in the error attribute doc[“error”] = e; // write untransformed document to error bucket with original ID error[meta.id] = doc; } } function OnDelete(meta) { } // This is a recursive function that will iterate over all properties in the document (including arrays & sub-objects) // It will transform Extended JSON to standard JSON. function transformValues(parentObj, parentProperty, obj) { var propertyType = “”; // for every property in the object for (var property in obj) { if (obj.hasOwnProperty(property) && obj[property] != null) { switch (property) { case “$oid”: // convert parentObj.parentProperty = {“$oid”:”3487634876″} // to parentObj.parentProperty = “3487634876” parentObj[parentProperty] = obj[property]; break; case “$date”: if (obj[“$date”][“$numberLong”] != null) { // convert parentObj.parentProperty = {“$date”:{“$numberLong”:”-2418768000000″}} // to parentObj.parentProperty = -2418768000000 parentObj[parentProperty] = Number(obj[“$date”][“$numberLong”]); break; } // convert parentObj.parentProperty = {“$date”:”1983-04-27T20:39:15Z”}} // to parentObj.parentProperty = “1983-04-27T20:39:15Z” parentObj[parentProperty] = obj[“$date”]; break; case “$numberInt”: case “$numberDecimal”: case “$numberLong”: case “$numberDouble”: // convert parentObj.parentProperty = {“$numberInt”:”1″} // to parentObj.parentProperty = 1 parentObj[parentProperty] = Number(obj[property]); break; // !!! This function can be extended by adding additional case statements here !!! default: // otherwise, check the property type propertyType = determineType(obj[property]); switch (propertyType) { case “Object”: // if the property is an object, recursively transform the object transformValues(obj, property, obj[property]); break; case “Array”: // if the property is an array, transform every element in the array transformArray(obj[property]); break; default: // otherwise, do nothing break; } } } } return obj; } // Determine the type of the specified object function determineType(obj) { return obj == null ? “null” : obj.constructor.name; } // Transform every element in the specified array function transformArray(obj) { for (var i = 0; i < obj.length; i++) { transformValues(obj, i, obj[i]); } } // Get document type from specified id. // This function expects that documents will be imported with IDs in the following format: // example: <document type>:12 function getTypeFromId(id) { return id.split(“:”)[0]; } // Generate a document ID for the specified document. // The new ID will be based on the value of the type attribute and the value of the _id attribute: // <type>:<_id> function generateId(document) { var documentId = document[“_id”]; if (determineType(documentId) != “String”) { throw “‘_id’ value must be a String: _id = ‘” + documentId + “‘”; } return document[“type”] + “:” + documentId; } |
Click Save to save the code and click < back to Eventing to go back to the Eventing section of the console.
![]()
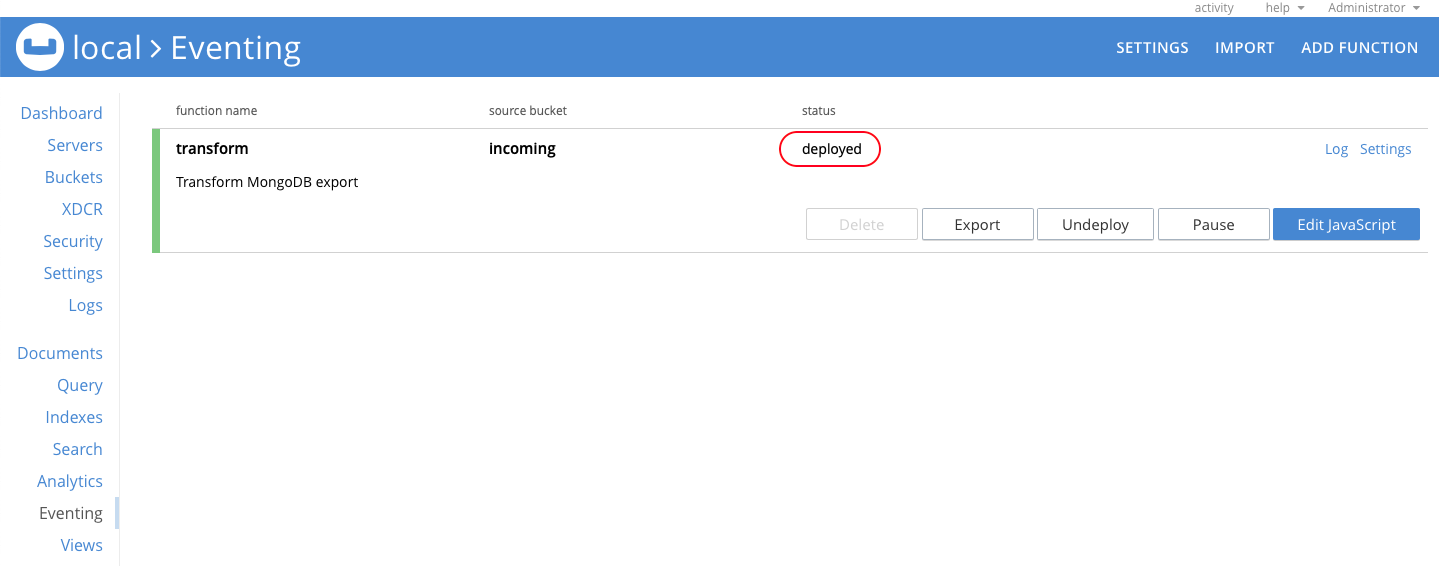
You will see the new transform function, but it needs to be deployed. Click on the transform function and then click Deploy.

Confirm function deployment with the default setting by clicking Deploy Function.
![]()
After the function deploys, the status is deployed.
Now everything is ready to import the MongoDB export data into Couchbase and transform it in real time.
Import Documents with cbimport
Use the cbimport utility to import the MongoDB export files. Before importing data it is important to understand the command syntax and what it is doing.
Here is an example cbimport command:
|
1 |
$ cbimport json –c <cluster> –u <admin username> –p <admin password> –b <bucket> –d <import file> –f <file format> –g <key generator> |
To import the MongoDB comments collection, execute the command below. Note that the location of the cbimport utility varies based on the OS and is documented here: CLI Reference.
|
1 |
$ <path_to_cbimport>/cbimport json –c <cluster> –u <admin username> –p <admin password> –b incoming –d file://<path to comments.json>/comments.json -f list -g comment:#MONO_INCR# |
The command will connect to the specified cluster (i.e. -c couchbase://127.0.0.1) using the supplied Administrator credentials (i.e. -u Administrator -p password).
The command will import JSON data from comments.json. Check the format of the exported comments.json file and specify the correct dataset format option based on the export file format. My export file follows the list format which contains a single JSON list where each element in the list represents a separate document (-f list).
The documents are written to the incoming bucket (-b incoming) using a key generated using the specified format (-g comment:#MONO_INCR#). In this command the format specifies that each document key will start with “comment:”. The MONO_INCR function increments by 1 each time it is called so the resulting keys are comment:1, comment:2, etc.
Upon completion you will see the following output:
|
1 2 |
Json `file://comments.json` imported to `https://127.0.0.1:8091` successfully. Documents imported: 50304 Documents failed: 0 |
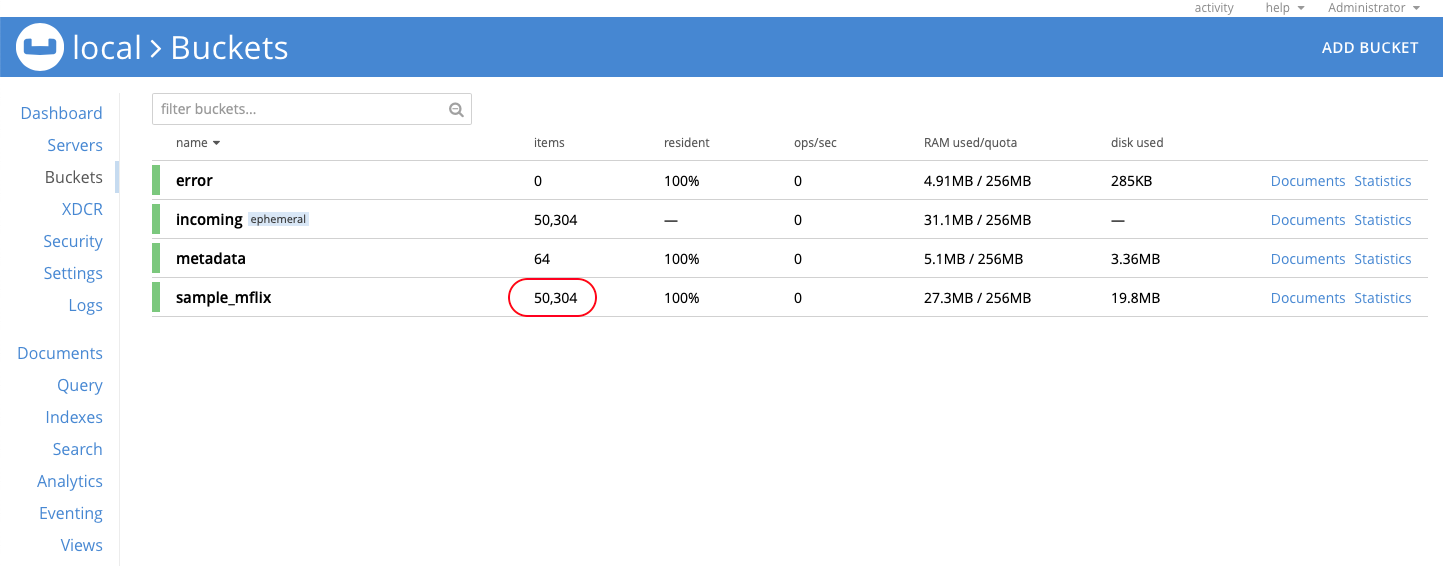
Go to the Buckets section and confirm that the sample_mflix bucket contains 50,304 documents.
To import the MongoDB movies collection, execute the command below.
|
1 |
$ <path_to_cbimport>/cbimport json –c <cluster> –u <admin username> –p <admin password> –b incoming –d file://<path to movies.json>/movies.json -f list -g movie:#MONO_INCR# |
Upon completion you will see the following output:
|
1 2 |
Json `file://movies.json` imported to `https://127.0.0.1:8091` successfully. Documents imported: 23539 Documents failed: 0 |
Go to the Buckets section and confirm that the sample_mflix bucket contains 73,843 documents.

Now check two of the transformed documents. Go to the Documents section and make sure that the Bucket is set to sample_mflix. Click on id comment:5a9427648b0beebeb69579cc (the first document in the list):

Note the contents:
|
1 2 3 4 5 6 7 8 9 |
{ “_id”: “5a9427648b0beebeb69579cc”, “name”: “Andrea Le”, “email”: “andrea_le@fakegmail.com”, “movie_id”: “573a1390f29313caabcd418c”, “text”: “Rem officiis eaque repellendus amet eos doloribus. Porro dolor voluptatum voluptates neque culpa molestias. Voluptate unde nulla temporibus ullam.”, “date”: “2012-03-26T23:20:16Z”, “type”: “comment” } |
Comparing it to the exported data (search for 5a9427648b0beebeb69579cc in comments.json):
|
1 2 3 4 5 6 7 8 |
{ “_id”:{“$oid”:“5a9427648b0beebeb69579cc”}, “name”:“Andrea Le”, “email”:“andrea_le@fakegmail.com”, “movie_id”:{“$oid”:“573a1390f29313caabcd418c”}, “text”:“Rem officiis eaque repellendus amet eos doloribus. Porro dolor voluptatum voluptates neque culpa molestias. Voluptate unde nulla temporibus ullam.”, “date”: {“$date”: “2012-03-26T23:20:16Z”} } |
The transform function has changed the Extended JSON _id, movie_id, & date values. Note that a type attribute was added based on the document key prefix (remember that we specified comment as the key prefix when importing the data).
Close the document editor when you are finished reviewing the contents of the document.
In the Document ID field enter movie:573a1390f29313caabcd4135, click Retrieve Docs, and click on id movie:573a1390f29313caabcd4135.
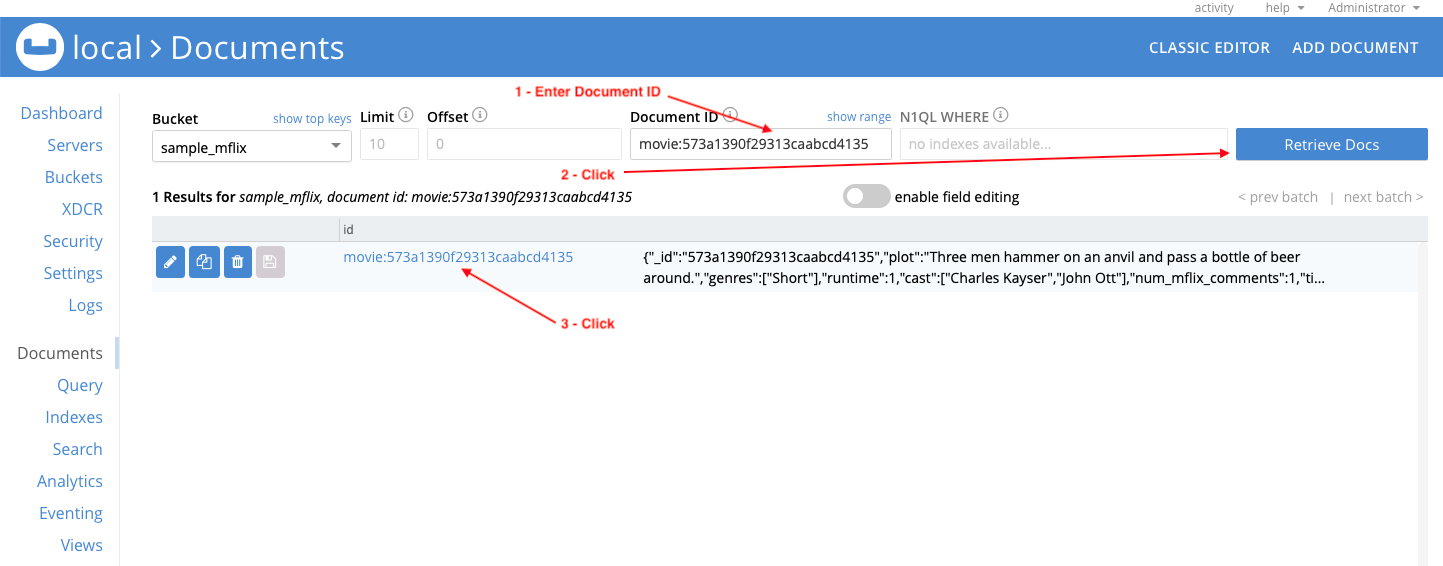
Note the contents:
|
1 2 3 4 5 6 7 8 9 10 11 12 13 14 15 16 17 18 19 20 21 22 23 24 25 26 27 28 29 30 31 32 33 34 35 |
{ “_id”: “573a1390f29313caabcd4135”, “plot”: “Three men hammer on an anvil …”, “genres”: [ “Short” ], “runtime”: 1, “cast”: [ “Charles Kayser”, “John Ott” ], “num_mflix_comments”: 1, “title”: “Blacksmith Scene”, “fullplot”: “A stationary camera looks at a large anvil …”, “countries”: [ “USA” ], “released”: –2418768000000, “directors”: [ “William K.L. Dickson” ], “rated”: “UNRATED”, “awards”: { “wins”: 1, “nominations”: 0, “text”: “1 win.” }, “lastupdated”: “2015-08-26 00:03:50.133000000”, “year”: 1893, “imdb”: { “rating”: 6.2, “votes”: 1189, “id”: 5 }, “type”: “movie”, “tomatoes”: { “viewer”: { “rating”: 3, “numReviews”: 184, “meter”: 32 }, “lastUpdated”: “2015-06-28T18:34:09Z” } } |
Comparing it to the exported data (search for 573a1390f29313caabcd4135 in movies.json):
|
1 2 3 4 5 6 7 8 9 10 11 12 13 14 15 16 17 18 19 20 21 22 23 24 25 26 27 28 29 30 31 32 33 34 35 |
{ “_id”: {“$oid”: “573a1390f29313caabcd4135”}, “plot”: “Three men hammer on an …”, “genres”: [ “Short” ], “runtime”: 1, “cast”: [ “Charles Kayser”, “John Ott” ], “num_mflix_comments”: 1, “title”: “Blacksmith Scene”, “fullplot”: “A stationary camera looks at a large anvil …”, “countries”: [ “USA” ], “released”: {“$date”: {“$numberLong”: “-2418768000000”}}, “directors”:[ “William K.L. Dickson” ], “rated”: “UNRATED”, “awards”: { “wins”: 1, “nominations”: 0, “text”: “1 win.” }, “lastupdated”: “2015-08-26 00:03:50.133000000”, “year”: 1893, “imdb”: { “rating”: 6.2, “votes”: 1189, “id”: 5 }, “type”: “movie”, “tomatoes”: { “viewer”: { “rating”: 3, “numReviews” 184, “meter”: 32 }, “lastUpdated”: {“$date”: “2015-06-28T18:34:09Z”} } } |
The transform function has changed the Extended JSON _id, released, & tomatoes.lastUpdated values. Note that a type attribute was not added in this case. The exported document already contained a type attribute, so the transform function did not add one but set the value based on the key prefix (remember that we specified movie as the key prefix when importing the data).
Close the document editor when you are finished reviewing the contents of the document.
What’s Next
If you do not plan to import any more MongoDB export data, you can undeploy the transform function and remove the incoming and error buckets.
- A future article will cover how to update existing client code to use the Couchbase SDK.
- Take advantage of our free, online training available at https://learn.couchbase.com to learn more about Couchbase.
- Check out the various Couchbase developer IDEs—JetBrains, VSCode—that we have plugins for.
For detailed information about the different document models between Couchbase and MongoDB, data modeling and MongoDB schema, and other ways of comparing MongoDB vs. Couchbase, see this document: Couchbase: Better Than MongoDB In Every Way.
Learn why other enterprises choose Couchbase over MongoDB:
Leave a comment
You must be logged in to post a comment.