
Understanding TLS within Couchbase Server
In Part 1 and Part 2 of this guide, we explained the history of TLS, the components involved and how it works. In this final 3rd part of the guide we combine this all together and learn how TLS works in Couchbase Server.
Couchbase Cluster Certificates
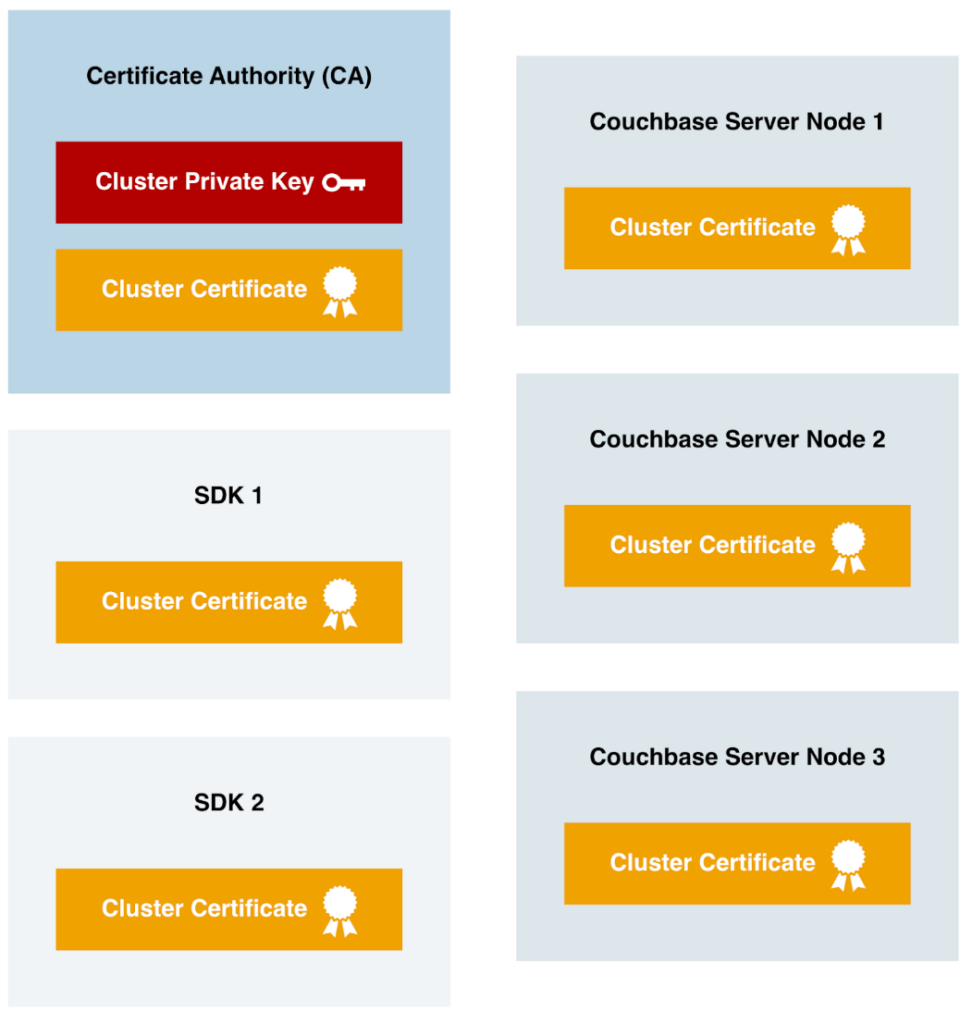
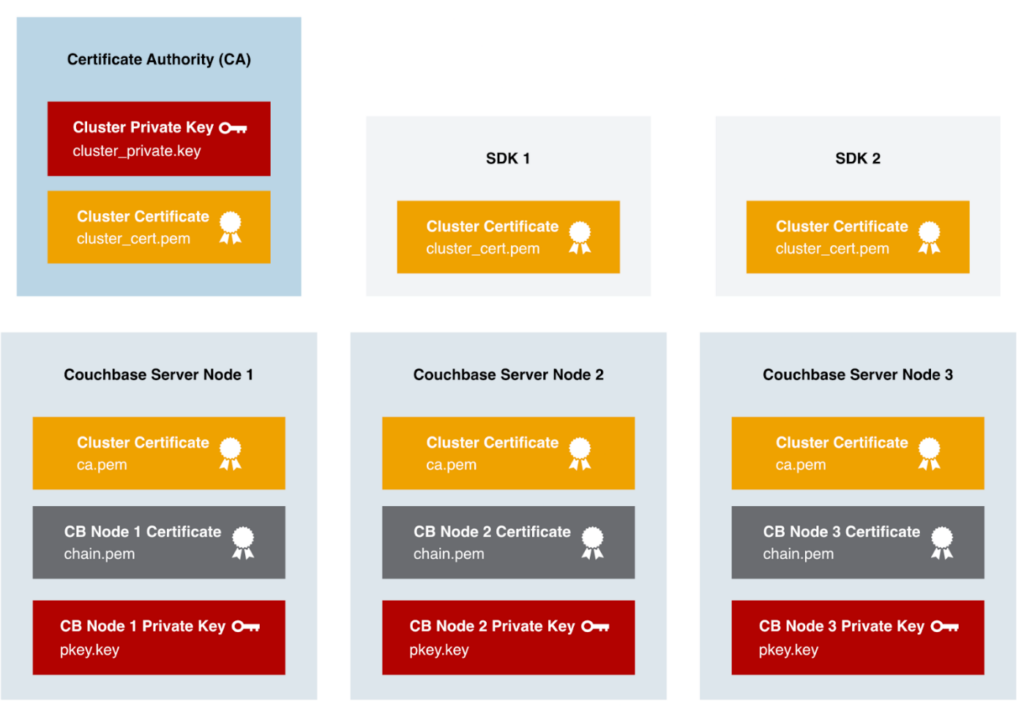
In Couchbase Server, a cluster certificate ties everything to one or more trusted Certificate Authorities (CAs); it does not directly handle the database encryption. Instead, it establishes a chain of trust for the per-node certificates within the cluster.
All relying parties in Couchbase Server deployment must have the Cluster Certificate installed and trusted. Just like the previous example with the web browser having trusted root CAs, in a Couchbase deployment each Couchbase Server Node and connecting application using one of the SDKs must trust the Cluster Certificate. It is also imported into additional Couchbase Server Clusters that use the cross-datacenter replication (XDCR) feature to replicate data between the clusters securely.
In Couchbase Capella, our Database as a Service (DBaaS) offering, all clusters actually use the same certificate authority, and hence all use the same Cluster Certificate. And, starting in early 2022, all official Couchbase SDKs released since have included, by default, automatic trusting of the Capella Cluster Certificate.
Node Certificates for Network Encryption
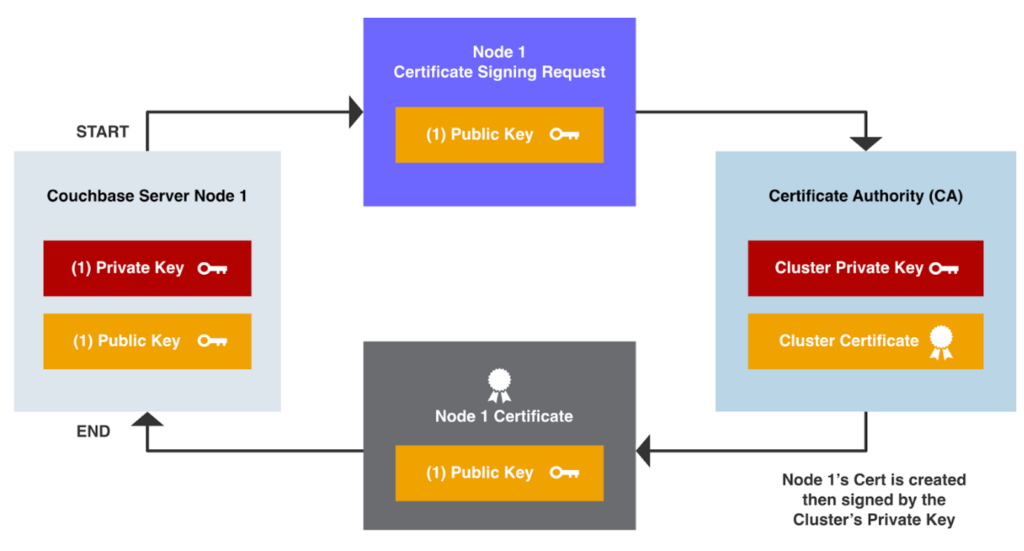
Node Certificates and the per-node private keys are the primary component responsible for network encryption in Couchbase Server. The Node Certificates are created by a trusted Certificate Authority (CA) and are signed by the CA’s Private Key (aka the Private Key associated with the Cluster Public Key/Cert).
Here’s the creation process for a Couchbase Node Certificate.
- A Certificate Signing Request (CSR) is requested to the Certificate Authority with an embedded Node’s Public Key.
- The Node’s Certificate is created, including the embedded Node Public Key and this is signed using the Cluster Private Key on the CA system itself.
- The Node Certificate is then provided back to the requestor.
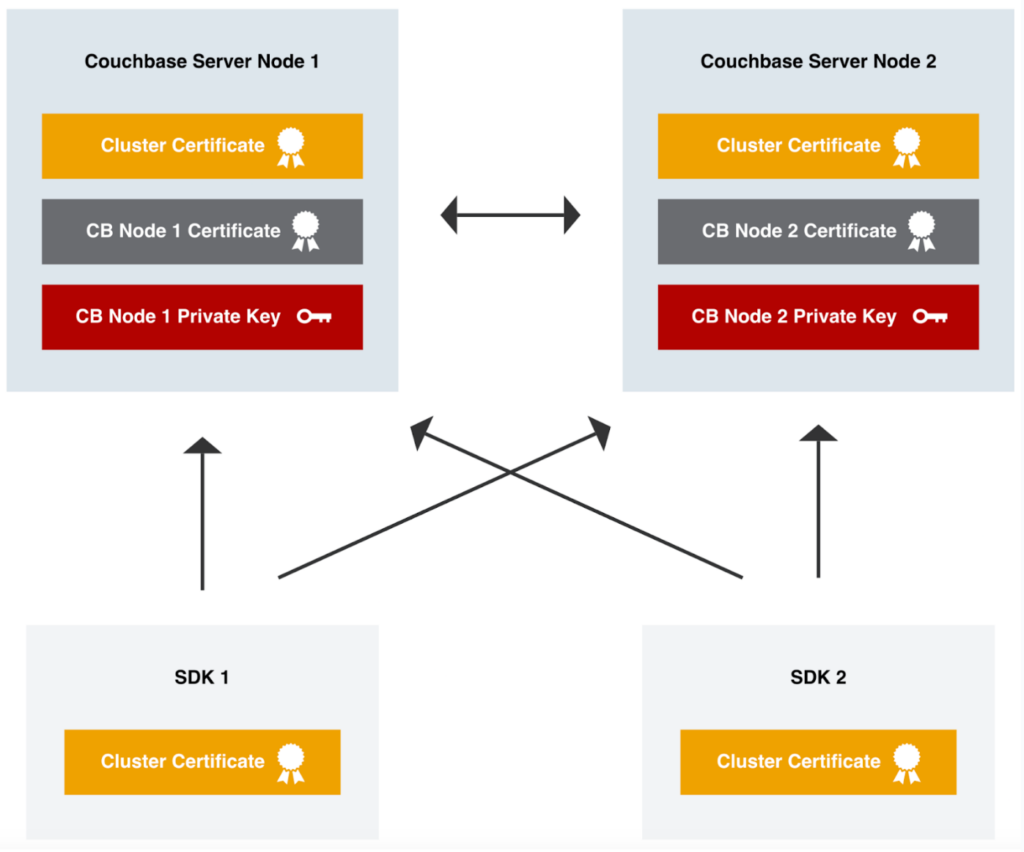
These certificates facilitate secure communication between Couchbase server nodes and enable encrypted connectivity with individual Couchbase server nodes from SDKs. Key points regarding node certificates include:
Node-to-node encryption: Node certificates secure the communication channels between Couchbase server nodes, safeguarding data as it travels within the cluster.
SDK connectivity: When SDKs connect to individual Couchbase server nodes, node certificates ensure that the communication is encrypted, maintaining data confidentiality.
Admin GUI access over HTTPS: By utilizing the node certificate, administrators can securely access the Couchbase Server’s graphical user interface (GUI) through HTTPS.
If we look at an example of how a SDK makes an encrypted connection to a Couchbase Server node, you’ll see the various components at work. I’ve intentionally left out some detail, to keep it somewhat simple.
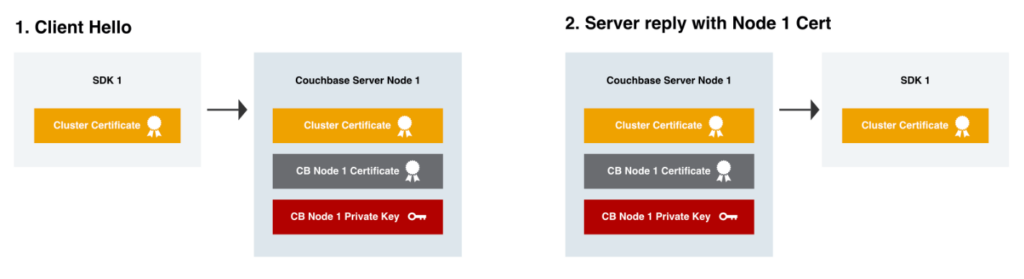
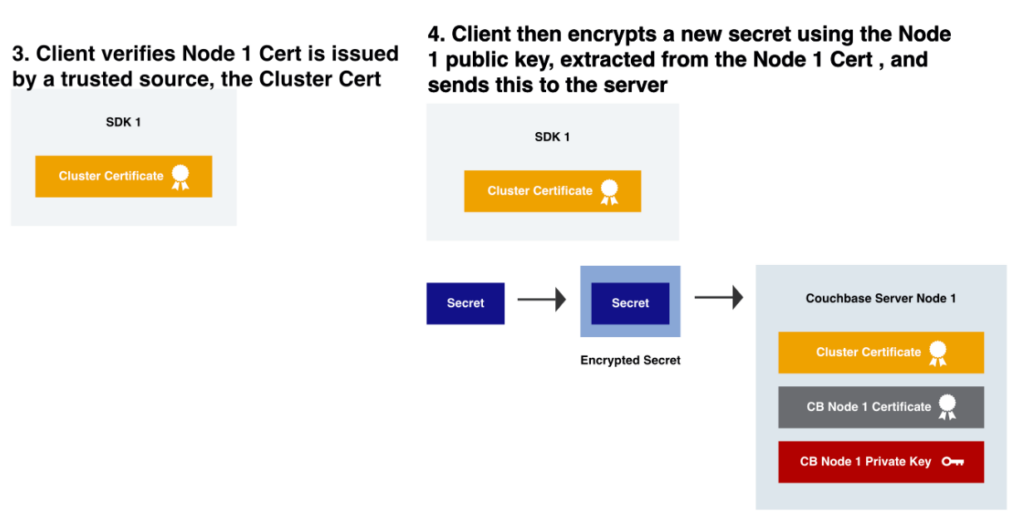
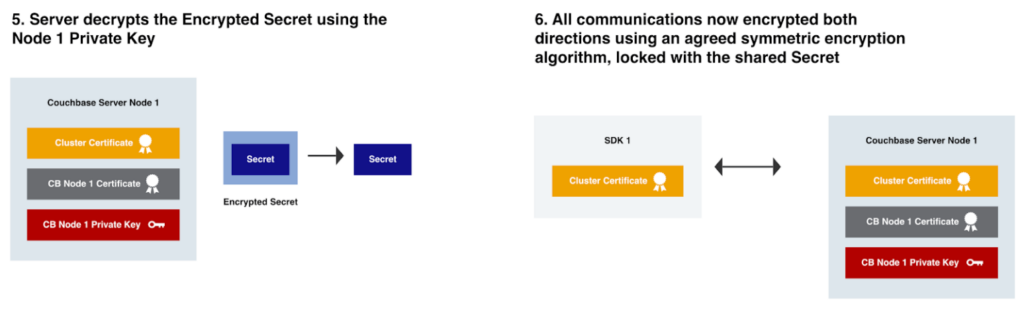
The SDK will perform these steps with each Couchbase Server Node across the cluster it establishes a TLS connection with.
Example of setting up TLS in Couchbase Server
In this section we’ll setup TLS network encryption on a 3 node Couchbase Server cluster, running version 7.2.0 on Linux hosts. There’s also a 4th Linux host used as the Certificate Authority.
Cluster Private Key + Certificate
Login to the Certificate Authority host, this is where we’ll create the cluster certificate.
This is just a Linux host that has a current version of OpenSSL installed.
First we’ll create a Couchbase template file that will be used later on for the per-node certificates.
| Command (no output) | ||
|
The next step will be to create the encrypted Cluster Private Key, named cluster_private.key.
Run the following command, you will be prompted for a passphrase to encrypt this key.
The private key will be PKCS8 (PKCS #8) format and encrypted with the very secure 265 bit Advanced Encryption Standard (AES).
| Command | ||
|
||
| Output | ||
|
You can validate it is an encrypted private key, by looking at the start of the file.
| Command | ||
|
||
| Output | ||
|
Now we’ll create the cluster certificate in the PEM x.509 format. In our case the certificate is intended to be self-signed, meaning that it will not be vouched for by any other authority. This means that it can be created directly, based on the existing private key ca.key, without assistance from a third party.
When we create the cluster certificate, valid for 3650 days (10 years), it will have a cluster public key embedded into the certificate which is the corresponding pair of the cluster_private.key made earlier. You will need to provide the passphrase you entered earlier to now decrypt the private key for this command.
| Command | ||
|
||
| Output | ||
|
Now we can print out the contents of the new cert file (and also see the public key).
| Command | ||
|
||
| Output | ||
|
Now we have the Cluster Certificate (cluster_cert.pem), this file needs to be copied to every Couchbase Server Node in the cluster. It also needs to be added to every application where the SDKs operate from as well as any hosts where admins access the UI such as an administrator’s laptop. It’s not a sensitive file and only contains public information.
Node Private Key + CSR
The steps in this section will need to be repeated for each Couchbase Server Node:
- Login to the Couchbase Server Node.
- Run the following commands in a temporary directory, inaccessible to other users on the system.
First let’s create node1’s, node private key, in a PKCS1 (PKCS #1) format
| Command | ||
|
||
| Output | ||
|
Next let’s create the Certificate Signing Request (CSR) for Node1, using the node1 private key. Remembering that a public key will be embedded in the CSR.
| Command (No output) | ||
This CSR and its embedded public key can now be viewed and verified. |
| Command | ||
|
||
| Output | ||
|
Now copy the CSR file, cbnode1.csr, over to the CA system. It only contains public information and is not sensitive.
Create Node Certificates
Login to the CA system, you should now have CSR files for each Couchbase Server Node in the cluster located on the CA system, cbnode1.csr, cbnode2.csr, etc.
For each Couchbase Server Node, you will need to create a template file. The template file created earlier, cbserver.ext, will be customized to each node. Run this command for each Couchbase Server Node, replacing the DNS hostname of the Couchbase Server Node and filename as needed. This will set the Subject Alternative Name (SAN) to match the name of the Couchbase Server Node.
If using hostnames for Couchbase Server, run this command:
| Command (no output) | ||
|
Alternatively if using IP addresses without hostnames for Couchbase Server, run this:
| Command (no output) | ||
Now you should have template files for each Couchbase Server Node in the cluster, cbnode1.ext, cbnode2.ext, cbnode3.ext, etc.. |
We will now generate the certificates, valid for 3 months, for each Couchbase Server Node. These will be in a PEM x.509 format. Run this command for each node, changing the filenames. Each time this is run, you will be prompted for your CA passphrase used to encrypt the cluster_private.key earlier.
| Command | ||
|
||
| Output | ||
|
Copy each certificate file off the Certificate Authority to each Couchbase Server Node they belong to. For example, copy node1_cert.pem on to Couchbase Server Node 1 and node2_cert.pem on to Couchbase Server Node 2.
Load the certificates into Couchbase Server
These steps will need to be performed on each Couchbase Server Node
Login to the Couchbase Server Node, you should have a folder that has 3 files.
- Cluster Certificate, cluster_cert.pem
- Node’s (Public) Certificate, node1_cert.pem
- Node’s Private Key, cbnode1_private.key
You no longer need the CSR file created earlier.
Now you need to move the files into the correct location, with the correct naming convention for Couchbase Server. Note that the same destination filename is used on each Couchbase Server Node, but each node has unique files for the chain.pem and pkey.key.
| Command | ||
|
Now all the correct files are ready to be imported to the Couchbase Server configuration.
Start by loading in the Cluster Certificate:
| Command | ||
|
||
| Output | ||
|
Next load in the Node Certificate and Private Key, and note that no warnings are printed:
| Command | ||
|
||
| Output | ||
|
You can now use TLS connections to your Couchbase Server Cluster.
Trusting the Cluster Certificate
Admin laptop
Login to an administrator’s laptop. In this case I’m using a Mac, similar steps can be performed for Windows and Linux machines.
| Command on MacOS (no output) | ||
|
Application SDK
We will use a Java application to connect to Couchbase Server, in this example we’ll point the application to the Cluster Certificate. Another option would be to use the JVM’s cacerts trust store, as the SDK will automatically trust any CAs defined there. Each programming language will have its own preferred way of trusting a CA certificate.
4
Loading up the default encrypted UI address for one of your node’s hostname from an administrator laptop. This should load up without any warnings: https://node1.cb.acme.com:18091/
Likewise, you can make TLS encrypted connections from your application to the database.
Remember to create and deploy new per-node keys/certs before the 90 day expiration by following these steps again.
Advanced TLS Topics
While the steps provided so far will suit most applications, there’s a few additional capabilities that are offered in Couchbase Server for more complex requirements. These are covered in the blog Encrypted Private Keys & Multi-CA, Enterprise Security Enhancements In Couchbase Server 7.1
Multiple Certificate Authorities in Couchbase Server
Instead of including a single certificate as the Cluster Certificate (cluster_cert.pem / ca.pem), multiple certificates can be concatenated together into the file. This is a great option to have redundant Certificate Authorities or to perform migration from one Certificate Authority to another without any downtime.
Encrypted Node Private Keys
Just like we performed on the cluster private key, the private key (pkey.key) that resides on each Couchbase Server Node can also optionally be encrypted with passphrase so that it is only readable by people and systems that have the correct authority to do so.
Conclusion
TLS certificates and their proper configuration are fundamental to establishing secure communications in Couchbase Server. Understanding the role of cluster certificates, the significance of node certificates, and the involvement of Certificate Authorities (CAs) empowers administrators to implement robust security measures. Furthermore, familiarizing oneself with Subject Alternative Names (SAN) enhances flexibility in certificate deployment across multiple domains or subdomains. By following the guidelines presented in this guide, administrators can fortify the security of their Couchbase deployments and safeguard sensitive data from unauthorized access.
Thank you for following along with this series, we hope you enjoyed the guided tour.
Leave a comment
You must be logged in to post a comment.