In today’s data-driven world, secure database credential management is a paramount concern for organizations of all sizes. As we strive to empower you with cutting-edge solutions, we are thrilled to announce the release of our HashiCorp Vault plugin for Capella database credential management.
Incorporating HashiCorp Vault into Capella offers a multifaceted approach to database security:
-
- One of the key advantages is external, centralized user management, where user identities and access permissions are managed in a unified and secure manner. This ensures that access to your databases is controlled, audited, and consistent across your organization.
- Vault’s capabilities extend to credential usage auditing, providing detailed logs and insights into who accessed your databases, when, and for what purpose. This level of transparency is invaluable for compliance and security teams, enabling them to track data access and meet regulatory requirements effectively.
- Vault’s automation shines through with automatic credential rotation and revocation, reducing the risk of unauthorized access due to stale or compromised credentials.
- Finally, Vault enables the issuance of dynamic temporary credentials, granting users time-limited access to databases. This not only enhances security but also simplifies user management by reducing the need for long-term credentials. Together, these features transform how you manage database access, making it more secure, efficient, and compliant.
This article serves as a guide to help you leverage the capabilities of our plugin effectively. We will walk you through the entire process, from setting up a local Docker container Vault to managing dynamic credentials effortlessly. By the end of this tutorial, you’ll be well-equipped to enhance your database security with ease.
Let’s dive into the world of secure database credential management and unlock the potential of our HashiCorp Vault plugin for Capella
Step 1: Preparations
Before diving into the details, it’s essential to lay the foundation. In this initial step, we’ll guide you through the essential preparations required to set the stage for seamless integration. From creating an API key to setting up a sandbox database and gathering crucial organizational details, these preparations ensure you have everything you need to complete the plugin setup.
Create a Capella API Key
Begin by ensuring you have the necessary API keys. Navigate to your organization settings and head to the API Key section. Here, generate a Version 4 key with the organization owner role. This key will be instrumental in our credential management process. The reason for the organization owner role is that we will rotate the root credential later on.

Decode API Key Credentials
We will need to provide the Capella ACCESS_KEY and the SECRET_KEY when we configure the vault plugin. We will grab this from the API key we generated earlier.
-
- Download the Key
- Click copy button twice at the end of the API Key Token field.

-
- Decode it using base64
|
1 |
echo "paste your key here" | base64 --decode |
The decoded key will have two values separated by a semicolon:
|
1 |
HLkOuJult1wb11S2eBBm2C2H0Bm1tHVe:d%1VRg34zdrOeSwgLljG0RGnJPxqeFecK#gfhVCyC%mwZ3gTf1wjJjO4vwPcRpRT |
The first one is your ACCESS_KEY and the second one is your SECRET_KEY. You will need this later when you configure the plugin.
Set Up a Sandbox Database
To facilitate this demo, set up a sandbox database. This will serve as a safe environment for testing our plugin.
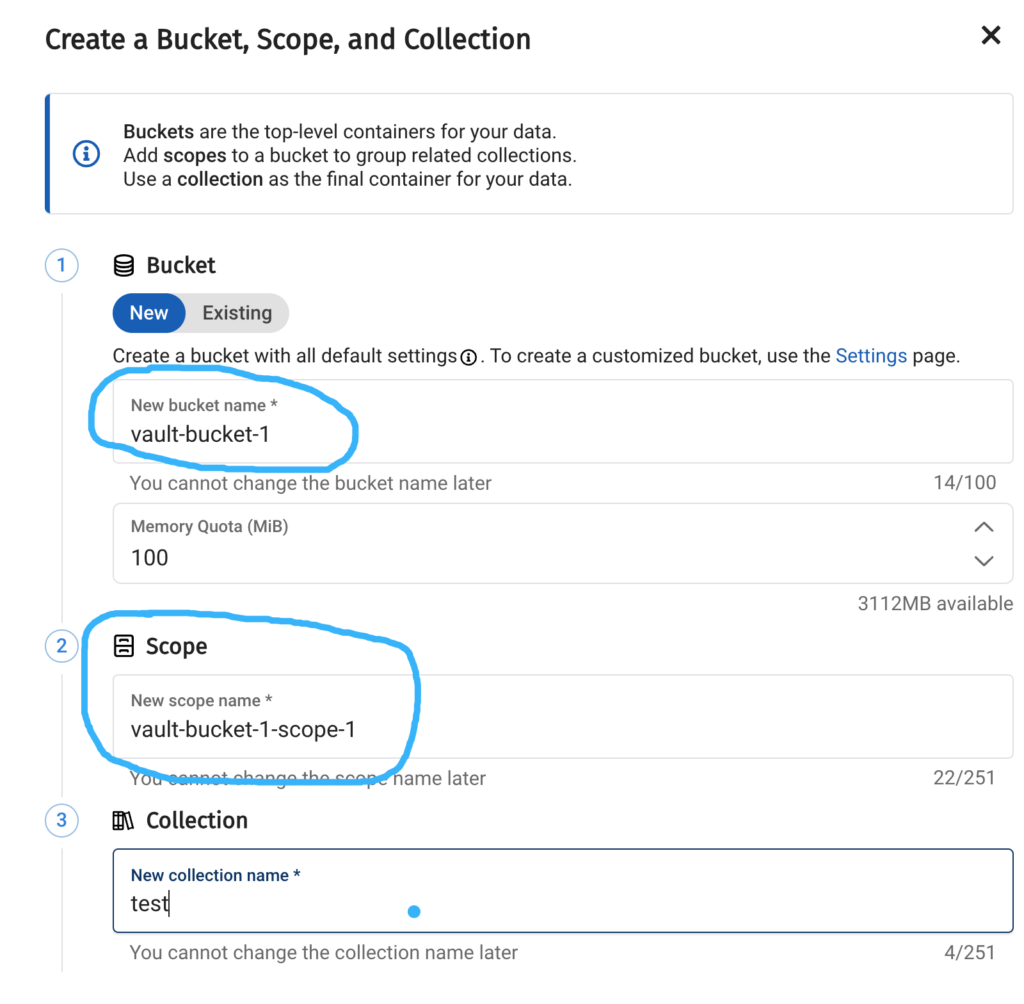
Create a Bucket and Scope
We’ll also create a bucket vault-bucket-1 and a scope vault-bucket-1-scope-1 within our cluster, which will be used when creating dynamic credentials later on.
Gather Essential Information
For the plugin configuration, you’ll need your organization ID, project ID, and cluster ID. The easiest way to obtain these details is by copying them from the URL and saving them in a text file for reference.
-
- oid is your organization Id
- projectId is your project id
- dbid is your database id
Step 2: Set up Vault
Now, let’s get started with the technical aspect. We have two options to run the demo.
-
- To run the demo, clone the repository and utilize the Dockerfile within it. This Dockerfile includes steps to compile the plugin from source.
- Alternatively, download the binary version of the plugin from the releases page and use that in your Vault installation.
I will provide instructions for both methods. Please choose the path that suits your needs and follow the corresponding steps. There is no need to execute both methods
Option 1: Use the Dockerfile in the plugin repository
Begin by cloning our GitHub repository:
|
1 |
git clone https://github.com/couchbasecloud/vault-plugin-database-couchbasecapella |
This repository contains the plugin source code, we will need to build the plugin. For this demo we will be building a docker image using Hashicorp’s vault image. The plugin will be built during the Docker image creation process. This method should only be used for demo purposes. Please follow the instructions from Hashicorp on how to install the plugin and use it in your environment.
|
1 2 |
cd vault-plugin-database-couchbasecapella docker build -t vault:with-cb-capella-plugin . |

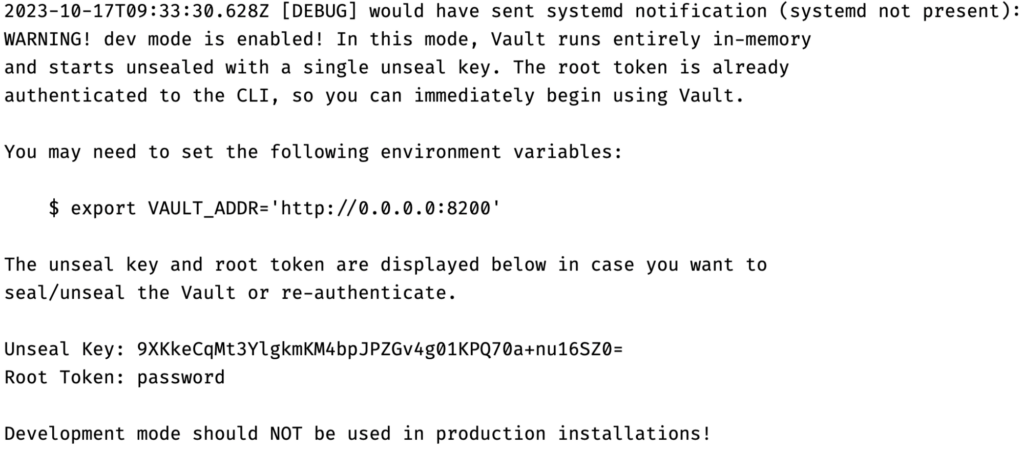
Now the image has been built, We’ll launch a Vault server in a Docker container, configured for development mode. This allows us to bypass certain security features for easier testing. The Vault server will listen on port 8200 and will be initialized with a root token set to password. We’ll also enable debug-level logging to capture detailed information during our tests.
|
1 2 3 4 5 6 7 |
docker run --cap-add=IPC_LOCK --name="couchbase_vault" --rm \ -e VAULT_DEV_LISTEN_ADDRESS=0.0.0.0:8200 \ -e VAULT_ADDR=https://0.0.0.0:8200 \ -p 8200:8200 \ vault:with-cb-capella-plugin \ vault server -dev -dev-root-token-id="password" \ -log-level=debug -config=/vault/config/config.json |
Please proceed directly to Step 3, bypassing Option 2.
Option 2: Download the plugin binary
Begin by downloading the plugin from the releases page. As of writing this article, the latest version is 1.0.0, and since I am running Linux, I will proceed with downloading the linux version.
Ensure you download the version appropriate for your computer’s architecture.
|
1 |
curl -L https://github.com/couchbasecloud/vault-plugin-database-couchbasecapella/releases/download/v1.0.0/vault-plugin-database-couchbasecapella-1.0.0_linux_amd64.zip -o vault-plugin-database-couchbasecapella-1.0.0_linux_amd64.zip |
As a security best practice, it’s important to validate the integrity of the file. Therefore, also download the checksums of the binaries, which can be found on the releases page.
|
1 |
curl -L https://github.com/couchbasecloud/vault-plugin-database-couchbasecapella/releases/download/v1.0.0/vault-plugin-database-couchbasecapella-1.0.0_checksums.txt -o vault-plugin-database-couchbasecapella-1.0.0_checksums.txt |
Locate the checksum corresponding to the file you downloaded within the text file.

Generate the checksum and validate the result
|
1 |
sha256sum vault-plugin-database-couchbasecapella-1.0.0_linux_amd64.zip |
![]()
The checksum comparison indicates a match, confirming that the file validation is successful.
It is now secure to extract the contents of the zipfile and retrieve the vault plugin.
|
1 |
unzip vault-plugin-database-couchbasecapella-1.0.0_linux_amd64.zip |
At this point, the vault plugin binary should be in our folder. The final step is to generate the hash of this binary, which is necessary for registering the plugin with Vault later. It’s important to note that this hash is for the binary itself, not the zip file downloaded earlier.
|
1 |
shasum -a 256 "couchbasecapella-database-plugin" | cut -d " " -f1 > couchbasecapella-database-plugin.sha256 |
Executing this command should have resulted in the creation of a new file containing the hash of the vault plugin.
We will also need to create a vault configuration that defines where the plugin resides.
|
1 |
echo '{"plugin_directory": "/vault/plugins", "storage": {"file": {"path": "/vault/file"}}, "default_lease_ttl": "168h", "max_lease_ttl": "720h", "ui": true}' > config.json |
The final step involves creating a custom password policy that mirrors the policy used in Capella.
|
1 2 3 4 5 6 7 8 9 10 11 12 13 14 15 16 17 18 19 20 21 22 23 |
cat >password_policy.hcl << EOF length=64 rule "charset" { charset = "abcdefghijklmnopqrstuvwxyz" min-chars = 1 } rule "charset" { charset = "ABCDEFGHIJKLMNOPQRSTUVWXYZ" min-chars = 1 } rule "charset" { charset = "0123456789" min-chars = 1 } rule "charset" { charset = "#@%!" min-chars = 1 } EOF |
Having downloaded the vault plugin and generated its hash, we will now initiate a Vault server in a Docker container, configured in development mode. This setup enables us to circumvent some security features for simplified testing purposes.
The Vault server will listen on port 8200 and will be initialized with a root token set to password. We’ll also enable debug-level logging to capture detailed information during our tests. It is also important to note that we will need to mount our plugin and sha as a volume:
|
1 2 3 4 5 6 7 8 9 10 11 |
docker run --cap-add=IPC_LOCK --name="couchbase_vault" --rm \ -e VAULT_DEV_LISTEN_ADDRESS=0.0.0.0:8200 \ -e VAULT_ADDR=https://0.0.0.0:8200 \ -p 8200:8200 \ -v $(pwd)/config.json:/vault/config/config.json \ -v $(pwd)/password_policy.hcl:/vault/password_policy.hcl \ -v $(pwd)/couchbasecapella-database-plugin:/vault/plugins/couchbasecapella-database-plugin \ -v $(pwd)/couchbasecapella-database-plugin.sha256:/vault/couchbasecapella-database-plugin.sha256 \ hashicorp/vault:1.15 \ vault server -dev -dev-root-token-id="password" \ -log-level=debug -config=/vault/config/config.json |
Step 3: Enable Database Secrets
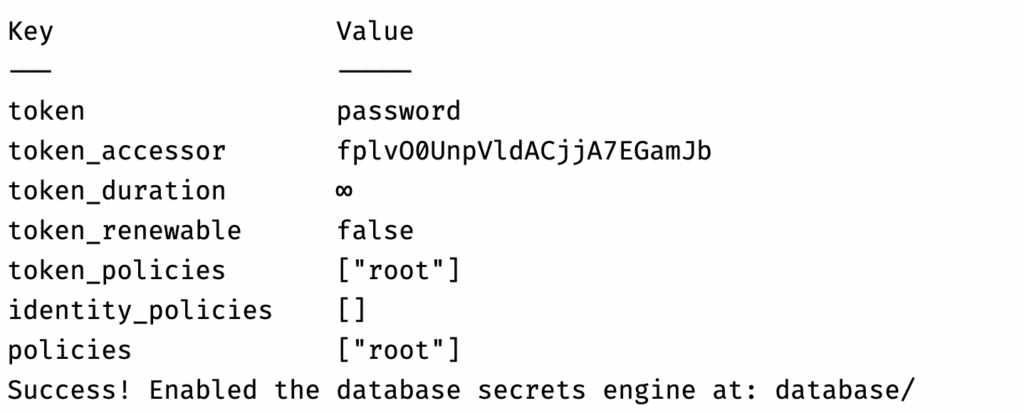
Vault is now up and running in development mode. Next We’ll enable Vault’s database secrets engine. This engine allows Vault to generate dynamic credentials for databases, and it’s crucial for our plugin to function correctly. By enabling this, we’re setting the stage for Vault to manage our Capella database credentials. Open up a new terminal and run the following:
|
1 2 3 |
docker ps docker exec -it "couchbase_vault" /bin/ash -c "vault login password && vault secrets enable database" |
Step 4: Register the Plugin
We’ll register our custom plugin with Vault. This involves calculating the SHA-256 hash of the plugin binary to ensure its integrity. Vault uses this hash to verify that the plugin hasn’t been tampered with when it’s invoked. Once the hash is calculated, we’ll use it to register the plugin.
|
1 |
docker exec -it "couchbase_vault" /bin/ash -c "SHA256=\$(cat /vault/couchbasecapella-database-plugin.sha256) && vault login password && vault write sys/plugins/catalog/database/couchbasecapella-database-plugin sha256=\$SHA256 command=couchbasecapella-database-plugin" |
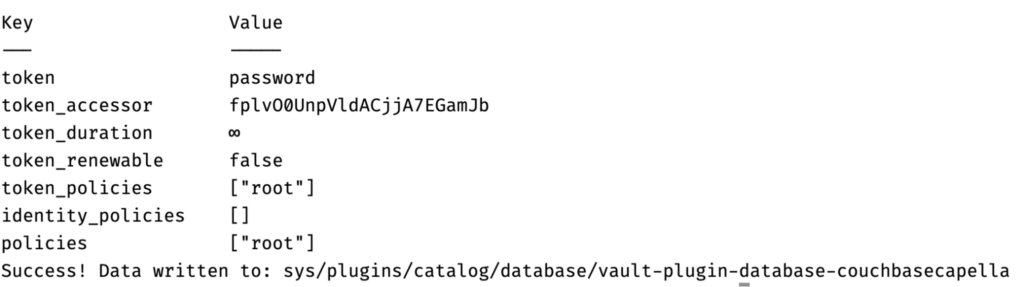
Now the plugin has been successfully registered.
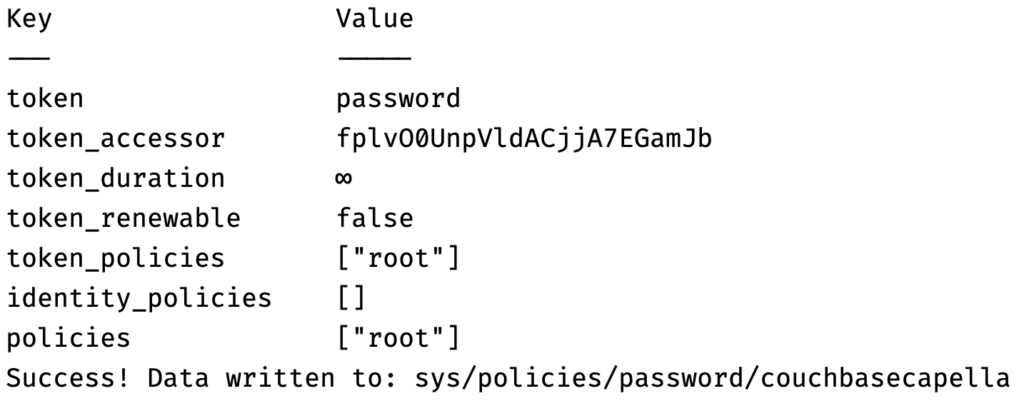
Step 5: Upload Password Policy
We’ll upload a password policy to Vault that aligns with Capella’s password requirements. This ensures that any credentials generated by Vault for Capella will comply with Capella’s security standards. The policy will be defined in a HashiCorp Configuration Language (HCL) file. This file was added to the Docker image during the build.
|
1 |
docker exec -it "couchbase_vault" /bin/ash -c "vault login password && vault write sys/policies/password/couchbasecapella policy=@/vault/password_policy.hcl" |
Step 6: Create Database Config
We’ll configure Vault to connect to our Capella cluster. This involves specifying various parameters like the base URL for Capella’s cloud API, organization ID, project ID, and cluster ID. We’ll also provide the Capella access key we generated earlier. This configuration allows Vault to interact with our Capella cluster and manage credentials dynamically.
|
1 |
docker exec -it "couchbase_vault" /bin/ash -c "vault login password && vault write database/config/couchbasecapella-database-plugin plugin_name='couchbasecapella-database-plugin' cloud_api_base_url='https://cloudapi.cloud.couchbase.com/v4' organization_id="$CAPELLA_ORG_ID" project_id="$CAPELLA_PROJECT_ID" cluster_id="$CAPELLA_CLUSTER_ID" username="$CAPELLA_ACCESS_KEY" password="$CAPELLA_SECRET_KEY" password_policy='couchbasecapella' allowed_roles='*'" |
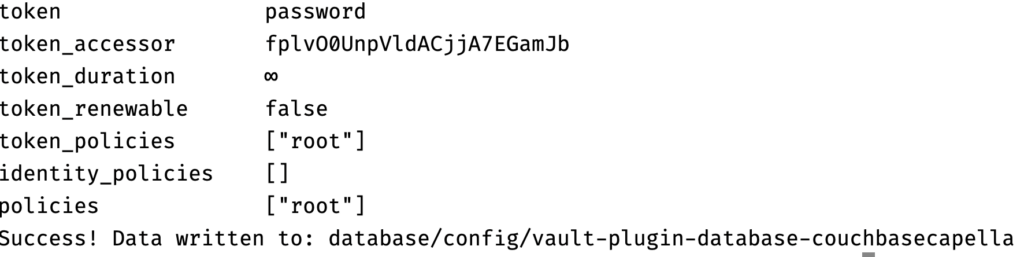
Now the Capella plugin is configured and able to talk to Capella.
Step 7: Rotate Root Credentials
We’ll perform a security best practice by rotating the high-privilege root credentials that Vault uses to manage the Capella database. This minimizes the risk associated with any potential exposure of these credentials.
|
1 |
docker exec -it "couchbase_vault" /bin/ash -c "vault login password && vault write -force database/rotate-root/couchbasecapella-database-plugin" |
![]()
Step 8: Create a Dynamic Role
Next We’ll define a dynamic role in Vault. This role will have a set of permissions, defined in JSON format, that specify what kind of database operations are allowed. For example, we’ll grant data_reader and data_writer privileges on a specific bucket and scope in our Capella cluster. This dynamic role will be used to generate credentials with these permissions.
|
1 |
docker exec -it "couchbase_vault" /bin/ash -c 'vault login password && vault write database/roles/dynamicrole1 db_name="couchbasecapella-database-plugin" creation_statements='\''{"access": [ { "privileges": [ "data_reader", "data_writer" ], "resources": { "buckets": [ { "name": "vault-bucket-1", "scopes": [ { "name": "vault-bucket-1-scope-1", "collections": [ "*" ] } ] } ] } } ]}'\'' default_ttl="5m" max_ttl="1h"' |

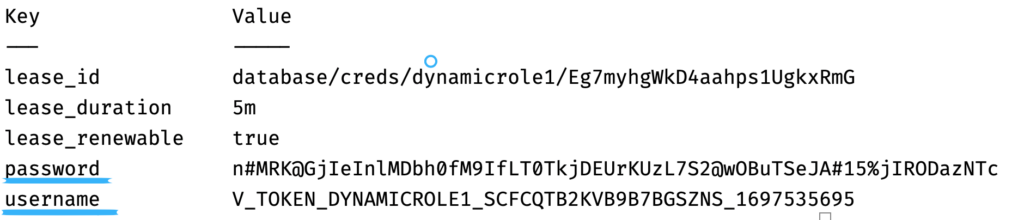
Step 9: Create New Credentials
Finally, we’ll generate a new set of database credentials using the dynamic role we created. These credentials are temporary and will adhere to the TTL (Time-To-Live) settings we’ve configured. This is the culmination of our setup, demonstrating how Vault can dynamically manage Capella database credentials.
|
1 |
docker exec -it "couchbase_vault" /bin/ash -c 'vault login password && vault read database/creds/dynamicrole1' |
Let’s go back to Capella to check if our credentials in fact show in the UI as well.

Conclusion
In conclusion, our HashiCorp Vault plugin for Capella’s database credential management opens new horizons in enhancing the security of your database infrastructure. Through this step-by-step tutorial, you’ve gained valuable insights into setting up and utilizing the plugin effectively.
By embracing this solution, you’re simplifying the process of managing database credentials. We encourage you to explore the full potential of our plugin and look forward to your experiences and feedback.
Secure, efficient, and user-friendly database credential management is now at your fingertips. Take the first step towards a more secure database environment today!
If you’re interested in learning more about how you can build your own mission-critical modern applications on Couchbase, try our 30 day free trial of Couchbase Capella. And to see more of what our customers are doing with Couchbase, check out our customer case study page!
