
We’re incredibly excited to present to you the new features of our Capella Management API. The new version of the API has been redesigned from the ground-up to be more RESTful, extensible, robust and secure. With an array of functionalities focused on enhancing control, security, and ease of use, we’re sure you’ll find many ways to improve your Capella DevOps workflows by leveraging the API within your Infrastructure-as-Code (IAC) tools and deployment scripts. In this post, we will walkthrough a simple example of using Postman to interact with and execute the API. But first, let’s take a quick look at the features that make our new Management API a powerful tool for organizations.
API Highlights
- API accesses are authenticated and authorized using API Keys which are associated with Organization level or the Project level roles.
- The initial bootstrap API key is generated via the Capella Admin UI. Thereafter, you can use the API to generate new API keys that can be scoped to either the Organization level or the Project level.
- Endpoints related to projects enable you to list, create, update, and delete projects through the API.
- In addition to deploying and listing clusters, the API allows you to modify the number of nodes and even change the support plan. You can also scale clusters horizontally and vertically.
- You can now manage users and modify user roles using the API.
- Cluster-allowed CIDRs can be managed through a dedicated API endpoint.
- Dynamic addition of database credentials is also supported, which can be useful for integrating external secrets management systems like Vault.
- Besides deploying clusters, you can now also manage the buckets within those clusters using the API.
- The API provides the capability to fetch the x.509 certificate for a given cluster.
- You can create on-demand backups of buckets or list existing backups, and even restore those backups, all through the API.
- In addition to managing your on-demand backups, you can also schedule backups via the API.
- And finally the API now includes the functionality to deploy App Services.
The list of endpoints mentioned above will continue to evolve. Refer to the comprehensive API reference for the complete set of resources and endpoints.
Before we dive in, it’s important to note that API v3 keys won’t be compatible with v4, so a new set of API keys will be necessary. Details on generating a new API key are provided in the walkthrough section below.
In the rest of the article, we will walk you through the steps to get started with our new API using Postman. Whether you’re a DevOps engineer, a developer, QA, or anyone interested in integrating with Capella, this guide is for you.
Walkthrough
Step 1: Install Postman
If you haven’t already installed Postman, you can download it from Postman’s website. Follow the installation steps to get it up and running on your machine.
Step 2: Generate API Keys
Login to Capella, and follow our guide to set up a management key that suits your use case. Due to incompatibility issues with v3, make sure to generate a new set of API keys specifically for API v4. For the purposes of this article, it’s advisable to configure a Management API key with an ‘Organization Owner’ role to enable comprehensive endpoint testing. However, in a production setting, adhere to the Principle of Least Privilege and employ the ‘Allowed IP Addresses’ feature for enhanced security and restricted access. You can use the “Add your current IP address block” feature to quickly allow access from your IP address.
Step 3: Download OpenAPI Specification
Download the OpenAPI Specification file for API v4 from our documentation site.

Step 4: Import OpenAPI Specification into Postman
- Open Postman and go to the “File” menu.
- Select “Import” and browse to the location where you saved the OpenAPI Specification file.
- Choose the file and click “Open” to import it (openapi.json) into Postman.
This will automatically create a new collection named Couchbase Capella Management API in Postman containing all the available API endpoints.

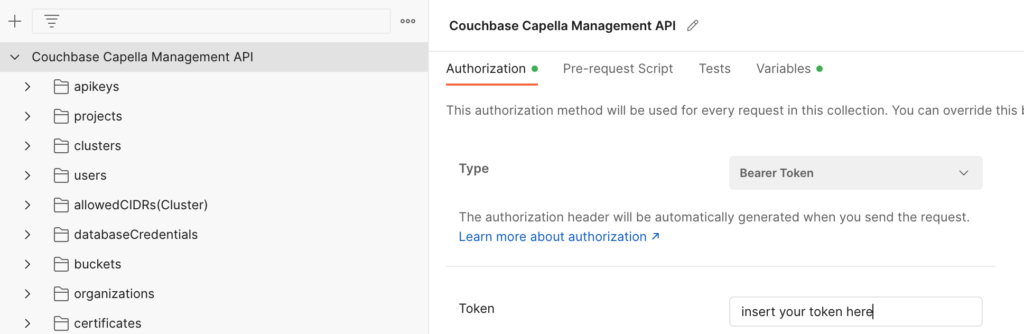
Step 5: Set Up Authorization
Select the entire collection you just imported. Navigate to the Authorization tab, and select the type as “Bearer Token”. Place the API Key Token you created earlier into the token field. Click save to make sure the change is applied to the whole collection.
Step 6: Create Postman Environment
In Postman, create a new environment and add a single variable called baseUrl with the value https://cloudapi.cloud.couchbase.com/
- Click on Environments
- Click on
 to create a new environment
 - Name your environment Capella v4 by clicking on

- Add a single variable called baseUrl with the value https://cloudapi.cloud.couchbase.com
- Make sure you select this environment as the active one.
> Note: Always make sure you select the correct environment before executing any API calls.

At this point we are ready to call the different API endpoints.
Testing the API
List Your Organizations
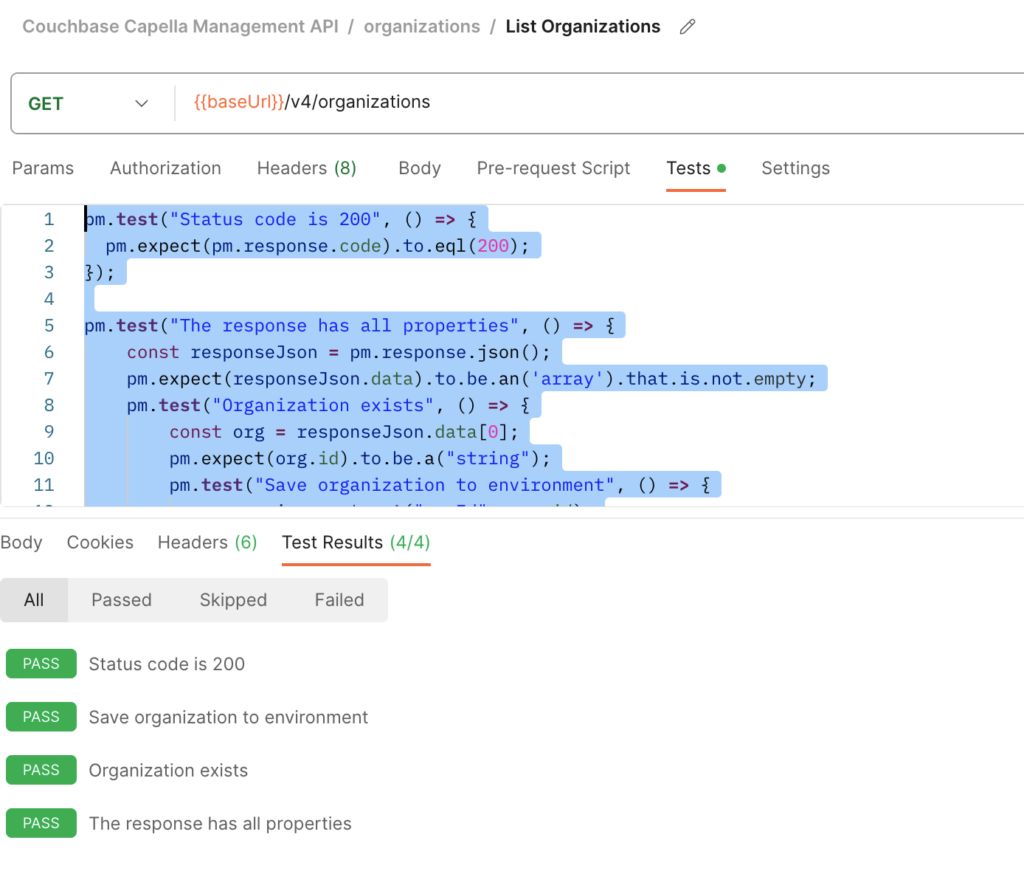
The first API endpoint we will test is the List Organizations endpoint. The goal is to fetch a list of Organizations that the API key allows access to.
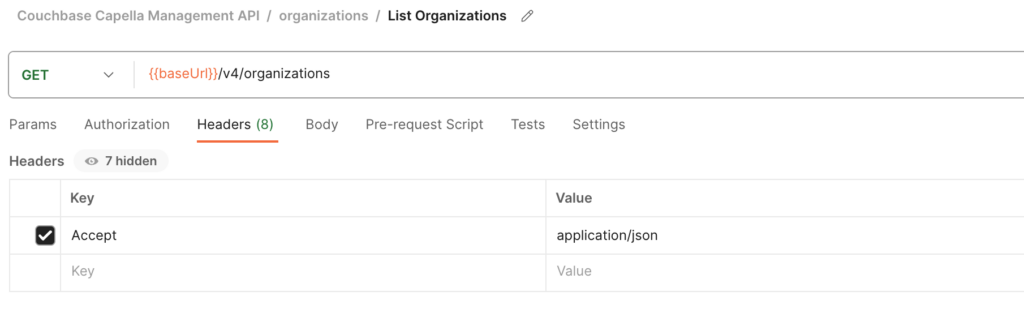
Go back to Postman, and within the collection you imported, navigate to the organizations folder and click on List organization.
The response should have at least one Capella Organization.
As a convenience, we have created a script for you that you can use in Postman to grab the id of the first organization from the response.
|
1 2 3 4 5 6 7 8 9 10 11 12 13 14 15 |
pm.test(“Status code is 200”, () => { pm.expect(pm.response.code).to.eql(200); }); pm.test(“The response has all properties”, () => { const responseJson = pm.response.json(); pm.expect(responseJson.data).to.be.an(‘array’).that.is.not.empty; pm.test(“Organization exists”, () => { const org = responseJson.data[0]; pm.expect(org.id).to.be.a(“string”); pm.test(“Save organization to environment”, () => { pm.environment.set(“orgId”, org.id); }); }); }); |
All you need to do is to paste this into the tests section of the List organization call.
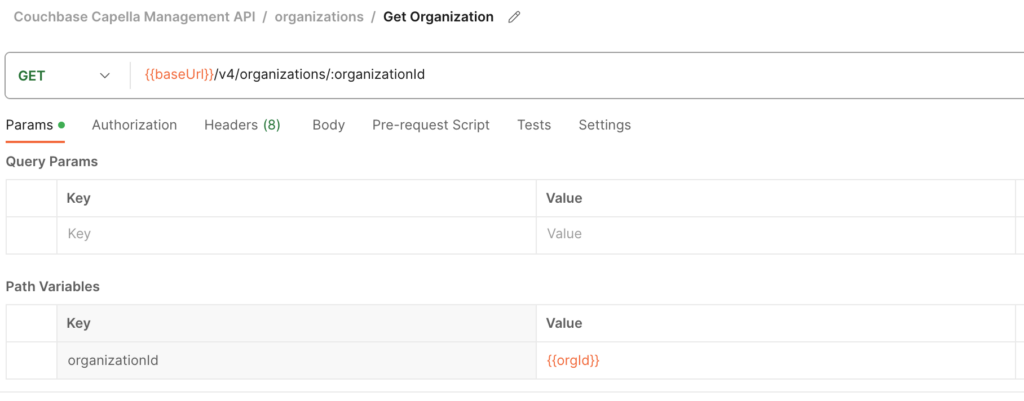
Get Your Organization
Assuming that the List organization call was successful, now we can move to the next step to try the Get Organization endpoint.
- Go and select Get organization endpoint in Postman inside the organizations folder.
- Before executing the API call, change the Path variable called organizationId to the environment variable called orgId that we created in the earlier step.
With successful retrieval of your organization information, you’ve just made your first step into leveraging the full power of our API v4.
Create a new Project
Projects are used to organize and manage groups of Couchbase databases within organizations. In this example we are going to create a new Project
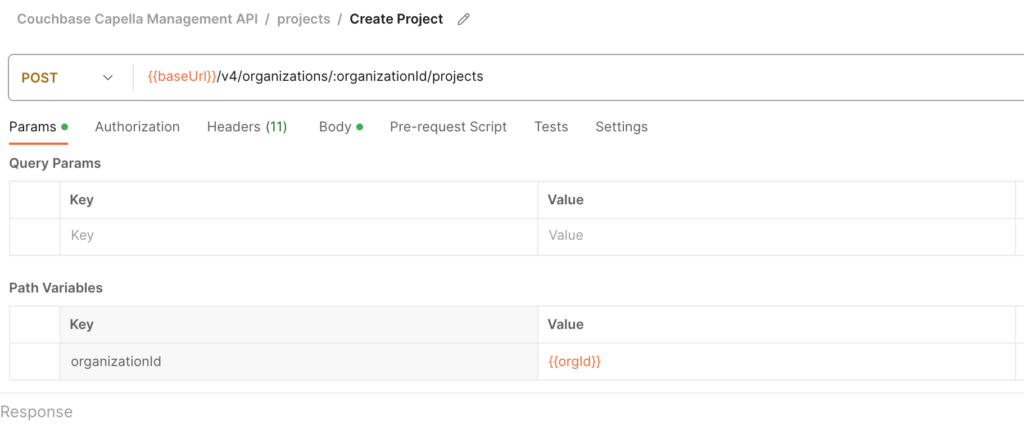
- Go to Postman and open the projects folder
- Select the Create Project operation
- Do not forget to change the organizationId path parameter to use your environment variable the same way we used in the Get Organization example
- Click on the Body tab to provide the name and the description of the project you would like to create
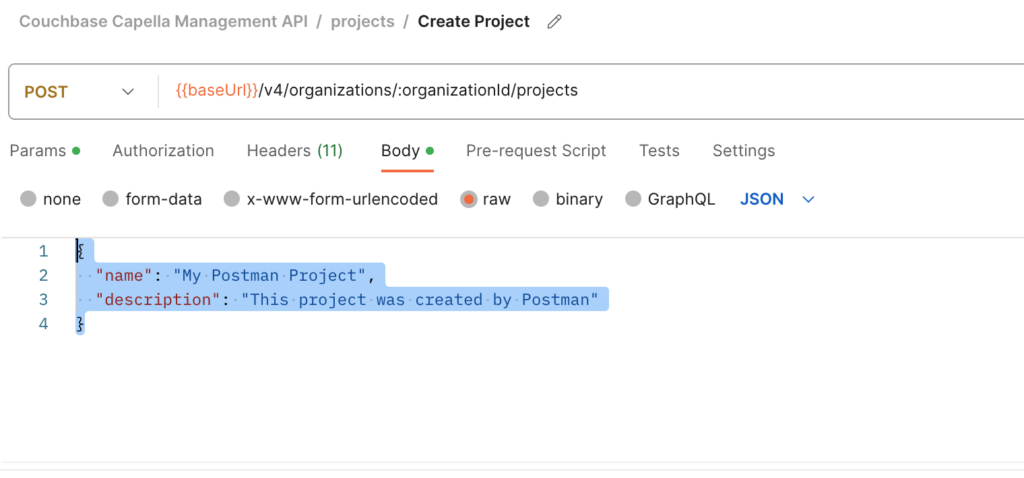
- Add the following script to the Tests to capture the Project id returned by the API
|
1 2 3 4 5 6 7 8 9 10 |
pm.test(“Status code is 201”, () => { pm.expect(pm.response.code).to.eql(201); }); pm.test(“The response has all properties”, () => { const responseJson = pm.response.json(); pm.expect(responseJson).to.be.an(‘object’).that.is.not.empty; pm.expect(responseJson.id).to.be.a(“string”); pm.environment.set(“projectId”, responseJson.id); }); |
- Click
 to create the project. The test script will grab the id from the response and save it as projectId in your environment.
Get the details of the Project
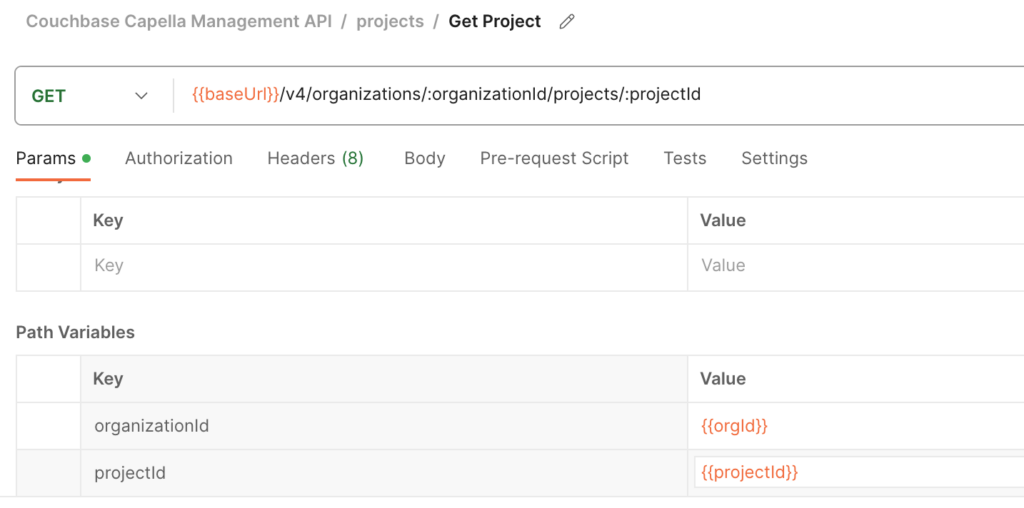
Next we are going to call the Get Project endpoint to validate that the project was created properly.
- In the projects folder select the Get Project call
- Change the path variable called organizationId to use the one from the environment
- Change the path variable called projectId to use the one from the environment
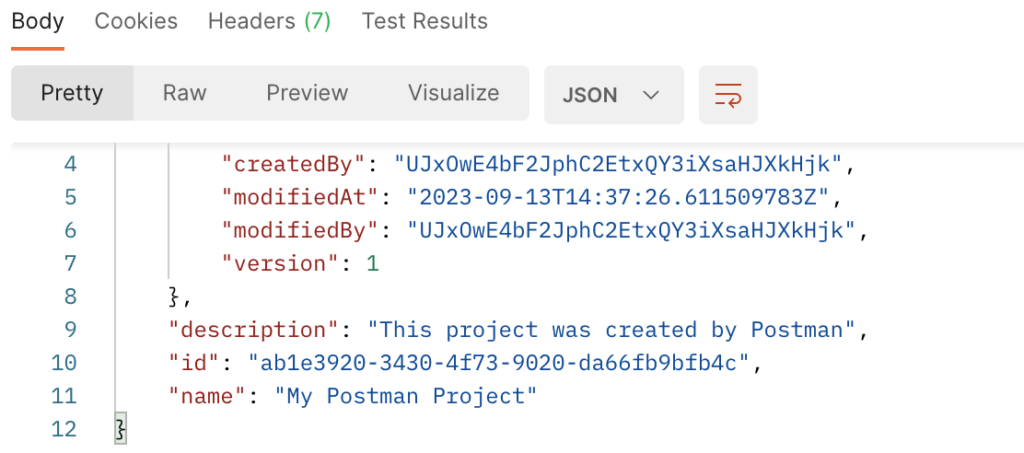
You should see the response and the same details you provided in the creation call.
Deploy a new cluster
Now you are ready to deploy your very own cluster. In this step you are going to deploy a new cluster into the Project we just created.
In order to deploy a cluster we need to have an organizationId and a projectId and the details of the cluster.
In our case, We will be using the environment variables we created in the earlier steps.
- Open the clusters folder in Postman
- Select the Create Cluster api endpoint
- Change the path variable called organizationId to use the one from the environment
- Change the path variable called projectId to use the one from the environment
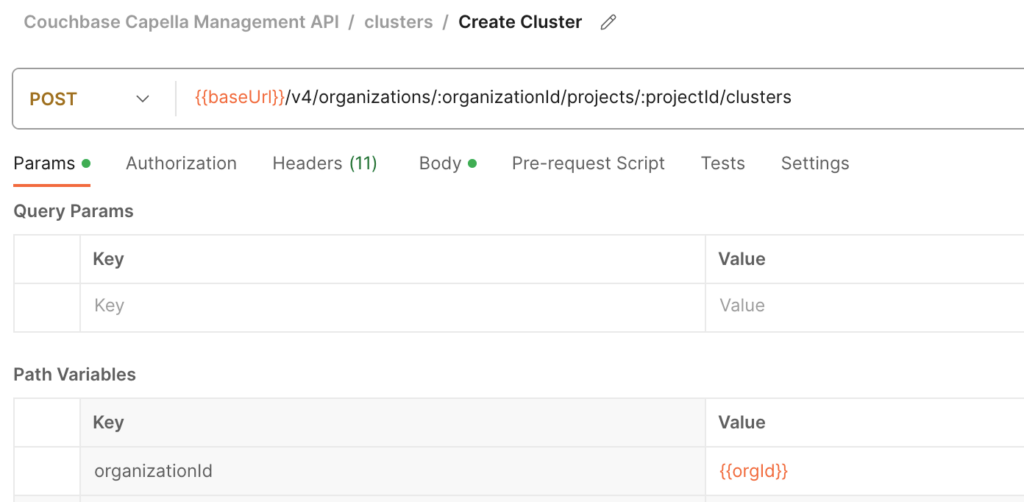
- Open the Body tab and paste the following JSON:
|
1 2 3 4 5 6 7 8 9 10 11 12 13 14 15 16 17 18 19 20 21 22 23 24 25 26 27 28 29 30 31 32 33 34 35 36 37 38 39 40 41 42 43 44 45 46 47 48 49 50 51 52 53 54 55 56 57 58 |
{ “name”:“Test-Postman-Cluster”, “description”:“My first test AWS cluster created with postman.”, “cloudProvider”:{ “type”:“aws”, “region”:“us-east-1”, “cidr”:“10.1.200.0/23” }, “couchbaseServer”:{ “version”:“7.1” }, “serviceGroups”:[ { “node”:{ “compute”:{ “cpu”:4, “ram”:16 }, “disk”:{ “storage”:50, “type”:“gp3”, “iops”:3000 } }, “numOfNodes”:3, “services”:[ “data”, “query”, “index”, “search” ] }, { “node”:{ “compute”:{ “cpu”:4, “ram”:32 }, “disk”:{ “storage”:50, “type”:“io2”, “iops”:3005 } }, “numOfNodes”:2, “services”:[ “analytics” ] } ], “availability”:{ “type”:“multi” }, “support”:{ “plan”:“developer pro”, “timezone”:“PT” } } |
- Add the following script to the Tests to capture the Cluster id returned by the API
|
1 2 3 4 5 6 7 8 9 10 |
pm.test(“Status code is 202”, () => { pm.expect(pm.response.code).to.eql(202); }); pm.test(“The response has all properties”, () => { const responseJson = pm.response.json(); pm.expect(responseJson).to.be.an(‘object’).that.is.not.empty; pm.expect(responseJson.id).to.be.a(“string”); pm.environment.set(“clusterId”, responseJson.id); }); |
- Click to create the cluster. The test script will grab the id from the response and save it as clusterId in your environment.
At this point, I will open Capella to check if my cluster is deployed.
- Log into Capella
- Go to the Databases section and find your database
- Click on the Database
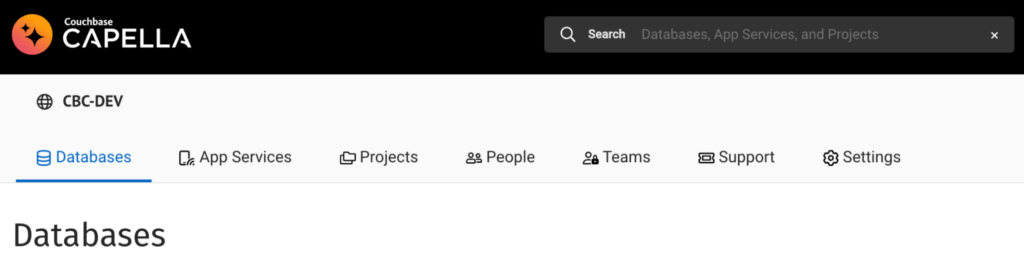

- Click on your database to open the details of the deployed cluster
- Click on Settings to check the summary of the cluster
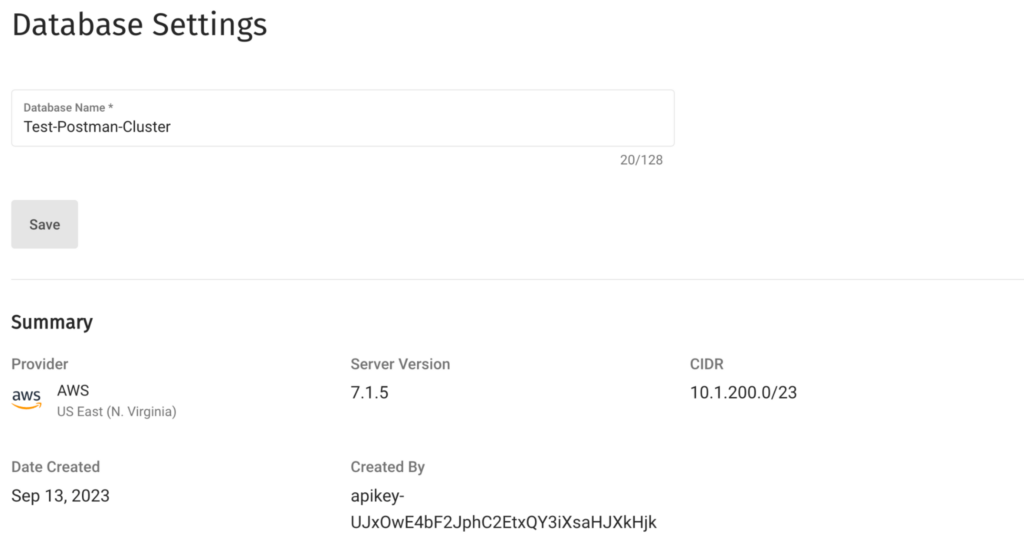
We can see our deployed cluster here. It is important to note that the API-key that was used to create the cluster is also shown on this screen.
Set up CIDRs for the cluster
In the last section, we are going to add an IP address to the allowed list of the deployed cluster to make sure you can access the cluster from a given location.
- Open the allowedCIDRs(Cluster) folder in Postman
- Select the Create Allowed CIDR api endpoint
- Change the path variable called organizationId to use the one from the environment
- Change the path variable called projectId to use the one from the environment
- Change the path variable called clusterId to use the one from the environment
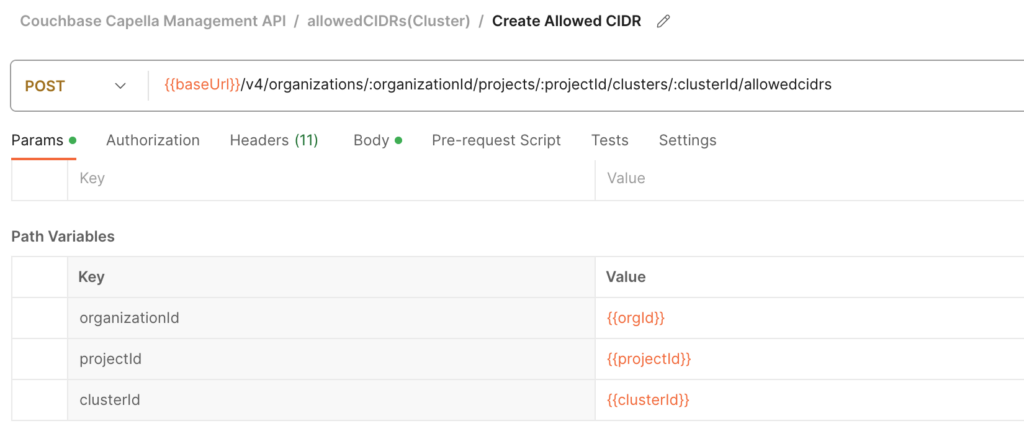
- Click on the Body tab to add your IP address
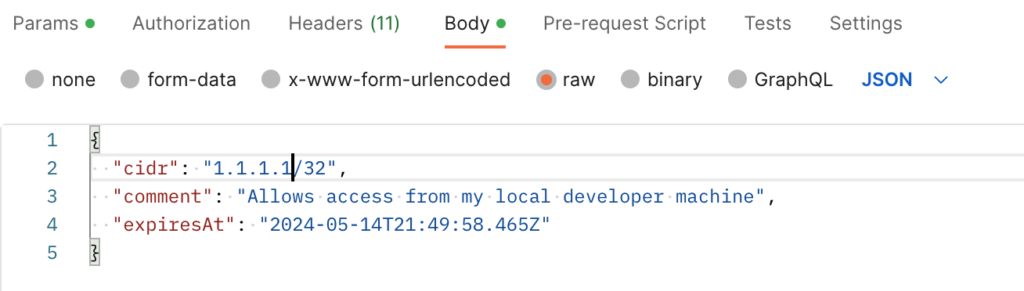
- Click to add your IP to the allowed CIDR list of your cluster.
Wrapping Up
We hope this guide has provided you with all the necessary steps to get up and running with our new API v4. But setting up and testing endpoints in Postman is just the tip of the iceberg. The real excitement begins when you start integrating this robust API into your own tools and workflows to automate various tasks that your organization handles on a daily basis. Make sure you check out our API reference guide to learn about the different endpoints and functionality.
If you have questions or feedback, please leave a comment below. The Couchbase Forums or Couchbase discord channels are another good place to reach out with questions.
Happy coding!
Leave a comment
You must be logged in to post a comment.