With security on everyone’s mind, organizations need to run sensitive workloads under stringent security and compliance standards. Couchbase 6.5 preview brings several new security capabilities, and node-to-node encryption has been a top wish list item for many customers.
In this blog, we will provide a quick overview of the new node-to-node encryption feature along with easy to follow steps to help you get started.
What is Node-to-Node Encryption?
In a distributed data platform like Couchbase Server, there are essentially 2 types of information exchanged between the nodes –
1. Control information that includes cluster metadata, settings, etc
2. User Data including JSON documents
In previous versions of Couchbase Server, encryption was available between client and server, and to protect XDCR traffic between data centers. In the absence of compensating security control such as network-wide IPSec, it was possible for an attacker to sniff information on the wire as long as access to the network was available. However, some of these compensating controls were hard to configure, or deploy at scale.
With the new node-to-node encryption feature in Couchbase 6.5, information that is flowing between the nodes is encrypted natively by Couchbase, without the need for installing any third-party software. The levels of encryption make it possible to only encrypt the control plane traffic, or all (control and data) between the nodes. This provides flexibility for customers so that they can pick the right encryption level they need for their use-case, while keeping performance in mind.
This doesn’t mean that node-to-node encryption solves everything. Node-to-node encryption still complements existing security controls including client-to-server encryption, encryption over XDCR, at-rest encryption, and virtual private cloud (VPC) based network-level security and isolation. The more layers of protection you add to your system, the harder you make it for an attacker to compromise it.
Node-to-node, not within a node
Based on customer feedback, the node-to-node encryption feature was added to 6.5. This feature took several months in the making, even though it might appear as if it applies a blanket TLS across all the cluster nodes. The following picture depicts some of the changes made in the cluster manager of Couchbase –
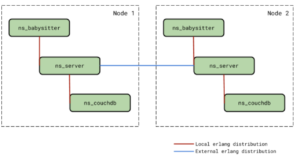
The red line indicates the local interactions that exist between the different processes on the same physical node – ns_babysitter, ns_server and ns_couchdb VMs. The blue line indicates the external interactions between ns_server VMs running on different nodes in the cluster. The interactions shown in red would always remain unencrypted regardless of cluster encryption being enabled or not. This is because we don’t want to unnecessarily overwhelm the running processes with encryption. On the other hand, external interactions (shown in blue) are encrypted when cluster encryption is turned on.
How to setup Node-to-Node Encryption?
Setting up node-to-node encryption is easy, and In this section, we will describe step by step instructions you can follow to get it setup –
Step 1: Install Couchbase Server 6.5 on 2 nodes. Let’s call these nodes node-1 and node-2.
Step 2: If this is a brand new cluster, during the graphical setup of the nodes, you will be prompted to select whether or not node-to-node encryption is enabled. By default, node encryption is not enabled.
Check the “enable cluster encryption” check-box in the dialog and proceed.
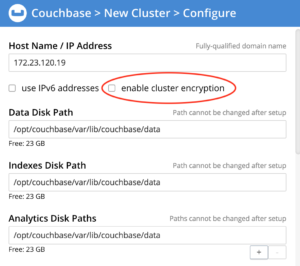
This setting is only applicable if all the nodes in the cluster are version 6.5 or higher. If this is a new 6.5 cluster, all new nodes joining the cluster will inherit this setting.
For an existing cluster that is upgraded to 6.5 or a new cluster, this operation can also be done using the CLI command as shown below –
| $> ./couchbase-cli node-to-node-encryption -c localhost:8091 -u <cluster-username> -p <cluster-password> –enable |
Step 3: Check the setting to ensure that cluster encryption is enabled
| ./couchbase-cli setting-security –get -c localhost:8091 -u <cluster-username> -p <cluster-password>
{“disableUIOverHttp”: false, “disableUIOverHttps”: false, “clusterEncryptionLevel”: “control”} |
Note that by default, the cluster encryption level is set to control. This means that data between nodes is still unencrypted but the control plane is encrypted.
Step 4: Using netstat to check the ports open on node-1 outgoing to node-2. When there is no encryption in effect, ports 21100 to 21299 are used for data exchange. For TLS connections between nodes we always use port 21150.
You will need to sudo as ‘root’ to run this command –
| $> netstat -atep –numeric-ports | grep ‘beam.smp’ | grep ‘node-2’ |
Output:
tcp 0 0 node-1.us-central:59586 node-2.us-central:11209 ESTABLISHED couchbase 26650 3953/beam.smp
tcp 0 0 node-1.us-central:21150 node-2.us-central:48498 ESTABLISHED couchbase 24960 3953/beam.smp
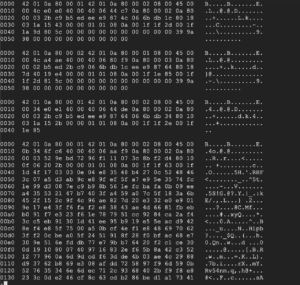
Step 5: If you’re brave enough, you can take this one step further using the tshark (wireshark) package and capture TCP packets. Here is how the output looks like –
| $> tshark -P -i eth0 -f tcp -w /tmp/eth0.pcap
$> tshark -x -r /tmp/eth0.pcap | less |
Encrypted output as shown below –
Rotating Certificates
As part of regular security hygiene, it’s expected that certificates that are installed will be periodically renewed. To ensure continuous cluster operations, the supported workflow would be to turn off the encryption mode, upload the newer certificates on all the nodes in the cluster and turn the encryption back on. Following will be the commands that the administrator will have to execute to rotate the certificates:
1. Check the cluster encryption level –
| ./couchbase-cli setting-security –get -c localhost:8091 -u <cluster-username> -p <cluster-password>
{“disableUIOverHttp”: false, “disableUIOverHttps”: false, “clusterEncryptionLevel”: “all”} |
If the level is “all” as shown, then you have to switch it to “control” using the couchbase-cli setting-security set command.
- Disable cluster encryption using the “change-cluster-encryption” CLI command.
| $> couchbase-cli node-to-node-encryptionchange-cluster-encryption
-c localhost:8091 -u <cluster-username> -p <cluster-password> –disable |
- Copy all the newer node certificates into the inbox folder on all the nodes in the cluster, and tell the cluster to reload the certificates.
If there is a need to renew the root certificate too, then upload the new root certificate to the cluster using the –upload-cluster-ca CLI command.
| $> couchbase-cli ssl-manage
–cluster <hostname>:<port> –upload-cluster-ca <path_to_root_ca> |
Then run the –set-node-certificate CLI command to reload the newer node certificates on all the nodes in the cluster
| $> couchbase-cli ssl-manage
–cluster <hostname>:<port> –set-node-certificate |
- Enable cluster encryption using the “change-cluster-encryption” CLI command Resources
$> couchbase-cli node-to-node-encryptionchange-cluster-encryption
-c localhost:8091
-u <cluster-username>
-p <cluster-password>
–enable
Conclusion
We are very excited about the new security features in Couchbase Server 6.5, as these features will address many requests that our customers have asked for. As always, we look forward to your feedback on our new features and we hope you get a chance to take Couchbase Server 6.5 preview for a spin.
Resources
Download
Documentation
Couchbase Server 6.5 Release Notes
Couchbase Server 6.5 What’s New
Blogs
Blog: Announcing Couchbase Server 6.5 – What’s New and Improved
Blog: Couchbase brings Distributed Multi-document ACID Transactions to NoSQL
Leave a comment
You must be logged in to post a comment.