¿Está interesado en conectarse a un clúster de Capella mediante Node.js?
En esta entrada de blog de inicio rápido (¡y me refiero a rápido!) le guiaré a través del breve conjunto de pasos para conectarse a un clúster en Capella con el SDK de Couchbase Node.js.
Configurar
Requisitos
Para completar este tutorial, debes tener lo siguiente:
- Una cuenta Couchbase Capella - pruebas gratuitas con un simple registro
- Grupo Capella desplegado y configurado para el acceso
- npm - Gestor de paquetes Node.js
Instale la última versión de soporte a largo plazo (LTS) de Nodo.
Descargue e instale la última versión de soporte a largo plazo (LTS) de Node si aún no lo ha hecho.
Si está instalando Node por primera vez, le recomendamos que utilice el archivo Gestor de versiones de nodos (nvm) para iniciarse en Node.
- Siga las instrucciones para instalando nvm
- Instale la última versión de Node LTS
|
1 |
$ nvm instale --lts |
Crear un proyecto Node.JS
Crear un proyecto Node.js es tan fácil como hacer un directorio e inicializarlo con npm. Los siguientes dos comandos lo harán por nosotros. Abre un terminal y ejecuta el siguiente comando:
|
1 |
$ mkdir nodo-couchbase-proyecto && cd $_ |
El comando anterior creará nuestro directorio y cambiará nuestro directorio de trabajo actual. El siguiente comando inicializa el directorio del proyecto:
|
1 |
$ npm init -y |
Si un directorio no tiene ya un paquete.json en su raíz, esto significa que no está inicializado. El comando anterior logrará esto.
Nota: Hemos utilizado el -y para tomar los valores predeterminados de inicialización. Para cambiar cualquiera de estos valores por defecto, basta con abrir la ventana paquete.json y realice los cambios manualmente.
|
1 2 3 4 5 6 7 8 9 10 11 12 |
{ "nombre": "node-couchbase-project", "version": "1.0.0", "descripción": "", "principal": "index.js", "scripts": { "test": "echo "Error: no se ha especificado ninguna prueba" && exit 1" }, "palabras clave": [], "autor": "", "licencia": "ISC" } |
Instalar el SDK de Couchbase Node.js
El SDK de Couchbase Node.js te permite interactuar con un cluster de Couchbase Server desde el lenguaje Node.js. El Cliente Couchbase Node.js se ejecutará en cualquier versión LTS compatible de Node.js.
Para instalar el último SDK de Couchbase Node.js, ejecuta el siguiente comando:
|
1 |
$ npm instale couchbase --guardar |
Utiliza el -guardar para añadir el módulo Couchbase como dependencia del proyecto. Esto ayudará a automatizar la instalación de paquetes si quieres distribuir tu trabajo en el futuro.
Conexión a Couchbase con el SDK integrado de Node.js
En instalación del SDK de CouchbaseEl siguiente paso es utilizar los ejemplos incorporados en el SDK para conectarse a su clúster.
Buscar la configuración de conexión del clúster
Vaya a la pestaña Connect del clúster en la interfaz de usuario de Couchbase Capella siguiendo estos pasos:
- Vaya a la pestaña Clusters en la navegación principal
- Busque y haga clic en su clúster (docs-cluster13feb1 en la siguiente captura de pantalla). Se abrirá el clúster con la pestaña Visión general seleccionada.
- Haga clic en la pestaña Conectar de la barra lateral izquierda
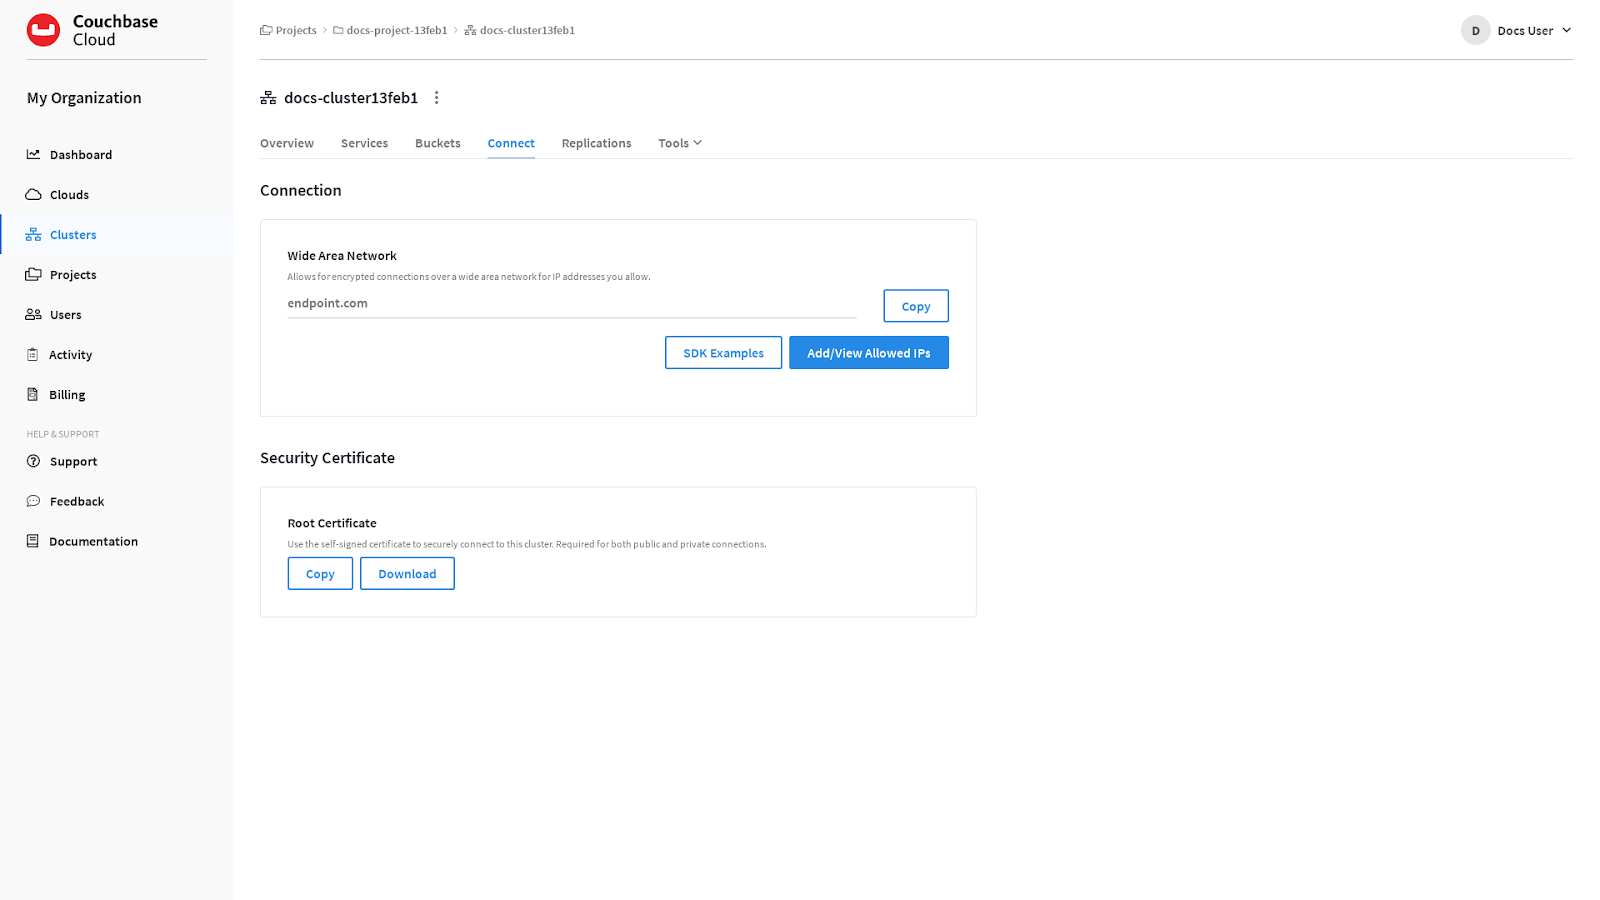
En la sección Conexión, se enumeran dos puntos finales: Uno denominado Público y uno etiquetado Privado.
Cuando se conecte al clúster a través de una red de área extensa, como cuando se conecta al clúster a través de Internet desde una aplicación de su ordenador portátil, utilizará el punto final público.
Cuando se conecte al clúster desde dentro de su proveedor de nube utilizando una conexión de peering, utilizará el punto final privado.
Sin embargo, no necesitará copiar el endpoint público para este post porque se incluye automáticamente en los ejemplos del SDK incorporado que utilizaremos.
Ejemplos de SDK abierto
Haga clic en Ejemplos SDK. Se abrirá el menú desplegable SDK Examples, que muestra las opciones de esta captura de pantalla:
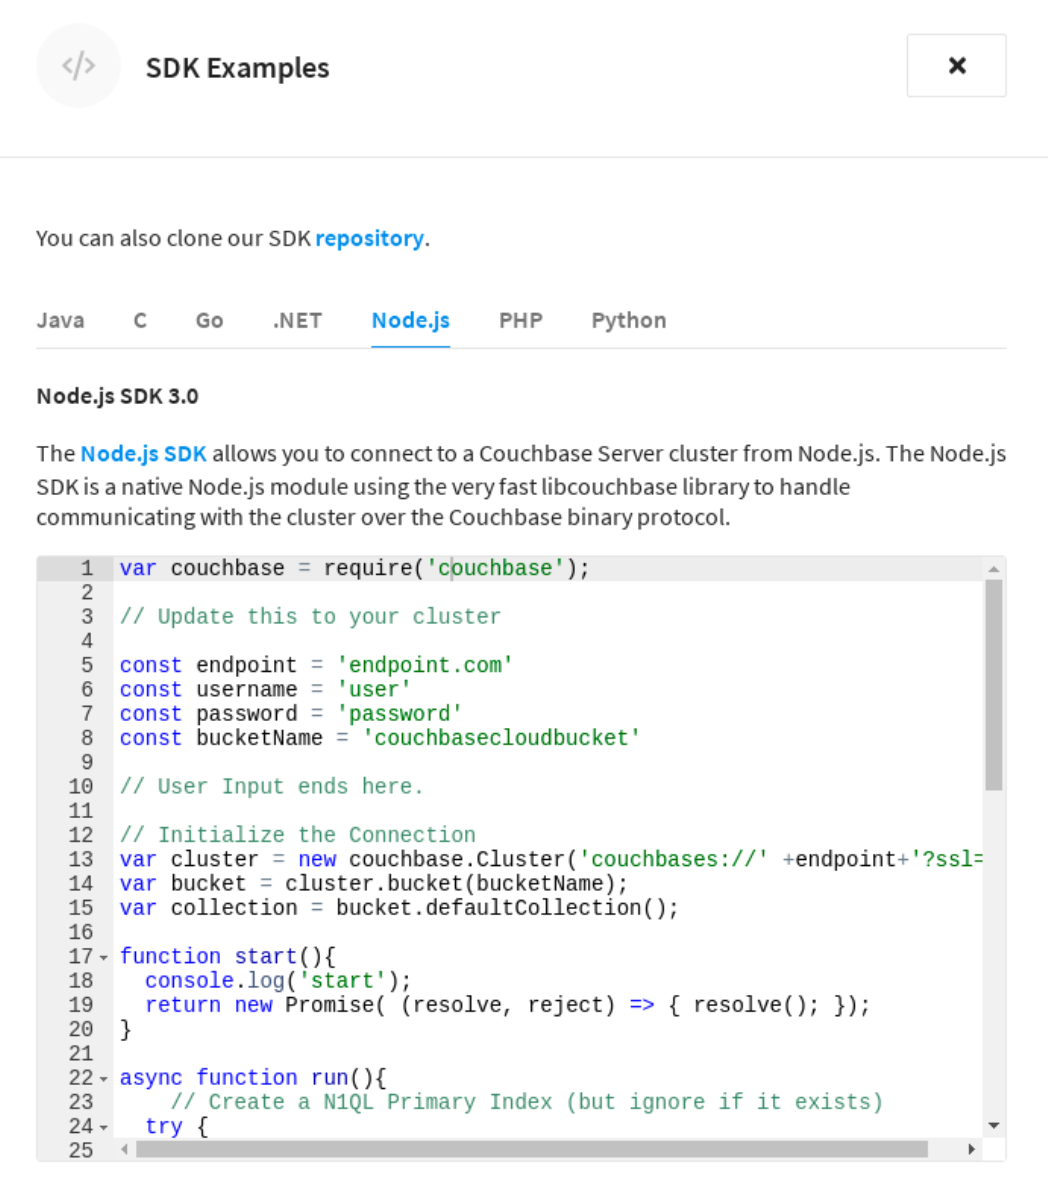
Cada uno de los lenguajes soportados por el SDK de Couchbase está representado por una pestaña. Bajo cada pestaña, se proporciona un fragmento de código de ejemplo. El código de ejemplo se rellena previamente con el punto final público del clúster y, con unas pocas modificaciones, se puede utilizar rápidamente para conectarse al clúster.
Copie el código de ejemplo.
Haga clic en la pestaña del lenguaje SDK que desee y copie el código de ejemplo. Si sigues los ejemplos de esta guía, haz clic en la pestaña Node.js y copia el código JavaScript de ejemplo.
Pegue el código de ejemplo en un editor de texto y actualice los datos de conexión.
El código de ejemplo del SDK incluye automáticamente el endpoint público del clúster y el nombre predeterminado del bucket.
Actualizar el nombre de usuario y contraseña a las credenciales de la base de datos que creó cuando usted acceso configurado a la base de datos antes.
Cambiar el cubo (opcional)
En bucketName es el nombre de un bucket en el cluster al que se conectará. El código de ejemplo viene precargado con el nombre del bucket por defecto: couchbasecloudbucket. Este cubo será suficiente para este tutorial, pero si usted elige a crear un nuevo cubo para este ejercicio, tendrá que especificar el nombre del nuevo cubo en el código de ejemplo.
Las credenciales de la base de datos deben permitir el acceso a cualquier cubo nuevo que añada. Si ha configurado la credencial de base de datos para que tenga permisos de lectura/escritura en todos los buckets (como se recomienda), puede especificar cualquier bucket al probar la conexión.
A continuación se muestra un ejemplo de configuración de Node.js:
|
1 2 3 4 5 6 7 8 9 10 11 12 13 14 15 16 17 18 19 20 21 22 23 24 25 26 27 28 29 30 31 32 33 34 35 36 37 38 39 40 41 42 43 44 45 46 47 48 49 50 51 52 53 54 55 56 57 58 59 60 61 |
var couchbase = requiere(couchbase); // Actualiza esto a tu cluster const punto final = '408f6eee-c52d-4d44-a155-691f9c511931.dataplane.couchbase.com' const nombre de usuario = 'admin' const contraseña = P@ssw0rd const bucketName = couchbasecloudbucket // La entrada del usuario termina aquí. // Inicializar la conexión var grupo = nuevo couchbase.Grupo(couchbases://' +punto final+ssl=no_verify&console_log_level=5', {nombre de usuario: nombre de usuario, contraseña: contraseña}); var cubo = grupo.cubo(bucketName); var colección = cubo.defaultCollection(); función iniciar(){ consola.registro(Inicio); devolver nuevo Promesa( (resolver, rechace) => { resolver(); }); } async función ejecute(){ // Crear un índice primario N1QL (pero ignorar si existe) pruebe { await grupo.queryIndexes().createPrimaryIndex(bucketName, {ignorarExiste: verdadero}); } captura (e) { } // Crear y almacenar un documento pruebe { await colección.upsert('user:king_arthur', { nombre: Arthur, correo electrónico: kingarthur@couchbase.com, intereses: [Santo Grial, Golondrinas africanas] }); } captura (e) { tirar(e); } // Cargar el documento e imprimirlo // Imprime el contenido y los metadatos del documento almacenado pruebe { deje obtenerResultado = await colección .consiga('user:king_arthur'); consola.registro('Got: '); consola.registro(obtenerResultado); } captura (e) { consola.registro(e); tirar(e); } // Realizar una consulta N1QL const opciones = { parámetros: [Golondrinas africanas] }; pruebe { deje queryResult = await grupo.consulta('SELECT nombre FROM '+bucketName +WHERE $1 in intereses LIMIT 1', opciones); queryResult.filas.paraCada((fila) => { consola.registro('Fila de consulta: ', fila) }); } captura (e) { consola.registro(e); tirar(e); } } iniciar().entonces(ejecute).entonces(() => { consola.registro("cerrando..."); grupo.cerrar();}); |
Una vez que haya terminado de actualizar el código de ejemplo con los detalles de su conexión, guárdelo en el directorio de su proyecto. Asegúrate de utilizar la extensión de archivo adecuada para el lenguaje del SDK.
Si sigues los ejemplos de esta guía, guarda el archivo como conexión-script.js en el node-couchbase-project que creaste anteriormente cuando instalaste el SDK de Couchbase Node.js.
Conéctate al clúster.
Desde el directorio del proyecto, ejecute el script de conexión utilizando el siguiente comando:
|
1 |
nodo conexión-script.js |
Los resultados que cabe esperar son los siguientes:
|
1 2 3 4 5 6 7 8 9 10 |
Tengo: { cas: CbCas { '0': <Tampón 08 00 64 71 50 c3 25 16> }, valor: { nombre: Arthur, correo electrónico: kingarthur@couchbase.com, intereses: [ Santo Grial, Golondrinas africanas ] } } Consulta fila: { nombre: Arthur } |
Si ha recibido los resultados anteriores, la conexión se ha realizado correctamente y se ha escrito un documento en el cubo.
¡Enhorabuena por completar esta guía de inicio rápido! Asegúrese de probar esto en Couchbase Capella para ver lo fácil que puede ser.
Recursos
Capella
Para saber más sobre Couchbase Capellanuestra oferta de base de datos como servicio:
- Inscríbete en prueba gratuita de 30 días si aún no lo ha hecho
- Conecte su grupo de prueba al Playground o conecte un proyecto para probarlo usted mismo
- Eche un vistazo al Ruta de aprendizaje Capella!
Tutoriales
En Portal para desarrolladores de Couchbase tiene toneladas de tutoriales/guías de inicio rápido y vías de aprendizaje para ayudarte a empezar, entre ellos:
Formación
Disponemos de varias opciones de formación en función de sus necesidades y nivel:
- Curso de Desarrollador Node.js Asociado (gratis)
- Curso de Arquitecto Asociado - independiente del idioma
- Todas las opciones de formación aquí
Consulte la documentación para obtener más información sobre los SDK de Couchbase.
____________________________________________________________________________
Gracias por leer este post. En este punto, deberías ser capaz de interactuar fácilmente con un cluster Couchbase Capella desde un script Node.js. Si tienes alguna pregunta o comentario, por favor conéctate con nosotros en el Couchbase Foros.
