Welcome to this comprehensive guide on integrating Couchbase with Keycloak. In today’s digital environment, securing applications and managing identities efficiently is paramount. SAML (Security Assertion Markup Language) and Keycloak, a versatile Identity and Access Management (IAM) tool, together form a robust solution for this purpose.
In this article, we will explore the intricacies of setting up Couchbase with a SAML Identity Provider (IdP). We will use Keycloak within a Docker environment. This integration will enhance your Couchbase’s security, streamline user management, and offer a seamless authentication experience.
Whether you are looking to expand your knowledge in identity management, or seeking to enhance your current setup, this guide is designed to provide you with a step-by-step approach to integrating Keycloak with your Couchbase database using SAML.
By the end of this guide, you will have a strong understanding of how Couchbase and SAML work together, and how you can leverage these technologies to bolster the security and efficiency of your system. While this guide primarily employs Keycloak as a SAML Identity Provider, the steps and principles delineated here should enable you to configure your own SAML Identity Provider effectively.
Prerequisites
Before diving into the setup process, it’s important to ensure that you have the following prerequisites ready. This will facilitate a smooth and efficient integration process:
-
- Existing Setup: Couchbase should be up and running. This guide assumes that you have already installed and configured Couchbase on your system.
- Docker: Docker needs to be installed on your machine. Docker will be used to run Keycloak in a containerized environment, providing an isolated and consistent platform for Keycloak. You may skip the relevant section if you have Keycloak up and running in a different way.
- Basic Knowledge:
- Docker: Familiarity with Docker commands and concepts is essential, as Keycloak will be deployed in a Docker container.
- Keycloak and SAML: While detailed steps will be provided, having a basic understanding of Keycloak as an IAM tool and SAML as an authentication protocol will be beneficial.
- System Requirements: Ensure your system meets the minimum requirements for running Docker and Keycloak smoothly. This includes sufficient memory, CPU power, and disk space.
- Network Accessibility: Make sure that your network configuration allows communication between the Docker container where Keycloak will run and the system where your Couchbase is hosted.
Overview of Keycloak and SAML
Understanding the roles of Keycloak and SAML in identity management is crucial for grasping their integration. This section provides an overview of both components and their significance in our setup.
What is Keycloak
Keycloak is an open-source Identity and Access Management solution aimed at modern applications and services. It provides extensive security capabilities including user authentication and authorization.
In our context, Keycloak serves as an Identity Provider (IdP). It centralizes the login mechanism and user management, offering a unified access point for various services and applications.
SAML (Security Assertion Markup Language)
-
- Basics of SAML: SAML is an open standard for exchanging authentication and authorization data between parties, specifically between an IdP and a Service Provider (SP).
- Importance in Authentication: SAML is widely used for web-based authentication. It allows users to log in to multiple applications with one set of credentials managed by the IdP, enhancing both security and user experience.
Integration Benefits
-
- Enhanced Security: By integrating SAML with Keycloak, your Couchbase benefits from a secure and centralized authentication mechanism.
- Single Sign-On (SSO): Users can enjoy SSO capabilities across different applications, reducing the need for multiple logins and passwords.
Step 1: Starting Keycloak in Docker
With Docker already running on your system, you can easily start Keycloak in a Docker container. This section provides the necessary steps and an example command to get Keycloak up and running smoothly.
Preparing for Keycloak Deployment
-
- Ensure Docker is Running: Confirm that Docker is active on your system. You can do this by running
docker info ordocker ps in your terminal or command prompt, which should return information about your Docker installation and running containers, respectively. - Port Availability: Keycloak typically runs on port 8080. Ensure this port is free on your system, or plan to map it to a different port when running the Docker container.
- Ensure Docker is Running: Confirm that Docker is active on your system. You can do this by running
Starting Keycloak Container
To start a Keycloak container with the default settings, use the following command:
|
1 |
docker run -p 8080:8080 -e KEYCLOAK_ADMIN=admin -e KEYCLOAK_ADMIN_PASSWORD=admin quay.io/keycloak/keycloak:22.0.5 start-dev |
Replace admin and admin with your desired admin username and password. This sets up an administrator account in Keycloak when the container starts.
Detached Mode: Optionally, you can run the container in detached mode by adding the -d flag. This runs the container in the background, allowing you to continue using the terminal.
Accessing Keycloak
Once the Keycloak container is running, you can access the Keycloak admin console by navigating to https://localhost:8080/auth in your web browser. Log in with the admin credentials you set.
Please be aware that we are running this container in development mode for our demonstration purposes. For guidance on how to deploy Keycloak in a production environment, you are encouraged to consult the Keycloak documentation.
Step 2: Configuring Keycloak as a SAML Identity Provider Part 1
Configuring Keycloak as a SAML Identity Provider involves setting up a new realm and a SAML client within that realm. Follow these detailed steps to ensure a proper setup.
Accessing the Keycloak Administration Console
-
- Open a web browser and navigate to https://localhost:8080/auth.
- Log in with your Keycloak admin credentials.
- You should now see the following:

Creating a New Realm
In Keycloak, a realm is a fundamental concept that serves as a top-level container for configurations and entities like users, clients, and roles. Creating a realm is essential because it provides an isolated space where all these elements can be managed.
Each realm acts as an independent identity domain, allowing you to maintain separate sets of users, credentials, roles, and clients, which is particularly useful in scenarios where you have multiple departments, organizations, or environments. Thus, creating a realm is the first step in setting up an identity management solution in Keycloak.
-
- In the top-left corner, click on the “Master” dropdown and select “Create realm“.
- Name your new realm (e.g.,
MyIdentityRealm) and click “Create“.

Setting Up a SAML Client
In Keycloak, a client represents an application that will rely on Keycloak for authentication and authorization. Creating a client is essential as it forms the link between Couchbase UI and Keycloak, enabling the secure management of user access and identity information. By creating a SAML client in Keycloak, you enable your application to authenticate users through Keycloak using SAML.
-
- Inside your new realm, click on “Clients” in the left-hand menu.
- Click “Create client” and select “saml” as the Client Protocol.
- On the General settings tab, fill in the following fields:
- Client ID: Enter the Entity ID of your SAML Service Provider (e.g.,
couchbase-ui). - Name: Provide a name for the client. (e.g.,
Couchbase). - Description: Optionally, add a description.
- Client Next
- Client ID: Enter the Entity ID of your SAML Service Provider (e.g.,

-
- On the Login settings tab, fill in the following fields:
- Home URL: Enter the URL of your Couchbase server (e.g. https://127.0.0.1:8091)
- Valid redirect URIs: Provide the URI which the IdP can redirect to (e.g. https://127.0.0.1:8091/*)
- Valid post logout redirect URIs: Enter the URIs that you allow the IdP to redirect after a logout event. (e.g. https://127.0.0.1:8091/*)
- Click Save to create a new SAML client
- On the Login settings tab, fill in the following fields:

Currently, the Keycloak client configuration is incomplete and will be addressed later. To complete the setup process, it is essential to first configure Couchbase.
Step 3: Configuring SAML with Couchbase Server
Once Keycloak is configured as a SAML Identity Provider, the next step is to integrate it with your Couchbase. This integration allows your Couchbase to authenticate users through Keycloak using SAML.
Understanding the Integration
-
- Role of Keycloak: Keycloak acts as the SAML Identity Provider (IdP), managing user identities and credentials.
- Role of Your Couchbase: Your Couchbase functions as a SAML Service Provider (SP), relying on Keycloak for authentication.
Preparing for SAML Integration
To configure Couchbase as a SAML Service Provider (SP), the initial step requires downloading the metadata from Keycloak.
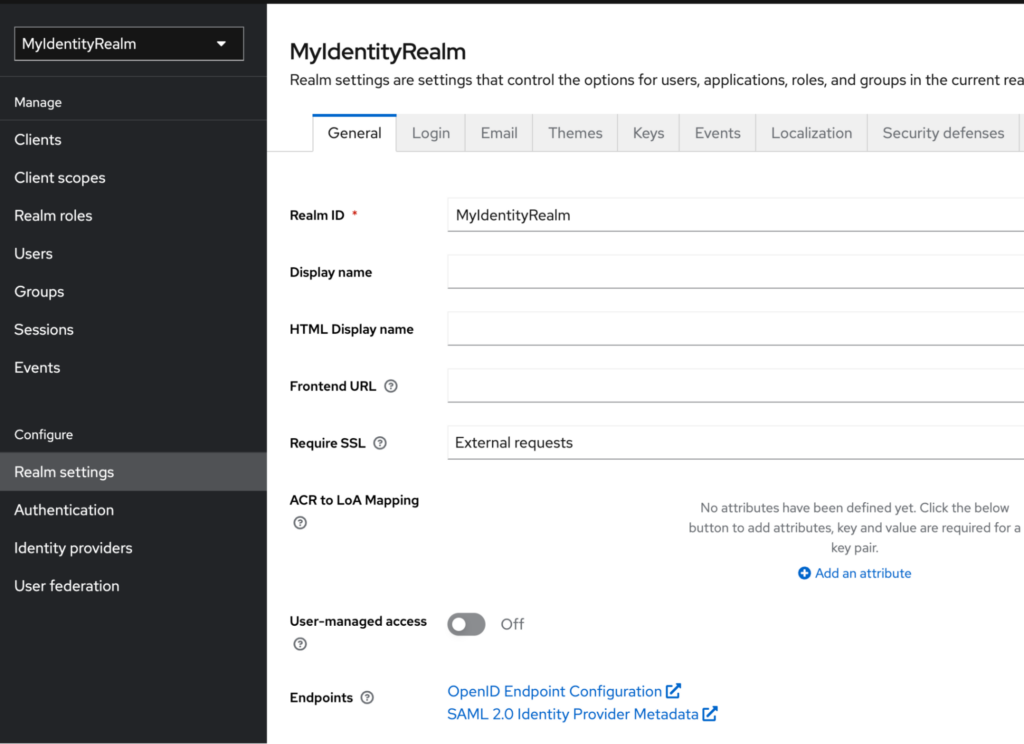
The metadata endpoint can be accessed by navigating to the realm settings page within the Keycloak administration area.
- Open the settings page: Collect the necessary information from Keycloak, such as the SAML IdP metadata URL, open the Realm settings page:
-
- Locate the Endpoints: scroll down to the Endpoints section and open the SAML 2.0 Identity Provider Metadata in a new window. The URL should look like
https://localhost:8080/auth/realms/{realm-name}/protocol/saml/descriptor. In our case it ishttps://localhost:8080/realms/MyIdentityRealm/protocol/saml/descriptor. Yours might be different depending on what the name of the realm is. Open this in a new tab and locate the key information in the metadata file. - The certificate information can be found in the X509Certificate tag.
- Locate the Endpoints: scroll down to the Endpoints section and open the SAML 2.0 Identity Provider Metadata in a new window. The URL should look like
|
1 2 3 |
<ds:X509Data> <ds:X509Certificate>MIICrTCCAZUCBgGM.....</ds:X509Certificate> </ds:X509Data> |
-
- The login and logout binding can be located in the corresponding SingleSignOnService and SingleLogoutService tags. They should look like the following code snippets:
|
1 |
<md:SingleSignOnService Binding="urn:oasis:names:tc:SAML:2.0:bindings:HTTP-POST" Location="https://localhost:8080/realms/MyIdentityRealm/protocol/saml"/> |
|
1 |
<md:SingleLogoutService Binding="urn:oasis:names:tc:SAML:2.0:bindings:HTTP-POST" Location="https://localhost:8080/realms/MyIdentityRealm/protocol/saml"/> |
-
- The entityID can be located in the EntityDescriptor and should look like this:
|
1 |
entityID="https://localhost:8080/realms/MyIdentityRealm" |
Store this metadata file on your computer, as it is required for configuring SAML in Couchbase. The certificate, entityId, login and logout bindings will all be needed when you create the SAML configuration in Couchbase.
Configuring Couchbase as a Service Provider
Having established Keycloak as an Identity Provider (iDP), the next step is to configure the Couchbase server to function as a SAML Service Provider (SP). This section provides detailed instructions for the initial setup and configuration process.
-
- Login to your Couchbase server UI: Log in to the administrative UI of Couchbase server. This is where you’ll configure the SAML settings.
- Click on Security: Select security in the left hand side navigation.

- Click on the SAML tab: on the top Locate the SAML tab and click on it. This will open the SAML configuration page.

- Enable SAML Authentication: There is a checkbox below the text. Toggle this setting on.

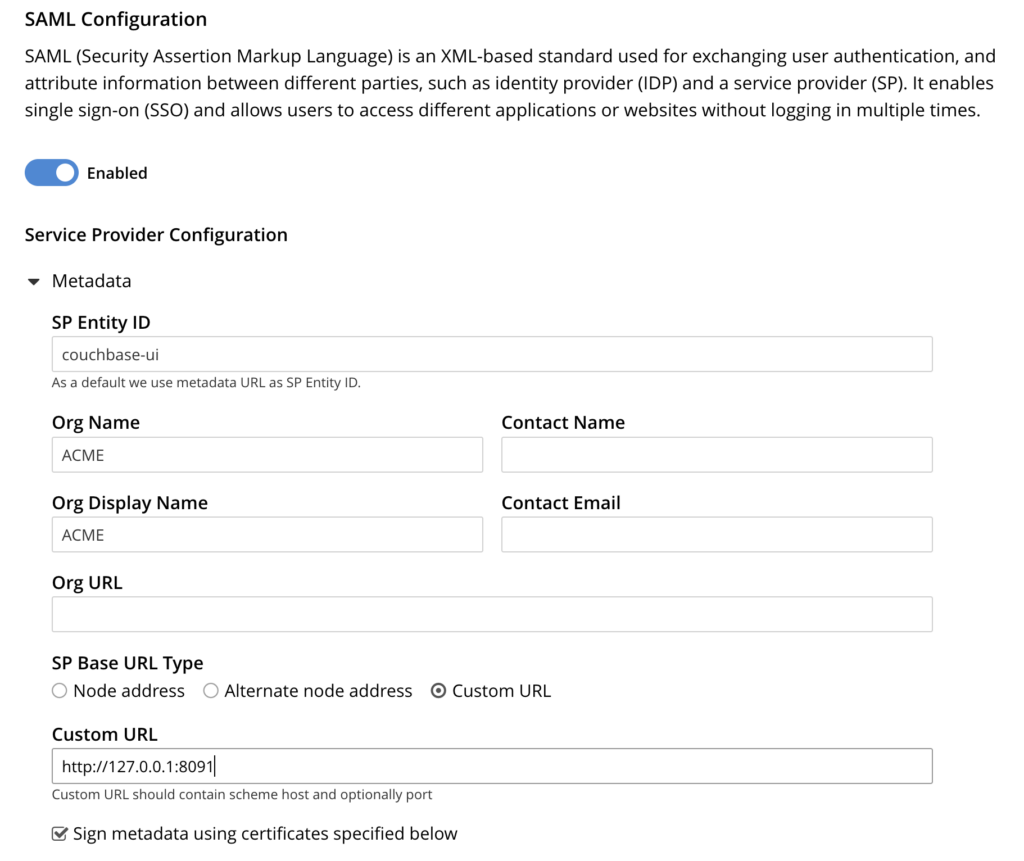
Metadata Configuration
-
- SP Entity ID: Set the Entity ID for Couchbase server. This is a unique identifier that you have configured in Keycloak as clientId and will be used to recognize your service. Use the same Entity ID you used on the Keycloak screen: “couchbase-ui”
- Organization detail: Fill in the Org Name and Contact fields with your information.
- SP Base URL Type: Select Custom URL and use the URL your service is accessible from the internet. I will specify https://127.0.0.1:8091 as I am running the Couchbase server locally.
- Sign Metadata: Make sure that the ‘Sign metadata using certificates specified below’ toggle is enabled.
Certificate Management
The Service Provider will also require a Private Key and an X.509 certificate, which is different from the Node or Cluster certificate. This specific certificate will be utilized for actions related to SAML.
In this example I will use a self signed certificate.
|
1 |
openssl req -x509 -newkey rsa:2048 -keyout key.pem -out cert.pem -sha256 -days 730 -nodes -subj "/C=CO/ST=State/L=City/O=Company/OU=Unit/CN=127.0.0.1" |
This command should have create two files (cert.pem and key.pem).
-
- Upload Private Key: Open the Key and Certificate section, and upload your private key.
- Upload Certificate: also upload your certificate.
- Certificate chain: Optionally if you need a certificate chain, please upload that as well. In my example I do not need a chain as my certificate is self signed.

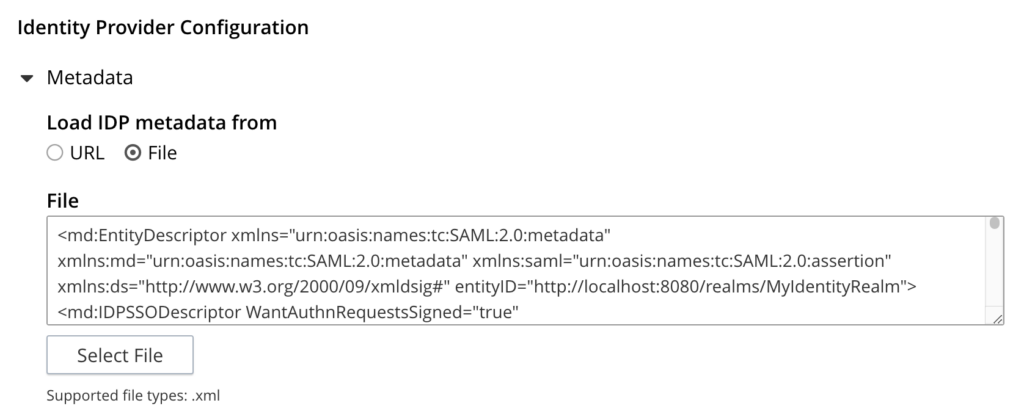
Identity Provider Configuration
-
- Open Metadata: Open the metadata section of this configuration

- Configure Metadata: Change the Load IDP metadata from setting from URL to File
- Open file: Find the file that you have downloaded from Keycloak in an earlier step.
- Copy the content: Select the whole file and copy the content to the clipboard
- Paste the XML: Go back to Couchbase server and paste the xml into the textarea
- Enable Verify remote peer: Toggle the Verify remote peer to make sure it is on

- Open Single Sign-On: In Settings section open Single Sign-on
- Post binding: Make sure that both of the Bindings are configured to use Post

- Click Save: Click save to persist your configuration.
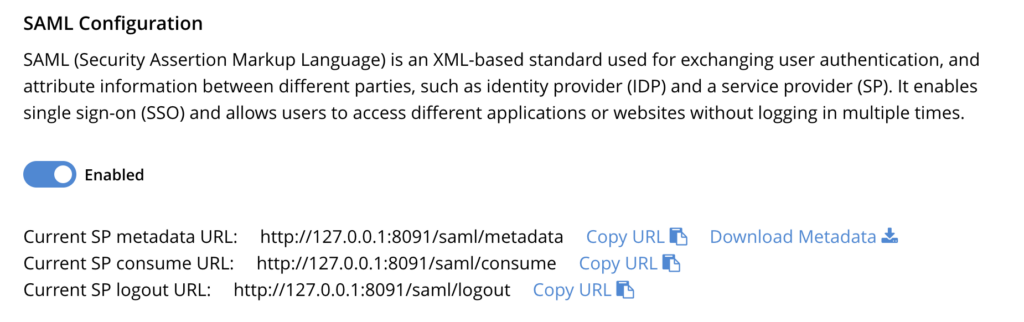
- Write down endpoint information: Remember to note down the SP consume URL and the SP logout URL, as they will be necessary for STEP 5.
- Open Metadata: Open the metadata section of this configuration
Step 5: Configuring Keycloak as a SAML Identity Provider Part 2
SAML Capabilities
-
- Open Keycloak: Go back to the Keycloak admin console and log-in
- Find the client: Click Clients and find the SAML client you created earlier and open it.

- Scroll down to SAML capabilities: On this screen, scroll down to locate the SAML capabilities section. Ensure that your configuration aligns with the settings shown in the image below.

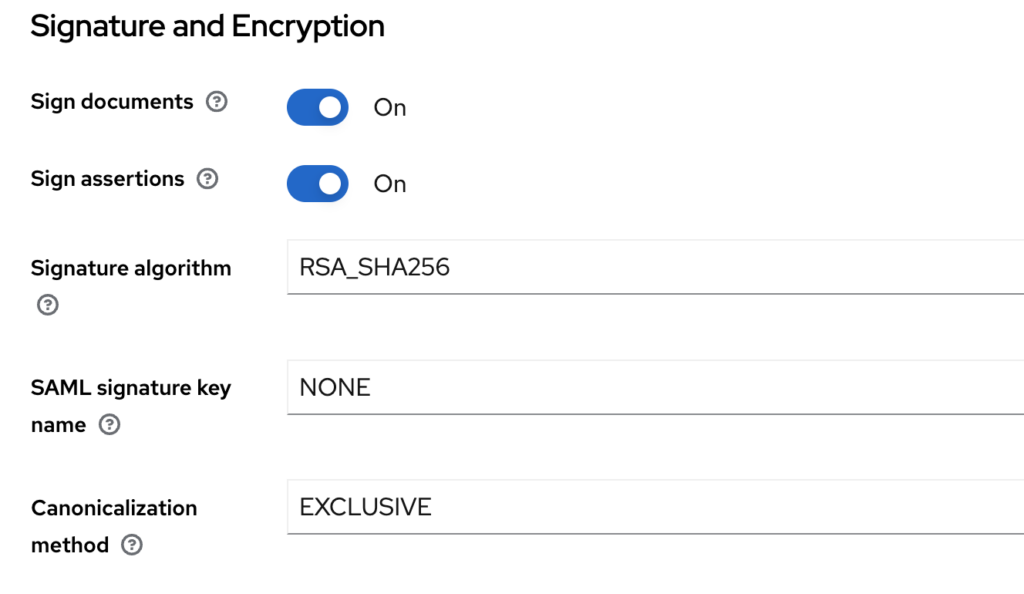
- Signature and Encryption: Proceed to the section following SAML Capabilities and verify that your configuration matches the one depicted in the picture below. Especially the Sign Assertions checkbox.
- Click Save to create a new SAML client
Client Certificate Setup
Open the Keys section of the SAML Client configuration and follow the instructions.
-
- Scroll down to Certificate

- Click “Import key”: Select the ‘Import key’ option to open the dialog window, where you can choose the Certificate you uploaded to the Couchbase server. The IdP (Keycloak) will utilize this certificate to validate the signature of requests sent by Couchbase.
- Upload “Certificate”: First, choose the “Certificate PEM” option for the archive format, then click the Browse button to select your certificate in PEM format.
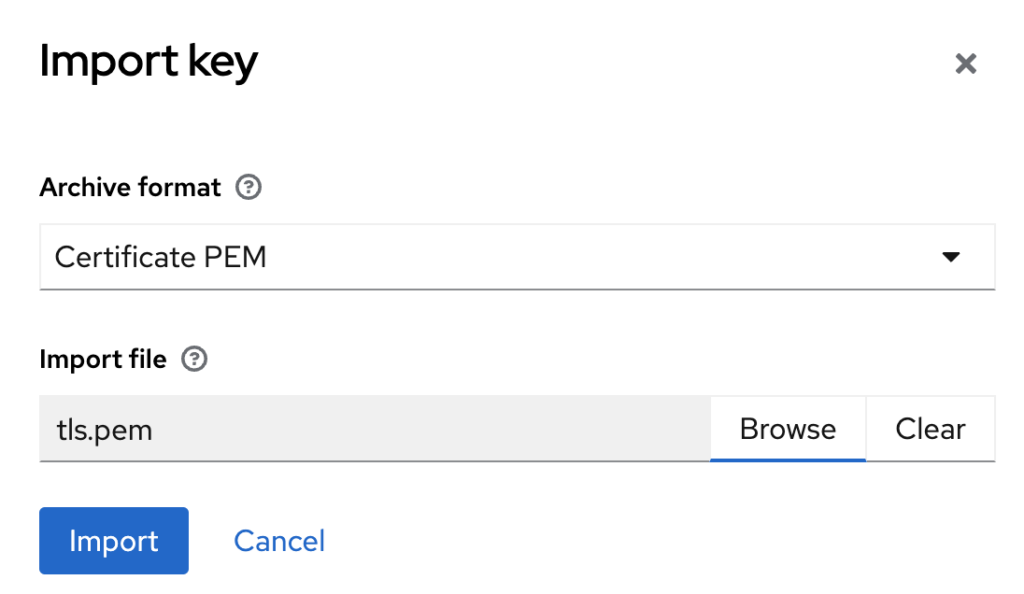
- Import: Click Import to load the Certificate into Keycloak
- Reload: At this point make sure you reload the whole web page
- Scroll down to Certificate
Fine Grain SAML Endpoint Configuration
Open the Advanced section of the SAML Client configuration and follow the instructions.
-
- Scroll down to “Fine Grain SAML Endpoint Configuration”

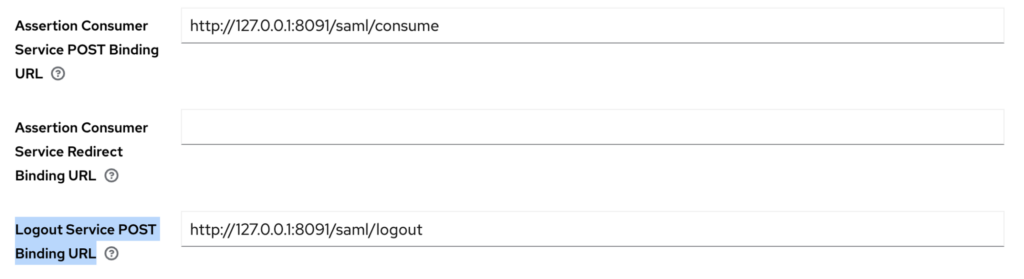
- Fill in Assertion Consumer Service POST Binding URL: Take the Current SP consume URL value from Couchbase SAML settings page and paste it into Assertion Consumer Service POST Binding URL field in Keycloak.
- Fill in Logout Service POST Binding URL: In this step use the Current SP logout URL field from Couchbase and paste it into the Logout Service POST Binding URL field.
- Click Save
- Scroll down to “Fine Grain SAML Endpoint Configuration”
Testing the Integration
Create a Keycloak user
After configuring both the Service Provider (Couchbase) and the Identity Provider (Keycloak), we now need to create a test user before proceeding to test the integration.
-
- Open Keycloak: Go back to the Keycloak admin console and log-in
- Select Users: Click on the Users menu item on the left
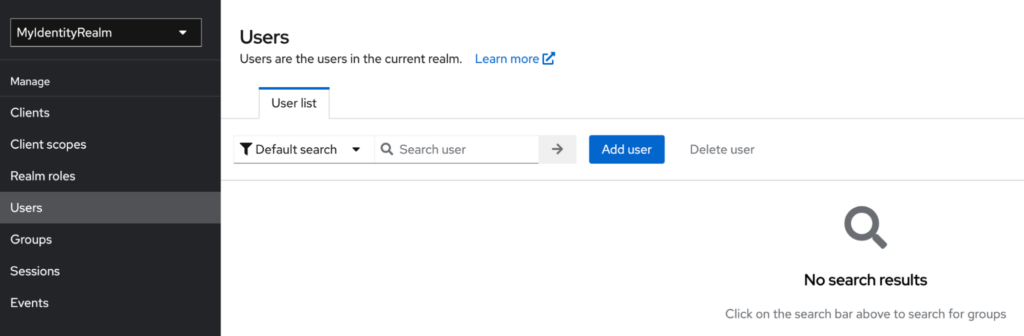
- Click “Add user”: Click on the ‘Add User’ button to add a new Keycloak test user
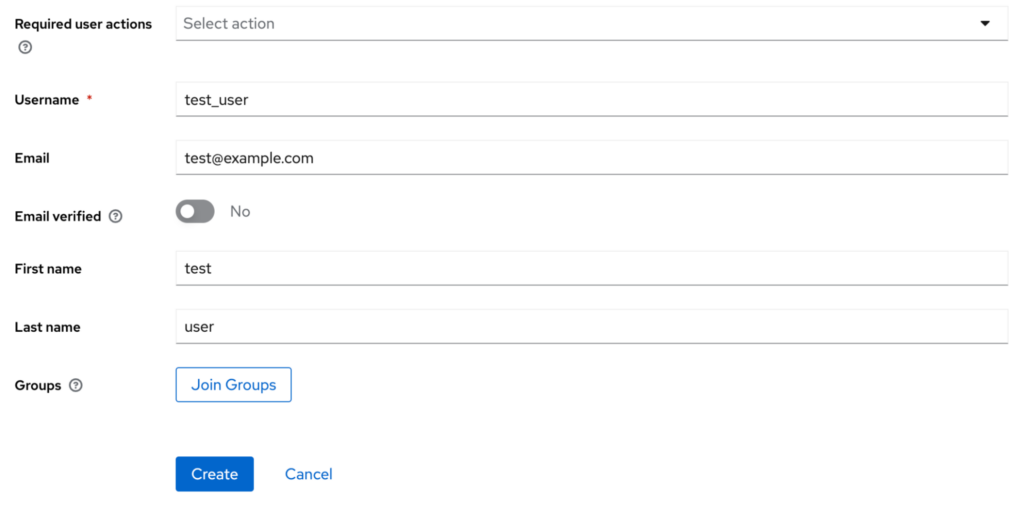
- Create: will create a user in Keycloak.
- Select Credential tab: Once the user is created, you will be directed to the user edit screen. On this screen, navigate to the Credentials tab and ensure you set a password for this user by clicking on Set Password:
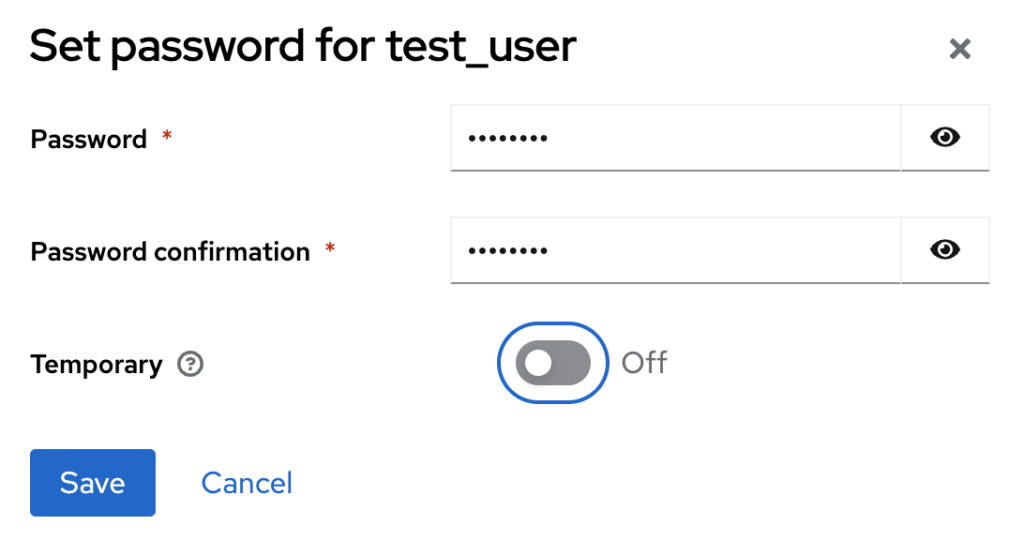
- Click Save: Save then Save Password
Add SAML email mapper
Now, it’s important to determine which user attributes will be used to map Keycloak users to Couchbase users. In this example, we’ll use the email field, but it’s also feasible to use the username or any other user attribute.
-
- Open Keycloak: Go back to the Keycloak admin console and log-in
- Find the client: Click Clients and find the SAML client you created earlier and open it
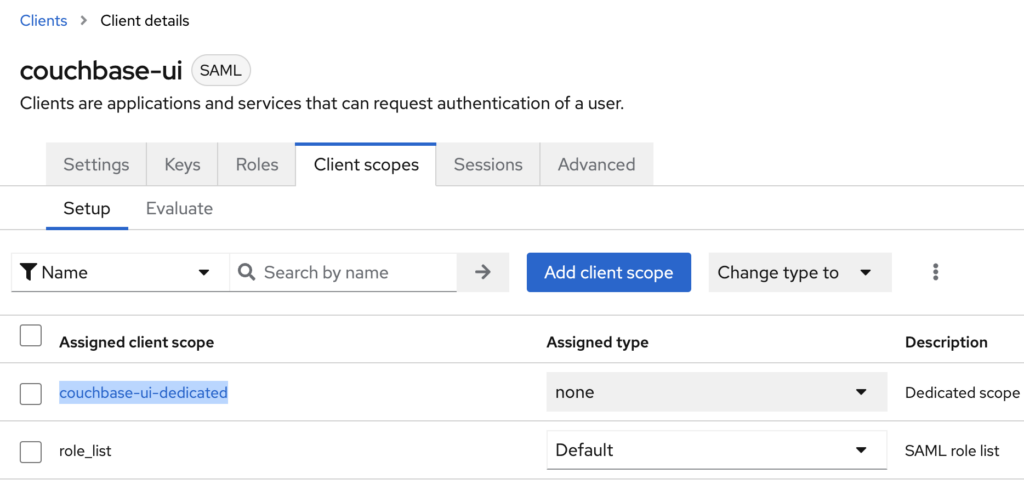
- Open Client scopes: Open Client scopes
- Click on the scope link: Each client has a default scope named after the client, which in this case is couchbase-ui-dedicated. Click on this link to modify the scope settings:
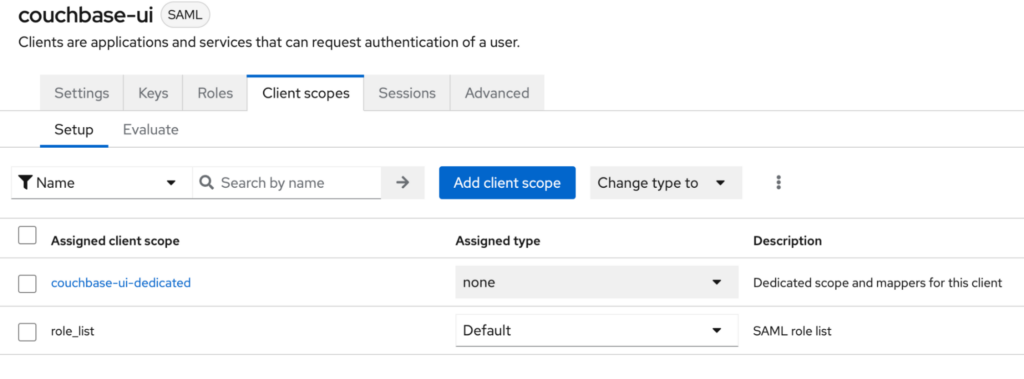
- Add mapper: In the new screen that appears after clicking on the scope link, click on the “Configure a new mapper” button.
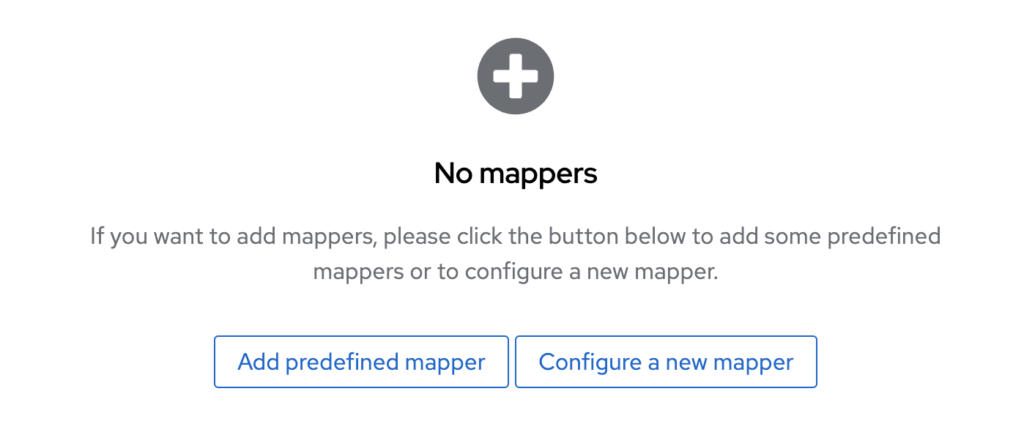
- Select User Attribute: From the list that is displayed select the “User Attribute” mapper

-
- Complete the form: Complete the form with the values as shown in the image below, paying particular attention to ensuring that the SAML Attribute NameFormat is set to unspecified.
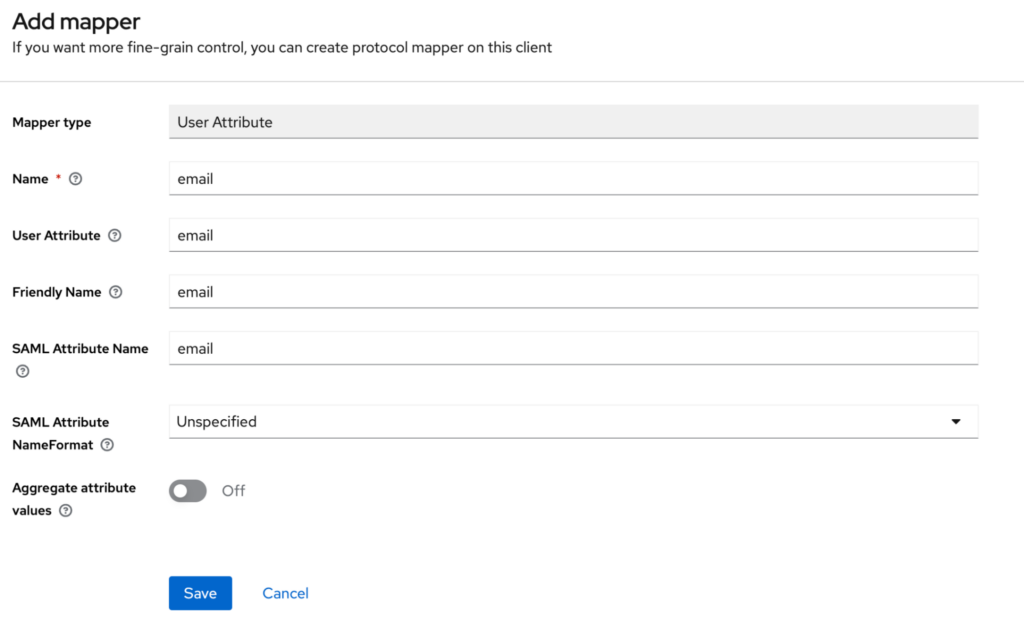
- Save: Click Save to add the mapper to the scope
- Complete the form: Complete the form with the values as shown in the image below, paying particular attention to ensuring that the SAML Attribute NameFormat is set to unspecified.
Configure Couchbase to use the mapper
The IdP is now transmitting the email attribute in the SAML Response, but Couchbase has not yet been configured to utilize this attribute for user identification:
-
- Login to your Couchbase server UI: Log in to the administrative UI of Couchbase server. This is where you’ll configure the SAML settings.
- Click on Security: Select security in the left hand side navigation.
- Select SAML tab: Click on the SAML tab to open the SAML settings
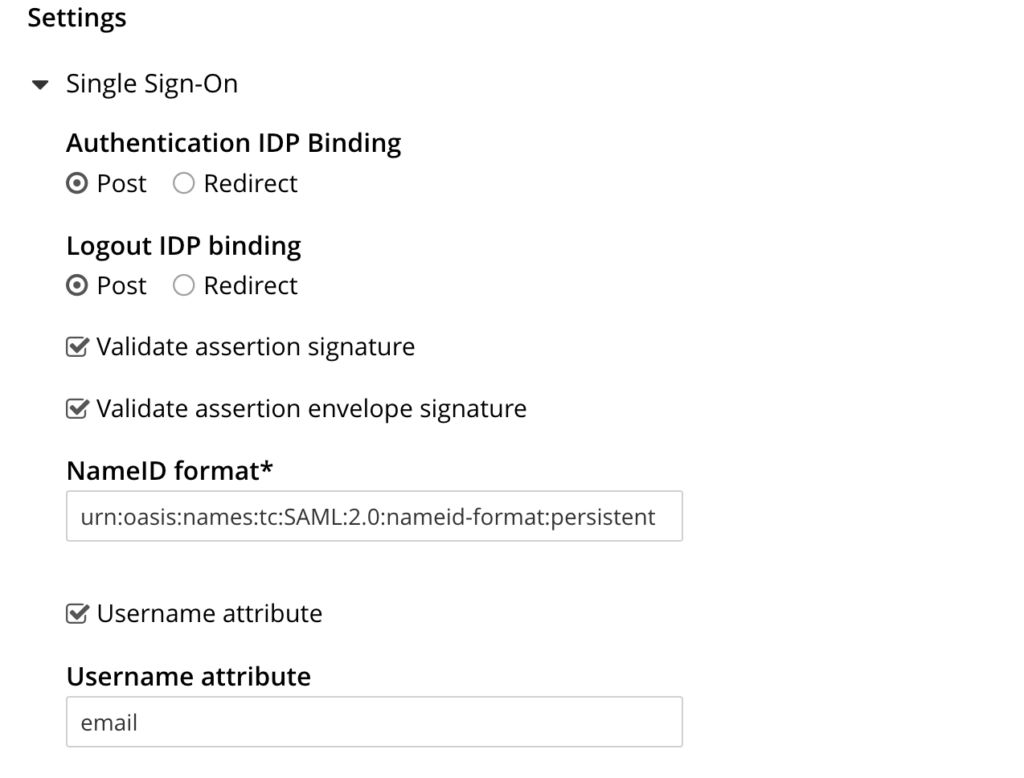
- Scroll down to Settings: Scroll down to the Settings section and open Single Sign-On section to configure the username mapping
- Configure attribute: Modify the ‘Username attribute’ field to match the SAML Attribute Name you specified in Keycloak. In this example, ’email’ was used.
User to user mapping
The most simple way to map users is to create external users in Couchbase server that match the users in Keycloak. In this example I did just that.
-
- Find email in Keycloak: Go back to Keycloak and find the email address of your user.
- Open Couchbase server UI: Open Couchbase server UI
- Click on Security: On the left you can find the security link
- Open the Users tab: On the top you will find the Users/Groups tab click on that to list the users in Couchbase server

- Add user: Click on the Add user button on the top right corner
- External user: You need to make sure you set up your user as “External” see our documentation.
- Fill in username: You copy the Keycloak email into this field
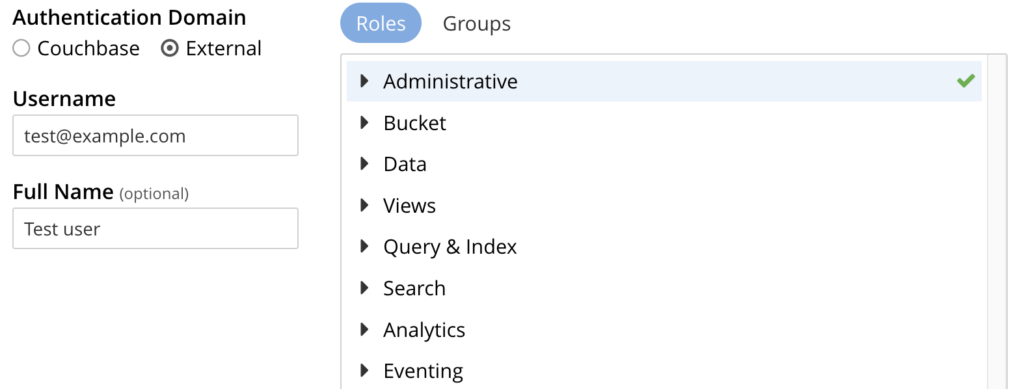
- Set up roles: On the right hand side you need to select the exact roles your user should have
- Set up Groups: (Optional) You can also add your external user to any Couchbase server groups you specified earlier
At this point you are ready to test the login with this test user. So head over to your Couchbase login page and click on Sign in Using SSO:

User mapping using groups
While user to user mapping is a great start, a better approach for aligning SSO users with Couchbase users involves mapping SSO groups to Couchbase groups. Then, utilize these Couchbase groups to assign appropriate roles, allowing for granular control without the need for individual user-to-user mapping.
Create a new group in Keycloak and assign users to it
-
- Log into Keycloak: Log into the Keycloak admin console and select your realm.
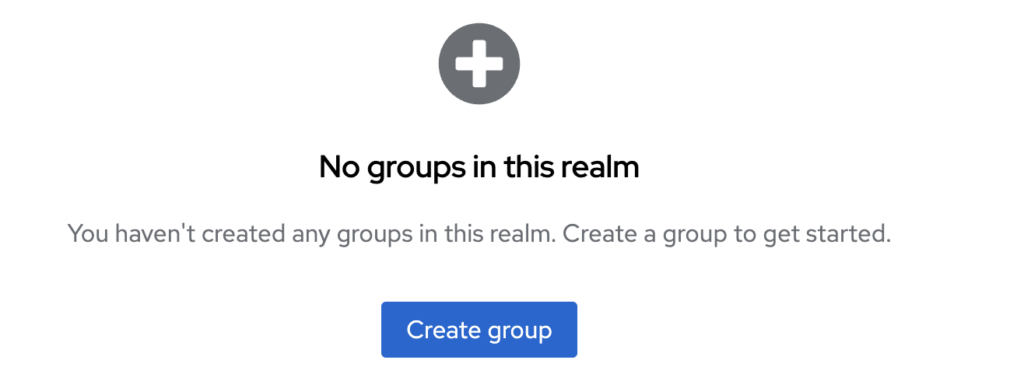
- Click on Groups: Click on the Groups menu item in the left hand navigation
- Create Groups in Keycloak. I am going to create a group called ro_admin in Keycloak. Click on the Create group button.
- Name your group: Name your group “ro_admin”

- Create group: Create the group by clicking on the Create button.
- Open your test user: Click on Users in the left hand navigation and find your test user and open the user.
- Select the Groups tab: Click on the groups tab to view the currently assigned groups.

- Click on Join Group: Click on the Join Group button to assign the new group you have just created to this test user.
- Tick the group name: Tick the ro_admin group name from the list and click Join.

Set up SAML group mappers in Keycloak
-
- Go the Clients: Open the Clients are in Keycloak and select the Client you created earlier for Couchbase integration
- Select Client Scopes: Select the Client Scopes Tab to edit the build-in scope for this client
- Open scope: Click on the Scope name which should be your client name dedicated. In our case this is called: couchbase-ui-dedicated
- Add mapper: Click on Add Mapper -> By Configuration and from the list select the Group List mapper.

- Set up the new mapper: Complete the form fields as illustrated in the image below. This will establish a group mapper that transfers the user groups to Couchbase in the SAML Attribute named groups.

- Click Save
Set up SAML group configuration in Couchbase
-
- Log into Couchbase: Log into the Couchbase admin console and go to Security and open the SAML settings page.
- Scroll down to Settings: Scroll down to the Settings section and open Single Sign on
- Find the group mapping section: Navigate to the Group settings section and configure it as depicted in the image below. Make sure you tick the Groups attribute checkbox and enter the name of the attribute we set up in Keycloak just before. In my case this is called groups.


- Create a group: Go to Security and click on the ADD GROUP button on the top right corner.
- Enter group details: Fill in the Group name and assign some roles as well. I am going to create a Read-Only administrator group in this example.
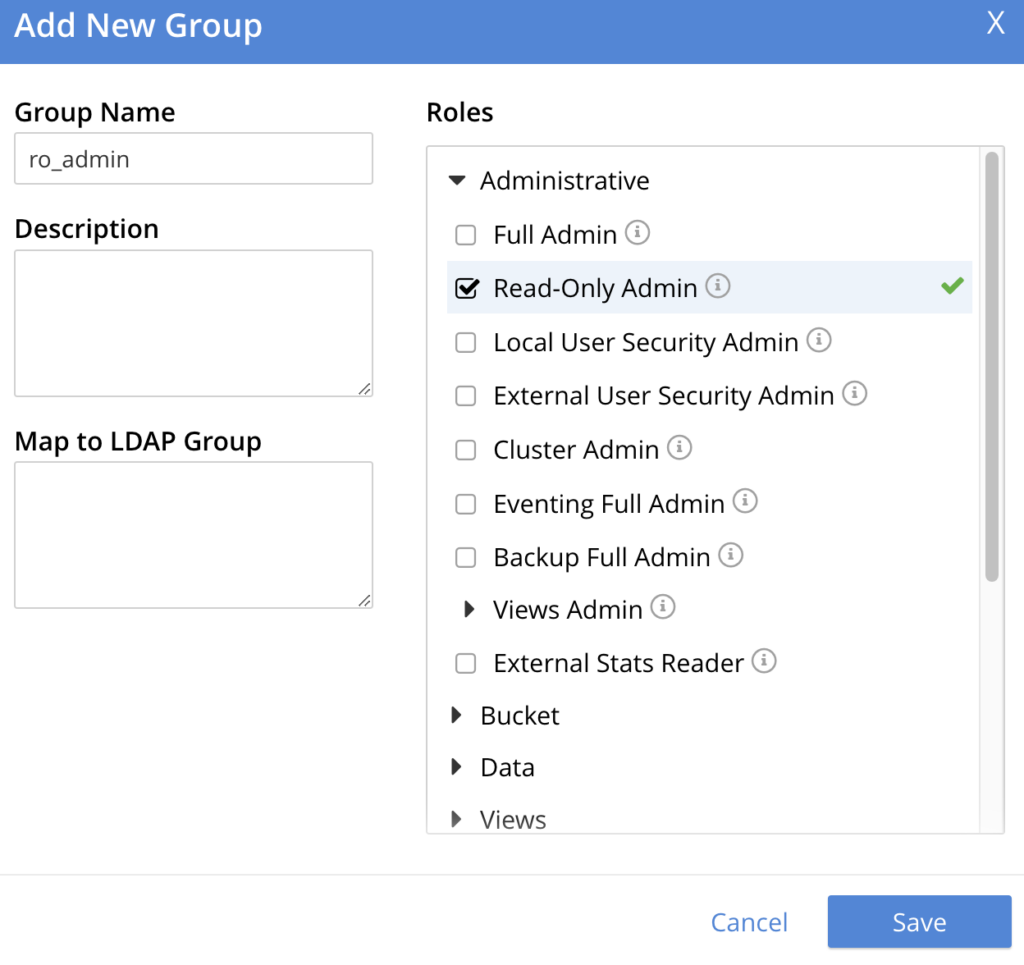
- Click Save
- Log into Couchbase: Log into the Couchbase admin console and go to Security and open the SAML settings page.
You are now prepared to conduct your initial group mapping test. If you previously created an external user in the User to User mapping section, it must be deleted to proceed with this test. It’s noteworthy that Couchbase will perform Just-In-Time (JIT) user provisioning in this scenario. There’s no necessity for a pre-existing external user; Couchbase will automatically create one and, based on the group mapping, assign the appropriate role to this user.
Troubleshooting
If you face any problems, review the SAML response and request logs in both Keycloak and Couchbase for potential errors or misconfigurations. Additionally, refer to our previous article on SAML, which offers numerous helpful tips for troubleshooting SAML-related issues.
Security Best Practices
Implementing strong security practices is crucial when integrating SAML with Keycloak and your Couchbase. This section highlights key security considerations and best practices to ensure a secure and robust setup.
-
- Use HTTPS: Always use HTTPS instead of HTTP for all communications involving Keycloak and your Couchbase, including the Assertion Consumer Service (ACS) UR
- Certificates and Keys: Use strong, up-to-date encryption certificates and keys for SAML assertions. Configure Keycloak and your Couchbase to trust these certificates
- Logs: Regularly review logs in both Keycloak and your Couchbase for any unusual activity or security breaches.
- Audit Trails: Maintain audit trails for critical actions and changes within Keycloak and Couchbase
- Review Default Settings: Carefully review and modify default configurations in Keycloak and your Couchbase to enhance security.
Conclusion
In this guide, we’ve explored the steps involved in integrating Couchbase with SAML Idp, specifically focusing on configurations within Keycloak. This integration facilitates secure and efficient user management, leveraging the robust capabilities of Keycloak as an Identity Provider. Remember, security and efficiency in user management are not just goals but ongoing processes. Regularly update your systems, stay informed about the latest security trends, and be proactive in making improvements. Your feedback on this guide is invaluable. Feel free to share your experiences, challenges, and successes.
