Con Couchbase Server 6.5.1. ahora estandarizamos la instalación y actualización no-root para paquetes rpm. Esto le permitirá instalar, actualizar y mantener fácilmente Couchbase Server como no root.
El objetivo de este blog no es sustituir nuestro excelente Documentación de Couchbasesino más bien reiterar algunas buenas prácticas para una instalación satisfactoria. Este blog se divide en 2 partes.
Parte 1: Instale Couchbase Server 6.5.1 como no root.
Parte 2: Actualice un Couchbase Server 6.0.4 instalado sin raíz a la versión 6.5.1.
Novedades de Couchbase Server 6.5.1
Instale: Un nuevo instalador cb-non-package-installerse utiliza para instalar el servidor Couchbase en lugar de utilizar rpm2cpio y reloc.sh.
Estado: Ahora puedes comprobar el estado del servidor Couchbase con un nuevo comando, couchbase-server -status
Actualizar: La cb-non-package-installer se utiliza para actualizar el servidor Couchbase desde la versión anterior. Todos los opciones de actualizaciónSe admite la actualización continua en línea con Graceful Failover y Delta Recovery.
Parte 1: Nueva instalación
Plan
- Despliegue de un cluster de 3 nodos Couchbase 6.5.1 como no-root
- El usuario será: ec2-user
- El Servidor será desplegado en: /home/ec2-user/cb-server
- Los datos estarán en: /home/ec2-user/cb-data
Requisitos previos
Hay algunos Errores comunes que te puedes encontrar cuando ejecutas el servidor Couchbase como no-root y el documento enlazado los describe. Por ejemplo: ulimits. Ulimit es el número de descriptores de fichero abiertos por proceso. El instalador estándar de root cambia esto durante la instalación, pero para los que no son root, tienes que ocuparte de esto tú mismo. Por lo tanto, permítanme destacar algunos aquí, ya que son muy importantes.
Desactivar Páginas Transparentes Enormes (THP)
Transparent huge pages (THP) es un sistema de gestión de memoria que está habilitado por defecto en la mayoría de los sistemas operativos Linux. THP debe ser deshabilitado para que Couchbase Server funcione correctamente en Linux. Por favor, siga las documentación y asegúrese de que THP ha sido desactivado.
Configurar el intercambio de núcleos
En Linux, el nivel de swappiness del kernel indica la probabilidad de que el sistema intercambie páginas fuera de la memoria física basándose en el uso de RAM. El swappiness debería ser 1 o 0 en la mayoría de los sistemas Linux para conseguir un rendimiento óptimo del Servidor Couchbase. Por favor, siga la documentación y asegúrese de que el intercambio se ha establecido según la recomendación.
Compruebe los límites máximos
Una comprobación rápida de los ulimits para el ec2-user. Estos son los valores mínimos recomendados. Hágalos permanentes.
|
1 2 3 4 5 |
[ec2-user@ip-172-31-22-131 ~]$ ulimit -n 70000 [ec2-user@ip-172-31-22-131 ~]$ ulimit -c unlimited |
Instalar los programas necesarios
Necesitamos python2, bzip2 y perl. Por lo tanto, asegúrese de que todos ellos están disponibles
|
1 2 3 4 5 6 7 8 9 |
[ec2-user@ip-172-31-22-131 ~]$ python2 -V Python 2.7.16 [ec2-user@ip-172-31-22-131 ~]$ bzip2 -V bzip2, a block-sorting file compressor; Version 1.0.6, 6-Sept-2010. [ec2-user@ip-172-31-22-131 ~]$ perl -v This is perl 5, version 26, subversion 3 (v5.26.3) built for x86_64-linux-thread-multi (with 51 registered patches, see perl -V for more detail) |
Descargar los paquetes
|
1 2 3 |
[ec2-user@ip-172-31-22-131 ~]$ wget https://packages.couchbase.com/releases/6.5.1/couchbase-server-enterprise-6.5.1-centos8.x86_64.rpm [ec2-user@ip-172-31-22-131 ~]$ wget https://packages.couchbase.com/cb-non-package-installer/cb-non-package-installer |
Instalar Couchbase Server como no-root
SSH en el primer nodo para instalar.
Paso 1: Crear los directorios para el Servidor y los Datos
|
1 2 3 4 |
[ec2-user@ip-172-31-22-131 ~]$ ls -l total 346696 drwxrwx---. 3 ec2-user ec2-user 21 Apr 24 18:03 cb-data drwxrwxr-x. 2 ec2-user ec2-user 6 Apr 24 18:03 cb-server |
Paso 2: Instalar el servidor Couchbase
|
1 2 |
[ec2-user@ip-172-31-22-131 ~]$ ./cb-non-package-installer --install --install-location /home/ec2-user/cb-server --package couchbase-server-enterprise-6.5.1-centos8.x86_64.rpm Successfully installed |
Paso 3: Inicie el Couchbase Server
|
1 2 3 4 5 6 7 8 9 10 11 12 |
/home/ec2-user/cb-server/opt/couchbase/bin/couchbase-server \-- -noinput -detached The maximum number of processes for the couchbase user is set too low (4096). It must be at least 10000. Normally this can be increased by adding the following lines to /etc/security/limits.conf: couchbase <value> couchbase <value> Where <value> is greater than 10000. The procedure may be totally different if you're running so called "non-root/non-sudo install" or if you've built Couchbase Server from source. |
Puedes ignorar ese mensaje puesto que ya hemos establecido los ulimits para ec2-user.
Paso 4: Comprobar el estado
|
1 2 |
[ec2-user@ip-172-31-22-131 ~]$ /home/ec2-user/cb-server/opt/couchbase/bin/couchbase-server --status Couchbase Server is running |
Repita los pasos anteriores para los otros 2 nodos
Configurar el clúster Couchbase
Acceso: https://xxxx.compute.amazonaws.com:8091
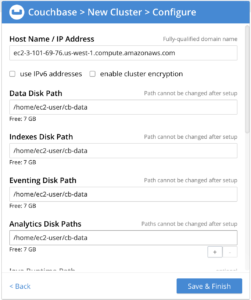
Observe los cambios en las distintas rutas de datos.
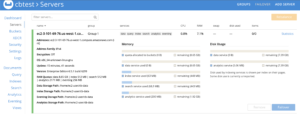
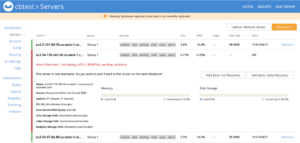
Compruebe el clúster de 1 nodo
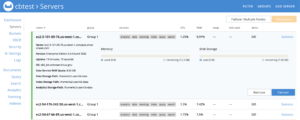
Añadir los nodos restantes
Haga clic en AÑADIR SERVIDOR de la pantalla anterior, añade los otros 2 nodos y Reequilibrar. Al añadir, compruebe el rutas de datos personalizadas en la pantalla Añadir servidor.
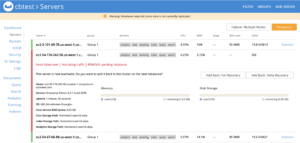
 El clúster ya está en marcha
Parte 2: Actualización
Antes de la actualización
Empiezo con un Couchbase Server 6.0.4 de 3 nodos instalado como ec2-user.
El home de instalación es: /home/ec2-user/cb-server
El directorio de datos es: /home/ec2-user/cb-data
Comprobemos el estado del servidor Couchbase accediendo a la interfaz de administración de Couchbase 6.0.4 y asegurémonos de que todo está en verde.
 A continuación, una rápida comprobación de los cubos muestra:

Ahora, vamos a actualizar este cluster a Couchbase 6.5.1.
Requisitos previos
Esto es lo mismo que se describe en la Parte 1 de este blog. Por favor, asegúrese de cumplir estos pre-requisitos incluso si no se han hecho cuando instaló Couchbase Server 6.0.4. El proceso de actualización es una buena oportunidad para hacerlo.
Proceso de actualización
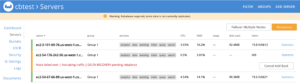
Paso 1: Conmutación por error de un nodo
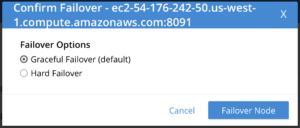
Notas
- Visite no Reequilibrar todavía
- El nodo ha fallado y no recibe tráfico, pero sigue formando parte del clúster.
Una comprobación rápida del nodo
SSH en el nodo fallido y realice estos pasos.
Paso 2: Detener el servidor
|
1 |
[ec2-user@ip-172-31-25-239 ~]$ /home/ec2-user/cb-server/opt/couchbase/bin/couchbase-server -k |
Paso 3: Actualizar el servidor
|
1 2 3 4 |
[ec2-user@ip-172-31-25-239 ~]$ ./cb-non-package-installer --upgrade --install-location \ /home/ec2-user/cb-server --package couchbase-server-enterprise-6.5.1-centos8.x86_64.rpm Running cbupgrade this could take some time Upgrade has completed successfully |
Paso 4: Iniciar el servidor
|
1 |
[ec2-user@ip-172-31-25-239 ~]$ /home/ec2-user/cb-server/opt/couchbase/bin/couchbase-server \-- -noinput -detached |
Consejo: En cualquiera de los pasos, puede comprobar el estado del servidor por:
|
1 |
[ec2-user@ip-172-31-25-239 ~]$ /home/ec2-user/cb-server/opt/couchbase/bin/couchbase-server --status |
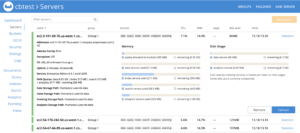
Compruebe la versión del servidor en la interfaz de usuario, después de la actualización
Observe el cambio en la Versión del Servidor.
Volver a añadir el nodo y reequilibrar
Nota: Actuaremos Actualización continua en línea con Graceful Failover y Delta Recovery.
Haga clic en el botón Volver a añadir: Recuperación Delta botón.
Opcional: Comprobar el registro
|
1 |
Starting rebalance, KeepNodes = ['ns_1@ec2-3-101-69-76.us-west-1.compute.amazonaws.com', 'ns_1@ec2-54-176-242-50.us-west-1.compute.amazonaws.com', 'ns_1@ec2-54-67-66-89.us-west-1.compute.amazonaws.com'], EjectNodes = [], Failed over and being ejected nodes = [], Delta recovery nodes = ['ns_1@ec2-54-176-242-50.us-west-1.compute.amazonaws.com'], Delta recovery buckets = all; Operation Id = 1651aa843a095465bbb5b38dd22a1adans_orchestrator 000ns_1@ec2-54-176-242-50.us-west-1.compute.amazonaws.com1:00:44 AM Fri Apr 24, 2020 |
Actualización completa
Repita el mismo proceso para los 3 nodos.Para conmutar por error el primer nodo, en el que iniciaba sesión en la interfaz de usuario de administración, tendrá que acceder a la interfaz de usuario de administración desde un nodo actualizado. La apariencia ha sido mejorada, pero la funcionalidad es la misma.
Conclusión
Una vez finalizado el proceso de actualización, compruebe la versión del servidor en el panel de control:
![]()
La actualización se ha completado.