누가 시간이 있겠어요? (예상보다 더 오래 걸렸기 때문에 파트 1도 마찬가지입니다 😬)
카우치베이스가 최근 도입한 벡터 검색 지원. 그리고 저는 그것을 가지고 놀 핑계를 찾고 있었습니다. 마침 최근에 개발자 마케팅에 관한 훌륭한 트위터 스레드가 있었습니다. 저는 그 내용 대부분에 공감할 수 있었습니다. 정말 멋진 글입니다. 팀원들이 단시간에 최대한 활용할 수 있도록 요약할 수 있을 것 같아요. 제가 직접 요약본을 작성할 수도 있죠. 아니면 그게 제가 찾던 변명일 수도 있죠.
저와 다른 분들을 위해 LLM(대규모 언어 모델)에게 이 훌륭한 글을 요약해 달라고 부탁해 보겠습니다. 이론적으로는 다음과 같이 진행되어야 합니다:
-
- 트윗 받기
- LLM으로 벡터로 변환하기
- 트윗과 벡터를 카우치베이스에 저장하기
- 쿼리를 위한 인덱스 생성
- LLM에 질문하기
- 이를 벡터로 변환
- 벡터 검색을 실행하여 LLM에 대한 컨텍스트를 얻습니다.
- 질문과 컨텍스트에서 LLM 프롬프트 만들기
- 환상적인 답변 받기
이것은 기본적으로 RAG 워크플로입니다. RAG는 검색 증강 세대의 약자입니다. 개발자는 컨텍스트를 제공함으로써 보다 정확하고 강력한 LLM 기반 애플리케이션을 구축할 수 있습니다.
트위터 데이터 추출하기
가장 먼저 트위터에서 데이터를 가져와야 합니다. 사실 API를 구독하지 않는다면 이 부분이 가장 어려운 부분입니다. 하지만 오래된 데이터를 스크랩하면 괜찮은 결과를 얻을 수 있습니다. 아마도 100%만큼 정확하지는 않겠지만, 괜찮은 수준은 될 것입니다. 그럼 시작해 봅시다.
제가 가장 좋아하는 IDE를 카우치베이스 플러그인 를 설치한 후 새 파이썬 스크립트를 생성하고 트위킷라는 트위터 스크레이퍼 라이브러리를 사용했습니다. HTTP 오류 429가 발생하기 전까지는 모든 것이 잘 작동합니다. 너무 많은 요청. 너무 열심히 스크랩했습니다. 나는 잡혔습니다. 이를 완화할 수 있는 몇 가지 방법이 있습니다.
-
- 먼저, 저처럼 정신없이 재로그인하지 말고 인증 쿠키를 파일에 저장하여 재사용하세요.
- 둘째, 온라인 IDE로 전환하면 IP를 더 쉽게 변경할 수 있습니다.
- 셋째, 대기 시간을 도입하고 무작위로 설정하세요. 무작위로 하는 것이 도움이 될지 모르겠지만 안 될 이유는 없습니다.
최종 스크립트는 다음과 같습니다:
|
1 2 3 4 5 6 7 8 9 10 11 12 13 14 15 16 17 18 19 20 21 22 23 24 25 26 27 28 29 30 31 32 33 34 35 36 37 38 39 40 41 42 43 44 45 46 47 48 49 50 51 52 53 54 55 56 57 58 59 60 61 62 63 64 65 66 67 68 69 70 71 72 73 74 |
from twikit import Client from random import randint import json import time def get_json_tweet(t, parentid): return { 'created_at': t.created_at, 'id': t.id, 'parent' : parentid, 'full_text': t.full_text, 'created_at': t.created_at, 'text': t.text, 'lang': t.lang, 'in_reply_to': t.in_reply_to, 'quote_count': t.quote_count, 'reply_count': t.reply_count, 'favorite_count': t.favorite_count, 'view_count': t.view_count, 'hashtags': t.hashtags, 'user' : { 'id' : t.user.id, 'name' : t.user.name, 'screen_name ' : t.user.screen_name , 'url ' : t.user.url , }, } def get_replies(id, total_replies, recordTweetid): tweet = client.get_tweet_by_id(id) if( tweet.reply_count == 0): return # Get all replies all_replies = [] tweets = tweet.replies all_replies += tweets while len(tweets) != 0: try: time.sleep(randint(10,20)) tweets = tweets.next() all_replies += tweets except IndexError: print("Array Index error") break print(len(all_replies)) print(all_replies) for t in all_replies: jsonTweet = get_json_tweet(t, id) if (not t.id in recordTweetid) and ( t.in_reply_to == id): time.sleep(randint(10,20)) get_replies(t.id, total_replies, recordTweetid) f.write(',\n') json.dump(jsonTweet, f, ensure_ascii=False, indent=4) client = Client('en-US') ## You can comment this `login`` part out after the first time you run the script (and you have the `cookies.json`` file) client.login( auth_info_1='username', password='secret', ) client.save_cookies('cookies.json'); # client.load_cookies(path='cookies.json'); replies = [] recordTweetid = [] with open('data2.json', 'a', encoding='utf-8') as f: get_replies('1775913633064894669', replies, recordTweetid) |
429를 피하는 것은 약간 고통스러웠고 몇 번의 반복을 거쳤지만 결국에는 대부분 작동하는 것을 얻었습니다. 시작 대괄호와 마침 대괄호를 추가하여 유효한 JSON 배열로 바꾸기만 하면 되었습니다:
|
1 2 3 4 5 6 7 8 9 10 11 12 13 14 15 16 17 18 19 20 21 22 |
[ { "created_at": "Thu Apr 04 16:15:02 +0000 2024", "id": "1775920020377502191", "full_text": null, "text": "@kelseyhightower SOCKS! I will throw millions of dollars at the first company to offer me socks!\n\nImportant to note here: I don’t have millions of dollars! \n\nI think I might have a problem.", "lang": "en", "in_reply_to": "1775913633064894669", "quote_count": 1, "reply_count": 3, "favorite_count": 23, "view_count": "4658", "hashtags": [], "user": { "id": "4324751", "name": "Josh Long", "screen_name ": "starbuxman", "url ": "https://t.co/PrSomoWx53" } }, ... ] |
양말은 아이러니와 함께 개발자 마케팅에서 우리가 하는 일의 핵심입니다.
이제 개발 마케팅 핫 테이크가 모두 포함된 JSON 문서 배열이 포함된 파일이 생겼습니다. 다음은 무엇일까요?
트윗을 벡터로 전환하기
LLM에서 추가 컨텍스트로 사용할 수 있도록 하려면 이를 벡터로 변환해야 합니다. 임베딩. 기본적으로 0과 1 사이의 십진수 값 배열입니다. 이 모든 것이 검색 증강 생성, 즉 RAG를 가능하게 합니다. 모든 LLM에는 텍스트, 오디오 또는 비디오 데이터와 같은 객체의 고유한 표현이 있기 때문에 보편적인 것은 아닙니다. 극도로 게으르고 그 공간에서 무슨 일이 일어나고 있는지 알지 못하기 때문에 저는 OpenAI/ChatGPT. 2017년의 자바스크립트 프레임워크보다 매주 더 많은 모델이 출시되고 있는 셈입니다.
어쨌든 저는 OpenAI 계정을 만들고 API 키를 생성한 다음, 무료라도 API를 사용할 수 없으니 몇 달러를 추가했습니다. 그런 다음 트윗을 벡터로 변환할 준비가 되었습니다. API를 통해 임베딩하는 가장 짧은 경로는 curl을 사용하는 것입니다. 다음과 같이 생깁니다:
|
1 2 3 4 5 6 7 8 9 10 11 12 13 14 15 16 17 18 19 20 21 22 23 24 25 |
curl https://api.openai.com/v1/embeddings -H "Authorization: Bearer $OPENAI_API_KEY" \ -H "Content-Type: application/json" \ -d '{"input": " SOCKS! I will throw millions of dollars at the first company to offer me socks!\n\nImportant to note here: I don’t have millions of dollars! \n\nI think I might have a problem.", "model": "text-embedding-ada-002"}' { "object": "list", "data": [ { "object": "embedding", "index": 0, "embedding": [ -0.008340064, -0.03142008, 0.01558878, ... 0.0007338819, -0.01672055 ] } ], "model": "text-embedding-ada-002", "usage": { "prompt_tokens": 40, "total_tokens": 40 } } |
여기서 JSON 입력에는 벡터로 변환할 입력 필드와 텍스트를 벡터로 변환하는 데 사용할 모델을 참조하는 모델 필드가 있는 것을 볼 수 있습니다. 출력은 벡터, 사용된 모델 및 API 사용 통계를 반환합니다.
환상적이죠, 이제 어떻게 하나요? 이를 벡터로 변환하는 것은 비용이 많이 듭니다. 나중에 재사용할 수 있도록 데이터베이스에 저장하는 것이 좋습니다. 또한 하이브리드 검색과 같은 멋진 추가 기능도 쉽게 얻을 수 있습니다.
이를 확인하는 방법에는 몇 가지가 있습니다. 지루한 수동 방식이 있지만 배우기에는 좋습니다. 그리고 삶을 더 쉽게 만들어주는 라이브러리와 도구를 사용하는 방법이 있습니다. 저는 실제로 랭체인 제 삶을 더 쉽게 만들어 줄 거라고 생각했고, 실제로 그렇게 되었지만 '조금' 길을 잃었습니다. 그래서 집단 학습의 이점을 위해 수동 방식부터 시작하겠습니다. JSON 문서 배열이 있고, 그 내용을 벡터화하여 Couchbase에 저장한 다음 다른 벡터로 쿼리할 수 있어야 합니다.
카우치베이스와 같은 벡터 스토어에서 트윗 로드하기
자바나 자바스크립트로도 랭체인 구현을 볼 수 있지만, 저는 파이썬을 더 잘해야 한다고 생각하기 때문에 파이썬을 사용하려고 합니다. 그리고 가장 먼저 다루고 싶은 것은 카우치베이스에 연결하는 방법입니다:
|
1 2 3 4 5 6 7 8 9 10 11 12 13 14 15 16 17 18 19 20 21 22 23 24 25 26 27 28 |
def connect_to_couchbase(connection_string, db_username, db_password): """Connect to couchbase""" from couchbase.cluster import Cluster from couchbase.auth import PasswordAuthenticator from couchbase.options import ClusterOptions from datetime import timedelta auth = PasswordAuthenticator(db_username, db_password) options = ClusterOptions(auth) connect_string = connection_string cluster = Cluster(connect_string, options) # Wait until the cluster is ready for use. cluster.wait_until_ready(timedelta(seconds=5)) return cluster if name == "__main__": # Load environment variables DB_CONN_STR = os.getenv("DB_CONN_STR") DB_USERNAME = os.getenv("DB_USERNAME") DB_PASSWORD = os.getenv("DB_PASSWORD") DB_BUCKET = os.getenv("DB_BUCKET") DB_SCOPE = os.getenv("DB_SCOPE") DB_COLLECTION = os.getenv("DB_COLLECTION") # Connect to Couchbase Vector Store cluster = connect_to_couchbase(DB_CONN_STR, DB_USERNAME, DB_PASSWORD) bucket = cluster.bucket(DB_BUCKET) scope = bucket.scope(DB_SCOPE) collection = scope.collection(DB_COLLECTION) |
이 코드에서 다음을 확인할 수 있습니다. CONNECT_TO_COUCHBASE 메서드를 허용하는 연결 문자열, 사용자 이름 그리고 비밀번호. 이 모든 것은 처음에 로드된 환경 변수에 의해 제공됩니다. 클러스터 객체가 있으면 연결된 버킷, 범위 및 컬렉션을 가져올 수 있습니다. Couchbase에 익숙하지 않으시다면, 컬렉션은 RDBMS 테이블과 유사합니다. 범위는 범위 수만큼 많은 컬렉션과 버킷을 가질 수 있습니다. 이러한 세분성은 여러 가지 이유(멀티테넌시, 빠른 동기화, 백업 등)로 유용합니다.
컬렉션을 가져오기 전에 한 가지 더 해야 할 일이 있습니다. 텍스트를 벡터로 변환하는 코드가 필요합니다. OpenAI 클라이언트를 사용하면 다음과 같습니다:
|
1 2 3 4 5 6 7 |
from openai import OpenAI def get_embedding(text, model="text-embedding-ada-002"): text = text.replace("\n", " ") return client.embeddings.create(input = [text], model=model).data[0].embedding client = OpenAI() |
이것은 앞서 컬 호출과 비슷한 작업을 수행합니다. 다만 OPENAI_API_KEY 환경 변수를 설정해야 클라이언트가 작동합니다.
이제 생성된 임베딩을 사용하여 JSON 트윗에서 Couchbase 문서를 만드는 방법을 살펴보겠습니다.
|
1 2 3 4 5 6 7 8 9 10 11 12 13 14 15 16 17 18 19 20 21 |
# Open the JSON file and load the tweets as a JSON array in data with open('data.json') as f: data = json.load(f) # Loop to create the object from JSON for tweet in data: text = tweet['text'] full_text = tweet['full_text'] id = tweet['id'] if full_text is not None: embedding = get_embedding(full_text) textToEmbed = full_text else: embedding = get_embedding(text) textToEmbed = text document = { "metadata": tweet, "text": textToEmbed, "embedding": embedding } collection.upsert(key = id, value = document) |
문서에는 세 개의 필드가 있습니다, 메타데이터 에는 전체 트윗이 포함됩니다, 텍스트 는 문자열로 변환된 텍스트이고 임베딩 는 OpenAI로 생성된 임베딩입니다. 핵심은 트윗의 아이디입니다. 그리고 업서트 는 문서가 없는 경우 문서를 업데이트하거나 삽입하는 데 사용됩니다.
이 프로그램을 실행하고 Couchbase 서버에 연결하면 문서가 생성되는 것을 볼 수 있습니다.
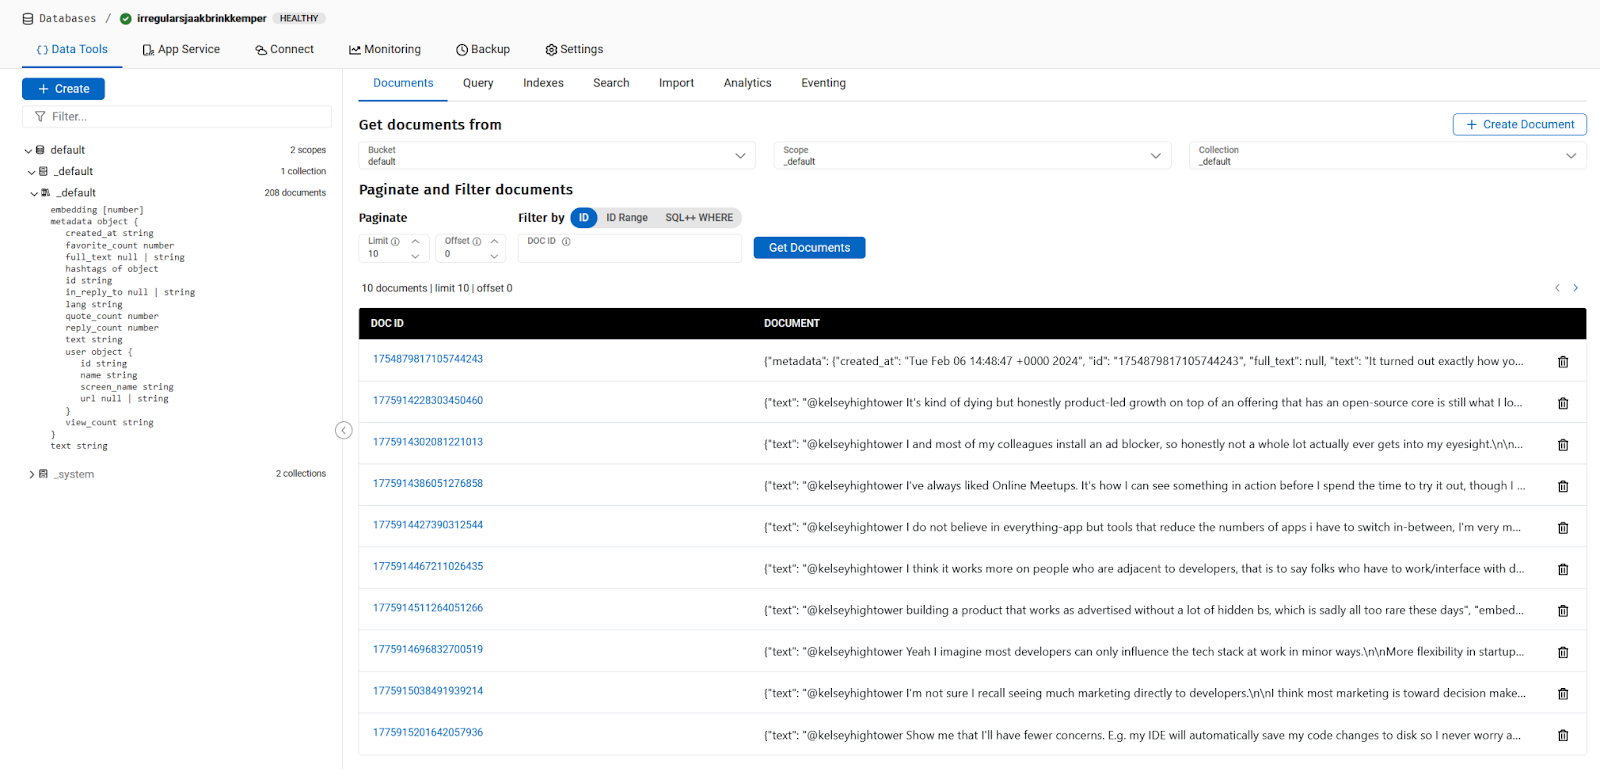
이 시점에서 저는 트위터에서 데이터를 추출하여 문서당 하나의 트윗으로 Couchbase에 업로드하고 각 트윗에 대해 OpenAI 임베딩을 생성하여 삽입했습니다. 이제 유사한 문서를 쿼리하기 위해 질문을 할 준비가 되었습니다.
트윗에서 벡터 검색 실행
이제 벡터 검색에 대해 이야기할 차례입니다. 주어진 텍스트와 유사한 트윗을 검색하는 방법은 무엇인가요? 가장 먼저 해야 할 일은 텍스트를 벡터 또는 임베딩으로 변환하는 것입니다. 그럼 질문해 보겠습니다:
|
1 2 |
query = "Should we throw millions of dollars to buy SOCKs for developer marketing ?" queryEmbedding = get_embedding(query) |
그게 다입니다. The 쿼리 임베딩 변수에는 쿼리를 나타내는 벡터가 포함됩니다. 쿼리로 이동합니다:
|
1 2 3 4 5 6 7 8 9 10 11 12 13 14 15 16 17 18 19 20 21 22 23 |
INDEX_NAME = os.getenv("INDEX_NAME") # Fulltext Index Name # This is the Vector Search Query search_req = search.SearchRequest.create( VectorSearch.from_vector_query( VectorQuery( "Embedding", # JSON property name containing the embedding to compare to queryEmbedding, # our query embedding 5, # maximum number of results ) ) ) # Execute the Vector Search Query against the selected scope result = scope.search( INDEX_NAME, # Fulltext Index Name search_req, SearchOptions( show_request=True, log_request=True ), ).rows() for row in result: print("Found tweet \"{}\" ".format(row)) |
제가 무엇을 하고 있는지 확인하고 싶기 때문에 이 환경 변수를 설정하여 Couchbase SDK 로그를 활성화하고 있습니다:
|
1 |
export PYCBC_LOG_LEVEL=info |
모든 것이 잘 진행되었다면 오류 메시지가 표시될 것입니다!
|
1 2 3 4 5 6 7 8 9 10 11 12 |
@ldoguin ➜ /workspaces/rag-demo-x (main) $ python read_vectorize_store_query_json.py Traceback (most recent call last): File "/workspaces/rag-demo-x/read_vectorize_store_query_json.py", line 167, in <module> for row in result: File "/home/vscode/.local/lib/python3.11/site-packages/couchbase/search.py", line 136, in __next__ raise ex File "/home/vscode/.local/lib/python3.11/site-packages/couchbase/search.py", line 130, in __next__ return self._get_next_row() ^^^^^^^^^^^^^^^^^^^^ File "/home/vscode/.local/lib/python3.11/site-packages/couchbase/search.py", line 121, in _get_next_row raise ErrorMapper.build_exception(row) couchbase.exceptions.QueryIndexNotFoundException: QueryIndexNotFoundException(<ec=17, category=couchbase.common, message=index_not_found (17), context=SearchErrorContext({'last_dispatched_to': '3.87.133.123:18094', 'last_dispatched_from': '172.16.5.4:38384', 'retry_attempts': 0, 'client_context_id': 'ebcca5-1b2f-c142-ccad-821b0f27e2ce0d', 'method': 'POST', 'path': '/api/bucket/default/scope/_default/index/b/query', 'http_status': 400, 'http_body': '{"error":"rest_auth: preparePerms, err: index not found","request":{"ctl":{"timeout":75000},"explain":false,"knn":[{"field":"embedding","k":5,"vector":[0.022349120871154076,..,0.006140850435491819]}],"query":{"match_none":null},"showrequest":true}', 'context_type': 'SearchErrorContext'}), C Source=/couchbase-python-client/src/search.cxx:552>) |
그리고 이것은 괜찮습니다. 쿼리 인덱스 찾을 수 없음 예외. 아직 존재하지 않는 인덱스를 찾고 있습니다. 그래서 우리는 그것을 만들어야 합니다. Capella에서 클러스터에 로그인하여 따라할 수 있습니다:
인덱스가 있으면 다시 실행하면 이 결과를 얻을 수 있습니다:
|
1 2 3 4 5 6 |
@ldoguin ➜ /workspaces/rag-demo-x (main) $ python read_vectorize_store_query_json.py Found tweet "SearchRow(index='default._default.my_index_6933ea565b622355_4c1c5584', id='1775920020377502191', score=0.6803812980651855, fields=None, sort=[], locations=None, fragments={}, explanation={})" Found tweet "SearchRow(index='default._default.my_index_6933ea565b622355_4c1c5584', id='1775925931791745392', score=0.4303199052810669, fields=None, sort=[], locations=None, fragments={}, explanation={})" Found tweet "SearchRow(index='default._default.my_index_6933ea565b622355_4c1c5584', id='1775921934645006471', score=0.3621498942375183, fields=None, sort=[], locations=None, fragments={}, explanation={})" Found tweet "SearchRow(index='default._default.my_index_6933ea565b622355_4c1c5584', id='1776058836278727024', score=0.3274463415145874, fields=None, sort=[], locations=None, fragments={}, explanation={})" Found tweet "SearchRow(index='default._default.my_index_6933ea565b622355_4c1c5584', id='1775979601862307872', score=0.32539570331573486, fields=None, sort=[], locations=None, fragments={}, explanation={}" |
우리는 다음을 얻습니다. 검색 행 객체에는 사용된 인덱스, 문서의 키, 관련 점수, 그리고 빈 필드가 많이 포함되어 있습니다. 또한 다음과 같은 순서로 정렬되어 있음을 알 수 있습니다. 점수를 입력하면 검색된 검색어와 가장 가까운 트윗을 제공합니다.
성공했는지 어떻게 알 수 있나요? 가장 빠른 방법은 IDE 플러그인으로 문서를 찾는 것입니다. 다음을 사용하는 경우 VSCode 또는 JetBrains IDE를 사용하면 매우 쉬울 것입니다. 카우치베이스 카펠라에 로그인하여 찾을 수도 있습니다.
또는 검색 인덱스를 수정하여 연관된 텍스트 필드와 메타데이터를 저장하고 쿼리를 다시 실행할 수 있습니다:
|
1 2 3 4 5 6 7 8 9 |
result = scope.search( INDEX_NAME, search_req, SearchOptions( fields=["metadata.text"], show_request=True, log_request=True ), ).rows() |
|
1 2 3 4 5 6 |
@ldoguin ➜ /workspaces/rag-demo-x (main) $ python read_vectorize_store_query_json.py Found tweet "SearchRow(index='default._default.my_index_6933ea565b622355_4c1c5584', id='1775920020377502191', score=0.6803812980651855, fields={'metadata.text': '@kelseyhightower SOCKS! I will throw millions of dollars at the first company to offer me socks!\n\nImportant to note here: I don’t have millions of dollars! \n\nI think I might have a problem.'}, sort=[], locations=None, fragments={}, explanation={})" Found tweet "SearchRow(index='default._default.my_index_6933ea565b622355_4c1c5584', id='1775925931791745392', score=0.4303199052810669, fields={'metadata.text': "@kelseyhightower If your t-shirt has a pleasant abstract design on it where the logo of your company isn't very obvious, I will wear that quite happily (thanks, Twilio)\n\nI also really like free socks"}, sort=[], locations=None, fragments={}, explanation={})" Found tweet "SearchRow(index='default._default.my_index_6933ea565b622355_4c1c5584', id='1775921934645006471', score=0.3621498942375183, fields={'metadata.text': "@kelseyhightower For some reason, devs think they aren't influenced by marketing even if they are😅\n\nI'm influenced by social media & fomo. If a lot of developers start talking about some framework or tool, I look into it\n\nI also look into things that may benefit my career in the future"}, sort=[], locations=None, fragments={}, explanation={})" Found tweet "SearchRow(index='default._default.my_index_6933ea565b622355_4c1c5584', id='1776058836278727024', score=0.3274463415145874, fields={'metadata.text': "@kelseyhightower Have a good product. That's the best marketing there is!"}, sort=[], locations=None, fragments={}, explanation={})" Found tweet "SearchRow(index='default._default.my_index_6933ea565b622355_4c1c5584', id='1775979601862307872', score=0.32539570331573486, fields={'metadata.text': '@kelseyhightower From a security standpoint, marketing that works on me:\n\nShowing strong technical expertise. If you’re of the few shops that consistently puts out good research and quality writeups? When I’m looking at vendors, I’m looking at you. When I’m not looking, I’m noting it for later'}, sort=[], locations=None, fragments={}, explanation={})" |
결론
그 결과, 양말에 대한 Josh의 트윗이 검색 상단에 표시되었습니다. 이제 트위터를 스크랩하고, 트윗을 벡터로 변환하고, 저장하고, 색인하고, Couchbase에서 쿼리하는 방법을 알게 되었습니다. 이것이 LLM 및 AI와 어떤 관련이 있을까요? 다음 포스팅에서 자세히 알아보세요!