
Because who has the time ? (also part 1 because it took me further than I expected 😬)
Couchbase recently introduced support for Vector Search. And I have been looking for an excuse to play with it. As it turns out there was recently a great Twitter thread about Developer Marketing. I can relate to most of what’s in there. It’s a fantastic thread. I could summarize it to make sure my teammates can get the best out of it in a short time. Like, I could write that summary manually. Or that could be the excuse I was looking for.
Let’s ask an LLM, Large Language Model, to summarize this brilliant thread for me, and for the benefit of others. In theory, things should go as follow:
- Getting the tweets
- Transforming them in vectors thanks to a LLM
- Storing the tweet and vectors in Couchbase
- Creating an index to query them
- Ask something to the LLM
- Transform that into a vector
- Run a vector search to get some context for the LLM
- Create the LLM prompt from the question and the context
- Get a fantastic answer back
This is basically a RAG workflow. RAG stands for Retrieval Augmented Generation. It allows developers to build more accurate, robust LLM-based applications by providing context.
Extracting Twitter Data
First thing first, getting data out of Twitter. This is actually the hard part if you don’t subscribe to their API. But with some good old scrapping, you can still do something decent. Probably not 100% accurate, but decent. So let’s get to it.
Getting my favorite IDE, with the Couchbase plugin installed, I create a new Python script and start playing with twikit, a Twitter scraper library. Everything works great until I quickly get an HTTP error 429. Too Many Requests. I have been scrapping too hard. I have been caught. A couple things to mitigate that.
- First, make sure you store your auth cookie in a file and reuse it, instead of frantically re logging-in like I did.
- Second, switch to an online IDE, you will be able to change IP more easily.
- Third, introduce waiting time and make it random. Not sure if the random part helps, but why not, it’s easy.
Final script looks like this:
|
1 2 3 4 5 6 7 8 9 10 11 12 13 14 15 16 17 18 19 20 21 22 23 24 25 26 27 28 29 30 31 32 33 34 35 36 37 38 39 40 41 42 43 44 45 46 47 48 49 50 51 52 53 54 55 56 57 58 59 60 61 62 63 64 65 66 67 68 69 70 71 72 73 74 |
에서 twikit 가져오기 클라이언트 에서 무작위의 가져오기 randint 가져오기 JSON 가져오기 time def get_json_tweet(t, parentid): 반환 { ‘created_at’: t.created_at, ‘id’: t.아이디, ‘parent’ : parentid, ‘full_text’: t.full_text, ‘created_at’: t.created_at, ‘text’: t.텍스트, ‘lang’: t.lang, ‘in_reply_to’: t.in_reply_to, ‘quote_count’: t.quote_count, ‘reply_count’: t.reply_count, ‘favorite_count’: t.favorite_count, ‘view_count’: t.view_count, ‘hashtags’: t.hashtags, ‘user’ : { ‘id’ : t.사용자.아이디, ‘name’ : t.사용자.이름, ‘screen_name ‘ : t.사용자.screen_이름 , ‘url ‘ : t.사용자.URL , }, } def get_replies(아이디, total_replies, recordTweetid): tweet = 클라이언트.get_tweet_by_id(아이디) 만약( tweet.reply_count == 0): 반환 # Get all replies all_replies = [] tweets = tweet.replies all_replies += tweets while len(tweets) != 0: 시도하다: time.sleep(randint(10,20)) tweets = tweets.다음() all_replies += tweets except IndexError: print(“Array Index error”) break print(len(all_replies)) print(all_replies) ~를 위해 t 안으로 all_replies: jsonTweet = get_json_tweet(t, 아이디) 만약 (not t.아이디 안으로 recordTweetid) 그리고 ( t.in_reply_to == 아이디): time.sleep(randint(10,20)) get_replies(t.아이디, total_replies, recordTweetid) f.write(‘,n’) JSON.dump(jsonTweet, f, ensure_ascii=False, indent=4) 클라이언트 = 클라이언트(‘en-US’) ## You can comment this `login“ part out after the first time you run the script (and you have the `cookies.json“ file) 클라이언트.login( auth_info_1=‘username’, 비밀번호=‘secret’, ) 클라이언트.save_cookies(‘cookies.json’); # client.load_cookies(path=’cookies.json’); replies = [] recordTweetid = [] ~와 함께 열다(‘data2.json’, ‘a’, encoding=‘utf-8’) as f: get_replies(‘1775913633064894669’, replies, recordTweetid) |
It was a bit painful to avoid the 429, I went through several iterations but in the end got something that mostly works. I just needed to add the start and finishing bracket to turn it into a valid JSON array:
|
1 2 3 4 5 6 7 8 9 10 11 12 13 14 15 16 17 18 19 20 21 22 |
[ { “created_at”: “Thu Apr 04 16:15:02 +0000 2024”, “id”: “1775920020377502191”, “full_text”: null, “text”: “@kelseyhightower SOCKS! I will throw millions of dollars at the first company to offer me socks!nnImportant to note here: I don’t have millions of dollars! nnI think I might have a problem.”, “lang”: “en”, “in_reply_to”: “1775913633064894669”, “quote_count”: 1, “reply_count”: 3, “favorite_count”: 23, “view_count”: “4658”, “hashtags”: [], “user”: { “id”: “4324751”, “이름”: “Josh Long”, “screen_name “: “starbuxman”, “url “: “https://t.co/PrSomoWx53” } }, ... ] |
Josh is obviously right, socks are at the heart of what we do in developer marketing, alongside irony.
I now have a file containing an array of JSON documents, all with dev marketing hot takes. What’s next?
Turning Tweets in Vectors
To make sure it can be used by a LLM as additional context, it needs to be transformed into a vector, or 임베딩. Basically it’s an array of decimal values between 0 and 1. All of this will allow RAG, Retrieval Augmented Generation. It’s not universal, every LLM has their own representation of an object (like text, audio or video data). Being extremely lazy and unaware of what’s going on in that space, I chose OpenAI/ChatGPT. It’s like there are more models coming up every week than we had JavaScript frameworks in 2017.
Anyway, I created my OpenAI account, created an API key, added a couple bucks because apparently you can’t use their API if you don’t, even the free stuff. Then I was ready to transform tweets into vectors. The shortest path to getting the embedding through the API is to use curl. It will look like this:
|
1 2 3 4 5 6 7 8 9 10 11 12 13 14 15 16 17 18 19 20 21 22 23 24 25 |
curl https://api.openai.com/v1/임베딩 –H “Authorization: Bearer $OPENAI_API_KEY” –H “Content-Type: application/json” –d ‘{“input”: ” SOCKS! I will throw millions of dollars at the first company to offer me socks!nnImportant to note here: I don’t have millions of dollars! nnI think I might have a problem.”, “model”: “text-embedding-ada-002”}’ { “object”: “목록”, “data”: [ { “object”: “embedding”, “index”: 0, “embedding”: [ –0.008340064, –0.03142008, 0.01558878, ... 0.0007338819, –0.01672055 ] } ], “model”: “text-embedding-ada-002”, “usage”: { “prompt_tokens”: 40, “total_tokens”: 40 } } |
Here you can see that the JSON input has an input field that will be transformed into a vector, and the model field that references the model to be used to transform the text in a vector. The output gives back the vector, model used, and API usage stats.
Fantastic, now what? Turning these into vectors is not cheap. Better to be stored in a database to be reused later. Plus, you can easily get some nice added features like hybrid search.
There are a couple ways to see that. There is a tedious manual way that’s great to learn things. And then there is using libraries and tools that makes life easier. I actually went straight ahead using Langchain thinking it would make my life easier, and it did, until I got a ‘little’ lost. So, for our collective learning benefit, let’s start with the manual way. I have an array of JSON documents, I need to vectorize their content, store it in Couchbase, and then I will be able to query them with another vector.
Loading the tweets in a Vector Store like Couchbase
I am going to use Python because I feel like I have to get better at it, even though we can see Langchain implementation in Java or JavaScript. And the first thing I want to address is how to connect to Couchbase:
|
1 2 3 4 5 6 7 8 9 10 11 12 13 14 15 16 17 18 19 20 21 22 23 24 25 26 27 28 |
def connect_to_couchbase(connection_string, db_username, db_password): “””Connect to couchbase””” 에서 카우치베이스.클러스터 가져오기 클러스터 에서 카우치베이스.auth 가져오기 PasswordAuthenticator 에서 카우치베이스.옵션 가져오기 ClusterOptions 에서 datetime 가져오기 timedelta auth = PasswordAuthenticator(db_username, db_password) 옵션 = ClusterOptions(auth) connect_string = connection_string 클러스터 = 클러스터(connect_string, 옵션) # Wait until the cluster is ready for use. 클러스터.wait_until_ready(timedelta(seconds=5)) 반환 클러스터 만약 이름 == “__main__”: # Load environment variables DB_CONN_STR = os.getenv(“DB_CONN_STR”) DB_USERNAME = os.getenv(“DB_USERNAME”) DB_PASSWORD = os.getenv(“DB_PASSWORD”) DB_BUCKET = os.getenv(“DB_BUCKET”) DB_SCOPE = os.getenv(“DB_SCOPE”) DB_COLLECTION = os.getenv(“DB_COLLECTION”) # Connect to Couchbase Vector Store 클러스터 = connect_to_couchbase(DB_CONN_STR, DB_USERNAME, DB_PASSWORD) 양동이 = 클러스터.양동이(DB_BUCKET) 범위 = 양동이.범위(DB_SCOPE) 컬렉션 = 범위.컬렉션(DB_COLLECTION) |
From this code you can see the connect_to_couchbase method that accepts a connection string, 사용자 이름 그리고 비밀번호. All of them are provided by the environment variables loaded at the beginning. Once we have the cluster object we can get the associated bucket, scope, and collection. If you are unfamiliar with Couchbase, collections are similar to an RDBMS table. Scopes can have as many collections and buckets as many scopes. This granularity is useful for a variety of reasons (multi-tenancy, faster sync, backup, etc.).
One more thing before getting the collection. We need code to transform text in vectors. Using the OpenAI client it looks like this:
|
1 2 3 4 5 6 7 |
에서 오픈에이아이 가져오기 OpenAI def get_embedding(텍스트, 모델=“text-embedding-ada-002”): 텍스트 = 텍스트.교체하다(“n”, ” “) 반환 클라이언트.임베딩.만들다(input = [텍스트], 모델=모델).데이터[0].임베딩 클라이언트 = OpenAI() |
This will do a similar job as the earlier curl call. Just make sure you have the OPENAI_API_KEY environment variable set for the client to work.
Now let’s see how to create a Couchbase document out of a JSON tweet, with the generated embedding.
|
1 2 3 4 5 6 7 8 9 10 11 12 13 14 15 16 17 18 19 20 21 |
# Open the JSON file and load the tweets as a JSON array in data ~와 함께 열다(‘data.json’) as f: 데이터 = JSON.load(f) # Loop to create the object from JSON ~를 위해 tweet 안으로 데이터: 텍스트 = tweet[‘text’] full_text = tweet[‘full_text’] 아이디 = tweet[‘id’] 만약 full_text 이다 not None: 임베딩 = get_embedding(full_text) textToEmbed = full_text 그 외: 임베딩 = get_embedding(텍스트) textToEmbed = 텍스트 document = { “metadata”: tweet, “text”: textToEmbed, “embedding”: 임베딩 } 컬렉션.업서트(열쇠 = 아이디, 가치 = document) |
The document has three fields, 메타데이터 contains the whole tweet, 텍스트 is the text transformed as a string and 임베딩 is the embedding generated with OpenAI. The key will be the id of the tweet. And 업서트 is used to either update or insert the doc if it does not exist.
If I go ahead and run this, and connect to my Couchbase server, I will see documents being created.
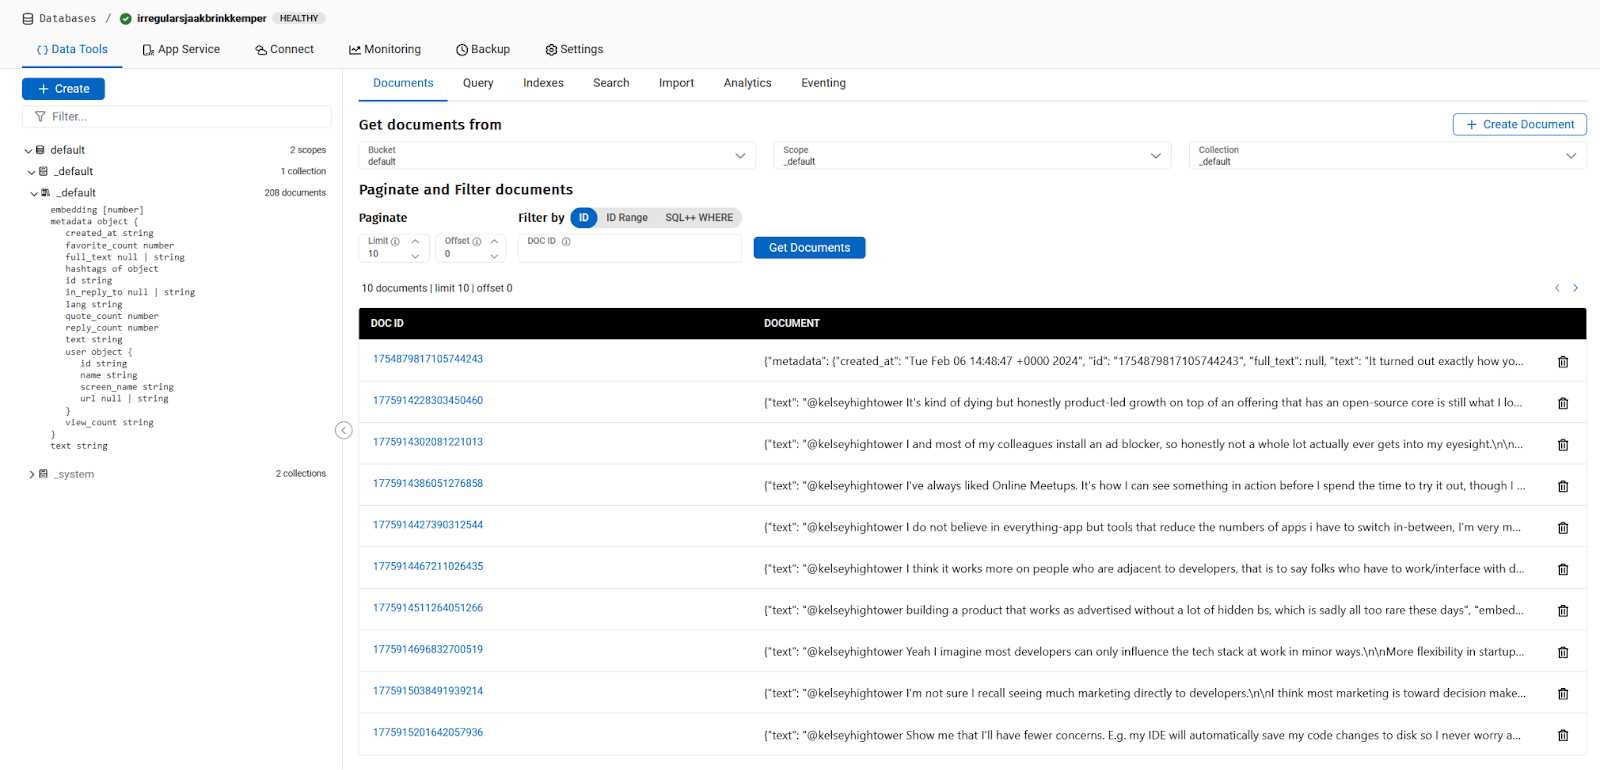
At this point I have extracted data from Twitter, uploaded it into Couchbase as one tweet per document, with the OpenAI embedding generated and inserted for each tweet. I am ready to ask questions to query similar documents.
Run Vector Search on Tweets
And now it’s time to talk about Vector Search. How to search for tweets similar to a given text? The first thing to do is to transform the text in a vector or embedding. So let’s ask the question:
|
1 2 |
질의 = “Should we throw millions of dollars to buy SOCKs for developer marketing ?” queryEmbedding = get_embedding(질의) |
That’s it. The queryEmbedding variable contains a vector representing the query. On to the query:
|
1 2 3 4 5 6 7 8 9 10 11 12 13 14 15 16 17 18 19 20 21 22 23 |
INDEX_NAME = os.getenv(“INDEX_NAME”) # Fulltext Index Name # This is the Vector Search Query search_req = 검색.SearchRequest.만들다( VectorSearch.from_vector_query( VectorQuery( “Embedding”, # JSON property name containing the embedding to compare to queryEmbedding, # our query embedding 5, # maximum number of results ) ) ) # Execute the Vector Search Query against the selected scope 결과 = 범위.검색( INDEX_NAME, # Fulltext Index Name search_req, SearchOptions( show_request=True, log_request=True ), ).rows() ~를 위해 열 안으로 결과: print(“Found tweet “{}” “.format(열)) |
Because I want to see what I am doing, I am activating Couchbase SDK logs by setting up this environment variable:
|
1 |
내보내기 PYCBC_LOG_LEVEL=info |
If you have been following along and everything goes well, you should get an error message!
|
1 2 3 4 5 6 7 8 9 10 11 12 |
@ldoguin ➜ /workspaces/rag–demo–x (메인) $ python read_vectorize_store_query_json.py Traceback (most recent 전화 last): File “/workspaces/rag-demo-x/read_vectorize_store_query_json.py”, 선 167, 안으로 <모듈< ~를 위해 열 안으로 결과: File “/home/vscode/.local/lib/python3.11/site-packages/couchbase/search.py”, 선 136, 안으로 __next__ raise ex File “/home/vscode/.local/lib/python3.11/site-packages/couchbase/search.py”, 선 130, 안으로 __next__ 반환 self._get_next_row() ^^^^^^^^^^^^^^^^^^^^ File “/home/vscode/.local/lib/python3.11/site-packages/couchbase/search.py”, 선 121, 안으로 _get_next_row raise ErrorMapper.build_exception(열) 카우치베이스.exceptions.QueryIndexNotFoundException: QueryIndexNotFoundException(<ec=17, category=카우치베이스.common, message=index_not_found (17), context=SearchErrorContext({‘last_dispatched_to’: ‘3.87.133.123:18094’, ‘last_dispatched_from’: ‘172.16.5.4:38384’, ‘retry_attempts’: 0, ‘client_context_id’: ‘ebcca5-1b2f-c142-ccad-821b0f27e2ce0d’, ‘method’: ‘POST’, ‘path’: ‘/api/bucket/default/scope/_default/index/b/query’, ‘http_status’: 400, ‘http_body’: ‘{“error”:”rest_auth: preparePerms, err: index not found”,”request”:{“ctl”:{“timeout”:75000},”explain”:false,”knn”:[{“field”:”embedding”,”k”:5,”vector”:[0.022349120871154076,..,0.006140850435491819]}],”query”:{“match_none”:null},”showrequest”:true}’, ‘context_type’: ‘SearchErrorContext’}), C 출처=/카우치베이스–python–클라이언트/소스/검색.cxx:552<) |
And this is fine because we get a QueryIndexNotFoundException. It’s looking for an index that does not exist yet. So we need to create it. You can login to your cluster on Capella and follow along:
Once you have the index, you can run it again and should get this:
0
We get SearchRow objects that contain the index used, the key of the document, the related score, and then a bunch of empty fields. You can see that this is also ordered by score, and it’s giving the closest tweet to the given query it found.
How do we know if it worked? Fastest thing to do is look for the document with our IDE plugin. If you are using VSCode or any 젯브레인즈 IDE, it should be pretty easy. You can also login to Couchbase Capella and find it there.
Or we can modify the search index to store the associated text field and metadata, and rerun the query:
1
2
결론
So it worked, Josh’s tweet about socks shows up at the top of the search. Now you know how to scrape twitter, transform tweets in vectors, store, index and query them in Couchbase. What does that have to do with LLM and AI? More on that in the next post!

댓글 남기기
댓글을 달기 위해서는 로그인해야합니다.