Este blog es parte de una serie de blogs de varias partes que muestra cómo ejecutar sus aplicaciones en Kubernetes. Se utilizará el Couchbaseuna base de datos documental distribuida NoSQL de código abierto, como el Docker
contenedor.
La primera parte (Couchbase en Kubernetes) explicó cómo iniciar el clúster Kubernetes utilizando Vagrant. Esa es una manera simple y fácil de desarrollar, probar y desplegar...
Kubernetes cluster en su máquina local. Pero esto podría ser de uso limitado bastante pronto como los recursos están limitados por la máquina local. Entonces, ¿qué hacer?
El clúster Kubernetes también se puede instalar en Amazon. Esta segunda parte mostrará:
- Cómo configurar e iniciar el clúster Kubernetes en Amazon Web Services
- Ejecutar el contenedor Docker en el clúster Kubernetes
- Exponer Pod en Kubernetes como Servicio
- Apagar el clúster
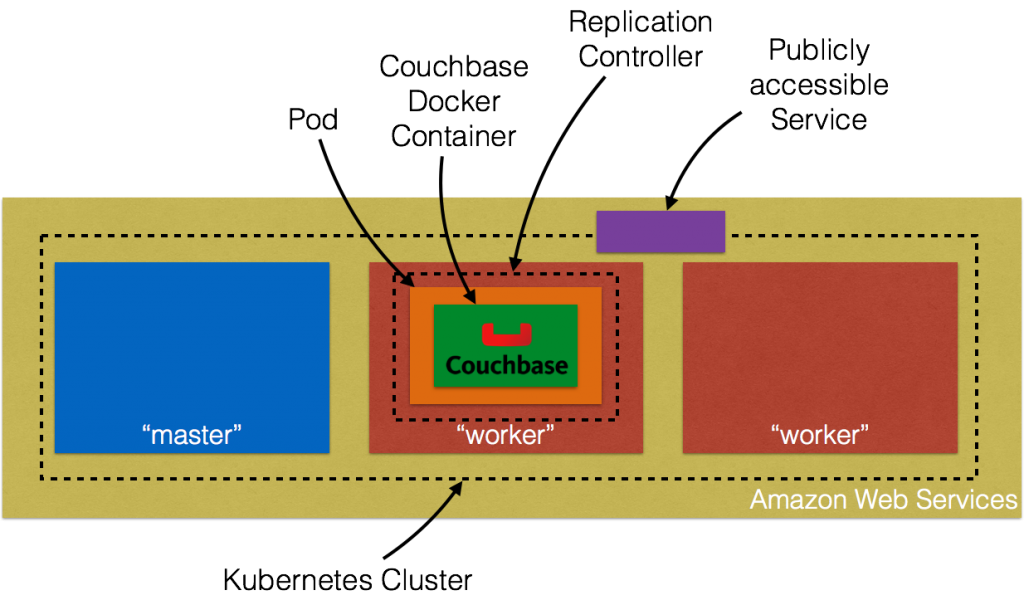
He aquí un breve resumen:
Profundicemos en los detalles.
Configuración del clúster Kubernetes en Amazon Web Services
Introducción a AWS EC2 proporcionan instrucciones completas para iniciar el clúster Kubernetes en Amazon. Asegúrese de tener los requisitos previos (cuenta de AWS, AWS CLI, acceso completo a EC2).
met antes de seguir estas instrucciones. El clúster Kubernetes se puede crear en Amazon como:
|
1 2 |
set KUBERNETES_PROVIDER=aws ./cluster/kube-up.sh |
Por defecto, esto aprovisiona una nueva VPC y un clúster Kubernetes de 4 nodos en us-oeste-2a (Oregón) con t2.micro ejecutándose en Ubuntu. Esto significa que se crean 5 AMIs (una para el maestro y 4 para los nodos trabajadores). Algunos
propiedades que merece la pena actualizar:
- Establecer
NUM_MINIONSal número de nodos necesarios para el clúster. Establézcala en 2 si sólo desea que se creen dos nodos trabajadores. - El tamaño de cada instancia es 1.1.x es
t2.micro. EstablecerMASTER_SIZEyTAMAÑO_MINIONvariables de entorno am3.mediode lo contrario los nodos se arrastrarán.
Si ha descargado Kubernetes desde github.com/kubernetes/kubernetes/releasestodos los valores pueden modificarse en cluster/aws/config-default.sh. Inicio de Kubernetes en
Amazon muestra el siguiente registro:
|
1 2 3 4 5 6 7 8 9 10 11 12 13 14 15 16 17 18 19 20 21 22 23 24 25 26 27 28 29 30 31 32 33 34 35 36 37 38 39 40 41 42 43 44 45 46 47 48 49 50 51 52 53 54 55 56 57 58 59 60 61 62 63 64 65 66 67 68 69 70 71 72 73 74 75 76 77 78 79 80 81 82 83 84 85 86 87 88 89 90 91 92 93 94 95 96 97 98 99 100 101 102 103 104 105 106 107 108 109 110 111 112 113 114 115 116 117 118 119 120 121 122 123 124 125 126 127 128 129 130 131 132 133 134 135 136 137 138 139 140 141 142 143 144 145 146 147 148 149 150 151 152 153 154 155 156 157 158 159 160 161 162 163 164 165 166 167 168 169 170 171 172 173 174 175 176 177 178 179 180 181 182 183 184 185 186 187 188 |
./kubernetes/cluster/kube-up.sh ... Starting cluster using provider: aws ... calling verify-prereqs ... calling kube-up Starting cluster using os distro: vivid Uploading to Amazon S3 +++ Staging server tars to S3 Storage: kubernetes-staging-0eaf81fbc51209dd47c13b6d8b424149/devel { "InstanceProfile": { "InstanceProfileId": "AIPAJMNMKZSXNWXQBHXHI", "Roles": [ { "RoleName": "kubernetes-master", "AssumeRolePolicyDocument": { "Version": "2012-10-17", "Statement": [ { "Action": "sts:AssumeRole", "Effect": "Allow", "Principal": { "Service": "ec2.amazonaws.com" } } ] }, "CreateDate": "2016-02-29T23:19:17Z", "Path": "/", "RoleId": "AROAJW7ER37BPXX5KFTFS", "Arn": "arn:aws:iam::598307997273:role/kubernetes-master" } ], "Arn": "arn:aws:iam::598307997273:instance-profile/kubernetes-master", "CreateDate": "2016-02-29T23:19:19Z", "Path": "/", "InstanceProfileName": "kubernetes-master" } } { "InstanceProfile": { "InstanceProfileId": "AIPAILRAU7RF4R2SDCULG", "Path": "/", "Arn": "arn:aws:iam::598307997273:instance-profile/kubernetes-minion", "Roles": [ { "Path": "/", "AssumeRolePolicyDocument": { "Statement": [ { "Effect": "Allow", "Action": "sts:AssumeRole", "Principal": { "Service": "ec2.amazonaws.com" } } ], "Version": "2012-10-17" }, "RoleName": "kubernetes-minion", "Arn": "arn:aws:iam::598307997273:role/kubernetes-minion", "RoleId": "AROAIBEPV6VW4IEE6MRHS", "CreateDate": "2016-02-29T23:19:21Z" } ], "InstanceProfileName": "kubernetes-minion", "CreateDate": "2016-02-29T23:19:22Z" } } Using SSH key with (AWS) fingerprint: 39:b3:cb:c1:af:6a:86:de:98:95:01:3d:9a:56:bb:8b Creating vpc. Adding tag to vpc-7b46ac1f: Name=kubernetes-vpc Adding tag to vpc-7b46ac1f: KubernetesCluster=kubernetes Using VPC vpc-7b46ac1f Creating subnet. Adding tag to subnet-cc906fa8: KubernetesCluster=kubernetes Using subnet subnet-cc906fa8 Creating Internet Gateway. Using Internet Gateway igw-40055525 Associating route table. Creating route table Adding tag to rtb-f2dc1596: KubernetesCluster=kubernetes Associating route table rtb-f2dc1596 to subnet subnet-cc906fa8 Adding route to route table rtb-f2dc1596 Using Route Table rtb-f2dc1596 Creating master security group. Creating security group kubernetes-master-kubernetes. Adding tag to sg-308b3357: KubernetesCluster=kubernetes Creating minion security group. Creating security group kubernetes-minion-kubernetes. Adding tag to sg-3b8b335c: KubernetesCluster=kubernetes Using master security group: kubernetes-master-kubernetes sg-308b3357 Using minion security group: kubernetes-minion-kubernetes sg-3b8b335c Starting Master Adding tag to i-b71a6f70: Name=kubernetes-master Adding tag to i-b71a6f70: Role=kubernetes-master Adding tag to i-b71a6f70: KubernetesCluster=kubernetes Waiting for master to be ready Attempt 1 to check for master nodeWaiting for instance i-b71a6f70 to spawn Sleeping for 3 seconds... Waiting for instance i-b71a6f70 to spawn Sleeping for 3 seconds... Waiting for instance i-b71a6f70 to spawn Sleeping for 3 seconds... Waiting for instance i-b71a6f70 to spawn Sleeping for 3 seconds... Waiting for instance i-b71a6f70 to spawn Sleeping for 3 seconds... Waiting for instance i-b71a6f70 to spawn Sleeping for 3 seconds... [master running @52.34.244.195] Attaching persistent data volume (vol-e072d316) to master { "Device": "/dev/sdb", "State": "attaching", "InstanceId": "i-b71a6f70", "VolumeId": "vol-e072d316", "AttachTime": "2016-03-02T18:10:15.985Z" } Attempt 1 to check for SSH to master [ssh to master working] Attempt 1 to check for salt-master [salt-master not working yet] Attempt 2 to check for salt-master [salt-master not working yet] Attempt 3 to check for salt-master [salt-master not working yet] Attempt 4 to check for salt-master [salt-master not working yet] Attempt 5 to check for salt-master [salt-master not working yet] Attempt 6 to check for salt-master [salt-master not working yet] Attempt 7 to check for salt-master [salt-master not working yet] Attempt 8 to check for salt-master [salt-master not working yet] Attempt 9 to check for salt-master [salt-master not working yet] Attempt 10 to check for salt-master [salt-master not working yet] Attempt 11 to check for salt-master [salt-master not working yet] Attempt 12 to check for salt-master [salt-master not working yet] Attempt 13 to check for salt-master [salt-master not working yet] Attempt 14 to check for salt-master [salt-master running] Creating minion configuration Creating autoscaling group 0 minions started; waiting 0 minions started; waiting 0 minions started; waiting 0 minions started; waiting 2 minions started; ready Waiting 3 minutes for cluster to settle ..................Re-running salt highstate Waiting for cluster initialization. This will continually check to see if the API for kubernetes is reachable. This might loop forever if there was some uncaught error during start up. Kubernetes cluster created. cluster "aws_kubernetes" set. user "aws_kubernetes" set. context "aws_kubernetes" set. switched to context "aws_kubernetes". Wrote config for aws_kubernetes to /Users/arungupta/.kube/config Sanity checking cluster... Attempt 1 to check Docker on node @ 52.37.172.215 ...not working yet Attempt 2 to check Docker on node @ 52.37.172.215 ...not working yet Attempt 3 to check Docker on node @ 52.37.172.215 ...working Attempt 1 to check Docker on node @ 52.27.90.19 ...working Kubernetes cluster is running. The master is running at: https://52.34.244.195 The user name and password to use is located in /Users/arungupta/.kube/config. ... calling validate-cluster Waiting for 2 ready nodes. 1 ready nodes, 2 registered. Retrying. Found 2 node(s). NAME LABELS STATUS AGE ip-172-20-0-92.us-west-2.compute.internal kubernetes.io/hostname=ip-172-20-0-92.us-west-2.compute.internal Ready 56s ip-172-20-0-93.us-west-2.compute.internal kubernetes.io/hostname=ip-172-20-0-93.us-west-2.compute.internal Ready 35s Validate output: NAME STATUS MESSAGE ERROR controller-manager Healthy ok nil scheduler Healthy ok nil etcd-0 Healthy {"health": "true"} nil etcd-1 Healthy {"health": "true"} nil Cluster validation succeeded Done, listing cluster services: Kubernetes master is running at https://52.34.244.195 Elasticsearch is running at https://52.34.244.195/api/v1/proxy/namespaces/kube-system/services/elasticsearch-logging Heapster is running at https://52.34.244.195/api/v1/proxy/namespaces/kube-system/services/heapster Kibana is running at https://52.34.244.195/api/v1/proxy/namespaces/kube-system/services/kibana-logging KubeDNS is running at https://52.34.244.195/api/v1/proxy/namespaces/kube-system/services/kube-dns KubeUI is running at https://52.34.244.195/api/v1/proxy/namespaces/kube-system/services/kube-ui Grafana is running at https://52.34.244.195/api/v1/proxy/namespaces/kube-system/services/monitoring-grafana InfluxDB is running at https://52.34.244.195/api/v1/proxy/namespaces/kube-system/services/monitoring-influxdb |
Amazon Console muestra:
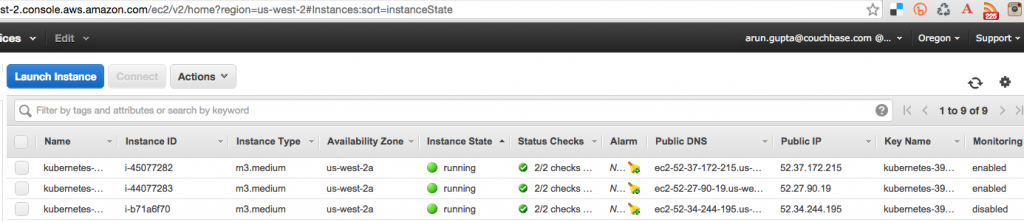
Se crean tres instancias como se muestra - una para el nodo maestro y dos para los nodos trabajadores. El nombre de usuario y la contraseña para el maestro Kubernetes se almacenan en /Usuarios/arungupta/.kube/config. Busca una sección como:
|
1 2 3 4 5 6 |
- name: aws_kubernetes user: client-certificate-data: DATA client-key-data: DATA password: 3FkxcAURLCWBXc9H username: admin |
Ejecutar un contenedor Docker en un clúster Kubernetes en Amazon
Ahora que el clúster está en marcha, obtenga una lista de todos los nodos:
|
1 2 3 4 |
./kubernetes/cluster/kubectl.sh get no NAME LABELS STATUS AGE ip-172-20-0-92.us-west-2.compute.internal kubernetes.io/hostname=ip-172-20-0-92.us-west-2.compute.internal Ready 18m ip-172-20-0-93.us-west-2.compute.internal kubernetes.io/hostname=ip-172-20-0-93.us-west-2.compute.internal Ready 18m |
Muestra dos nodos trabajadores. Crea un nuevo pod de Couchbase:
|
1 2 |
./kubernetes/cluster/kubectl.sh run couchbase --image=arungupta/couchbase replicationcontroller "couchbase" created |
Observe que el nombre de la imagen puede especificarse en la CLI. Este comando crea un controlador de replicación con un único pod. El pod utiliza arungupta/couchbase Imagen Docker
que proporciona un servidor Couchbase preconfigurado. Aquí se puede especificar cualquier imagen Docker. Obtén todos los recursos RC:
|
1 2 3 |
./kubernetes/cluster/kubectl.sh get rc CONTROLLER CONTAINER(S) IMAGE(S) SELECTOR REPLICAS AGE couchbase couchbase arungupta/couchbase run=couchbase 1 12m |
Esto muestra el Controlador de Replicación que se crea para usted. Obtenga todos los Pods:
|
1 2 3 |
./kubernetes/cluster/kubectl.sh get po NAME READY STATUS RESTARTS AGE couchbase-kil4y 1/1 Running 0 12m |
La salida muestra el Pod que se crea como parte del Replication Controller. Obtenga más detalles sobre el Pod:
|
1 2 3 4 5 6 7 8 9 10 11 12 13 14 15 16 17 18 19 20 21 22 23 24 25 26 27 28 29 30 31 32 33 34 35 36 37 38 39 40 41 42 43 44 |
./kubernetes/cluster/kubectl.sh describe po couchbase-kil4y Name: couchbase-kil4y Namespace: default Image(s): arungupta/couchbase Node: ip-172-20-0-93.us-west-2.compute.internal/172.20.0.93 Start Time: Wed, 02 Mar 2016 10:25:47 -0800 Labels: run=couchbase Status: Running Reason: Message: IP: 10.244.1.4 Replication Controllers: couchbase (1/1 replicas created) Containers: couchbase: Container ID: docker://1c33e4f28978a5169a5d166add7c763de59839ed1f12865f4643456efdc0c60e Image: arungupta/couchbase Image ID: docker://080e2e96b3fc22964f3dec079713cdf314e15942d6eb135395134d629e965062 QoS Tier: cpu: Burstable Requests: cpu: 100m State: Running Started: Wed, 02 Mar 2016 10:26:18 -0800 Ready: True Restart Count: 0 Environment Variables: Conditions: Type Status Ready True Volumes: default-token-xuxn5: Type: Secret (a secret that should populate this volume) SecretName: default-token-xuxn5 Events: FirstSeen LastSeen Count From SubobjectPath Reason Message ───────── ──────── ───── ──── ───────────── ────── ─────── 13m 13m 1 {scheduler } Scheduled Successfully assigned couchbase-kil4y to ip-172-20-0-93.us-west-2.compute.internal 13m 13m 1 {kubelet ip-172-20-0-93.us-west-2.compute.internal} implicitly required container POD Pulled Container image "gcr.io/google_containers/pause:0.8.0" already present on machine 13m 13m 1 {kubelet ip-172-20-0-93.us-west-2.compute.internal} implicitly required container POD Created Created with docker id 3830f504a7b6 13m 13m 1 {kubelet ip-172-20-0-93.us-west-2.compute.internal} implicitly required container POD Started Started with docker id 3830f504a7b6 13m 13m 1 {kubelet ip-172-20-0-93.us-west-2.compute.internal} spec.containers{couchbase} Pulling Pulling image "arungupta/couchbase" 12m 12m 1 {kubelet ip-172-20-0-93.us-west-2.compute.internal} spec.containers{couchbase} Pulled Successfully pulled image "arungupta/couchbase" 12m 12m 1 {kubelet ip-172-20-0-93.us-west-2.compute.internal} spec.containers{couchbase} Created Created with docker id 1c33e4f28978 12m 12m 1 {kubelet ip-172-20-0-93.us-west-2.compute.internal} spec.containers{couchbase} Started Started with docker id 1c33e4f28978 |
Exponer Pod en Kubernetes como Servicio
Ahora que nuestro pod está funcionando, ¿cómo accedo al servidor Couchbase? Necesitas exponerlo fuera del cluster Kubernetes. El kubectl exponer toma un pod, servicio o controlador de replicación y lo expone como un Servicio Kubernetes. Veamos
exponer el controlador de replicación previamente creado y exponerlo:
|
1 2 |
./kubernetes/cluster/kubectl.sh expose rc couchbase --target-port=8091 --port=8091 --type=LoadBalancer service "couchbase" exposed |
Más información sobre el Servicio:
|
1 2 3 4 5 6 7 8 9 10 11 12 13 14 15 16 17 |
./kubernetes/cluster/kubectl.sh describe svc couchbase Name: couchbase Namespace: default Labels: run=couchbase Selector: run=couchbase Type: LoadBalancer IP: 10.0.158.93 LoadBalancer Ingress: a44d3f016e0a411e5888f0206c9933da-1869988881.us-west-2.elb.amazonaws.com Port: 8091/TCP NodePort: 32415/TCP Endpoints: 10.244.1.4:8091 Session Affinity: None Events: FirstSeen LastSeen Count From SubobjectPath Reason Message ───────── ──────── ───── ──── ───────────── ────── ─────── 7s 7s 1 {service-controller } CreatingLoadBalancer Creating load balancer 5s 5s 1 {service-controller } CreatedLoadBalancer Created load balancer |
En Balanceador de carga atributo Ingress le da la dirección del equilibrador de carga que ahora es de acceso público. Espere 3 minutos para que el equilibrador de carga se asiente. Acceda a él utilizando el puerto 8091 y la página de inicio de sesión de
Aparece la Consola Web de Couchbase:
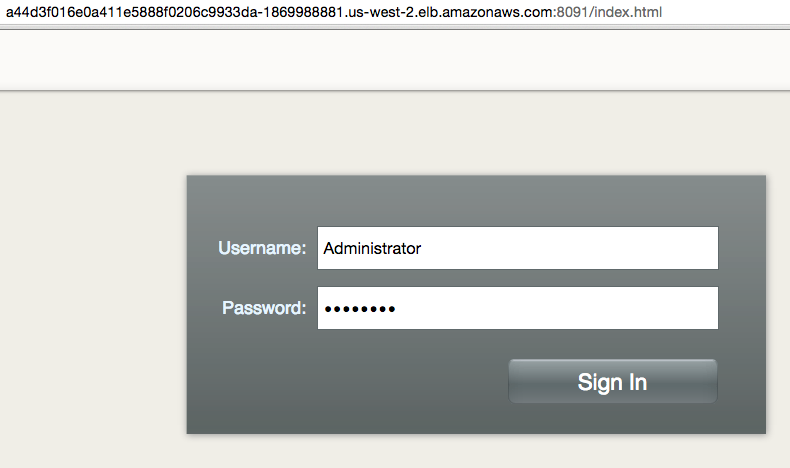
Introduzca las credenciales como "Administrador" y "contraseña" para ver la Consola Web:
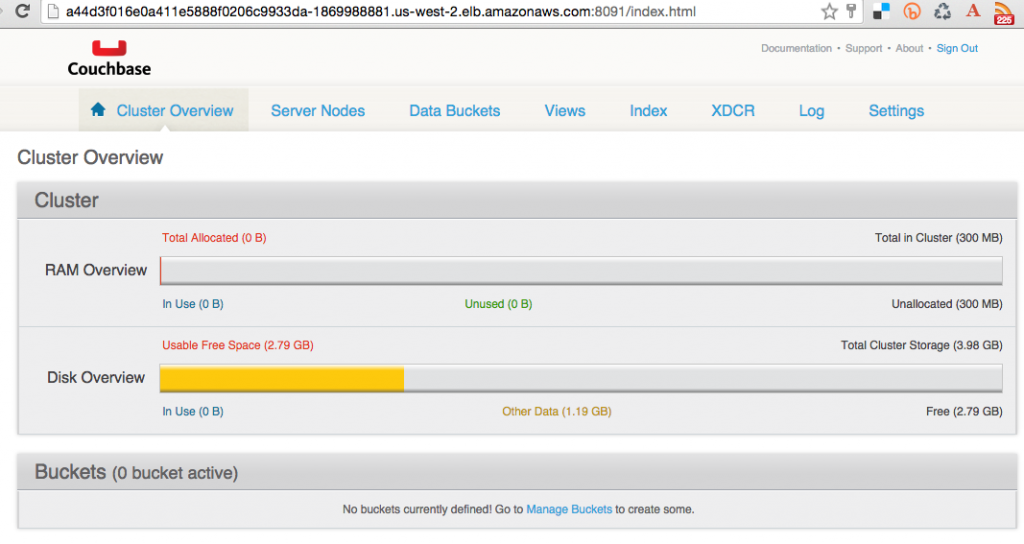
Y así acabas de acceder a tu pod fuera del clúster Kubernetes.
Apagar el clúster Kubernetes
Por último, apague el clúster mediante cluster/kube-down.sh guión.
|
1 2 3 4 5 6 7 8 9 10 11 12 13 14 15 16 17 18 19 20 21 22 23 24 25 26 27 28 29 30 31 32 33 34 35 36 37 38 39 40 41 42 43 44 |
./kubernetes/cluster/kube-down.sh Bringing down cluster using provider: aws Deleting ELBs in: vpc-7b46ac1f Waiting for ELBs to be deleted All ELBs deleted Deleting auto-scaling group: kubernetes-minion-group Deleting auto-scaling launch configuration: kubernetes-minion-group Deleting instances in VPC: vpc-7b46ac1f Waiting for instances to be deleted Instances not yet deleted: i-45077282 i-44077283 i-b71a6f70 Sleeping for 3 seconds... Instances not yet deleted: i-45077282 i-44077283 i-b71a6f70 Sleeping for 3 seconds... Instances not yet deleted: i-45077282 i-44077283 i-b71a6f70 Sleeping for 3 seconds... Instances not yet deleted: i-45077282 i-44077283 i-b71a6f70 Sleeping for 3 seconds... Instances not yet deleted: i-45077282 i-44077283 i-b71a6f70 Sleeping for 3 seconds... Instances not yet deleted: i-45077282 i-44077283 i-b71a6f70 Sleeping for 3 seconds... Instances not yet deleted: i-45077282 i-44077283 i-b71a6f70 Sleeping for 3 seconds... Instances not yet deleted: i-45077282 i-44077283 i-b71a6f70 Sleeping for 3 seconds... Instances not yet deleted: i-45077282 i-44077283 i-b71a6f70 Sleeping for 3 seconds... Instances not yet deleted: i-45077282 i-44077283 i-b71a6f70 Sleeping for 3 seconds... Instances not yet deleted: i-45077282 i-44077283 i-b71a6f70 Sleeping for 3 seconds... Instances not yet deleted: i-45077282 i-44077283 i-b71a6f70 Sleeping for 3 seconds... Instances not yet deleted: i-44077283 i-b71a6f70 Sleeping for 3 seconds... All instances deleted Deleting VPC: vpc-7b46ac1f Cleaning up security group: sg-308b3357 Cleaning up security group: sg-3b8b335c Cleaning up security group: sg-e3813984 Deleting security group: sg-308b3357 Deleting security group: sg-3b8b335c Deleting security group: sg-e3813984 Done |
Para una limpieza completa, sigue siendo necesario eliminar explícitamente el bucket de S3 donde se almacenan los binarios de Kubernetes.
¡Que aproveche!