Introdução
O Couchbase Server 8.0 apresenta um novo manipulador de função Eventing chamado OnDeploy, que permite que os clientes executem a lógica de negócios durante a implantação ou retomada da função Eventing sem exigir nenhuma mutação externa para acioná-la.
Anteriormente, os clientes com casos de uso que precisavam executar qualquer lógica antes de uma função Eventing ser implantada ou retomada tinham algumas opções, como:
- Realizar manualmente a configuração necessária por conta própria.
- Automatize a configuração por meio de um script externo antes de acionar a implementação ou a retomada da função Eventing.
Esses dois métodos são complicados e dependem de intervenção externa ou manual.
Os eventos de “implantação” e “retomada” no ciclo de vida da função Eventing marcam os pontos em que ela está prestes a iniciar o processamento de mutações. Isso faz com que a OnDeploy adequado para injetar lógica que exija a execução de qualquer uma das seguintes atividades:
- Realize verificações antes do voo para garantir que o ambiente esteja configurado corretamente.
- Configure caches (por exemplo, tabelas de consulta) para aumentar a eficiência.
- Enviar, coletar e processar dados de diferentes serviços externos e do Couchbase.
- “Auto-acionar” a função Eventing depois que ela for implementada/continuada, modificando pelo menos um documento em seu espaço-chave de origem.
- Essa mutação acionará sua
Sobre a atualizaçãoe/ouOnDeletemanipulador. - Esse é um caso de uso avançado do
OnDeployporque, tradicionalmente, a execução da função Eventing era restrita a ser acionada somente quando ocorriam alterações em seu espaço de chaves de origem por entidades que não fossem a própria função Eventing ou pela expiração do cronômetro.
- Essa mutação acionará sua
Limitador de taxa
Nesta postagem, criaremos um limitador de taxa robusto usando o algoritmo de token-bucket e o serviço Eventing do Couchbase. Ao longo do caminho, você terá experiência prática com o novo manipulador OnDeploy e descobrirá como o Eventing simplifica a integração com outros serviços do Couchbase.
Projeto de alto nível
Dimensionamento multidimensional
O cluster de 6 nós deve ter os seguintes mapeamentos de serviços para nós:
| S.No. | Número do nó | Serviço(s) |
|---|---|---|
| 1. | 0 | Dados |
| 2. | 1 | Dados |
| 3. | 2 | Dados |
| 4. | 3 | Eventos, consultas |
| 5. | 4 | Eventos, consultas |
| 6. | 5 | Indexação |
Alguns pontos a serem observados sobre a configuração do cluster:
- Usamos 3 nós de serviço de dados para garantir a redundância por meio da replicação de dados.
- Executamos o serviço Eventing em 2 nós para aumentar o paralelismo da função Eventing.
- Isso é feito além de ter vários funcionários para nossa função de eventos.
- Os serviços com uso intenso de CPU, como Data e Eventing, devem ser mantidos em nós de cluster separados.
- Precisamos do serviço Query porque determinadas operações, como a exclusão de todos os documentos em um espaço-chave, podem ser convenientemente executadas por meio do serviço Query.
- Precisamos do serviço de indexação para criar índices primários para o bucket Ephemeral.
Espaços-chave
Nosso cluster deve ter os seguintes espaços de chave:
| S.No. | Nome do balde | Tipo de caçamba | Escopo | Coleção | Descrição |
|---|---|---|---|---|---|
| 1 | padrão | Couchbase | Padrão | Padrão |
|
| _sistema | _mobile | - | |||
| _sistema | _query | - | |||
| 2 | limitador de taxa | Efêmera | Padrão | Padrão | - |
| _sistema | _mobile | - | |||
| _sistema | _query | - | |||
| my-llm | limites | Armazena o documento que contém o mapeamento de limite de nível para taxa. | |||
| my-llm | rastreador | Armazene documentos de contador para acompanhar o uso de usuários individuais. | |||
| 3 | my-llm | Couchbase | Padrão | Padrão | - |
| _sistema | _mobile | - | |||
| _sistema | _query | - | |||
| usuários | contas | Armazene os detalhes da conta do usuário, incluindo o “nível”. | |||
| usuários | eventos | Armazene os eventos do usuário que devem ter a taxa limitada com base no “nível” do usuário. |
Observação:
- O
limitador de taxabalde éEfêmeraporque não precisamos manter esses dados. Usamos os dados desse bucket para rastrear o uso do limite de taxa por usuário e para armazenar em cache o mapeamento de camada para limite de taxa.
Pontos de extremidade externos da API REST
A função Eventing interage com pontos de extremidade de API externos que fornecem as seguintes funcionalidades:
- Forneça o mapeamento mais recente de camada para limite de taxa.
- Aceitar modificações no mapeamento de camada para limite de taxa.
- Aceitar solicitações de entrada que estejam dentro do limite de taxa do usuário por nossa função Eventing.
- Neste projeto, nosso endpoint manterá uma contagem dessas solicitações de entrada.
Essa contagem nos ajudará a verificar se nosso aplicativo limitador de taxa funciona conforme o esperado.
- Neste projeto, nosso endpoint manterá uma contagem dessas solicitações de entrada.
- Forneça o número de solicitações recebidas que nossa função Eventing considerou estar dentro do limite de taxa do usuário.
O link para a especificação OpenAPI dos pontos de extremidade da API acima pode ser encontrado aqui.
Observação: o programa em Go que hospeda esses pontos de extremidade da API REST está vinculado no Apêndice.
Design de baixo nível
Configuração da função Eventing
Abaixo está uma lista de todas as alterações que precisamos fazer nas configurações padrão da função Eventing.
Espaços-chave
| S.No. | Campo | Valor |
|---|---|---|
| 1. | Escopo da função | default._default |
| 2. | Fonte Keyspace | my-llm.users.events |
| 3. | Espaço-chave de armazenamento para eventos | default._default._default |
Configurações
| S.No. | Campo | Valor |
|---|---|---|
| 1. | Nome | limitador de taxa my-llm |
| 2. | Limite de alimentação da implantação | A partir de agora |
| 3. | Descrição | Essa função Eventing atua como um limitador de taxa. |
| 4. | Trabalhadores | 10 |
Amarrações de balde
| S.No. | Balde Apelido |
Espaço-chave | Acesso | ||
|---|---|---|---|---|---|
| Balde | Escopo | Coleção | |||
| 1. | Contas de usuário | my-llm | usuários | contas | Somente leitura |
| 2. | Limitador de taxa | limitador de taxa | my-llm | rastreador | Ler e escrever |
| 3. | tierLimits | limitador de taxa | my-llm | limites | Ler e escrever |
Vinculações de URL
| S.No. | Alias de URL | URL | Autenticação | Nome de usuário | Senha |
|---|---|---|---|---|---|
| 1. | llmEndpoint | http://localhost:3054/my-llm | Básico | Eventos | Eventos123 |
| 2. | tiersEndpoint | http://localhost:3054/tiers |
Observação: As opções “permitir cookies” e “validar certificado SSL” estão desativadas.
Diagrama completo do fluxo de aplicativos

Este diagrama mostra as interações entre os manipuladores da função Eventing, os pontos de extremidade da API REST externa e os espaços de chave para se comportar como um limitador de taxa com base no algoritmo de token bucket.
Nas seções a seguir, implementaremos o limitador de taxa passo a passo.
OnDeploy Configuração
Obter e armazenar as camadas do ponto de extremidade da API REST externa

Quando o OnDeploy começa a ser executado, ele deve primeiro obter o mapeamento de camadas para limite de taxa do ponto de extremidade externo da API REST representado pelo tiersEndpoint Vinculação de URL.
A resposta do /tiers A API REST externa será um valor JSON que contém o mapeamento do nome da camada (do tipo Cordas) para um limite de taxa por hora representado pela contagem total de solicitações permitidas por hora (ou seja, total_request_count) (do tipo número).
Armazenamos o mapeamento de camadas para limite de taxa no rate-limit.my-llm.limits espaço-chave.
|
1 2 3 4 5 6 7 8 9 10 11 12 13 14 15 16 17 18 19 20 21 22 23 24 25 26 27 28 29 30 31 32 33 34 35 36 37 38 39 40 41 42 43 44 45 46 47 48 49 |
function OnDeploy(action) { // ... // GET the tiers from the `tiersEndpoint` const response = curl('GET', tiersEndpoint); if (response.status != 200) { throw new Error("Error(Cannot get tiers): " + JSON.stringify(response)); } const tiers = response.body; log("Successfully retrieved the tiers: " + JSON.stringify(tiers)); // Write the tiers to the `tierLimits` keyspace, in the document with ID `limits` tierLimits["limits"] = tiers; // ... // Create a timer to run every 24 hours to refresh the tiers let timeAfter24hours = new Date(); timeAfter24hours.setDate(timeAfter24hours.getDate() + 1); log("Time after 24 hours is: " + timeAfter24hours); createTimer(updateTierCallback, timeAfter24hours, "tier-updater", {}); // ... } // Function to update the user tiers every 24 hours function updateTierCallback(context) { log('From updateTierCallback: timer fired'); // GET the tiers from the `tiersEndpoint` const response = curl('GET', tiersEndpoint); if (response.status != 200) { log("Error(Cannot get tiers): " + JSON.stringify(response)); } else { const tiers = response.body; log("Successfully retrieved the tiers: " + JSON.stringify(tiers)); // Write the tiers to the `tierLimits` keyspace, in the document with ID `limits` tierLimits["limits"] = tiers; } // Create a timer to run every 24 hours to refresh the tiers let timeAfter24hours = new Date(); timeAfter24hours.setDate(timeAfter24hours.getDate() + 1); log("Time after 24 hours is: " + timeAfter24hours); createTimer(updateTierCallback, timeAfter24hours, "tier-updater", {}); } |
Redefinir todos os rastreadores de limite de taxa ao implantar
![]()
Em nosso aplicativo, modelamos a desimplantação da função Eventing como um desligamento forçado; portanto, durante sua implantação, excluímos todos os documentos que rastreiam o uso do limite de taxa dos usuários. Modelamos a pausa como uma suspensão temporária das atividades de limitação de taxa; portanto, não limpamos esses documentos no caso de retomada da função Eventing.
Percebeu como tratamos as operações de implementação e retomada separadamente? OnDeploy torna esses casos de uso possíveis porque o Eventing também passa um razão no campo ação para o objeto OnDeploy para especificar se a função Eventing está sendo implantada ou retomada.
|
1 2 3 4 5 6 7 8 9 10 11 12 |
function OnDeploy(action) { // ... // If we are deploying, then we should delete all the existing document in the keyspace `rateLimiter` if (action.reason === "deploy") { let results = N1QL("DELETE FROM `rate-limiter`.`my-llm`.tracker"); results.close(); log("Deleted all the documents in the `rate-limiter`.`my-llm`.tracker keyspace as we are deploying!"); } // ... } |
Redefinir os limites de taxa dos usuários a cada hora
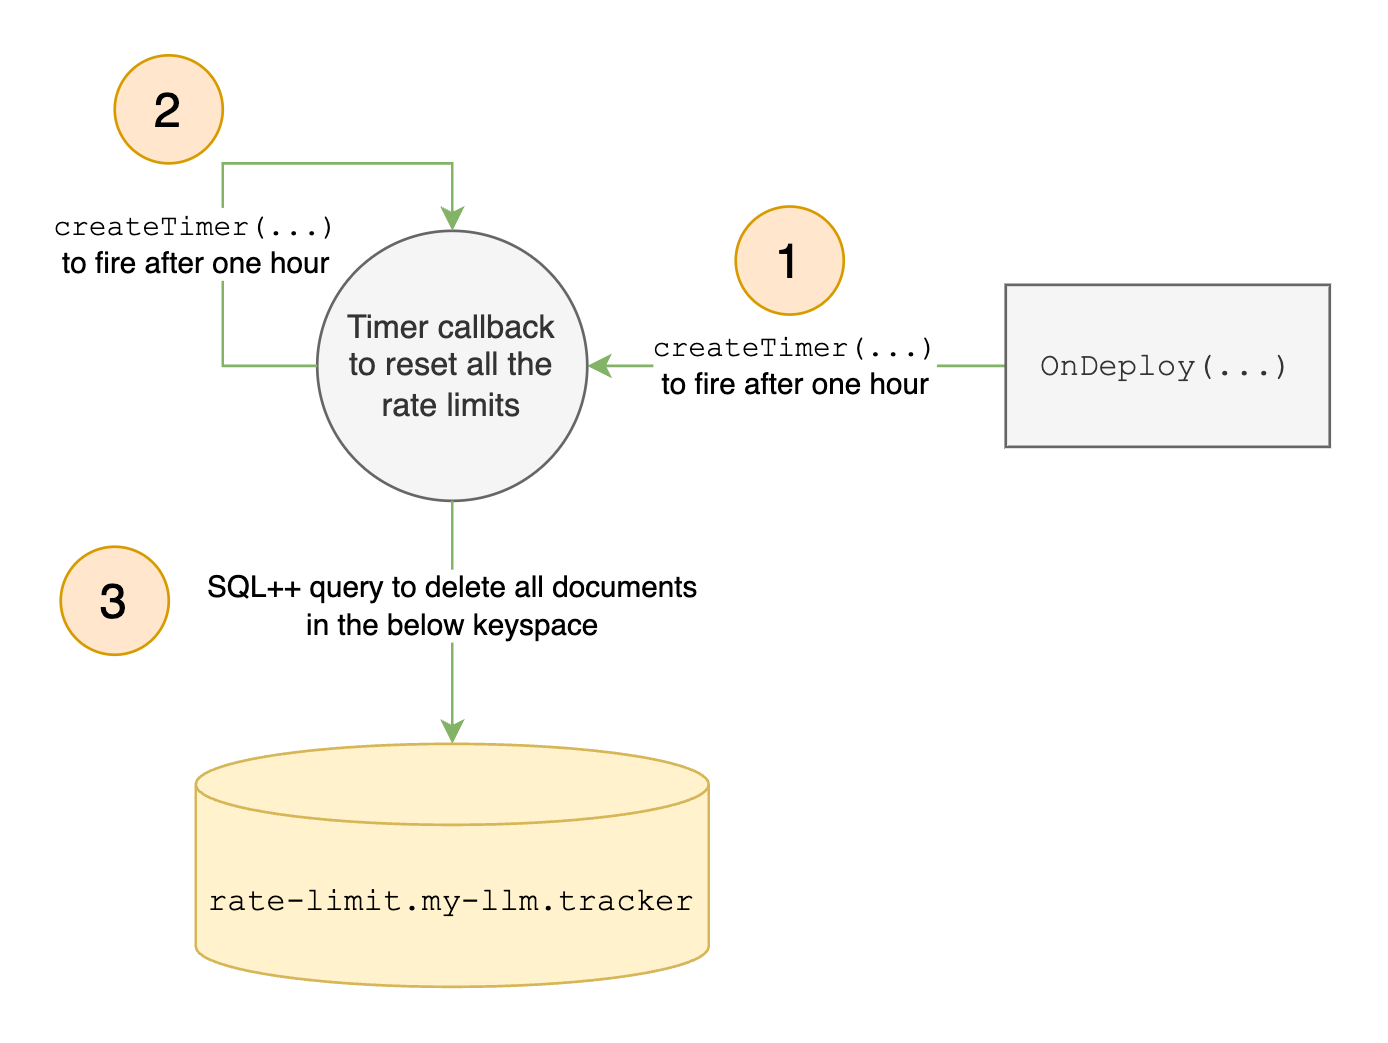
Como estamos implementando um algoritmo de token-bucket, redefinimos os limites de taxa dos usuários a cada hora usando temporizadores - uma funcionalidade do Eventing que é essencial para o nosso caso de uso. Criamos o primeiro cronômetro no OnDeploy para disparar após uma hora. Quando o timer-callback for acionado, ele criará um novo timer para ser acionado após uma hora, e assim por diante, criando um timer autorrecorrente que será acionado a cada hora, desde que a função Eventing seja implantada.
Observe que esse cronômetro não exigiu nenhuma mutação externa para acionar a função Eventing para criá-lo. Tudo isso foi feito durante a implantação/retomada no sistema. Tudo isso foi feito durante a implantação/retomada no OnDeploy manipulador.
|
1 2 3 4 5 6 7 8 9 10 11 12 13 14 15 16 17 18 19 20 21 22 23 24 25 26 27 |
function OnDeploy(action) { // ... // Create a timer to run every 1 hour to reset user rate limits let timeAfter1Hour = new Date(); timeAfter1Hour.setHours(timeAfter1Hour.getHours() + 1); log("Time after 1 hour is: " + timeAfter1Hour); createTimer(resetRateLimiter, timeAfter1Hour, "rate-limit-resetter", {}); // ... } // Function to reset the rate limits for all users every 1 hour function resetRateLimiter(context) { log('From resetRateLimiter: timer fired'); let results = N1QL("DELETE FROM `rate-limiter`.`my-llm`.tracker"); results.close(); // Create a timer to run every 1 hour to reset user rate limits let timeAfter1Hour = new Date(); timeAfter1Hour.setHours(timeAfter1Hour.getHours() + 1); log("Time after 1 hour is: " + timeAfter1Hour); createTimer(resetRateLimiter, timeAfter1Hour, "rate-limit-resetter", {}); } |
Atualizar os limites de taxa de nível diariamente

Modelamos nosso aplicativo para permitir alterações no limite de taxa a cada 24 horas; portanto, nossa função Eventing deve extrair o mapeamento mais recente de camada para limite de taxa do endpoint externo da API REST a cada 24 horas para garantir que os limites de taxa corretos sejam aplicados aos nossos usuários.
Novamente, usamos temporizadores de recorrência automática para obter o mapeamento mais recente de camada para limite de taxa a cada 24 horas.
|
1 2 3 4 5 6 7 8 9 10 11 12 13 14 15 16 17 18 19 20 21 22 23 24 25 26 27 28 29 30 31 32 33 34 35 36 |
function OnDeploy(action) { // ... // Create a timer to run every 24 hours to refresh the tiers let timeAfter24hours = new Date(); timeAfter24hours.setDate(timeAfter24hours.getDate() + 1); log("Time after 24 hours is: " + timeAfter24hours); createTimer(updateTierCallback, timeAfter24hours, "tier-updater", {}); // ... } // Function to update the user tiers every 24 hours function updateTierCallback(context) { log('From updateTierCallback: timer fired'); // GET the tiers from the `tiersEndpoint` const response = curl('GET', tiersEndpoint); if (response.status != 200) { log("Error(Cannot get tiers): " + JSON.stringify(response)); } else { const tiers = response.body; log("Successfully retrieved the tiers: " + JSON.stringify(tiers)); // Write the tiers to the `tierLimits` keyspace, in the document with ID `limits` tierLimits["limits"] = tiers; } // Create a timer to run every 24 hours to refresh the tiers let timeAfter24hours = new Date(); timeAfter24hours.setDate(timeAfter24hours.getDate() + 1); log("Time after 24 hours is: " + timeAfter24hours); createTimer(updateTierCallback, timeAfter24hours, "tier-updater", {}); } |
Sobre a atualização Configuração
Manipulação de eventos do usuário

Nosso aplicativo ouvirá os documentos de solicitação de entrada do my-llm.users.events espaço-chave. Esses documentos têm uma ID exclusiva e contêm dados no formato:
|
1 2 3 4 5 6 |
{ "user_id": String, "respond_to": String, "payload": String, "header": String } |
Se a solicitação do usuário estiver dentro do limite de taxa, todos os dados do documento, exceto o user_id, serão enviados para o endpoint protegido pelo nosso limitador de taxa.
Leitura do nível do usuário

Quando o Sobre a atualização é acionado por um documento de evento de usuário de entrada da etapa anterior, devemos extrair o user_id campo dele.
Usando o user_id recuperaremos o documento de detalhes da conta do usuário a partir do campo my-llm.users.accounts espaço-chave. A partir desse documento, extrairemos o valor da variável nível campo.
|
1 2 3 4 5 6 7 8 9 10 11 12 13 14 15 16 17 18 19 20 21 22 23 |
function OnUpdate(doc, meta, xattrs) { // ... const user_id = doc.user_id; let done = false; while (!done) { // Get the tier of the `user_id` let userAccountsMeta = { "id": user_id }; let userAccountsResult = couchbase.get(userAccounts, userAccountsMeta, { "cache": true }); if (!userAccountsResult.success) { throw new Error("Error(Unable to get the user's details): " + JSON.stringify(userAccountsResult)); } const tier = userAccountsResult.doc.tier; // ... } // ... } |
Leitura dos limites de taxa da camada

Obtemos os limites de taxa para a camada do usuário no documento que contém o mapeamento de camadas para limites de taxa, localizado no rate-limit.my-llm.limits espaço-chave.
|
1 2 3 4 5 6 7 8 9 10 11 12 13 14 15 16 17 18 19 20 21 22 |
function OnUpdate(doc, meta, xattrs) { // ... while (!done) { // ... // Get the rate limit for the tier let tierLimitsMeta = { "id": "limits" }; let tierLimitsResult = couchbase.get(tierLimits, tierLimitsMeta, { "cache": true }); if (!tierLimitsResult.success) { throw new Error("Error(Unable to get the tier limits): " + JSON.stringify(tierLimitsResult)); } const rateLimit = tierLimitsResult.doc[tier]; // ... } // ... } |
Decidir se é necessário limitar a taxa da solicitação e atualizar o uso do limite de taxa do usuário

Dado o limite de taxa do usuário, agora verificamos seu uso atual para decidir se ele pode fazer uma solicitação. O limitador de taxa rastreia o uso de cada usuário com um documento contador no rate-limit.my-llm.tracker espaço-chave. Criamos esse contra-documento sob demanda para cada user_id para armazenar a contagem de solicitações desse usuário para a janela atual, antes que o limite do token bucket seja atualizado. Se o uso de um usuário atingir ou exceder o limite de sua camada, bloquearemos sua solicitação. Caso contrário, nós a encaminhamos para o endpoint protegido. Por fim, atualizamos o uso do limite de taxa do usuário em seu documento de contador correspondente no rate-limit.my-llm.tracker espaço-chave.
|
1 2 3 4 5 6 7 8 9 10 11 12 13 14 15 16 17 18 19 20 21 22 23 24 25 26 27 28 29 30 31 32 33 34 35 36 37 38 39 40 41 |
function OnUpdate(doc, meta, xattrs) { // ... while (!done) { // ... // Try to get the rate limit count for the `user_id` const userIDMeta = { "id": user_id }; const result = couchbase.get(rateLimiter, userIDMeta); // If the rate limit count for the `user_id` does not exist. Try to create it. while (!result.success) { couchbase.insert(rateLimiter, userIDMeta, { "count": 0 }); result = couchbase.get(rateLimiter, userIDMeta); } // Assign the counter document's `count` and `meta` to local variables for convenience const counterDocCount = result.doc.count; const counterDocMeta = result.meta; // Check if the counter has hit the rate limit // We use >= instead of == to handle the edge case where the tier limits have reduced // but the tier tracker documents have not yet been deleted. if (counterDocCount >= rateLimit) { log("User with ID '" + user_id + "' hit their rate limit of " + rateLimit + "!"); done = true; continue; } // Update the count in the document let res = couchbase.mutateIn(rateLimiter, counterDocMeta, [ couchbase.MutateInSpec.replace("count", counterDocCount + 1), ]); // ... } // ... } |
Enviar a solicitação “dentro do limite” para o ponto de extremidade desejado

As solicitações do usuário, dentro dos limites de taxa da camada correspondente, são enviadas para o endpoint da API REST protegido por nosso limitador de taxa.
|
1 2 3 4 5 6 7 8 9 10 11 12 13 14 15 16 17 18 |
function OnUpdate(doc, meta, xattrs) { // ... while (!done) { // ... done = res.success; if (done) { // POST the request to the `llmEndpoint` delete doc.user_id; const response = curl('POST', llmEndpoint, doc); if (response.status != 200) { throw new Error("Error(MyLLM endpoint is not working): " + response.status); } } } // ... } |
Testando nosso aplicativo
Agora que implementamos nosso limitador de taxa, podemos criar o ambiente para executá-lo e testá-lo:
- Execute o programa Go para carregar um conjunto de amostra de 100 usuários.
- Execute o programa Go para iniciar o servidor HTTP que fornece as APIs REST externas com as quais nossa função Eventing interage.
- Implante a função Eventing.
- Para acionar a função Eventing, devemos executar o programa Go para carregar documentos de eventos do usuário em seu espaço de chave de origem, ou seja,
my-llm.users.events. - Para obter o número de solicitações de usuários que chegam ao endpoint externo da API REST protegido por nosso limitador de taxa, você deve enviar um
OBTERsolicitação para o/my-llmponto final.
Conclusão
Esta postagem mostrou como usar o novo manipulador de eventos do Couchbase, OnDeploy, para criar um limitador de taxa de token-bucket - destacando o poder e a flexibilidade do Couchbase Eventing para desenvolver soluções integradas e autônomas.
De forma mais ampla, ele demonstra uma mudança no desenvolvimento de aplicativos: criar aplicativos a partir do próprio banco de dados. Isso permite soluções personalizadas para diversos requisitos, tudo dentro da plataforma Couchbase.
Apêndice
Código completo de eventos: Clique aqui
Código Go do servidor: Clique aqui
Código Go do cliente: Clique aqui
Código Go do carregador de usuário: Clique aqui