아론 벤튼 는 혁신적인 모바일 애플리케이션 개발을 위한 창의적인 솔루션을 전문으로 하는 숙련된 아키텍트입니다. 그는 10년 이상 ColdFusion, SQL, NoSQL, JavaScript, HTML 및 CSS를 포함한 전체 스택 개발 분야에서 경력을 쌓았습니다. 현재 노스캐롤라이나주 그린즈버러에 위치한 Shop.com의 애플리케이션 아키텍트인 Aaron은 카우치베이스 커뮤니티 챔피언.

마지막 포스팅에서는 FakeIt 시리즈를 통해 어떻게 하면 FakeIt + 카우치베이스 서버 + 동기화 게이트웨이 를 사용하여 모바일 개발을 위한 로컬 환경을 구축할 계획입니다. 이를 위해 다음과 같은 방법을 사용할 것입니다. Docker 그리고 도커-컴포즈. 면책 조항: 저는 Docker 전문가가 아니며, 개발 환경과 데이터 집합을 빠르게 설정하기 위해 수행한 작업의 예시일 뿐입니다.
Docker
두 개의 도커 컨테이너를 사용할 것입니다. 카우치베이스 서버 그리고 하나는 동기화 게이트웨이. 단순히 couchbase:최신 및 couchbase/sync-gateway:최신에서 가져온 docker-compose.yaml 파일을 정의할 수 있지만 여전히 수동 구성이 필요하며 애플리케이션을 최대한 자동화할 수 있기를 원합니다. 그러기 위해서는 이 두 컨테이너에 자체 스크립트와 구성을 추가하여 자체 컨테이너를 구축해야 합니다.
|
1 2 3 4 5 6 7 8 9 10 11 12 13 14 15 16 17 18 19 20 21 22 23 |
./docker-compose.yaml version: '2' services: fakeit-couchbase: build: context: ./.docker/couchbase/ container_name: fakeit-couchbase ports: - "8091-8094:8091-8094" - "11210:11210" volumes: - ./:/app fakeit-syncgatway: build: context: ./.docker/sync-gateway/ container_name: fakeit-syncgateway depends_on: - fakeit-couchbase ports: - "4984-4985:4984-4985" volumes: - ./:/app |
먼저 ./.docker/couchbase/Dockerfile에서 컨테이너를 빌드하는 docker-compose.yaml 파일은 다음과 같이 보입니다.
|
1 2 3 4 5 6 7 8 9 10 |
./.docker/couchbase/Dockerfile # start with couchbase FROM couchbase:latest # copy the configure script COPY scripts/configure-node.sh /opt/couchbase # execute the configure-node.sh script CMD ["/opt/couchbase/configure-node.sh"] |
이 Docker파일은 실제로 구성 스크립트를 복사하고 해당 스크립트를 실행하는 두 가지 작업만 수행합니다. configure-node.sh 스크립트는 다음과 같습니다.
|
1 2 3 4 5 6 7 8 9 10 11 12 13 14 15 16 17 18 19 20 |
./.docker/couchbase/scripts/configure-node.sh set -m /entrypoint.sh couchbase-server & echo 'Waiting 20 seconds for Couchbase service to start' sleep 20 # configure the cluster echo 'Configuring Cluster' /opt/couchbase/bin/couchbase-cli cluster-init -c localhost:8091 --cluster-username=Administrator --cluster-password=password --cluster-port=8091 --cluster-ramsize=500 --service=data # create the ecommerce bucket echo 'Creating ecommerce bucket' /opt/couchbase/bin/couchbase-cli bucket-create -c localhost:8091 -u Administrator -p password --bucket=ecommerce --bucket-eviction-policy=fullEviction --bucket-type=membase --bucket-priority=high --enable-index-replica=0 --bucket-port=11211 --enable-flush=1 --bucket-replica=1 --bucket-ramsize=200 echo 'Couchbase server is ready' fg 1 |
configure-node.sh 스크립트는 몇 가지 작업을 수행합니다:
- 구성할 수 있도록 Couchbase 서비스가 시작되기를 기다리는 중입니다.
- 클러스터 구성 초기화하기
- 전자상거래 버킷 만들기
이제 Couchbase 컨테이너가 빌드되었으므로 다음으로 빌드해야 할 컨테이너는 Sync Gateway 컨테이너입니다. 기본적으로 동기화 게이트웨이 컨테이너는 해마 메모리 전용 동기화 게이트웨이 버킷을 사용합니다. 스토리지 및 액세스 설정을 업데이트할 수 있도록 자체 sync-gateway.json 파일을 제공하여 이 구성을 업데이트해야 합니다. 마지막으로 동기화 게이트웨이 컨테이너는 공용 포트인 4984 포트만 노출하지만 개발 목적이므로 관리자 포트인 4985 포트를 노출하겠습니다.
|
1 2 3 4 5 6 7 8 9 10 11 12 13 14 15 16 17 18 19 20 21 22 23 24 25 26 27 28 29 30 31 32 33 34 35 36 37 38 39 40 41 42 43 44 45 46 47 48 49 50 51 52 53 54 55 56 57 58 59 60 61 62 63 64 65 66 67 68 69 70 71 |
./.docker/sync-gateway/Dockerfile # Start with the base sync gateway FROM couchbase/sync-gateway:latest # Copy the sync-gateway.json into the container COPY sync-gateway.json /opt/sync_gateway/sync-gateway.json # Create Volume for data to persist RUN mkdir -p /opt/sync_gateway/data # Copy Entry Point COPY scripts/entrypoint.sh / ENTRYPOINT ["/entrypoint.sh"] # Copy the configure script COPY scripts/configure-node.sh /opt/sync_gateway # Configure the Sync Gateway and Start it CMD ["/opt/sync_gateway/configure-node.sh"] # port 4984: public port # port 4985: admin port EXPOSE 4984 4985 ./.docker/sync-gateway/sync-gateway.json { "interface": "0.0.0.0:4984", "adminInterface": "0.0.0.0:4985", "log": ["CRUD+", "REST+", "Changes+", "Attach+"], "CORS": { "Origin":[ "https://localhost:8000", "*" ], "LoginOrigin":[ "https://localhost:8000", "*" ], "Headers":["Content-Type"], "MaxAge": 1728000 }, "databases": { "ecommerce": { "server": "https://fakeit-couchbase:8091", "bucket": "ecommerce", "users": { "GUEST": { "disabled": false } }, "sync": "function(doc, oldDoc) { channel(doc.channels); }" } } } ./.docker/sync-gateway/scripts/configure-node.sh #!/bin/bash set -m echo 'Waiting 20 seconds for Couchbase service to start and warm up' sleep 20 echo 'Starting the Sync Gateway Service' /entrypoint.sh sync_gateway /opt/sync_gateway/sync-gateway.json echo 'Couchbase Sync Gateway is ready' |
다시 한 번 말씀드리지만 이것은 개발 목적으로만 사용됩니다. 어디에서든 관리자 인터페이스에 대한 액세스를 허용하거나 다음을 활성화해서는 안 됩니다. 게스트 특별한 이유가 없는 한 동기화 게이트웨이에 액세스할 수 없습니다.
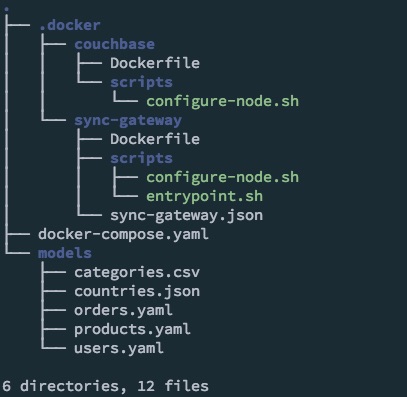
이제 앱의 구조는 다음과 같습니다:
이제 Docker 컨테이너를 구성하고 docker-compose.yaml 파일을 설정했으므로 컨테이너를 빌드하고 시작해야 합니다. 애플리케이션 디렉토리에서 다음 명령을 실행하여 이를 수행합니다:
|
1 |
docker-compose up -d |
참고: 스크린캐스트에서는 분리된 모드로 컨테이너를 실행하기 위한 -d 매개변수를 생략합니다.
모델
이제 컨테이너가 시작되었으므로 데이터 세트를 생성하기 전에 다음으로 해야 할 일은 채널 속성을 지원하도록 모델을 업데이트하는 것입니다.
|
1 |
users.yaml |
이 모델은 사용자별 채널에만 동기화됩니다.
|
1 2 3 4 5 6 7 8 9 10 11 12 13 14 15 16 17 18 19 20 21 22 23 24 25 26 |
name: Users type: object key: _id data: min: 1000 max: 2000 inputs: ./countries.json properties: _id: type: string description: The document id built by the prefix "user_" and the users id data: post_build: `user_${this.user_id}` channels: type: array data: post_build: | return [ `channel-user-${this.user_id}` ]; doc_type: type: string description: The document type data: value: "user" ... products.yaml |
재미로 이 모델을 모든 사용자가 구독할 수 있는 글로벌 채널에 게시할 예정입니다.
|
1 2 3 4 5 6 7 8 9 10 11 12 13 14 15 16 17 18 19 20 21 22 23 24 25 26 27 28 |
name: Products type: object key: _id data: min: 500 max: 1000 inputs: - ./categories.csv pre_build: globals.current_category = faker.random.arrayElement(inputs.categories); properties: _id: type: string description: The document id data: post_build: `product_${this.product_id}` channels: type: array data: build: | return [ `channel-products` ]; doc_type: type: string description: The document type data: value: product ... orders.yaml |
이 모델은 사용자별 채널에만 동기화됩니다.
|
1 2 3 4 5 6 7 8 9 10 11 12 13 14 15 16 17 18 19 20 21 22 23 24 25 26 |
name: Orders type: object key: _id data: dependencies: - products.yaml - users.yaml min: 5000 max: 6000 properties: _id: type: string description: The document id data: post_build: `order_${this.order_id}` channels: type: array data: build: | return [ `channel-user-${this.user_id}` ]; doc_type: type: string description: The document type data: value: "order" ... |
이제 채널을 지원하도록 모델이 업데이트되었으므로 무작위 데이터 집합을 생성하여 다음 위치에 푸시할 수 있습니다. 카우치베이스 서버 를 통해 동기화 게이트웨이 REST API. 우리는 말합니다 FakeIt 다음 명령을 사용하여 이 작업을 수행합니다:
|
1 |
fakeit sync-gateway --server https://localhost:4984 --bucket ecommerce --verbose models/* |
개발 목적으로 게스트의 액세스 권한을 허용했습니다. 동기화 게이트웨이. 그러나 게스트 액세스를 사용하지 않도록 설정한 경우에도 여전히 FakeIt 다음 명령을 사용하여 기존 사용자에 대한 사용자 이름과 비밀번호를 지정하면 됩니다:
|
1 |
fakeit sync-gateway --server https://localhost:4984 --bucket ecommerce --username YOURUSERNAME --password YOURPASSWORD --verbose models/* |
생성된 데이터 세트가 출력되기 전입니다, FakeIt 에 대해 인증합니다. 동기화 게이트웨이 를 클릭해 필요한 세션 정보를 검색합니다.
테스트
다음으로 해야 할 일은 문서를 로컬로 동기화할 수 있도록 동기화 게이트웨이 사용자를 만드는 것입니다. 이 테스트에서는 사용자 모델에서 임의의 사용자 문서를 가져와서 그 문서에서 사용자를 만들겠습니다. 이 예에서는 user_1001이 될 것이며, curl 명령을 사용하여 사용자를 만들겠습니다:
|
1 2 3 4 5 6 |
curl --silent --show-error \ -H "Content-Type: application/json; charset=UTF-8" \ -H "Content-type: application/json" \ -X PUT \ -d '{"name":"Domenic81","password":"pgid_Tubn0qoEtZ","admin_channels":["channel-user-1001", "channel-products"]}' \ 'https://localhost:4985/ecommerce/_user/Domenic81' |
애플리케이션
저희는 작은 VueJS 프로젝트를 활용하는 PouchDB 를 클릭하여 동기화 게이트웨이에 연결하고 인증된 사용자 문서를 가져옵니다. 애플리케이션은 사용 가능한 다양한 유형의 문서, 해당 문서의 ID 및 콘텐츠만 표시합니다.
|
1 2 3 4 5 6 7 8 9 10 11 12 13 14 15 16 17 18 19 20 21 22 23 24 25 26 27 28 29 30 31 32 33 34 35 36 37 38 39 40 41 42 43 44 45 46 47 48 49 50 51 52 53 54 55 56 57 58 59 60 61 62 63 64 65 66 67 68 69 70 71 72 73 74 75 76 77 78 79 80 81 82 83 84 85 86 87 88 89 90 91 92 93 94 95 |
// register highlight.js vue component Vue.use(VueHighlightJS) // create local ecommerce database var db = new PouchDB('local_ecommerce', { auto_compaction: true, revs_limit: 3 }); // create remote ecommerce database var remote_db = new PouchDB('https://localhost:4984/ecommerce/', { auth: { username: 'Domenic81', password: 'pgid_Tubn0qoEtZ' }, skip_setup: true }); // merge remote database with local database PouchDB.sync(db, remote_db, { live: true, retry: true }) var app = new Vue({ el: '#app', data: { current_type: '', items: [], id: '', current: JSON.stringify({}), types: [], }, watch: { id(id) { if (id) { db.get(id).then((current) => this.current = JSON.stringify(current, null, 2)) } }, current_type(type) { this.id = '' // update the current item to be blank this.current = JSON.stringify({}) // when `current_type` changes update the items list with the current types list this.updateItems(type) .then(() => { if (!this.id) { this.id = this.items[0] } }) } }, methods: { updateItems(type) { return db.query('ecommerce/by_doc_type', { key: type, reduce: false }) .then((result) => { this.items = result.rows.map((item) => item.id) }) }, removeStyle(el) { setTimeout(() => { el.style = '' }, 1000) } }, created() { // create the view to be queried var ddoc = { _id: '_design/ecommerce', views: { by_doc_type: { map: function(doc) { if (doc.doc_type) { emit(doc.doc_type); } }.toString(), reduce: '_count' } } } db.put(ddoc) // design document created // call the design document view index immediately to trigger a build .then(() => db.query('ecommerce/by_doc_type', { limit: 0 })) .catch((err) => { // it is fine if this fails and returns a document conflict that just means it doesnt need to be created if (err.status !== 409) { throw err; } }) // get all of the doc types available .then(() => db.query('ecommerce/by_doc_type', { reduce: true, group: true })) .then((types) => { this.types = types.rows.map((type) => type.key) this.current_type = this.types[0] }) } }) |
전체 샘플 애플리케이션은 다음에서 확인할 수 있습니다. https://github.com/bentonam/fakeit-couchbase-mobile-example
결론
이 시리즈를 통해 다음과 같은 방법을 살펴보았습니다. FakeIt 는 간단한 YAML 모델을 사용해 방대한 양의 가짜 데이터를 생성하고 해당 데이터를 여러 대상에 전송할 수 있습니다. 리포지토리를 확인하시고 풀 리퀘스트를 환영하며, 커뮤니티에 더 유용한 도구를 만들기 위해 항상 개선과 향상을 모색하고 있습니다. 이 자리를 빌려 프로젝트에 기여해 주신 분들께도 감사의 말씀을 전하고 싶습니다. 다음과 같은 분들의 도움이 없었다면 1.0 버전은 출시되지 못했을 것입니다. 타일러 벤튼 (@tjbenton21), 또한 트레버 브린들 (빈스케라지), 제시카 케네디 (미스터센더), 아담 버뎃 (@RavenStorms619) 및 브랜트 버넷 (@btburnett3)
이전 게시물
- FakeIt 시리즈 1/5: 가짜 데이터 생성하기
- FakeIt 시리즈 2/5: 공유 데이터 및 종속성
- 페이크잇 시리즈 3/5: 정의를 통해 본 린 모델
- FakeIt 시리즈 4/5: 기존 데이터로 작업하기