중요 참고: 이 블로그 게시물에는 다음과 같은 개발자 미리 보기 CURL 함수에 대한 정보가 포함되어 있습니다. 이벤트. 카우치베이스 서버 6.5에서 CURL 함수가 변경될 예정입니다. 이벤트 서비스와 함께 cURL 사용하기: 업데이트 에서 자세한 내용을 확인하세요.
이벤트는 카우치베이스 서버에서 사용할 수 있는 새로운 서비스입니다. 신시내티 레즈는 이 기능을 사용하여 VIP 고객에게 보다 신속하게 서비스를 제공하고자 합니다. 한 명 이상의 VIP에게 컨시어지가 할당됩니다. VIP가 야구장에 입장하면 컨시어지에게 문자 메시지가 전송됩니다. 그러면 컨시어지는 좌석에서 VIP를 만날 수 있습니다.
개념 증명을 위해 함수(Eventing의 일부)를 사용하여 문자 메시지를 보내는 예제를 만들었습니다. 저는 트윌리오 평가판 계정 를 클릭해 메시지를 보냅니다. I 하지 마십시오. 생산 시스템에서 Twilio를 사용할 계획인지 문자 메시지를 사용할 계획인지 알 수 없었습니다. 하지만 Twilio는 무료이고 쉽게 시작할 수 있기 때문에 개념 증명에 사용하기로 결정했습니다. HTTP API만 있으면 원하는 메시징/알림 서비스를 사용할 수 있습니다.
이벤트 리뷰
여기서 이벤트에 대한 모든 세부 정보를 제공하지는 않겠습니다. 이미 제 동료들이 블로그에 많이 포스팅한 내용입니다. 자세한 내용은 해당 포스팅을 꼭 확인해 보세요:
하지만 간단히 설명하면 이렇습니다: 카우치베이스 함수(Eventing의 일부)를 사용하면 문서 생성/업데이트/삭제에 응답하는 JavaScript 함수를 작성할 수 있습니다. 이러한 함수 내에서 문서를 읽고, 문서를 (다른 버킷에) 쓰고, N1QL 쿼리를 실행하고, 다른 버킷에 curl 함수를 사용하여 HTTP 엔드포인트에 요청할 수 있습니다. 참고: 컬 구조는 아직 개발 중입니다. 이 기능은 개발 목적으로만 사용되며 프로덕션 환경에서는 사용해서는 안 됩니다.
위의 블로그 포스팅을 종합하여 Reds를 위한 이벤트 개념 증명을 만들려고 합니다.
티켓 스캔
첫 번째 단계는 게이트에서 고객의 티켓을 스캔하는 것입니다. 저는 다음과 같은 프로그램을 작성했습니다. 시뮬레이션 를 입력합니다. 그러면 Couchbase의 '티켓' 버킷에 무작위로 '티켓스캔' 문서가 생성됩니다.
티켓을 스캔하기 전에 버킷을 몇 가지 데이터로 미리 채워야 했습니다.
저는 1번부터 9번까지의 고객을 VIP로, 그 외의 고객은 '일반 고객'으로 정했습니다.
|
1 2 3 4 5 6 7 8 9 |
_bucket.Upsert("customer::1", new { Name = "George Clooney" }); _bucket.Upsert("customer::2", new { Name = "Josh Hutcherson" }); _bucket.Upsert("customer::3", new { Name = "Darius Rucker" }); _bucket.Upsert("customer::4", new { Name = "Brooklyn Decker" }); _bucket.Upsert("customer::5", new { Name = "Eddie Vedder" }); _bucket.Upsert("customer::6", new { Name = "Nick Lachey" }); _bucket.Upsert("customer::7", new { Name = "Nick Goepper" }); _bucket.Upsert("customer::8", new { Name = "Johnny Bench" }); _bucket.Upsert("customer::9", new { Name = "Ryan Collins" }); |
재미있는 점: 이 VIP들은 모두 실제 레드삭스 팬입니다!
또한 3명의 컨시어지를 만들어 VIP를 나눠서 관리했습니다.
|
1 2 3 4 5 6 7 8 9 10 11 12 13 14 15 16 17 18 |
_bucket.Upsert("concierge::1", new { Name = "Matt Groves", CellNumber = _yourVerifiedNumber, vips = new List<string> { "customer::1", "customer::2", "customer::9" } }); _bucket.Upsert("concierge::2", new { Name = "Mr. Redlegs", CellNumber = _yourVerifiedNumber, vips = new List<string> { "customer::3", "customer::4", "customer::5" } }); _bucket.Upsert("concierge::3", new { Name = "Rosie Red", CellNumber = _yourVerifiedNumber, vips = new List<string> { "customer::6", "customer::7", "customer::8" } }); |
위의 예에서는 고객 1, 2, 9를 "Matt Groves"에게 배정하고 있습니다. 즉, 조지 클루니, 조쉬 허처슨, 라이언 콜린스가 컨시어지 Matt Groves가 관리하도록 배정된 VIP입니다. (바꾸기 _yourVerifiedNumber Twilio에서 확인한 전화번호로).
또한 문서에 Twilio 자격 증명을 저장하고 있습니다. 이렇게 한 이유는 Couchbase 함수 내부에 자격 증명이 필요하고 거기에 하드 코딩하고 싶지 않았기 때문입니다. 자격 증명 문서는 다음과 같습니다:
|
1 2 3 4 5 6 |
{ "url": "https://api.twilio.com/2010-04-01/Accounts/< twilio user name here >/Messages.json", "username": "< twilio user name here >", "password": "< twilio password name here >", "fromNumber": "< twilio 'from' number here >" } |
새 "티켓 스캔" 문서를 만드는 콘솔 앱을 만들었습니다. 이 앱을 실행할 때 VIP 스캔 또는 "일반 조" 스캔을 만들도록 선택할 수 있습니다.
|
1 2 3 4 |
Console.WriteLine("1 - Simulate a VIP ticket scan."); Console.WriteLine("2 - Simulate a regular joe ticket scan."); Console.WriteLine("Q - End simulation."); var choice = Console.ReadKey().KeyChar; |
티켓 스캔 문서에는 고객 문서의 ID, 타임스탬프, 좌석 번호의 세 가지 필드만 포함됩니다.
|
1 |
_bucket.Upsert(ticketScanId, new {CustomerId = customerId, Timestamp = ticketScanTimestamp, Seat = seatInformation }); |
다음에서 깃허브의 전체 소스 코드.
이벤트 기능
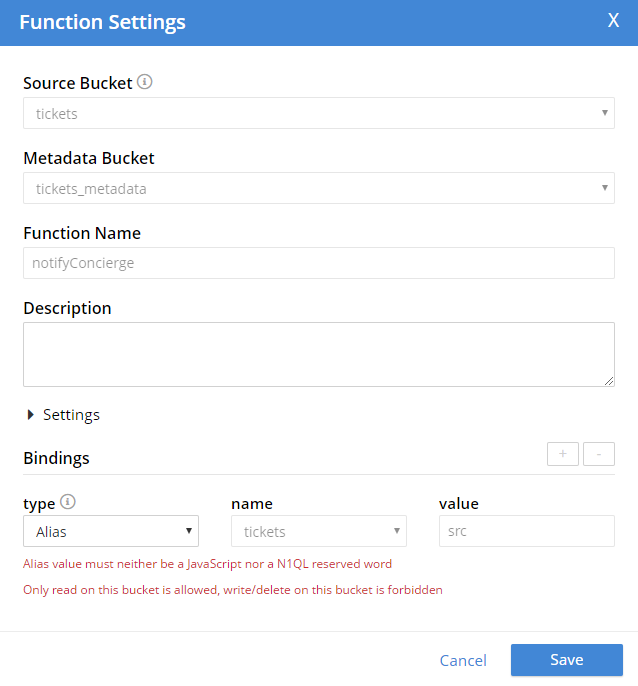
이 이벤트 예제의 핵심은 함수입니다. 이 함수를 만들 때는 아래 그림과 같이 "notifyConcierge"라는 함수를 만들었고, "tickets_metadata" 버킷을 사용했습니다. 가장 중요한 것은 "tickets" 버킷의 별칭을 만들어 "src"라고 불렀다는 점입니다. 함수 내에서 이 버킷은 읽기 전용이지만 고객 및 컨시어지 정보와 Twilio 자격 증명을 가져오는 데 필요합니다.
그리고 전체 함수는 깃허브에서 확인할 수 있습니다.. 다음은 기능에 대한 단계별 분석입니다:
1 - 변경된 문서가 티켓스캔인가요? 그렇다면 계속 진행합니다. 그렇지 않은 경우 이 함수는 이를 무시할 수 있습니다.
|
1 |
if (meta.id.indexOf("ticketscan::") !== -1) { |
2 - 이 티켓을 스캔한 고객이 VIP인가요? 그렇다면 컨시어지의 세부 정보를 확인한 후 계속 진행하세요. 그렇지 않으면 무시하세요. 이 부분의 함수에서 인라인 N1QL을 주목하세요. 이는 카우치베이스 함수에서 사용되는 자바스크립트 특유의 기능입니다.
|
1 2 3 4 5 6 7 8 9 10 11 12 13 14 |
let customerId = doc.customerId; let stmt = SELECT t.cellNumber, t.name FROM tickets t WHERE ANY v IN t.vips SATISFIES v == $customerId END; //get the concierge (there should only be one) let concierge = null; for (var record of stmt) { concierge = record; } // only proceed with notification if // the customer has a concierge if (concierge) { |
3 - VIP의 세부 정보를 확인합니다.
|
1 |
let customer = src[customerId]; |
4 - Twilio 자격 증명을 받습니다.
|
1 |
let twilioCredentials = src["twilio::credentials"]; |
5 - 메시지 작성(VIP의 이름, 좌석 번호, 컨시어지 이름 포함). 데이터 는 Twilio의 API를 사용하는 데 필요한 최소한의 정보입니다.
|
1 2 3 |
let message = "Hello '" + concierge.name + "'. A VIP assigned to you just checked in. '" + customer.name + "' will be in '" + doc.seat + "'"; let from = twilioCredentials.fromNumber; let data = "To=" + concierge.cellNumber + "&From=" + from + "&Body=" + message; |
6 - Twilio API를 사용하여 컨시어지에게 문자 메시지를 보냅니다. 컬 구조는 아직 개발 중입니다. 이 기능은 개발 목적으로만 사용되며 프로덕션 환경에서는 사용해서는 안 됩니다.
|
1 2 3 |
let url = twilioCredentials.url; let auth = twilioCredentials.username + ": " + twilioCredentials.password; var result = curl(url, { "data": data, "header": ["Content-Type: x-www-form-urlencoded"], "method": "POST", "auth": auth }); |
이벤트 실행 중
이제 티켓 스캔 문서가 생성되거나 수정될 때마다 컨시어지에게 휴대폰으로 알림이 전송됩니다. 다음은 티켓 스캔부터 SMS 알림까지 전체 데모의 예시입니다:
이 이미지에서는 4개의 티켓 스캔을 생성하고 있습니다. 첫 번째는 VIP용, 다음 두 개는 일반 조스용, 마지막은 VIP용입니다. 두 개의 문자 메시지가 나타납니다. 실제로는 각기 다른 휴대폰에 표시되지만 테스트를 위해 모든 알림을 하나의 번호로 전송하고 있습니다. 참고: 저는 join.me 를 클릭하여 콘솔과 나란히 라이브 Android 화면을 표시합니다.)
문제가 발생하는 경우 다행히도 Couchbase의 함수에서 디버깅을 사용할 수 있다는 점이 다행입니다. 자바스크립트에서 중단점을 설정하고 Chrome과 같은 도구를 사용하여 단계별로 진행할 수 있습니다. 이에 대한 자세한 내용은 이벤트 공지 게시물.
요약
이 기능을 카우치베이스의 이벤트 시스템에서 실행하면 VIP에 대한 새로운 티켓 스캔이 발생할 때마다 문자 메시지 알림이 트리거됩니다. 티켓 스캔 시스템은 데이터가 Couchbase에 저장되는 한 Twilio에 대해 아무것도 알 필요가 없습니다. 또한 다음과 같은 경우 기타 시스템이 티켓 스캔 문서를 만들면 거기서도 SMS가 트리거됩니다. 로직은 다음과 같습니다. 닫기 를 데이터에 추가합니다.
이것으로 신시내티 레즈 시리즈 포스팅을 마무리합니다(현재로서는). 시리즈의 다른 두 게시물은 다음과 같습니다:
- 카우치베이스 서버를 사용한 Nifi 처리 및 흐름 - 이것이 레드팀이 실제로 티켓 스캔 데이터를 카우치베이스에 입력하는 방식입니다.
- 카우치베이스 및 Knowi를 사용한 데이터 시각화 - 이는 레드팀이 티켓 스캔 데이터를 사용하는 또 다른 사용 사례입니다.
아래에 댓글을 남기거나 다음에서 저를 찾아주세요. 트위터 @mgroves. Go Reds!
좋은 블로그 게시물과 블로그 타이밍이 좋았습니다!
함수에서 오류를 기록/디버깅하는 방법. 기본적으로 작동하지 않는 경우 디버깅할 위치.
로깅/디버깅 정보는 다음을 참조하세요. https://docs.couchbase.com/server/6.0/eventing/eventing-debugging-and-diagnosability.html (베타 버전을 사용하는 경우 6.5로 대체).