자체 관리형 Couchbase Server 클러스터를 Couchbase Capella™ 서비스형 데이터베이스(DBaaS)로 마이그레이션하는 단계
카우치베이스 카펠라 는 Couchbase를 시작하는 가장 쉽고 빠른 방법입니다. 이 완전 관리형 서비스형 데이터베이스는 데이터베이스 관리 작업을 없애고 비용을 절감하는 동시에 내장된 다중 모델 기능으로 모든 사용 사례에서 유연성을 제공합니다. 메모리 우선 아키텍처로 대규모의 고속 데이터 응답을 지원하므로 완전 관리형 문서 데이터베이스 중 최고의 가성비를 자랑합니다.
마이그레이션하는 이유는 무엇인가요?
자체 관리형 Couchbase Server를 구현하는 경우, 여러분과 여러분의 팀은 애플리케이션 개발에 시간을 빼앗기는 데이터베이스 유지 관리 작업을 처리해야 할 책임이 있을 것입니다. 관리형 서비스인 Couchbase Capella를 사용하면 설치, 업그레이드 및 일반적인 데이터베이스 유지 관리를 처리할 필요가 없으며, 모두 자동으로 처리됩니다. 또한 Couchbase Server 커뮤니티 에디션을 사용하는 경우, Couchbase Capella는 더 많은 노드와 엔터프라이즈 기능으로 데이터베이스를 빠르고 쉽게 레벨업할 수 있는 방법을 제공할 수 있습니다. Couchbase Capella는 모든 Couchbase Server 서비스 및 기능을 지원합니다.
이 블로그에서는 온프레미스 또는 클라우드에서 실행 중인 Couchbase Server 클러스터의 데이터와 인덱스를 Couchbase Capella로 마이그레이션하는 단계를 설명합니다.
전제 조건
-
- 기존 카우치베이스 카펠라 계정. 카우치베이스 카펠라를 무료로 생성하여 사용할 수 있습니다, 여기에서 가입하세요.
- 의 지침을 따르세요. 카우치베이스 카펠라 시작하기 시작하기 튜토리얼
- 참고: 셀프서비스 무료 티어 버전은 단일 노드와 10GB의 데이터로 제한됩니다 - 자세한 내용은 다음을 참조하세요. 카펠라 문서
- 온프레미스 또는 클라우드 서비스 제공업체에 배포된 기존의 자체 관리형 Couchbase Server 환경
- 이미 가지고 있다고 가정합니다:
- Couchbase Server 및 Couchbase Capella 관리에 익숙함
- 명령줄 인터페이스(CLI)에서 명령 실행에 익숙함
- 기존 카우치베이스 카펠라 계정. 카우치베이스 카펠라를 무료로 생성하여 사용할 수 있습니다, 여기에서 가입하세요.
제한 사항
이 가이드는 데이터 및 보조 인덱스를 Couchbase Server에서 Couchbase Capella로 마이그레이션하는 데 사용됩니다. 이 가이드는 다음을 마이그레이션하는 데는 적용되지 않습니다. 카우치베이스 이벤트 서비스, 카우치베이스 전체 텍스트 검색 (FTS) 지수 또는 카우치베이스 애널리틱스.
이 가이드에서 지원하는 Couchbase 버전에는 Couchbase Server(커뮤니티 에디션 또는 엔터프라이즈 에디션) 버전 6.6, 7.0.x, 7.1 및 최신 버전이 포함됩니다.
유틸리티
-
- 카우치베이스 cbbackupmgr - 는 Couchbase Server 데이터의 백업 및 복원을 관리하기 위한 명령줄 인터페이스(CLI) 도구입니다. 다음 버전의 자체 관리형 Couchbase Server에서 Capella로 데이터 및 인덱스를 마이그레이션하는 데 사용됩니다:
- Enterprise Edition 버전 6.6, 버전 7.x
- 커뮤니티 에디션 버전 7.x
- 마이그레이션을 위해 cbbackupmgr을 사용하는 단계는 이 가이드의 다음 섹션에 자세히 설명되어 있습니다. cbbackupmgr을 사용하여 마이그레이션 - 옵션 1
- 카우치베이스 cbbackup 그리고 cbrestore - 는 다음 버전의 자체 관리형 Couchbase Server에서 Capella로 데이터를 마이그레이션하는 데 사용되는 CLI 도구입니다:
- 커뮤니티 에디션 버전 6.6
- 마이그레이션을 위해 cbbackup 및 cbrestore를 사용하는 단계는 이 가이드의 다음 섹션에 자세히 설명되어 있습니다. cbbackup 및 cbrestore를 사용하여 마이그레이션 - 옵션 2
- 카우치베이스 XDCR - Couchbase 교차 데이터 센터 복제(XDCR)를 사용하면 클러스터 간에 데이터를 복제할 수 있습니다. 이 가이드에서는 자체 관리형 Couchbase Server 클러스터에서 Capella 클러스터로의 지속적인 마이그레이션을 위해 이 기능을 사용합니다.
- 카우치베이스 cbbackupmgr - 는 Couchbase Server 데이터의 백업 및 복원을 관리하기 위한 명령줄 인터페이스(CLI) 도구입니다. 다음 버전의 자체 관리형 Couchbase Server에서 Capella로 데이터 및 인덱스를 마이그레이션하는 데 사용됩니다:
참고: 카우치베이스 서버 커뮤니티 에디션 또는 카펠라 무료 티어에서는 XDCR을 사용할 수 없습니다.
그리고 마이그레이션 준비 이 문서의 섹션에서는 자체 관리형 Couchbase Server 클러스터의 크기를 평가하고 이를 사용하여 Couchbase Capella 클러스터에 필요한 구성을 식별하기 위한 일반적인 지침을 제공합니다. 보다 자세한 Couchbase Capella 크기 조정 연습에 대한 도움이 필요하면 다음을 참조하세요. 카우치베이스에 문의.
마이그레이션 준비
Couchbase Capella 무료 티어를 사용하는 경우 이 가이드에 따라 데이터를 마이그레이션할 수 있지만 무료 티어의 구성 제한으로 인해 멀티노드 Capella 환경을 배포할 수 없습니다. 무료 티어를 유료 티어로 전환하는 것이 좋습니다. 유료 계정 마이그레이션을 시작하기 전에 전체 멀티노드 배포를 구성해야 합니다. 계정을 전환하려면 청구 섹션에서 카우치베이스 아카펠라 UI를 선택한 다음 활성화 ID 추가.
자체 관리형 Couchbase Server 클러스터를 검토하세요:
-
- 자체 관리되는 카우치베이스 서버 웹 콘솔 클러스터의 노드와 버킷을 평가합니다.
- 를 선택하고 서버 탭을 클릭하면 클러스터 노드 목록이 표시됩니다. 노드 수를 기록한 다음 목록에서 각 노드를 선택하여 해당 속성을 표시합니다.
- 각 개별 노드에 대한 메모리 및 스토리지 기록
- 를 선택하고 버킷 탭을 클릭한 다음 목록에서 각 버킷을 선택하여 해당 속성을 표시합니다.
- 각 버킷에 대한 RAM 할당량 및 충돌 해결 설정을 기록하세요.
- 자체 관리형 Couchbase Server 클러스터 구성을 Couchbase Capella에서 대상 클러스터의 크기 조정 및 구성에 대한 일반적인 가이드로 사용합니다.
Capella에서 정확한 클러스터 구성을 복제할 필요는 없습니다. 고정 구성으로 제공되는 Capella 무료 티어를 사용하는 경우 특히 그렇습니다.
자체 관리형 Couchbase Server 클러스터의 Couchbase 서비스 배포에 유의하세요:
자체 관리형 카우치베이스 서버 클러스터 노드의 IP 주소를 기록합니다:
커뮤니티 에디션을 사용하는 경우 이 단계를 건너뛰세요.
-
- 클러스터의 각 노드에 대한 IP 주소를 기록해 두면 나중에 Couchbase Capella 클러스터에 화이트리스트에 추가할 수 있습니다.
- 팁: 자체 관리 클러스터에 있는 각 노드의 IP를 가져오려면:
- 노드에 SSH 접속
- 이 명령을 실행합니다:
dig +short myip.opendns.com @resolver1.opendns.com
카우치베이스 카펠라에서 클러스터 배포 및 구성하기
카우치베이스 카펠라에서 클러스터를 만들고 구성합니다:
-
- 카우치베이스 아카펠라 UI에 로그인하여 클러스터 탭을 클릭한 다음 클러스터 만들기. (무료 티어에서는 이미 클러스터가 생성되어 있어야 하며, 크기를 더 이상 사용자 지정할 수 없습니다).
- 자체 관리형 Couchbase Server 클러스터 검토에서 기록한 정보를 사용하여 구성의 요구 사항을 충족하는 클러스터 템플릿을 선택합니다.
- 적절한 템플릿을 찾지 못하면 다음을 선택하세요. 사용자 지정 템플릿 에서 클러스터 크기 조정 편집기
- 노드 수, 서비스 배포, 컴퓨팅 또는 RAM, 스토리지 등 자체 관리형 Couchbase Server 클러스터 환경에 맞게 노드를 선택하고 구성합니다.
- 지원 영역 및 지원 패키지를 선택한 다음 클러스터를 배포합니다. 클러스터 만들기에 대한 자세한 단계 및 지침은 다음을 참조하세요. 클러스터 만들기 카우치베이스 카펠라 문서에서
카우치베이스 카펠라 사용 다차원 스케일링 가이드라인에 따라 서비스 및 노드를 선택해야 하며, 배포 가이드라인에 따라서만 서비스 및 노드를 선택할 수 있습니다.
데이터베이스 자격 증명 사용자를 만듭니다:
-
- 데이터베이스 자격 증명 사용자는 클러스터에 고유하며 사용자 이름, 비밀번호 및 일련의 버킷 권한으로 구성됩니다. 이 사용자는 버킷 데이터에 액세스하는 데 필요합니다.
- Couchbase Capella UI에서 다음 지침에 따라 새 클러스터에 대한 데이터베이스 자격 증명 사용자를 생성합니다. 데이터베이스 자격 증명 구성 카우치베이스 카펠라 문서의
카우치베이스 카펠라 클러스터 연결 엔드포인트를 기록하고 IP 주소를 "허용된 IP"로 추가합니다.
자체 관리형 카우치베이스 서버 및 카우치베이스 카펠라에 대한 루트 인증서를 저장합니다:
-
- 카우치베이스 아카펠라 UI에서 다음을 선택합니다. 클러스터을 클릭한 다음 대상 클러스터를 선택합니다. 를 선택한 다음 연결 탭을 클릭하고 클러스터의 연결 엔드포인트를 다음 아래에 기록합니다. 광역 네트워크.
- 참고: 자체 관리형 카우치베이스 서버에서 버전 7.0.x를 실행하는 경우 광역 네트워크 엔드포인트 대신 데이터 서비스 노드의 호스트 이름 URL을 복사해야 합니다.
- 카우치베이스 아카펠라 UI에서 다음을 선택합니다. 노드 탭을 클릭하면 클러스터의 모든 노드가 나열됩니다. 데이터 서비스를 실행 중인 노드 중 하나를 선택하고 해당 노드의 호스트 이름을 기록합니다.
데이터 마이그레이션을 위한 명령줄 도구를 실행할 시스템의 IP 주소를 허용된 IP로 추가합니다. 아래 광역 네트워크를 클릭하고 허용된 IP 관리, 을 클릭한 다음 허용 IP 추가. IP 주소를 입력하고 IP 추가. 허용된 IP에 대한 자세한 내용은 다음을 참조하세요. 허용된 IP 주소 구성 를 참조하세요.
참고: 허용된 IP 추가에 실패하는 경우 대부분의 경우 방화벽 문제와 관련이 있습니다. Couchbase 문서 참조 를 참조하여 Couchbase Server에서 사용하는 기본 포트에 대한 정보를 확인하세요.
Capella 클러스터의 루트 인증서를 다운로드합니다. 아래 루트 인증서, 클릭 다운로드. 루트 인증서를 .pem 파일 확장자를 가진 파일을 Couchbase CLI 도구를 실행할 시스템의 폴더에 저장합니다.
다음으로, 자체 관리형 Couchbase Server 웹 콘솔에 로그인합니다. 자체 관리형 Couchbase Server 클러스터에 대한 루트 인증서를 복사하여 .pem 파일을 카우치베이스 카펠라 클러스터의 루트 인증서 파일을 저장한 폴더와 동일한 폴더에 복사합니다. 루트 인증서에 대한 자세한 내용은 다음을 참조하세요. 루트 인증서 를 참조하세요.
카우치베이스 카펠라에서 대상 버킷을 만듭니다:
-
- 카우치베이스 아카펠라 UI에 로그인합니다.
- 의 지침에 따라 각 소스 버킷에 대해 Couchbase Capella 클러스터에 하나의 대상 버킷을 만듭니다. 버킷 만들기 카우치베이스 카펠라 문서에서
중요: 버킷 이름에는 밑줄을 포함할 수 없습니다.
cbbackupmgr을 사용하여 마이그레이션 - 옵션 1
이 옵션은 다음 버전의 자체 관리형 Couchbase Server에 적용됩니다:
-
- Enterprise Edition 버전 6.6, 버전 7.0.x, 버전 7.1
- 커뮤니티 에디션 버전 7.0.x, 버전 7.1
cbbackupmgr CLI 도구를 사용합니다:
-
- cbbackupmgr 는 자체 관리형 Couchbase Server 설치의 루트 디렉토리에 있습니다.
- 명령줄 터미널을 사용하여 cbbackupmgr로 작업합니다.
플랫폼에 따라 cbbackupmgr은 다음 위치에 Couchbase Server와 함께 설치됩니다:
-
- Linux: /opt/couchbase/bin/cbbackupmgr
- Windows (기본 설치 가정): C:\프로그램 파일\Couchbase\서버\bin\cbbackupmgr
- Mac OS X: /애플리케이션/카우치베이스 서버앱/콘텐츠/리소스/couchbase-core/bin/cbbackupmgr
팁: Couchbase Server의 설치 디렉터리에 직접 액세스할 수 없는 경우 다음을 통해 cbbackupmgr 명령줄 유틸리티를 얻을 수 있습니다. 카우치베이스 서버 다운로드 를 클릭하고 로컬 시스템에 설치합니다.
자체 관리형 카우치베이스 서버 시스템에서 백업 리포지토리 만들기
-
- 명령줄 터미널에서 자체 관리형 Couchbase 서버에서 로컬 백업의 저장소 역할을 할 디렉터리를 만듭니다. 다음 명령 예제는 Linux 구문을 사용하므로 명령줄 터미널 및 플랫폼에 맞게 조정하세요.
- 다음 명령은 시스템 루트 폴더에 디렉터리를 생성합니다:
mkdir /backups/ - 새 디렉터리에 리포지토리를 만들려면 다음 cbbackupmgr 명령을 실행하여 다음을 대체합니다.
<SELF-MANAGED-BUCKET-NAME>를 마이그레이션하려는 버킷의 실제 이름과 함께 입력하세요:
1cbbackupmgr config --archive /backups/ --repo <SELF-MANAGED-BUCKET-NAME> --disable-eventing --disable-analytics --disable-cluster-analytics --disable-bucket-query --disable-cluster-query --include-data <SELF-MANAGED-BUCKET-NAME>
참고:
-
- 이 리포지토리는 지정된 버킷만 백업합니다.
- 애널리틱스 및 이벤트가 명시적으로 비활성화됨
다음 명령을 실행하여 리포지토리를 검사합니다:
|
1 |
cbbackupmgr info -a /backups -all |
리포지토리에 대한 기본 정보가 표시됩니다.
자체 관리형 Couchbase Server 버킷 백업
다음 명령을 실행하여 백업을 생성합니다:
|
1 |
cbbackupmgr backup --archive /backups --repo <SELF-MANAGED-BUCKET-NAME> --cluster couchbases://<SELF-MANAGED-SERVER-URL> --username <SELF-MANAGED-SERVER-ADMIN> --password <SELF-MANAGED-SERVER-ADMIN-PWD> --cacert <FULL-PATH-TO-SELF-MANAGED-ROOT-CERT> --full-backup |
참고: 명령어에서 다음과 같이 대체하세요:
-
- 교체
<SELF-MANAGED-BUCKET-NAME>를 마이그레이션하려는 버킷의 실제 이름과 함께 입력합니다. - 교체
<SELF-MANAGED-SERVER-ADMIN>자체 관리형 Couchbase 서버의 관리자 사용자 이름과 함께 - 교체
<자체 관리 서버 관리자 비밀번호> 자체 관리형 카우치베이스 서버의 관리자 비밀번호를 사용합니다. - 교체
<FULL-PATH-TO-SELF-MANAGED-ROOT-CERT>(이전 단계에서 저장한 대로) 자체 관리형 Couchbase Server 루트 인증서의 전체 파일 경로를 사용합니다.
- 교체
예제 명령은 다음과 같습니다:
|
1 |
cbbackupmgr backup --archive /backups --repo samplebucket --cluster couchbases://127.0.0.1 --username Administrator --password A5121U!i --cacert /ROOT_CERT/root-certificate.pem --full-backup |
명령의 출력은 다음과 같습니다:
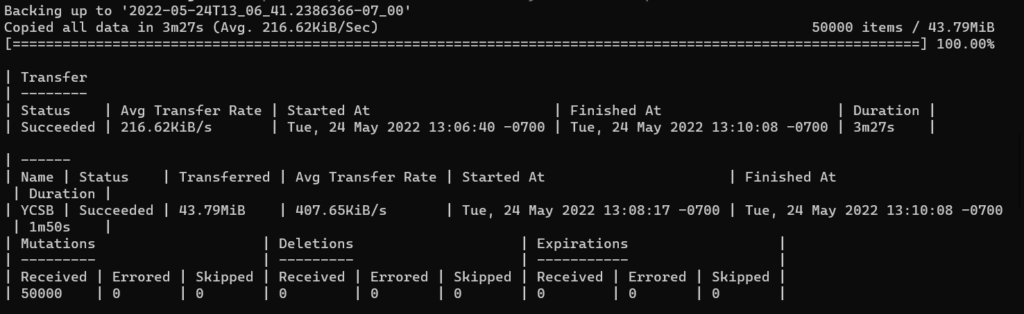
명령을 사용하여 백업을 검사합니다:
|
1 |
cbbackupmgr info -a /backups -all |
백업에 대한 기본 정보가 표시됩니다.
백업된 자체 관리 버킷을 Capella로 복원하기
명령줄 터미널에서 다음 명령을 사용하여 백업된 자체 관리 버킷을 Capella로 복원합니다:
|
1 |
cbbackupmgr restore --archive /backups --repo <SELF-MANAGED-BUCKET-NAME> --cluster couchbases://<CAPELLA-ENDPOINT> --username <CAPELLA-DATABASE-CREDENTIALS-USER> --password <CAPELLA-DATABASE-CREDENTIALS-PASSWORD> --cacert <FULL-PATH-TO-CAPELLA-ROOT-CERT> |
참고: 명령어에서 다음과 같이 대체하세요:
-
- 교체
<SELF-MANAGED-BUCKET-NAME>를 마이그레이션할 버킷의 실제 이름과 함께 입력합니다. - 교체
<CAPELLA-ENDPOINT>앞서 기록된 Capella 클러스터 엔드포인트 URL을 사용하여- 자체 관리형 카우치베이스 서버에서 버전 7.0.x를 실행하는 경우, 광역 네트워크 엔드포인트 대신 데이터 서비스 노드에 호스트 이름 URL을 사용해야 합니다.
- Couchbase Capella UI에서 대상 클러스터의 "노드" 탭을 선택하면 클러스터의 모든 노드가 나열됩니다. 데이터 서비스를 실행 중인 노드 중 하나를 선택하고 해당 노드의 호스트 이름을 기록합니다.
- 교체
<CAPELLA-DATABASE-CREDENTIALS-USER>데이터베이스 자격 증명 사용자를 Capella 클러스터에 추가합니다. - 교체
<CAPELLA-DATABASE-CREDENTIALS-PASSWORD>데이터베이스 자격 증명 사용자 비밀번호로 - 교체
<FULL-PATH-TO-CAPELLA-ROOT-CERT>에 Capella 클러스터 루트 인증서의 전체 파일 경로(이전 단계에서 저장한 대로)를 입력합니다.
- 교체
이 명령은 클러스터의 크기에 따라 실행하는 데 몇 분 정도 걸릴 수 있습니다. 완료되면 터미널에 복원된 백업에 대한 세부 정보가 표시되고 다음과 같은 메시지가 표시됩니다: "복원이 성공적으로 완료되었습니다."
마이그레이션된 문서 및 색인 검토하기
-
- 카우치베이스 아카펠라 UI에서 다음을 선택합니다. 도구 > 문서 대상 클러스터에 대한
- 모든 자체 관리 클러스터 문서가 Capella로 마이그레이션된 것을 볼 수 있습니다.
- 카우치베이스 아카펠라 UI에서 다음을 선택합니다. 도구 > 색인 대상 클러스터에 대한
- 모든 자체 관리 클러스터 인덱스가 Capella로 마이그레이션된 것을 볼 수 있습니다.
참고: 정의가 다음과 같이 설정된 모든 인덱스 defer_build:true 마이그레이션되지만, 다음과 같이 나열됩니다. 생성됨. 이러한 인덱스는 여전히 Capella를 기반으로 구축해야 합니다.
Capella에서 인덱스 구축
-
- 카우치베이스 아카펠라 UI에서 다음을 선택합니다. 도구 > 쿼리 워크벤치 대상 클러스터에 대한
- 다음 쿼리는 마이그레이션 중에 생성되었지만 빌드되지 않은 모든 인덱스에 대한 BUILD 문을 생성합니다. 다음 쿼리를 Capella의 쿼리 워크벤치에 복사/붙여넣은 다음 실행:
|
1 2 3 4 5 6 7 8 9 10 |
SELECT RAW CONCAT("BUILD INDEX ON ", k , "(['", CONCAT2 ("','", inames), "']);") FROM system:indexes AS s LET bid = CONCAT("`",s.bucket_id, "`"), sid = CONCAT("`", s.scope_id, "`"), kid = CONCAT("`", s.keyspace_id, "`"), k = NVL2(bid, CONCAT2(".", bid, sid, kid), kid) WHERE s.namespace_id = "default" GROUP BY k LETTING inames = ARRAY_AGG(s.name) FILTER (WHERE s.state = 'deferred') HAVING ARRAY_LENGTH(inames) > 0; |
쿼리 결과는 생성된 인덱스를 빌드하는 BUILD 문을 반환합니다. 클러스터의 각 범위에 대해 BUILD 문이 있다는 점에 유의하세요. 결과는 다음과 같이 표시됩니다:
|
1 2 3 4 |
[ "BUILD INDEX ON `couchmusic2`.`music`.`subregions`(['region']);", "BUILD INDEX ON `couchmusic2`.`music`.`countries`(['country_code','country_region_number']);" ] |
각 BUILD 문을 복사한 다음(큰따옴표 사이) 쿼리 편집기에 붙여넣고 실행 를 사용하여 인덱스를 빌드합니다. 각 BUILD 문에 대해 반복합니다,
축하드립니다. 자체 관리형 Couchbase Server 클러스터에서 Capella로 데이터와 인덱스를 마이그레이션하셨습니다!
cbbackup 및 cbrestore를 사용하여 마이그레이션 - 옵션 2
이 옵션은 다음 버전의 자체 관리형 Couchbase Server에 적용됩니다:
-
- 커뮤니티 에디션 버전 6.6
cbbackup CLI 도구를 사용합니다:
-
- cbbackup 는 자체 관리형 카우치베이스 서버 설치의 루트 디렉토리에 있습니다.
- 명령줄 터미널을 사용하여 cbbackup으로 작업합니다.
- 플랫폼에 따라 cbbackup은 다음 위치에 Couchbase Server와 함께 설치됩니다:
- Linux: /opt/couchbase/bin/cbbackup
- Windows (기본 설치 가정): C:\프로그램 파일\Couchbase\서버\bin\cbbackup
- Mac OS X: /Applications/Couchbase Server.app/Contents/Resources/couchbase-core/bin/cbbackup
카우치베이스 서버의 설치 디렉터리에 직접 액세스할 수 없는 경우에는 cbbackup 그리고 cbrestore 명령줄 유틸리티를 카우치베이스 서버 다운로드 를 클릭하고 로컬 시스템에 설치합니다.
자체 관리형 카우치베이스 서버 시스템에서 백업 만들기
명령줄 터미널에서 자체 관리형 Couchbase Server에서 로컬 백업을 위한 디렉터리를 만듭니다. 다음 명령은 시스템 루트 폴더에 디렉터리를 생성합니다:
mkdir /backups/
다음을 실행합니다. cbbackup 명령을 사용하여 백업을 생성합니다:
|
1 |
cbbackup -u <SELF-MANAGED-SERVER-ADMIN> -p <SELF-MANAGED-SERVER-ADMIN-PWD> couchbase://<URL-TO-SELF-MANAGED-COUCHBASE-SERVER> /backups -b <SELF-MANAGED-BUCKET-NAME> |
M명령에서 다음과 같이 대체할 수 있습니다:
-
- 교체
<SELF-MANAGED-SERVER-ADMIN>자체 관리형 Couchbase 서버의 관리자 사용자 이름과 함께 - 교체
<SELF-MANAGED-SERVER-ADMIN-PWD>자체 관리형 카우치베이스 서버의 관리자 비밀번호를 사용합니다. - 교체
<URL-TO-SELF-MANAGED-COUCHBASE-SERVER>자체 관리형 카우치베이스 서버에 대한 URL을 포함시킵니다. - 교체
<SELF-MANAGED-BUCKET-NAME>에 마이그레이션하려는 버킷의 이름을 입력합니다.- 참고: 이 명령은 지정된 버킷만 백업합니다.
- 교체
다음 명령을 실행하여 백업을 검사합니다:
-
- ls /backups
Windows용:
-
- dir /backups
백업에 대한 기본 정보가 표시됩니다.
cbrestore CLI 도구를 사용합니다:
- cbrestore 는 자체 관리형 Couchbase Server 설치의 루트 디렉토리에 있습니다.
- 명령줄 터미널을 사용하여 다음과 같이 작업합니다. cbrestore.
- 플랫폼에 따라 다릅니다, cbrestore 는 다음 위치에 카우치베이스 서버와 함께 설치됩니다:
- Linux: /opt/couchbase/bin/cbrestore
- Windows (기본 설치 가정): C:\프로그램 파일\Couchbase\서버\bin\cbrestore
- Mac OS X: /응용 프로그램/카우치베이스 서버.app/콘텐츠/리소스/카우치베이스 코어/빈/cbrestore
cbrestore를 사용하여 백업을 Capella로 복원합니다.
다음을 실행합니다. cbrestore 명령을 사용하여 Capella에서 백업을 복원합니다:
|
1 |
cbrestore /backups https://<CAPELLA-NODE-HOSTNAME>:18091 --bucket-source=<SELF-MANAGED-BUCKET-NAME> --bucket-destination=<CAPELLA-BUCKET-NAME> --from-date=<DATE-OF-BACKUP> --to-date=<DATE-FOLLOWING-BACKUP> --username=<CAPELLA-DATABASE-CREDENTIALS-USER> --password=<CAPELLA-DATABASE-CREDENTIALS-PASSWORD> --ssl --cacert=<FULL-PATH-TO-CAPELLA-ROOT-CERT> |
명령에서 다음과 같이 대체합니다:
-
- 교체
<CAPELLA-NODE-HOSTNAME>를 Capella 클러스터의 노드 호스트 이름(앞서 기록한)으로 변경합니다. - 교체
<SELF-MANAGED-BUCKET-NAME>를 마이그레이션할 버킷의 이름과 함께 입력합니다. - 교체
<CAPELLA-BUCKET-NAME>에 대상 버킷의 이름을 입력합니다. - 교체
<DATE-OF-BACKUP>백업을 수행한 날짜와 함께- 참고: 날짜 형식 사용 YYYY-MM-DD
- 교체
<DATE-FOLLOWING-BACKUP>백업을 수행한 날짜의 다음 날짜와 함께- 참고: 날짜 형식 사용 YYYY-MM-DD
- 교체
<CAPELLA-DATABASE-CREDENTIALS-USER>데이터베이스 자격 증명 사용자를 Capella 클러스터에 추가합니다. - 교체
<CAPELLA-DATABASE-CREDENTIALS-PASSWORD>데이터베이스 자격 증명 사용자 비밀번호로 - 교체
<FULL-PATH-TO-CAPELLA-ROOT-CERT>에 Capella 클러스터 루트 인증서의 전체 파일 경로(이전 단계에서 저장한 대로)를 입력합니다.
- 교체
다음은 명령이 어떻게 표시되는지 보여주는 예시입니다:
|
1 |
cbrestore /backups https://12345xxxxxx.cloud.couchbase.com:18091 --bucket-source=migration-sample --bucket-destination=migration-sample --from-date=2022-05-19 --to-date=2022-05-20 --username=dataUser --password=A5121U!i --ssl --cacert=/ROOT_CERT/Capella-root-certificate.pem |
이 명령은 클러스터의 크기에 따라 실행하는 데 몇 분 정도 걸릴 수 있습니다. 완료되면 터미널에 복원된 백업에 대한 세부 정보가 표시되고 메시지가 표시됩니다: 완료되었습니다.
마이그레이션된 문서와 색인을 살펴보세요:
-
- 카우치베이스 아카펠라 UI에서 다음을 선택합니다. 도구 > 문서 대상 클러스터에 대한
- 모든 자체 관리 클러스터 문서가 Capella로 마이그레이션된 것을 볼 수 있습니다.
- 카우치베이스 아카펠라 UI에서 다음을 선택합니다. 도구 > 색인 대상 클러스터에 대한
- 모든 자체 관리 클러스터 인덱스가 Capella로 마이그레이션된 것을 볼 수 있습니다.
- 참고: 정의가 다음과 같이 설정된 모든 인덱스는
defer_build:true마이그레이션되지만, 다음과 같이 나열됩니다. 생성됨 하지만 READY. 이러한 인덱스는 여전히 Capella를 기반으로 구축해야 합니다.
Capella에서 인덱스 구축
-
- 카우치베이스 아카펠라 UI에서 다음을 선택합니다. 도구 > 쿼리 워크벤치 대상 클러스터에서
- 다음 쿼리는 마이그레이션 중에 생성되었지만 빌드되지 않은 모든 인덱스에 대한 BUILD 문을 생성합니다.
- 다음 쿼리를 Capella의 쿼리 워크벤치에 복사/붙여넣은 다음, 다음을 클릭합니다. 실행:
|
1 2 3 4 5 6 7 8 9 10 |
SELECT RAW CONCAT("BUILD INDEX ON ", k , "(['", CONCAT2 ("','", inames), "']);") FROM system:indexes AS s LET bid = CONCAT("`",s.bucket_id, "`"), sid = CONCAT("`", s.scope_id, "`"), kid = CONCAT("`", s.keyspace_id, "`"), k = NVL2(bid, CONCAT2(".", bid, sid, kid), kid) WHERE s.namespace_id = "default" GROUP BY k LETTING inames = ARRAY_AGG(s.name) FILTER (WHERE s.state = 'deferred') HAVING ARRAY_LENGTH(inames) > 0; |
쿼리 결과는 빌드 문을 사용하여 생성된 인덱스를 빌드합니다. 결과는 다음과 같이 표시됩니다:
|
1 2 3 4 5 |
[ "BUILD INDEX ON `sample-bucket`(['def_airportname','def_city','def_faa','def_icao','def_name_type','def_primary','def_route_src_dst_day','def_schedule_utc','def_sourceairport','def_type']);" ] |
복사 빌드 문(큰따옴표 사이)을 복사한 다음 쿼리 편집기에 붙여넣고 실행 를 사용하여 인덱스를 작성합니다.
축하드립니다. 자체 관리형 Couchbase Server 클러스터에서 Capella로 데이터와 인덱스를 마이그레이션하셨습니다!
XDCR(교차 데이터 센터 복제)을 통한 마이그레이션 진행 중
이 옵션은 다음 버전의 자체 관리형 Couchbase Server에 적용됩니다:
-
- Enterprise Edition 버전 6.6, 7.0.x, 7.1
이 단계는 선택 사항입니다. CLI 도구를 사용하여 초기 마이그레이션 이후에도 일정 기간 동안 데이터를 계속 마이그레이션하려면 XDCR 사용을 고려하세요.
자체 관리형 Couchbase Server 클러스터를 Couchbase Capella 클러스터에 연결하기
엔터프라이즈 에디션만 해당
-
- 카우치베이스 아카펠라 UI 메인 탐색에서 다음을 클릭합니다. 클러스터을 클릭한 다음 마이그레이션할 대상 클러스터를 클릭합니다.
- 를 클릭합니다. 연결 탭을 클릭한 다음 광역 네트워크 클릭 허용된 IP 관리
- 허용된 IP 화면에서 허용 IP 추가
- 플라이아웃 편집기에서 자체 관리형 Couchbase Server 클러스터 노드의 IP 주소를 입력(또는 + 내 IP 추가 를 클릭하여 현재 IP 주소에 자동으로 붙여넣기)
- 클릭 IP 추가
- 각 클러스터 노드 IP 주소에 대해 반복합니다.
- 클릭 < 뒤로 을 눌러 이전 화면으로 이동합니다.
참고: IP 허용 목록에 실패하는 경우 대부분의 경우 방화벽 문제와 관련이 있습니다. Couchbase 문서 참조 를 참조하여 Couchbase Server에서 사용하는 기본 포트에 대한 정보를 확인하세요:
-
- 아래 광역 네트워크를 클릭하고 표시된 URL을 복사하여 저장하면 이것이 Capella 클러스터의 엔드포인트 연결입니다. 나중에 이 URL을 사용하여 자체 관리형 Couchbase Server 클러스터를 Couchbase Capella에 연결할 수 있습니다.
- 아래 루트 인증서를 클릭하고 복사 (이렇게 하면 클립보드에 붙여넣을 수 있도록 인증서가 캡처됩니다).
- 자체 관리형 카우치베이스 서버 웹 콘솔에 로그인하고 기본 탐색에서 다음을 클릭합니다. XDCR. 클릭 원격 추가
다음 설정을 입력합니다:
-
- 클러스터 이름 - 원격 클러스터 연결의 이름을 입력합니다.
- IP/호스트명 - 앞서 복사한 Couchbase Capella 클러스터 엔드포인트 URL을 입력합니다.
- 사용자 이름 원격 클러스터용 - Capella 대상 클러스터의 데이터베이스 자격 증명 사용자 이름을 입력합니다.
- 비밀번호 - Capella 대상 클러스터에 대한 데이터베이스 자격 증명 사용자의 비밀번호를 입력합니다.
- 보안 연결 사용 - 확인됨
- 를 선택하고 전체 라디오 버튼
- 앞서 복사한 Capella 클러스터 루트 인증서를 붙여넣습니다.
- 클릭 저장
카우치베이스 XDCR 설정
엔터프라이즈 에디션만 해당됩니다:
Couchbase 교차 데이터 센터 복제(XDCR)를 사용하면 서로 다른 데이터 센터에 있는 클러스터 간에 데이터를 복제할 수 있습니다. 이 기능은 자체 관리형 Couchbase Server 클러스터에서 Couchbase Capella로 데이터를 마이그레이션하는 데 사용할 수 있습니다.
참고: XDCR은 인덱스를 마이그레이션하지 않습니다.
자체 관리형 Couchbase Server 웹 콘솔에서 다음을 클릭합니다. XDCR 을 클릭한 다음 복제 추가
다음 설정을 입력합니다:
-
- 버킷에서 복제 - 마이그레이션할 소스 버킷을 선택합니다.
- 원격 버킷 - 원격 버킷 이름을 입력합니다.
- 원격 클러스터 - 이전에 생성한 원격 클러스터를 선택합니다.
- 클릭 복제 저장
복제 프로세스는 몇 초 내에 시작됩니다.
마이그레이션 확인
데이터 마이그레이션:
-
- 카우치베이스 아카펠라 UI에서 다음을 선택합니다. 클러스터 을 클릭한 다음 클러스터 목록에서 대상 클러스터를 클릭합니다.
- 를 선택하고 버킷 탭을 클릭합니다. 대상 클러스터의 항목 대상 버킷의 항목 수(문서)가 소스 버킷의 항목 수와 일치합니다.
- 대상 클러스터에서 다음을 선택합니다. 문서 에서 도구 드롭다운 목록으로 이동합니다. 모든 문서가 마이그레이션되었는지 확인
인덱스 마이그레이션:
카우치베이스 아카펠라 UI에서 다음을 선택합니다. 색인 에서 도구 드롭다운 목록에서 대상 클러스터를 선택합니다. 인덱스가 마이그레이션되고 빌드되었는지 확인합니다.
쿼리 런타임:
카우치베이스 아카펠라 UI에서 다음을 선택합니다. 쿼리 워크벤치 에서 도구 드롭다운 목록에서 대상 클러스터를 선택합니다.
샘플 SQL++ 쿼리 또는 애플리케이션에서 사용되는 쿼리를 실행하여 자체 관리되는 Couchbase Server 클러스터의 쿼리와 동일한 결과를 받는지 테스트합니다.
관련 리소스
마이그레이션 준비 중입니다:
카우치베이스 카펠라에서 리소스를 배포하고 구성합니다: