Hace poco escribí sobre la creación de aplicaciones de escritorio con Couchbase Lite y JavaFX. Como se ha demostrado Couchbase es una excelente solución para el almacenamiento de datos y sincronización en una aplicación de escritorio debido a la Java SDK disponible. Sin embargo, soy consciente de que JavaFX no es para todo el mundo.
Existe otro framework similar para crear aplicaciones de escritorio en Java. Se llama Gluon, y también ofrece soporte para aplicaciones Android e iOS. Sin embargo, en este ejemplo nos centraremos estrictamente en el escritorio.
Vamos a ver cómo crear una aplicación de escritorio Gluon utilizando casi el mismo código que se encuentra en nuestro anterior ejemplo JavaFX.
Requisitos
Hay algunos requisitos para construir una aplicación Gluon que utilice Couchbase.
- JDK 1.7+
- IntelliJ IDEA
- Pasarela de sincronización Couchbase
Normalmente no hago de esto un requisito, pero es mucho más fácil crear una aplicación Gluon con un IDE como IntelliJ, por eso está en la lista. Hay un plugin para IntelliJ que construirá un proyecto Gluon con Gradle y todo lo que necesitas.
Aunque Couchbase Sync Gateway no es realmente un requisito, es necesario si quieres añadir soporte de sincronización entre tu aplicación y Couchbase Server / otras plataformas y dispositivos.
Creación de un nuevo proyecto Gluon
Si decide utilizar IntelliJ para compilar su proyecto, asegúrese de haber descargado el plugin Gluon tal y como se describe a continuación aquí.
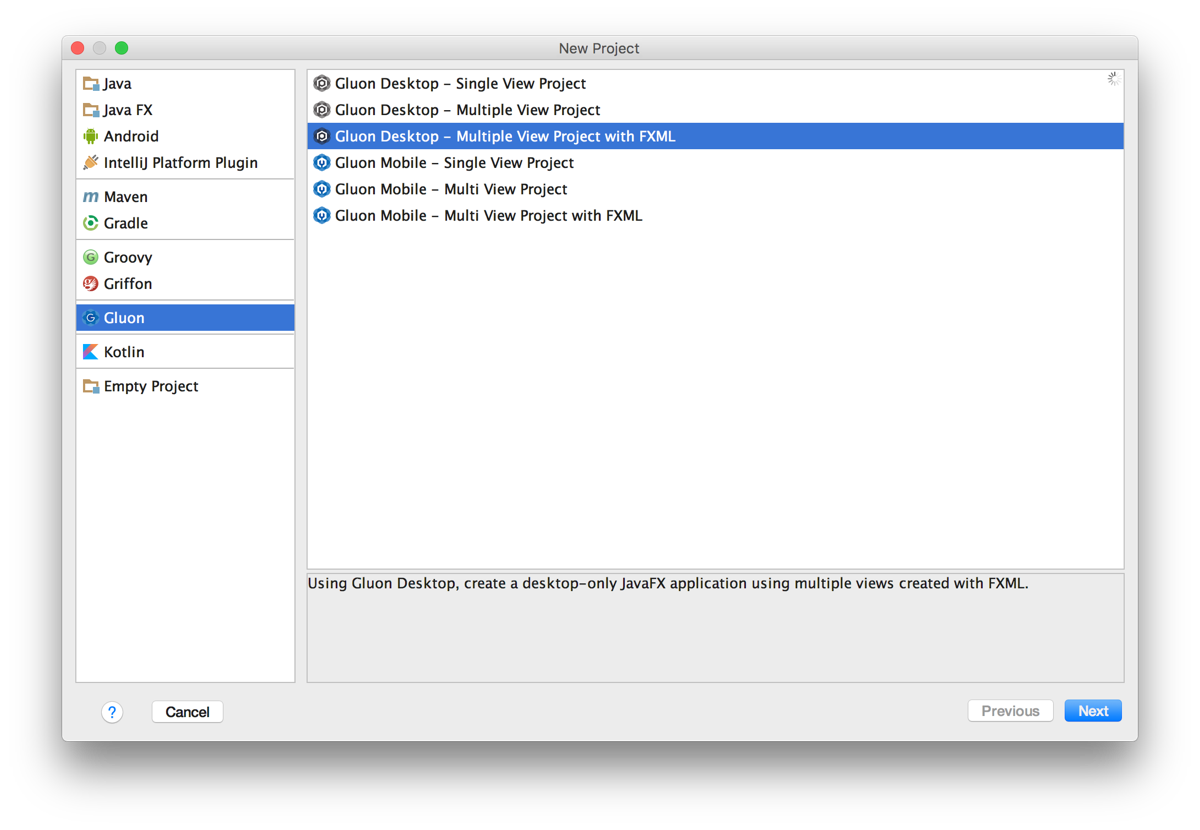
Utilizando IntelliJ, cree un nuevo proyecto, pero elija crear un proyecto Gluon Desktop - Proyecto de vistas múltiples con FXML como se ve a continuación.
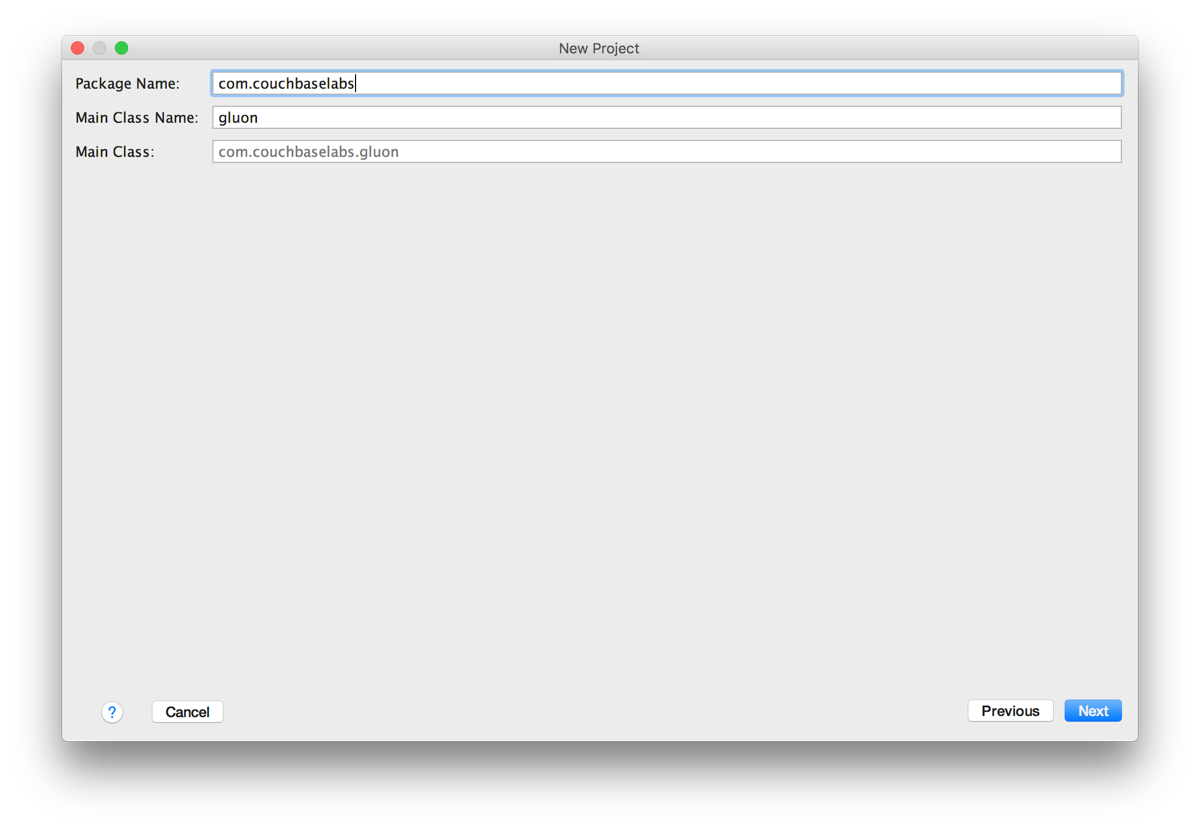
En última instancia, depende de usted hacia dónde ir a partir de aquí, pero para mantenerse lo más cerca posible de esta guía, dé a su proyecto un com.couchbaselabs nombre del paquete y gluón clase principal.
Todo lo que sigue puede dejarse por defecto ya que sólo vamos a hacer una aplicación de dos páginas con Gluon. Cuando hayamos terminado, es de esperar que nos quedemos con una estructura de archivos y directorios parecida a la siguiente:
|
1 2 3 4 5 6 7 8 9 10 11 12 13 14 15 16 17 18 19 20 21 22 23 24 25 26 27 28 29 |
gradle wrapper src main java com couchbaselabs views PrimaryPresenter.java PrimaryView.java SecondaryPresenter.java SecondaryView.java CouchbaseSingleton.java Todo.java gluon.java resources couchbaselabs views primary.fxml primary.css secondary.fxml secondary.css style.css icon.png build.gradle gradlew gradlew.bat |
Te darás cuenta de que he creado algunos archivos adicionales, tales como CouchbaseSingleton.java y Todo.java.
Esencialmente tenemos vistas XML y controladores que van con esas vistas. Esto es muy similar a lo que vimos en un Aplicación JavaFX. A la hora de diseñar esas vistas, tenemos varias opciones. Podemos usar XML sin procesar, o podemos usar SceneBuilder. Ahora bien, no hay que confundir este SceneBuilder con el JavaFX SceneBuilder. Cometí este error y estuve dándome cabezazos durante bastante tiempo. La versión que queremos soportará aplicaciones Gluon.
Antes de empezar a añadir código de aplicación, debemos añadir nuestras dependencias al archivo Gradle del proyecto. Si no estás familiarizado con Gradle, hace el mismo trabajo que Maven o Ant. La sintaxis es diferente, pero yo personalmente lo encuentro un poco más limpio. Abra el proyecto de build.gradle e incluya el siguiente código:
|
1 2 3 4 5 6 7 8 9 10 11 12 13 14 15 16 17 18 19 20 21 22 23 24 25 26 27 |
buildscript { repositories { jcenter() } dependencies { classpath 'org.javafxports:jfxmobile-plugin:1.0.8' } } apply plugin: 'org.javafxports.jfxmobile' repositories { jcenter() maven { url 'https://nexus.gluonhq.com/nexus/content/repositories/releases' } } mainClassName = 'com.couchbaselabs.gluon' dependencies { compile 'com.gluonhq:charm:3.0.0' compile 'com.couchbase.lite:couchbase-lite-java:1.3.0' desktopRuntime 'com.gluonhq:charm-desktop:3.0.0' } |
Lo más importante aquí son las dependencias:
|
1 2 3 4 5 6 7 |
dependencies { compile 'com.gluonhq:charm:3.0.0' compile 'com.couchbase.lite:couchbase-lite-java:1.3.0' desktopRuntime 'com.gluonhq:charm-desktop:3.0.0' } |
Esto incluirá la biblioteca Couchbase Lite, así como el tiempo de ejecución de la aplicación de escritorio para Gluon.
Con el proyecto listo, podemos empezar a desarrollar la aplicación.
Diseño de la capa de datos de Couchbase
Cuando trabajamos con Couchbase es una buena idea crear una instancia singleton del mismo. Esto significa que vamos a utilizar la misma instancia abierta durante toda la aplicación, hasta que decidamos cerrarla.
Abra el archivo src/main/java/com/couchbaselabs/CouchbaseSingleton.java e incluya el siguiente código:
|
1 2 3 4 5 6 7 8 9 10 11 12 13 14 15 16 17 18 19 20 21 22 23 24 25 26 27 28 29 30 31 32 33 34 35 36 37 38 39 40 41 42 43 44 45 46 47 48 49 50 51 52 53 54 55 56 57 58 59 60 61 62 63 64 65 66 67 68 69 70 71 72 73 74 75 76 77 78 79 80 81 82 83 84 85 86 87 88 89 90 91 92 93 94 95 96 |
package com.couchbaselabs; import com.couchbase.lite.*; import com.couchbase.lite.replicator.Replication; import java.net.URL; import java.util.ArrayList; import java.util.HashMap; import java.util.Iterator; import java.util.Map; public class CouchbaseSingleton { private Manager manager; private Database database; private Replication pushReplication; private Replication pullReplication; private static CouchbaseSingleton instance = null; private CouchbaseSingleton() { try { this.manager = new Manager(new JavaContext("data"), Manager.DEFAULT_OPTIONS); this.database = this.manager.getDatabase("fx-project"); View todoView = database.getView("todos"); todoView.setMap(new Mapper() { @Override public void map(Map<String, Object> document, Emitter emitter) { emitter.emit(document.get("_id"), document); } }, "1"); } catch (Exception e) { e.printStackTrace(); } } public static CouchbaseSingleton getInstance() { if(instance == null) { instance = new CouchbaseSingleton(); } return instance; } public Database getDatabase() { return this.database; } public void startReplication(URL gateway, boolean continuous) { this.pushReplication = this.database.createPushReplication(gateway); this.pullReplication = this.database.createPullReplication(gateway); this.pushReplication.setContinuous(continuous); this.pullReplication.setContinuous(continuous); this.pushReplication.start(); this.pullReplication.start(); } public void stopReplication() { this.pushReplication.stop(); this.pullReplication.stop(); } public Todo save(Todo todo) { Map<String, Object> properties = new HashMap<String, Object>(); Document document = this.database.createDocument(); properties.put("type", "todo"); properties.put("title", todo.getTitle()); properties.put("description", todo.getDescription()); try { todo.setDocumentId(document.putProperties(properties).getDocument().getId()); } catch (Exception e) { e.printStackTrace(); } return todo; } public ArrayList query() { ArrayList results = new ArrayList(); try { View todoView = this.database.getView("todos"); Query query = todoView.createQuery(); QueryEnumerator result = query.run(); Document document = null; for (Iterator it = result; it.hasNext(); ) { QueryRow row = it.next(); document = row.getDocument(); results.add(new Todo(document.getId(), (String) document.getProperty("title"), (String) document.getProperty("description"))); } } catch (Exception e) { e.printStackTrace(); } return results; } } |
Si viste la aplicación JavaFX que construí anteriormente, notarás que este singleton es el mismo entre los dos proyectos. Incluso puedes usar una versión similar para Android.
En el CouchbaseSingleton estamos creando y abriendo una base de datos local llamada proyecto fx. Esta base de datos se utilizará en toda la aplicación. También estamos creando nuestra vista Couchbase Lite para realizar consultas. Este todos emitirá un par clave-valor de id de documento y documento para cada documento de la base de datos local.
El método constructor es privado, lo que significa que no queremos que el usuario pueda instanciar un objeto desde él. En su lugar, queremos utilizar un método estático getInstance para hacer el trabajo.
Aunque no nos ocuparemos de la replicación hasta más adelante en la guía, queremos sentar las bases. El sitio startReplication nos permitirá definir una sincronización bidireccional con una pasarela de sincronización y el método stopReplication nos permitirá detener la replicación, quizás cuando se cierre la aplicación.
Ahora tenemos nuestras funciones para guardar y cargar datos.
|
1 2 3 4 5 6 7 8 9 10 11 12 13 14 15 |
public Todo save(Todo todo) { Map<String, Object> properties = new HashMap<String, Object>(); Document document = this.database.createDocument(); properties.put("type", "todo"); properties.put("title", todo.getTitle()); properties.put("description", todo.getDescription()); try { todo.setDocumentId(document.putProperties(properties).getDocument().getId()); } catch (Exception e) { e.printStackTrace(); } return todo; } |
En el guardar aceptamos un método personalizado Todo objeto. Este objeto sólo contiene un id, un título y una descripción. La clase se parece a esto:
|
1 2 3 4 5 6 7 8 9 10 11 12 13 14 15 16 17 18 19 20 21 22 23 24 25 26 27 28 29 30 31 32 33 34 35 36 37 38 39 40 41 |
package com.couchbaselabs; import java.util.*; public class Todo { private String documentId; private String title; private String description; public Todo(String documentId, String title, String description) { this.documentId = documentId; this.title = title; this.description = description; } public Todo(String title, String description) { this.documentId = UUID.randomUUID().toString(); this.title = title; this.description = description; } public void setDocumentId(String documentId) { this.documentId = documentId; } public String getDocumentId() { return this.documentId; } public String getTitle() { return this.title; } public String getDescription() { return this.description; } } |
Esta clase se encuentra en la sección src/main/java/com/couchbaselabs/Todo.java archivo. Lo que estamos haciendo en realidad es tomar el objeto y añadirlo como propiedades a un documento NoSQL de Couchbase. Después de guardar el documento y obtener un id, devolvemos el mismo documento con el id incluido.
La función de consulta ejecutará la vista que hemos creado anteriormente y añadirá cada uno de los elementos resultantes a un array de Todo poniendo fin a nuestro singleton de base de datos.
Creación de una vista para listar datos
Vamos a crear una aplicación que utiliza múltiples vistas Gluon en lugar de tratar de meter todo en la misma vista. Esto no debe confundirse con Couchbase Lite Views que están en el tema de los datos, no UI.
La vista por defecto será la primera vista que aparezca cuando iniciemos la aplicación. Esta vista mostrará una lista de todos nuestros elementos de tareas. Si no se utiliza SceneBuilder, el marcado XML que se encuentra en src/main/resources/com/couchbaselabs/views/primary.fxml tendría el siguiente aspecto:
|
1 2 3 4 5 6 |
<!--?xml version="1.0" encoding="UTF-8"?--> <!--?import com.gluonhq.charm.glisten.mvc.View?--> <!--?import javafx.scene.control.ListView?--> <!--?import javafx.scene.layout.BorderPane?--> |
|
1 2 3 |
La vista resultante tendrá el siguiente aspecto:
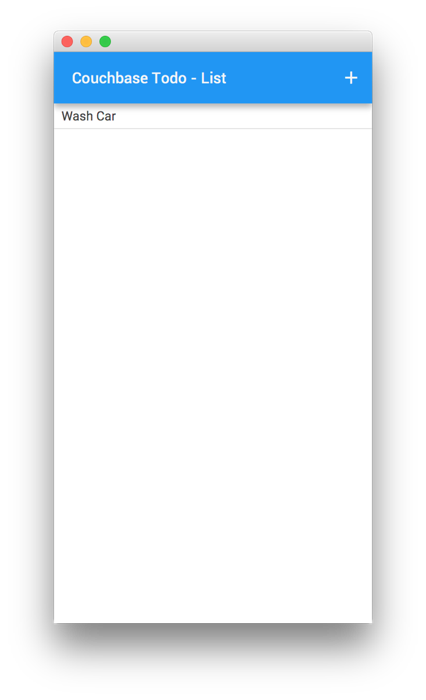
Verá en la imagen que hay una barra de navegación con un botón, pero no aparece en el diseño XML. En su lugar, el diseño sólo contiene la vista de lista. Sin embargo, el XML hace referencia a nuestro src/main/java/com/couchbaselabs/views/PrimaryPresenter.java archivo. Este es el archivo donde no sólo definimos la barra de navegación, sino cualquier lógica que alimente la vista en particular.
En src/main/java/com/couchbaselabs/views/PrimaryPresenter.java se parecerá mucho a nuestro proyecto JavaFX, con las diferencias en el componente de navegación.
|
1 2 3 4 5 6 7 8 9 10 11 12 13 14 15 16 17 18 19 20 21 22 23 24 25 26 27 28 29 30 31 32 33 34 35 36 37 38 39 40 41 42 43 44 45 46 47 48 49 50 51 52 53 54 55 56 57 58 59 60 61 62 63 64 65 66 67 68 69 70 71 72 73 74 75 76 77 78 79 80 81 82 83 84 85 86 87 88 89 90 91 92 93 94 95 96 97 98 99 100 |
package com.couchbaselabs.views; import com.couchbaselabs.CouchbaseSingleton; import com.couchbaselabs.Todo; import com.couchbase.lite.Database; import com.couchbase.lite.Document; import com.couchbaselabs.gluon; import com.gluonhq.charm.glisten.application.MobileApplication; import com.gluonhq.charm.glisten.control.AppBar; import com.gluonhq.charm.glisten.mvc.View; import com.gluonhq.charm.glisten.visual.MaterialDesignIcon; import javafx.application.Platform; import javafx.collections.ObservableList; import javafx.fxml.FXML; import javafx.scene.control.ListCell; import javafx.scene.control.ListView; import javafx.util.Callback; public class PrimaryPresenter { private CouchbaseSingleton couchbase; @FXML private View primary; @FXML private ListView fxListView; public void initialize() { try { this.couchbase = CouchbaseSingleton.getInstance(); fxListView.getItems().addAll(this.couchbase.query()); this.couchbase.getDatabase().addChangeListener(new Database.ChangeListener() { @Override public void changed(Database.ChangeEvent event) { for(int i = 0; i < event.getChanges().size(); i++) { final Document retrievedDocument = couchbase.getDatabase().getDocument(event.getChanges().get(i).getDocumentId()); Platform.runLater(new Runnable() { @Override public void run() { int documentIndex = indexOfByDocumentId(retrievedDocument.getId(), fxListView.getItems()); for (int j = 0; j < fxListView.getItems().size(); j++) { if (((Todo) fxListView.getItems().get(j)).getDocumentId().equals(retrievedDocument.getId())) { documentIndex = j; break; } } if (retrievedDocument.isDeleted()) { if (documentIndex > -1) { fxListView.getItems().remove(documentIndex); } } else { if (documentIndex == -1) { fxListView.getItems().add(new Todo(retrievedDocument.getId(), (String) retrievedDocument.getProperty("title"), (String) retrievedDocument.getProperty("description"))); } else { fxListView.getItems().remove(documentIndex); fxListView.getItems().add(new Todo(retrievedDocument.getId(), (String) retrievedDocument.getProperty("title"), (String) retrievedDocument.getProperty("description"))); } } } }); } } }); } catch (Exception e) { e.printStackTrace(); } fxListView.setCellFactory(new Callback<ListView, ListCell>() { @Override public ListCell call(ListView p) { ListCell cell = new ListCell() { @Override protected void updateItem(Todo t, boolean bln) { super.updateItem(t, bln); if (t != null) { setText(t.getTitle()); } } }; return cell; } }); primary.showingProperty().addListener((obs, oldValue, newValue) -> { if (newValue) { AppBar appBar = MobileApplication.getInstance().getAppBar(); appBar.setTitleText("Couchbase Todo - List"); appBar.getActionItems().add(MaterialDesignIcon.ADD.button(e -> MobileApplication.getInstance().switchView(gluon.SECONDARY_VIEW) )); } }); } private int indexOfByDocumentId(String needle, ObservableList haystack) { int result = -1; for(int i = 0; i < haystack.size(); i++) { if(haystack.get(i).getDocumentId().equals(needle)) { result = i; break; } } return result; } } |
En el archivo anterior tenemos la propiedad de vista de lista vinculada a la vista de lista real en el XML. Sin embargo, el código que realmente importa es el que se encuentra en el archivo inicializar método. En él hacemos tres cosas fundamentales.
|
1 2 3 4 5 6 7 8 9 10 11 12 13 14 15 16 17 |
fxListView.setCellFactory(new Callback<ListView, ListCell>() { @Override public ListCell call(ListView p) { ListCell cell = new ListCell() { @Override protected void updateItem(Todo t, boolean bln) { super.updateItem(t, bln); if (t != null) { setText(t.getTitle()); } } }; return cell; } }); |
En el código anterior definimos cómo aparecerán los datos en la lista. Por defecto sólo acepta datos de cadena, así que lo anulamos para que tome el título de nuestro Todo objetos.
|
1 2 3 4 5 6 7 8 9 10 11 |
primary.showingProperty().addListener((obs, oldValue, newValue) -> { if (newValue) { AppBar appBar = MobileApplication.getInstance().getAppBar(); appBar.setTitleText("Couchbase Todo - List"); appBar.getActionItems().add(MaterialDesignIcon.ADD.button(e -> MobileApplication.getInstance().switchView(gluon.SECONDARY_VIEW) )); } }); |
En el listener anterior establecemos el título de nuestra barra de navegación así como el botón. Cuando se pulse el botón, la vista cambiará a nuestra vista secundaria.
Por último, nos queda ejecutar la consulta inicial de datos y rellenar la lista, así como estar atentos a los nuevos datos que vayan llegando. Si llegan cambios, se iterará sobre ellos y se revisarán los indicadores en cada documento modificado. Si se ha eliminado un indicador, los datos se borrarán de la lista. Si se ha producido un cambio, los datos de la vista de lista se eliminarán y, a continuación, se sustituirán. En caso contrario, sólo se añadirán los datos. Dado que el listener opera en un subproceso en segundo plano, los cambios en la interfaz de usuario deben realizarse dentro del subproceso Plataforma.runLater.
Esto nos lleva al segundo y último punto de vista.
Creación de una vista para guardar datos
La segunda vista tendrá un formulario y será responsable de que las entradas del usuario se añadan a la base de datos y se muestren en la vista anterior. El marcado XML que alimenta esta vista tendrá el siguiente aspecto:
|
1 2 3 4 5 6 7 8 9 10 11 12 13 14 15 16 17 18 19 20 21 22 23 24 25 26 27 28 29 30 31 32 33 34 35 36 37 38 39 40 41 42 43 44 45 46 47 48 49 50 51 52 53 54 55 56 57 58 59 60 61 62 63 64 65 66 67 68 69 70 71 72 73 74 75 76 77 78 79 80 81 82 83 84 85 86 87 88 89 90 91 92 93 94 95 96 97 98 99 100 101 102 103 104 105 106 107 108 109 110 111 112 113 114 115 116 117 118 119 120 121 122 123 124 125 126 127 128 129 130 131 132 133 134 135 136 137 138 139 140 141 142 143 144 145 146 147 148 149 150 151 152 153 154 155 156 157 158 159 160 161 162 163 164 165 166 167 168 169 170 171 172 173 174 175 176 177 178 179 |
<!--?xml version="1.0" encoding="UTF-8"?--> <!--?import com.gluonhq.charm.glisten.mvc.View?--> <!--?import javafx.geometry.Insets?--> <!--?import javafx.scene.control.TextArea?--> <!--?import javafx.scene.control.TextField?--> <!--?import javafx.scene.layout.BorderPane?--> <!--?import javafx.scene.layout.VBox?--> <textarea> </children> </VBox> </top> <padding> <Insets bottom="10.0" left="10.0" right="10.0" top="10.0" /> </padding> </View> </code> </pre> <p>The XML above is found in the <strong>src/main/resources/com/couchbaselabs/views/secondary.fxml</strong> file and the view itself looks like the following:</p> <p><img src="/wp-content/original-assets/2016/october/using-couchbase-lite-in-a-java-gluon-application/cb-gluon-desktop-4.png" /></p> <p>Notice that there are two <code>TextField</code> inputs. They will be important in the <strong>src/main/java/com/couchbaselabs/views/SecondaryPresenter.java</strong> file referenced in the XML. This file contains the following code:</p> <pre> <code> package com.couchbaselabs.views; import com.couchbaselabs.CouchbaseSingleton; import com.couchbaselabs.Todo; import com.gluonhq.charm.glisten.animation.BounceInRightTransition; import com.gluonhq.charm.glisten.application.MobileApplication; import com.gluonhq.charm.glisten.control.AppBar; import com.gluonhq.charm.glisten.layout.layer.FloatingActionButton; import com.gluonhq.charm.glisten.mvc.View; import com.gluonhq.charm.glisten.visual.MaterialDesignIcon; import javafx.fxml.FXML; import javafx.scene.control.Alert; import javafx.scene.control.TextArea; import javafx.scene.control.TextField; public class SecondaryPresenter { private CouchbaseSingleton couchbase; @FXML private View secondary; @FXML private TextField fxTitle; @FXML private TextArea fxDescription; public void initialize() { this.couchbase = CouchbaseSingleton.getInstance(); secondary.setShowTransitionFactory(BounceInRightTransition::new); secondary.getLayers().add(new FloatingActionButton(MaterialDesignIcon.SAVE.text, e -> save() )); secondary.showingProperty().addListener((obs, oldValue, newValue) -> { if (newValue) { AppBar appBar = MobileApplication.getInstance().getAppBar(); appBar.setTitleText("Couchbase Todo - Create"); } }); } private void save() { if(!fxTitle.getText().equals("") && !fxDescription.getText().equals("")) { couchbase.save(new Todo(fxTitle.getText(), fxDescription.getText())); fxTitle.setText(""); fxDescription.setText(""); MobileApplication.getInstance().switchToPreviousView(); } else { Alert alert = new Alert(Alert.AlertType.INFORMATION); alert.setTitle("Missing Information"); alert.setHeaderText(null); alert.setContentText("Both a title and description are required for this example."); alert.showAndWait(); } } } </code> </pre> <p>The input fields are mapped to this controller, but what really matters here is the code for adding the floating action button and setting the navigation bar title.</p> <pre> <code> secondary.getLayers().add(new FloatingActionButton(MaterialDesignIcon.SAVE.text, e -> save() )); secondary.showingProperty().addListener((obs, oldValue, newValue) -> { if (newValue) { AppBar appBar = MobileApplication.getInstance().getAppBar(); appBar.setTitleText("Couchbase Todo - Create"); } }); </code> </pre> <p>When the floating action button is clicked, the <code>save</code> method is called. In the <code>save</code> method we check to make sure the input fields are not blank and if they aren't, save the data and navigate backwards in the stack to the previous view.</p> <h2>Syncing Data with Couchbase Sync Gateway</h2> <p>Up until now, every part of our Gluon application was built for offline local use. However, including synchronization support into the mix is not only useful, but incredibly easy.</p> <p>At this point I'm going to assume you've downloaded and installed Couchbase Sync Gateway. Before we run it, we need to create a configuration file. Create a JSON file with the following:</p> <pre> <code> { "log":["CRUD+", "REST+", "Changes+", "Attach+"], "databases": { "fx-example": { "server":"walrus:", "sync":` function (doc) { channel (doc.channels); } `, "users": { "GUEST": { "disabled": false, "admin_channels": ["*"] } } } } } </code> </pre> <p>The above configuration file is one of the most simplest you can make for Sync Gateway. You're creating a partition called <strong>fx-example</strong> within the in-memory database <strong>walrus</strong> and you're accepting all documents from everyone with no read or write permissions.</p> <p>Running this configuration with Sync Gateway won't get us very far yet because we haven't activated sync support in our application. Open the project's <strong>src/main/java/com/couchbaselabs/gluon.java</strong> file and include the following:</p> <pre> <code> package com.couchbaselabs; import com.couchbaselabs.views.PrimaryView; import com.couchbaselabs.views.SecondaryView; import com.gluonhq.charm.glisten.application.MobileApplication; import com.gluonhq.charm.glisten.visual.Swatch; import javafx.scene.Scene; public class gluon extends MobileApplication { public static final String PRIMARY_VIEW = HOME_VIEW; public static final String SECONDARY_VIEW = "Secondary View"; public CouchbaseSingleton couchbase; @Override public void init() { addViewFactory(PRIMARY_VIEW, () -> new PrimaryView(PRIMARY_VIEW).getView()); addViewFactory(SECONDARY_VIEW, () -> new SecondaryView(SECONDARY_VIEW).getView()); } @Override public void postInit(Scene scene) { Swatch.BLUE.assignTo(scene); scene.getStylesheets().add(gluon.class.getResource("style.css").toExternalForm()); try { this.couchbase = CouchbaseSingleton.getInstance(); this.couchbase.startReplication(new URL("https://localhost:4984/fx-example/"), true); } catch (Exception e) { e.printStackTrace(); } } } </code> </pre> <p>Really we only care about the <code>startReplication</code> line in the <code>postInit</code> method. Once we call it, replication will happen in both directions, continuously.</p> <h2>Conclusion</h2> <p>You just saw how to create a Java desktop application with Gluon and Couchbase. Using Gradle you can build and run the application and with a few revisions it can be converted to Android as well.</p> <p>The full source code to this project can be found on GitHub <a href="https://github.com/couchbaselabs/couchbase-lite-gluon-example">here</a>.</p> </textarea> |