Este blog com várias partes o ajudará a criar um aplicativo móvel de ponta a ponta usando o Couchbase Lite. Os aplicativos de ponta a ponta, escaláveis e de nível de produção incluem os seguintes recursos:
-
- Um banco de dados incorporado - O armazenamento de dados localmente reduz as viagens da rede para um banco de dados centralizado para cada atividade. Isso é fundamental para melhorar a experiência do usuário.
- Sincronização com outros dispositivos móveis pares e com um servidor centralizado.
- Análise avançada recursos, pesquisa de texto completo e aprendizado de máquina no dispositivo.
Como há muito a ser abordado, dividimos este projeto em três partes. A Parte 1 apresenta o processo de criação de um aplicativo móvel que aproveita o Couchbase Lite e o usa como um banco de dados incorporado para armazenar dados. A Parte 2 mostrará como executar o Full Text Search (FTS) no dispositivo. E pA arte 3 mostrará o processo de sincronização dos dados com pares e um servidor Couchbase centralizado.
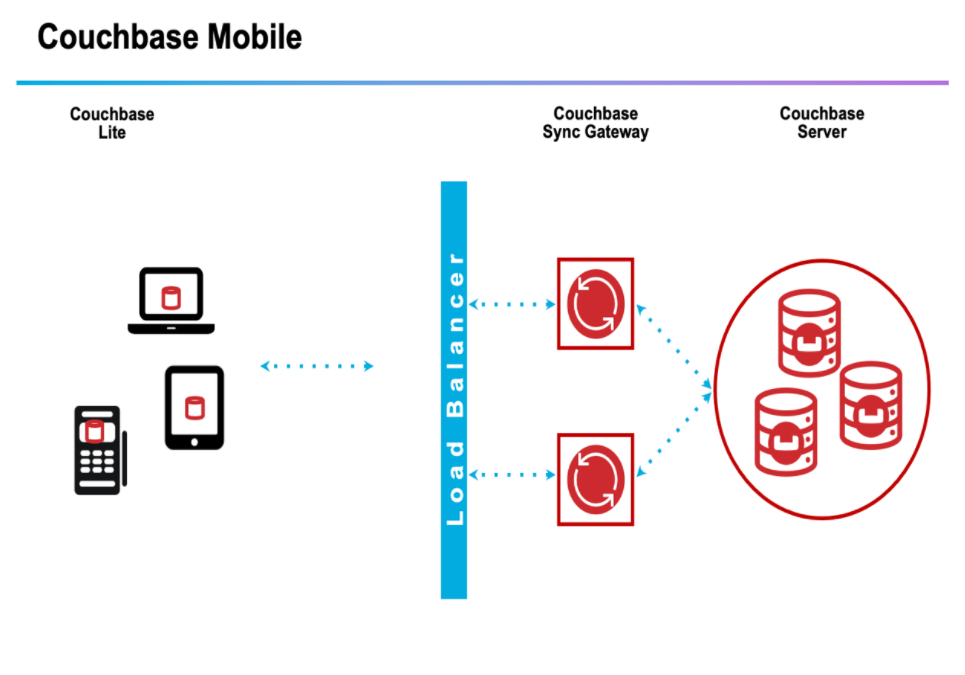
O que é o Couchbase Mobile?
Couchbase Mobile Inclui:
-
- Incorporado Couchbase Lite banco de dados para dispositivos de borda
- Alto desempenho Gateway de sincronização para sincronização ponto a ponto e centralizada do servidor
- Data centers de borda alimentados por Servidor Couchbase que pode ser implantado na nuvem, no local ou em data centers de borda local.
Visão geral do aplicativo móvel
O código para esse aplicativo de demonstração está no meu arquivo Repositório do GitHub do Couchbase Mobile. Baixar Rateit.zip e extraia os arquivos para sua pasta local. Como alternativa, você pode seguir as instruções deste blog para criar o aplicativo do zero.
A funcionalidade do aplicativo é dividida em três partes:
-
- Enviar solicitações de classificação
- Receber solicitações de classificação de outras pessoas
- Visualizar a solicitação classificada retornada por outros
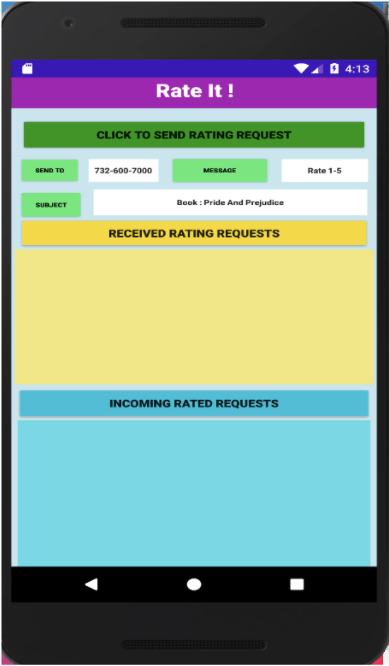
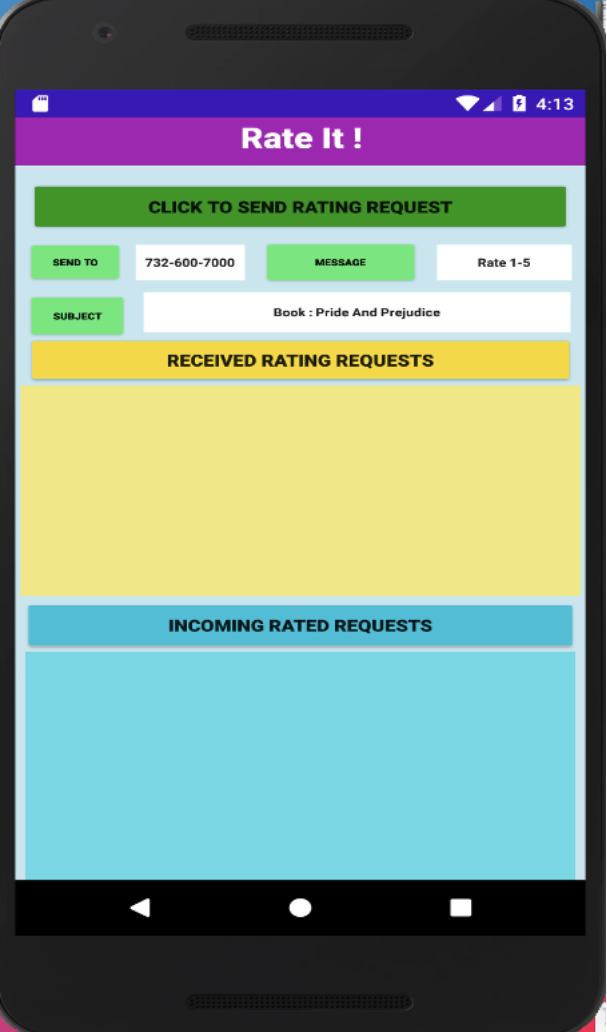
Enviar solicitações de classificação
O aplicativo que criaremos neste aplicativo envia uma solicitação de classificação para uma pessoa e recebe a solicitação de classificação de volta.
O ENVIAR PARA indica o número de telefone da pessoa para quem você deseja enviar a solicitação. O campo MENSAGEM indica o que você deseja que eles façam com ela. Nesse caso, como se trata de uma solicitação de classificação, tenho uma mensagem predefinida de "Rate 1-5", indicando que eles precisam fornecer uma classificação quando enviarem a solicitação de volta.
O ASSUNTO indica qualquer tópico sobre o qual você deseja uma classificação, por exemplo, como um destes:
Ator: Chris Hemsworth
Livro: Orgulho e Preconceito
www.google.com
Não há validações rigorosas de edição nos campos, mas isso é algo que você faria ao criar um aplicativo móvel de nível de produção.
Quando você clica em ENVIARQuando o usuário envia uma solicitação, uma solicitação é enviada para a pessoa da qual você deseja obter uma resposta. Como falaremos sobre a sincronização ponto a ponto com outros dispositivos e com um servidor centralizado em um post futuro, aqui nos concentraremos na função modo off-line local funcionalidade.
Solicitações de classificação recebidas
Essa seção do aplicativo permite que você responda às solicitações de classificação recebidas de outras pessoas. Definimos uma barra de classificação que permite que você insira o número de estrelas para sua classificação.
Para que eu permaneça dentro do escopo deste aplicativo, quando envio uma solicitação, codifiquei valores para remetente e receptor. Eu usei Sandhya como o remetente e Rangana como o receptor. Essa seção exibirá todas as solicitações de Rangana, ou seja, onde o PARA é igual a Rangana.
Solicitações avaliadas recebidas
Esta seção lista todas as solicitações para as quais você enviou e recebeu uma classificação de volta.
Agora vamos analisar um exemplo para deixar todas as seções claras.
Primeiro, enviamos uma solicitação para o número de telefone 732-600-7000 com uma mensagem para avaliar o livro Pride and Prejudice.
Quando você clica em SOLICITAÇÕES DE CLASSIFICAÇÃO RECEBIDAS na verdade, ele está me mostrando os que enviei para outra pessoa, apenas para fins de demonstração aqui. No mundo real, ele seria enviado para a pessoa real a quem foi endereçado.
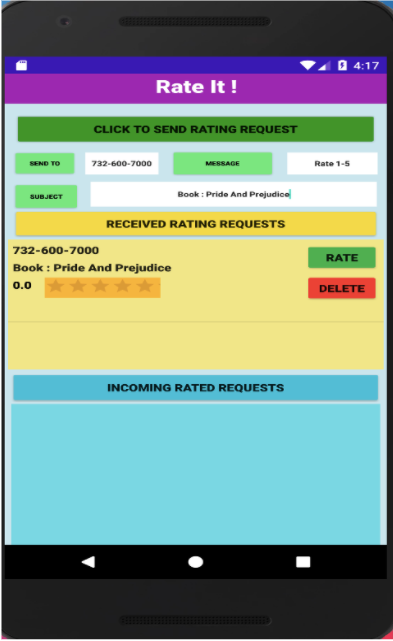
Seleciono uma classificação de quatro estrelas e clico no botão TAXA que inicia o retorno para o envio (essa solicitação classificada volta para mim, conforme mostrado abaixo):
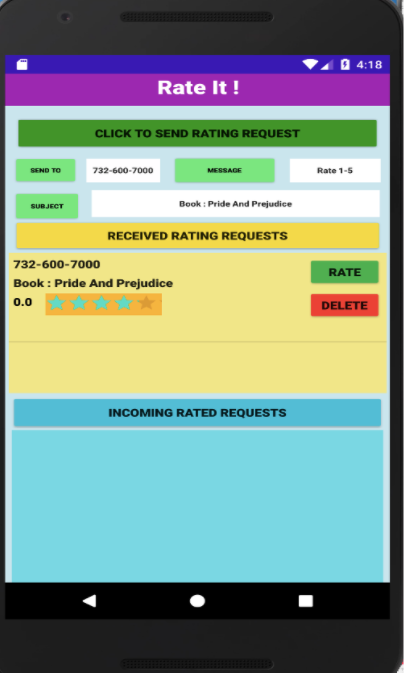
Agora, ao clicar em SOLICITAÇÕES CLASSIFICADAS RECEBIDASSe a avaliação foi enviada para mim, o remetente, podemos ver se ela foi devolvida. Você pode ver que ela retornou e listou minha classificação de 4,0 estrelas.
O DELETE está disponível para que você remova essa linha específica agora.
Agora, vamos criar o aplicativo!
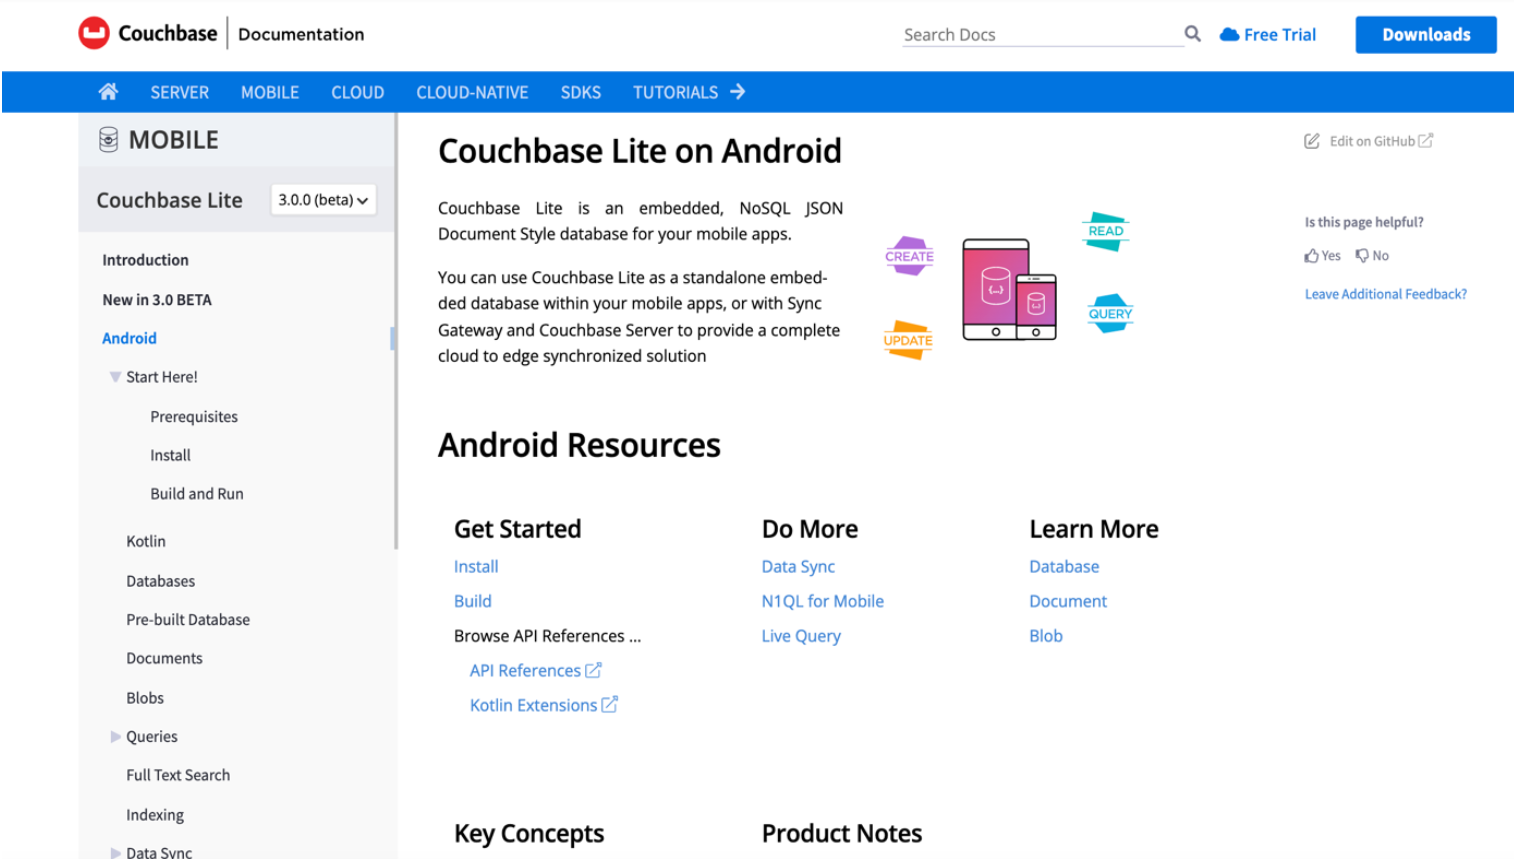
Primeiros passos: Revisar a documentação do CBLite
Consulte o documentação para entender os vários componentes de um aplicativo de banco de dados Couchbase Lite. Para este aplicativo, crio um banco de dados totalmente novo quando o aplicativo é chamado pela primeira vez. Como alternativa, o aplicativo também pode usar um banco de dados pré-criado.
As etapas para incorporar o banco de dados podem ser encontradas aqui na seção Documentação do Couchbase Lite. Revise cada uma das seções para aprender os seguintes conceitos:
-
- Criar e abrir um banco de dados
- gravação de um documento no banco de dados incorporado
- escrever consultas para recuperar o documento
- expiração ou exclusão de um documento
Pré-requisitos para a criação de aplicativos
Este aplicativo foi desenvolvido para dispositivos Android usando os seguintes pré-requisitos de software e hardware que você precisa conhecer:
-
- Você precisa entender os fundamentos da criação de aplicativos com o Android Studio e da programação em Java.
- Este aplicativo de demonstração e as capturas de tela relacionadas são provenientes da criação do aplicativo em um computador MacOS.
- Usamos o software, disponível gratuitamente, Android Studio 2020.3 para criar aplicativos móveis para dispositivos Android.
- É usada a versão 3.0.0-beta02 do Couchbase Lite. As bibliotecas necessárias serão incorporadas ao código e não há necessidade de fazer download do software manualmente em seu desktop.
Criação do aplicativo
Certifique-se de que o Android Studio esteja instalado em seu desktop e crie um novo projeto, escolhendo Atividade vazia como o tipo de projeto. O Android Studio cria um modelo da página principal para você com base no que você escolher. Escolhi esse modelo porque quero criar uma página inicial de aplicativo personalizada.
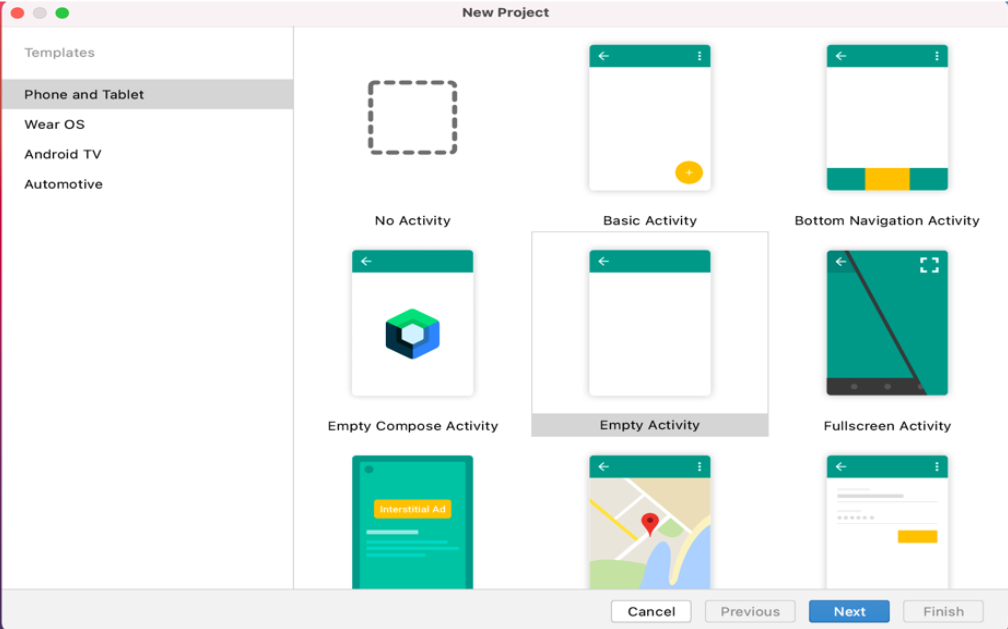
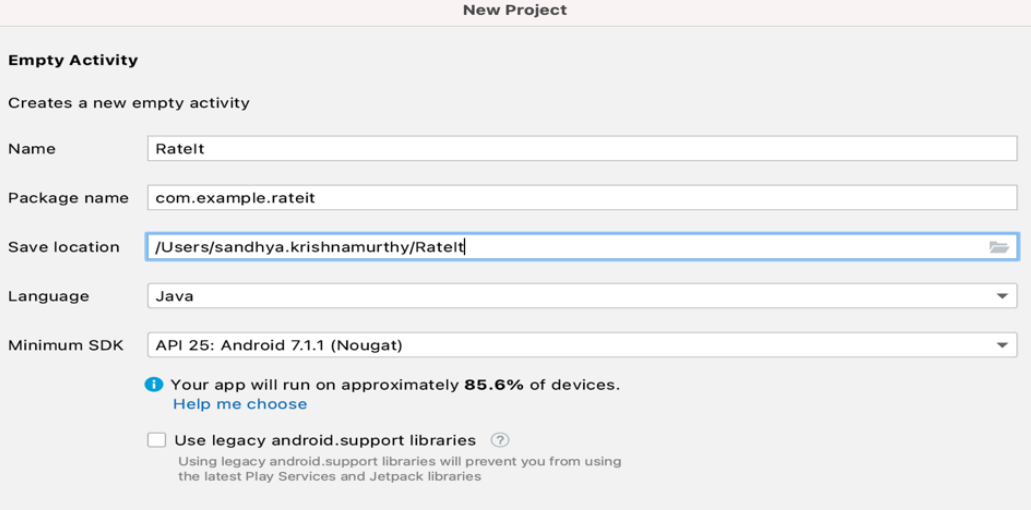
Você pode ver as diferentes configurações que usei na seção Novo projeto form. Isso cria um aplicativo que exibirá "hello world" quando compilado e executado em um emulador. Para criar um emulador para o aplicativo, clique em Tools → AVD Manager → Create virtual Device.
Isso lhe dá uma lista de dispositivos que você pode emular sem precisar adquirir o dispositivo real e compilar ou implantar o código nele. Eu usei o NEXUS 5X API 25.

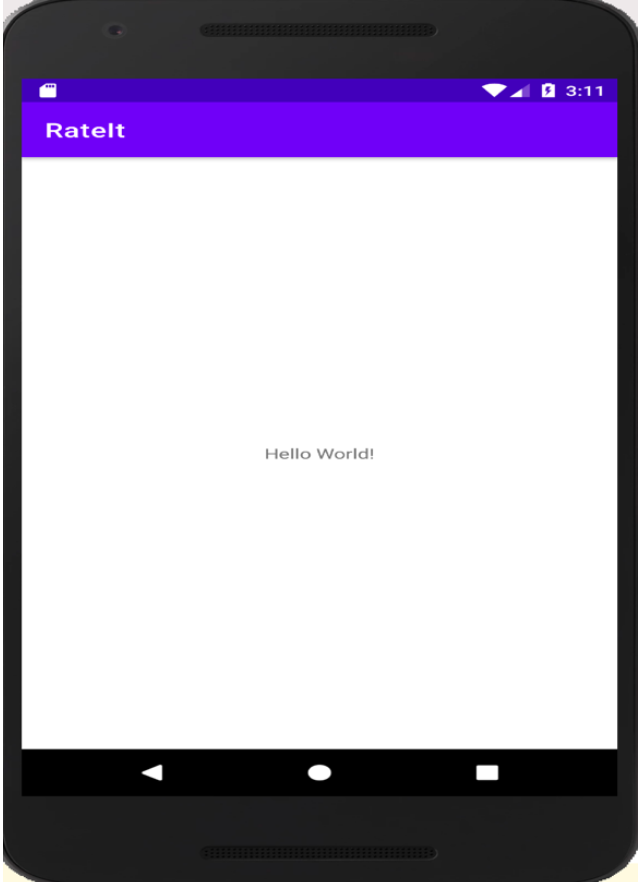
Quando você executa o emulador, a tela a seguir mostra o aplicativo básico, vazio:
A partir daí, criamos os componentes reais do aplicativo Rateit:
Localize o build.gradle(Module.App.rateit) e modifique o conteúdo para corresponder ao seguinte:
-
- O compilarSDK e minSDK para o emulador que você escolher.
- A versão do Java que você tem.
- Adicione o seguinte implementação na seção de dependências:
|
1 |
implementation 'com.couchbase.lite:couchbase-lite-android:3.0.0-beta02' |
Layouts
Os arquivos de layout são arquivos XML que descrevem a tela do aplicativo móvel. O activity_mail.xml estará presente na pasta do projeto e precisa ser substituído pelo arquivo XML de o código do GitHub. O restante dos arquivos XML pode ser adicionado clicando com o botão direito do mouse em layout → Novo → XML → Arquivo XML de layout.
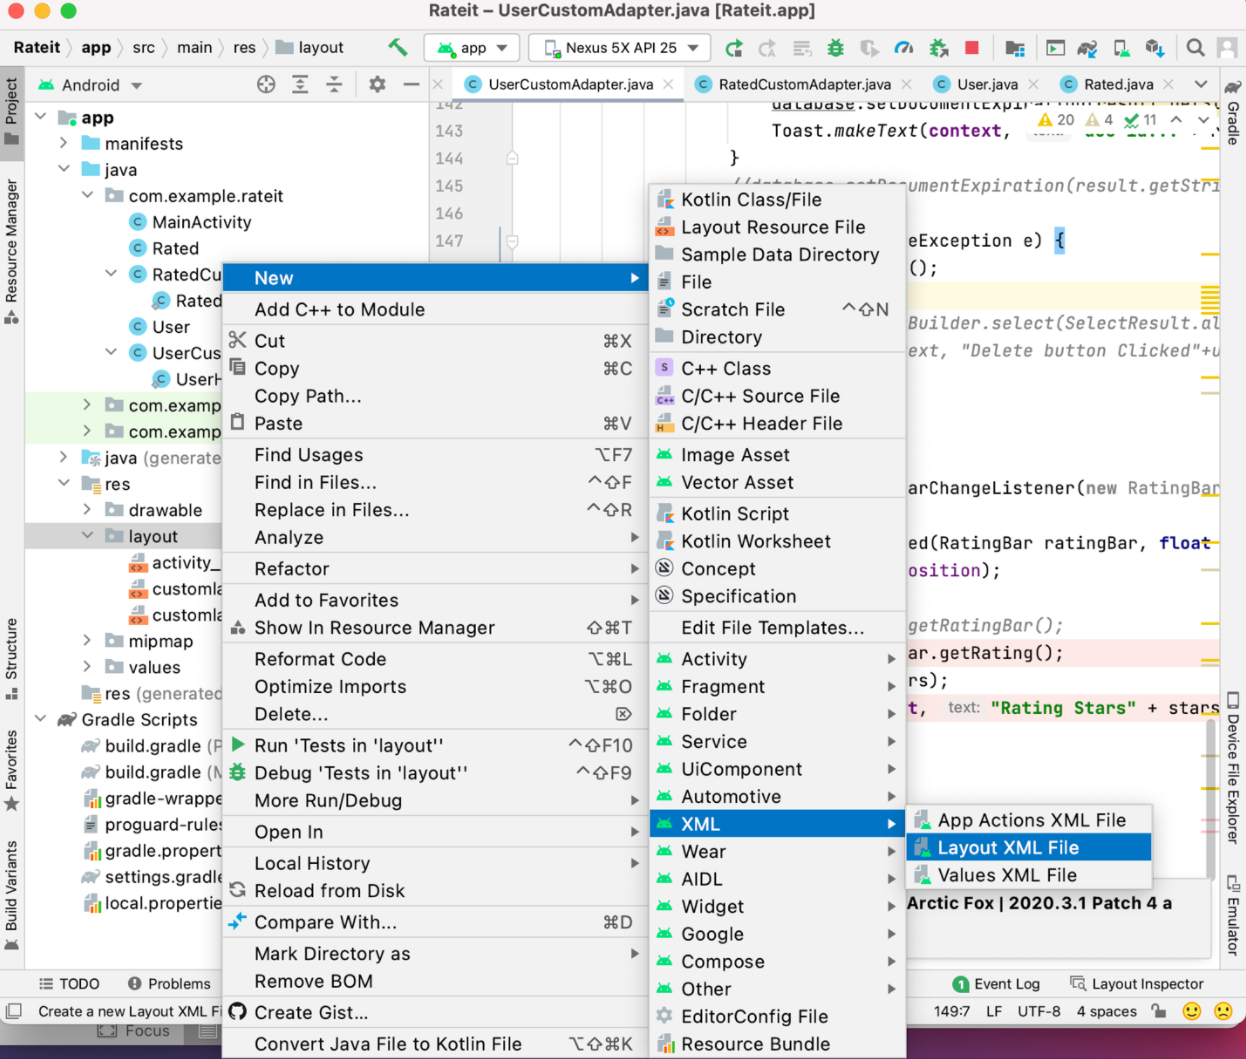
Há mais três arquivos XML de layout a serem criados:
activity_main.xml
Isso tem a ENVIAR PARA, MENSAGEM, ASSUNTO campos além do dois modos de exibição de lista para o Enviado e Recebido solicitações. Ele também define a função a ser invocada quando o CLIQUE PARA ENVIAR SOLICITAÇÃO DE CLASSIFICAÇÃO, SOLICITAÇÕES DE CLASSIFICAÇÃO RECEBIDAS e SOLICITAÇÕES DE CLASSIFICAÇÃO RECEBIDAS botões são pressionados. O código XML pode ser escrito ou pode ser gerado definindo-se os atributos no arquivo atributos seção do designer.
CustomLayout.xml
Isso tem a Visualização de lista e o layout de todos os SOLICITAÇÕES DE CLASSIFICAÇÃO RECEBIDAS e define a função a ser invocada quando o Taxa e Excluir são pressionados.
CustomLayoutRated.xml
Esse layout tem o Visualização de lista e o layout de todos os SOLICITAÇÕES CLASSIFICADAS RECEBIDAS e também define a função a ser invocada quando o Excluir é pressionado.
O aplicativo Rateit
A página principal do aplicativo tem três botões:
-
- CLIQUE PARA ENVIAR SOLICITAÇÃO DE CLASSIFICAÇÃO
- SOLICITAÇÕES DE CLASSIFICAÇÃO RECEBIDAS
- SOLICITAÇÕES DE CLASSIFICAÇÃO RECEBIDAS
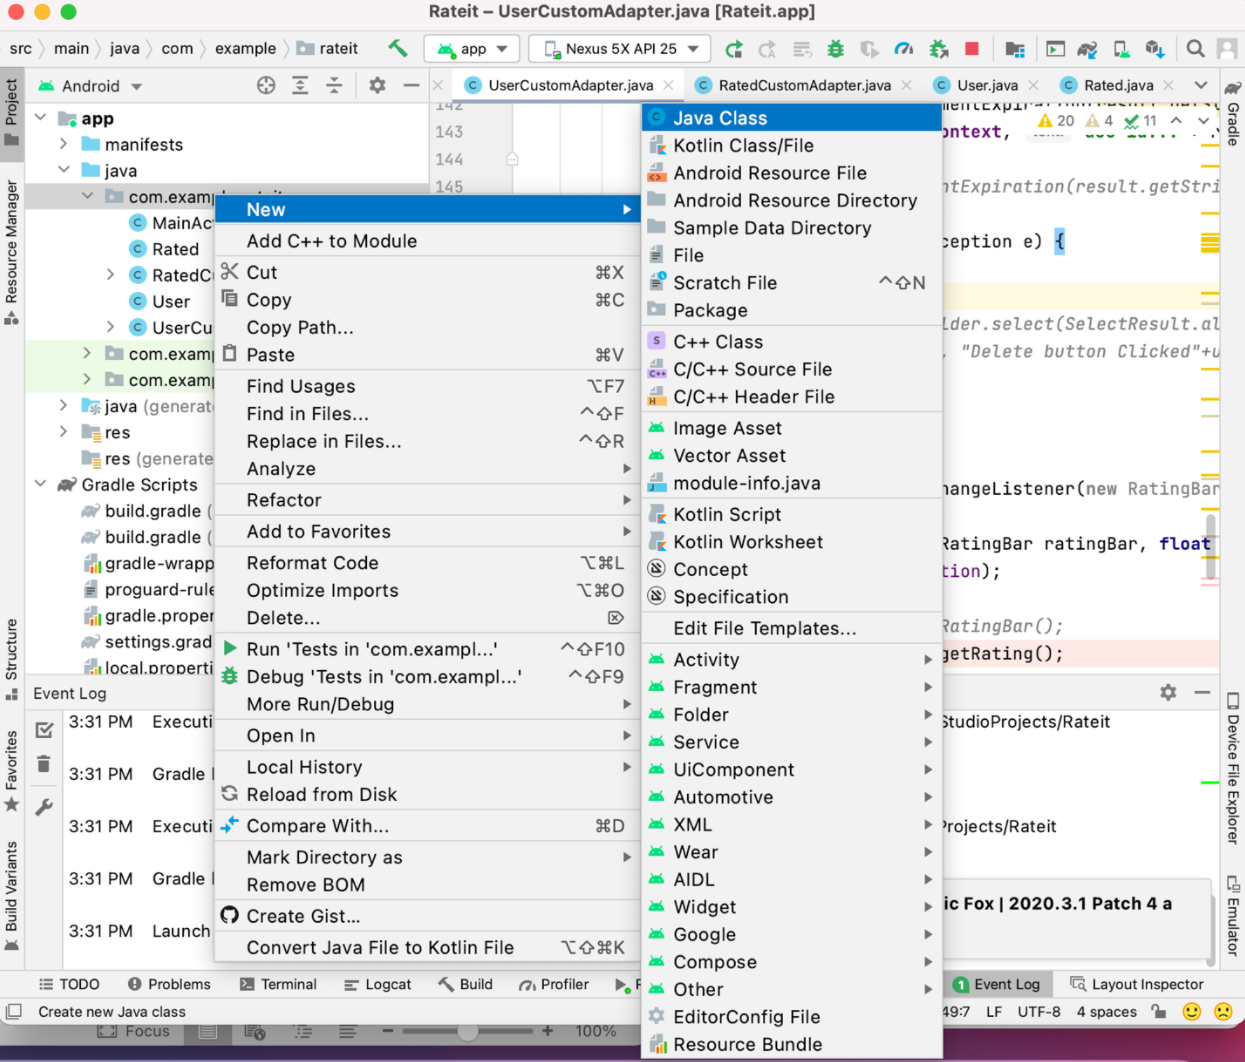
O mainactivity.java estará presente na pasta do projeto e precisa ser substituído pelo código de o repositório do GitHub. O restante dos arquivos Java pode ser adicionado clicando em Java, destacando com.example.rateit e clicando com o botão direito do mouse em Novo → Classe Java. Criar classes para cada uma delas:
-
- Usuário.java
- UserCustomAdapter.java
- Classificado.java
- RatedCustomAdapter.java
Revisão do código
Mainactivity.java
Localizar Mainactivity.java sob o Java → com.example.rateit e cole o seguinte código dentro da classe Atividade principal.
O dados enviados é ativada quando CLIQUE PARA ENVIAR SOLICITAÇÃO DE CLASSIFICAÇÃO é clicado. Ele coleta todos os campos de entrada e cria dois documentos - um do tipo Enviar e um do tipo Recebido. O tipo de registro recebido nos ajuda a ver os registros no SOLICITAÇÕES DE CLASSIFICAÇÃO RECEBIDAS.
Observe que a Parte 2 da série do blog mostrará o recurso de sincronização ponto a ponto e a gravação do registro recebido será removida porque o segundo dispositivo estará recebendo essa solicitação.
O dados recebidos é ativada quando SOLICITAÇÕES DE CLASSIFICAÇÃO RECEBIDAS é clicado e exibe todas as solicitações de classificação recebidas. Ele executa uma consulta ao banco de dados local para obter os registros. Ele permite que você insira uma classificação e cria um registro JSON com a classificação quando o TAXA é clicado, gravando a solicitação de volta no banco de dados com um tipo de documento de classificado. Se o DELETE é clicado, o registro é excluído, mas a configuração do botão TTL (Time to Live) do documento a expirar.
O incomingratings é ativada quando a função SOLICITAÇÕES DE CLASSIFICAÇÃO RECEBIDAS é clicado e exibe todas as classificações enviadas pelo usuário que foram classificadas por outros e retornaram. Quando o botão DELETE for pressionado, o atributo TTL (Time to Live) será definido como expirado.
Classificado.Java detém o Classificado e define e obtém os vários atributos dos registros
RatedCustomAdapter.java e RatedHolder.java preencherá a visualização de lista. O layout é definido em CustomLayoutRated.xml
Usuário.java tem as funções get e set para os atributos do documento necessários para preencher o SOLICITAÇÃO DE CLASSIFICAÇÃO RECEBIDA visualização de lista.
UserCustomAdapter.java e UserHolder.java tem o SOLICITAÇÃO DE CLASSIFICAÇÃO RECEBIDA incluindo a visualização de lista Barra de classificação, o conteúdo do registro e o TAXA e DELETE botão
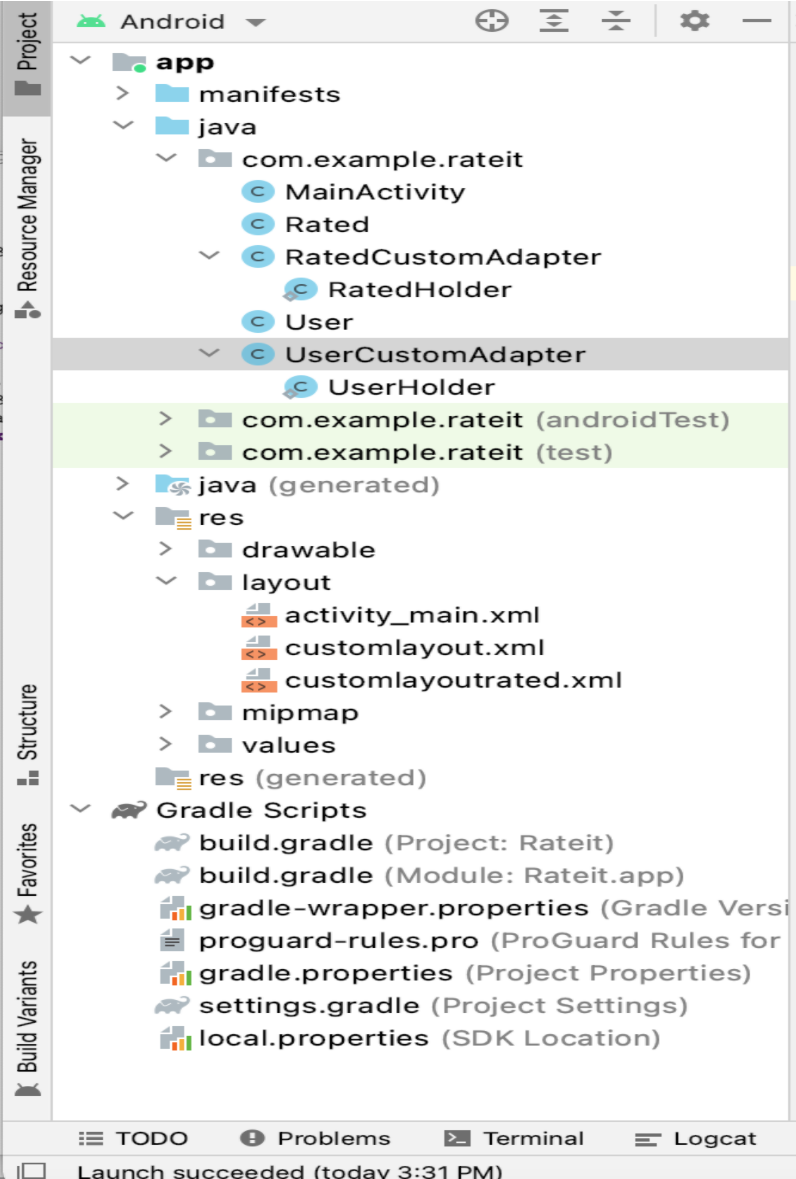
Depois que todas essas partes do código forem colocadas nas pastas e arquivos apropriados no aplicativo, a pasta do projeto terá a seguinte aparência:
Compilação do código
Quando todo o código tiver sido atualizado, clique em Build → ReBuild Project. Quando for bem-sucedido, clique em Criar → Executar.
Você será solicitado a escolher o emulador na primeira vez que executar o aplicativo, por exemplo, escolha o emulador NEXUS 5X API 25 como eu fiz. Quando a execução for concluída, a página principal terá a seguinte aparência:
Agora você implantou com êxito o código no emulador de sua escolha.
Próximas etapas
Esta é a primeira parte da série de blogs, Criação de um aplicativo móvel com o Couchbaseque se concentra em uma solução móvel completa de ponta a ponta. Esta postagem mostrou como criar um aplicativo móvel off-line com um banco de dados local e incorporado do Couchbase Lite.
Na próxima parte da série, usaremos o recurso Sync Gateway para demonstrar o recurso de sincronização ponto a ponto, bem como a sincronização com um cluster centralizado do Couchbase Server.
Os principais recursos citados nesta postagem incluem: