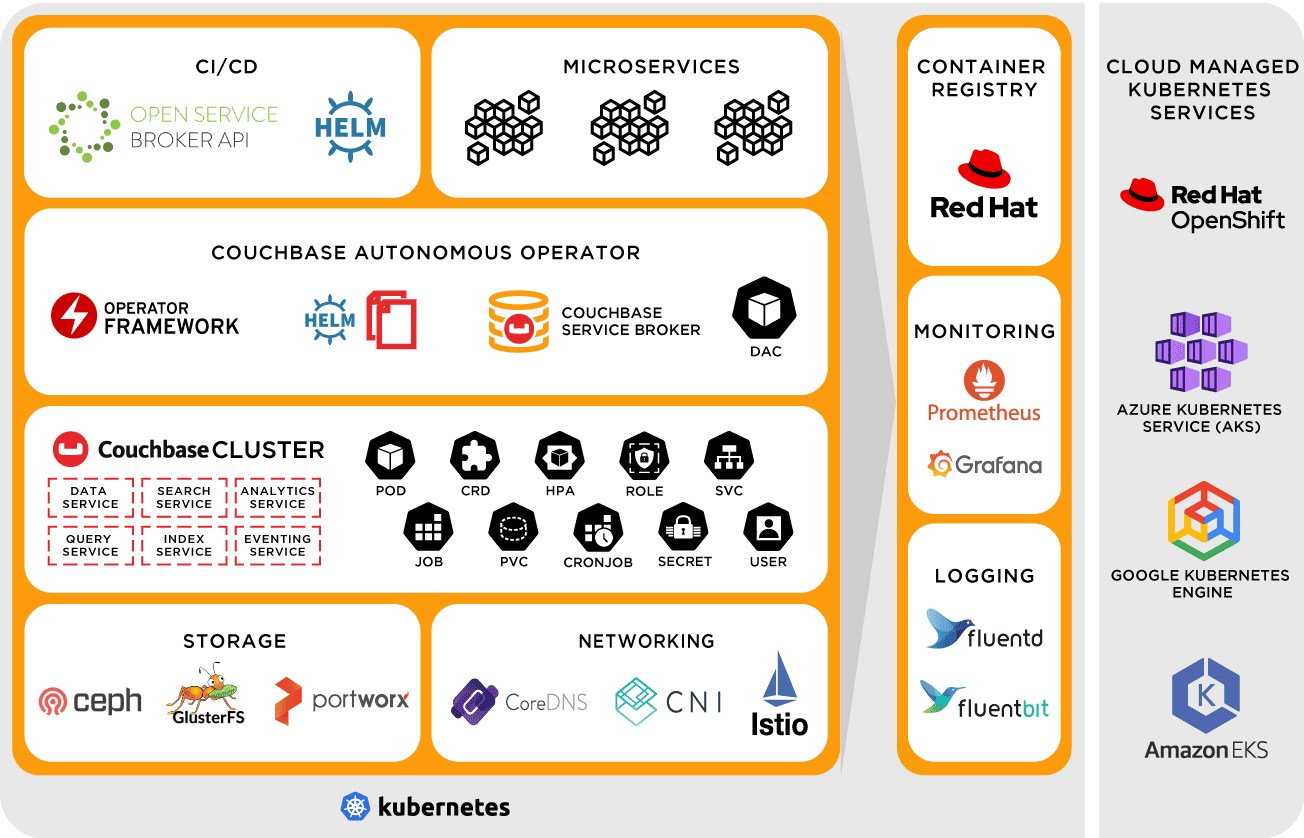
Whenever I hear about a customer’s first experience with the Couchbase Autonomous Operator (CAO) for Kubernetes, their first question tends to be “How much?”

The answer is that it’s already included in their Enterprise Edition subscription. Joyous to hear this, most customers move to the next stage of conducting a small Proof of Concept (PoC) using the Couchbase Autonomous Operator.

If you’re already using Couchbase, you’re aware of the required maintenance practices, managing the service nodes, version upgrades, etc. There is also maintenance required outside of Couchbase, such as OS upgrades. All of these maintenance steps cost you personnel resources.

The CAO alleviates this personnel resource pressure, enabling you to automate the management of common Couchbase tasks such as the configuration, creation, scaling, and recovery of Couchbase clusters. By reducing the complexity of running a Couchbase cluster, it lets you focus on the desired configuration and not worry about the details of manual deployment and life-cycle management.

Often with the best intentions, customers jump into a PoC, and sometimes it’s their first experience with Kubernetes (or K8s if you’re cool). But the Couchbase Autonomous Operator is a complex tool: It orchestrates operations which would normally be performed by a team of skilled engineers constantly managing your Couchbase cluster around the clock. It helps to tread carefully.

In this case, it’s important that you have a foundational understanding of Kubernetes and of the CAO. From there, you’ll build a successful Proof of Concept. Without this background knowledge, it will be difficult – or impossible – to troubleshoot your new PoC.

This blog post takes you through how to quickly deploy a Couchbase Autonomous Operator and Couchbase cluster.

Before We Dive In

This blog post focuses on the CAO and assumes a certain level of Kubernetes knowledge. If you’re new, or if you’re rusty, here’s a quick refresher on Kubernetes.

Because of the vast and complex ecosystem that is Kubernetes, for the sake of this article, let’s make it as easy as possible to get a cluster running. The CAO is cloud agnostic and therefore runs in a multitude of cloud environments – whether that’s your own Kubernetes cluster, or a Kubernetes service from your public cloud provider.

In this blog post, we’re going to use Kubernetes in Docker, a.k.a. “kind”, to run Kubernetes nodes as local containers, so you’ll need to have Docker installed and running.

We’re using kind for a multitude of reasons:

    • The install is quick and easy
    • There’s a default image to use for each Kubernetes version
    • We can get an environment running as quickly as possible

It even kindly (get it?) tells you how to interact with the Kubernetes cluster and how to delete it when you’re done. It’s all visualized from a single page and is great for a variety of use cases like continuous integration and delivery/deployment (CI/CD) and Infrastructure as Code (IaC). For beginners, it means you can easily provision and destroy clusters.

How to Install kind

First, make sure you have Docker installed. Then, to install kind, follow these steps for your OS:

On Linux:

On macOS via Homebrew:

On Windows:

Creating a Cluster

Before you start to create a cluster, remember that kind utilises Docker for its Kubernetes nodes, so ensure that Docker is running before you start.

Creating a cluster in kind is simple, you could just run kind create cluster and have a default cluster startup. Kind is very customisable, but in this article we will mostly use the defaults, only modifying the worker node configuration.

What Is YAML?

YAML is a markup language which is commonly used in configuration files across the Kubernetes ecosystem.

If you haven’t encountered YAML before, it has an intentionally minimal syntax and its basic structure is a map. YAML is reliant on its indentation to indicate nesting. As in Python, the format of this indentation is very important, so make sure your editor uses spaces as opposed to tabs.

Your First YAML Configuration File: Your kind Cluster

Create the following configuration file, named kind-config.yaml, which we’ll use when creating our kind cluster:

Create your cluster with the following command:

After your cluster is created, run the following command: kubectl cluster-info --context kind-couchbase. You should get output similar to the following to let you know you have a running Kubernetes cluster:

“What is kubectl?” I hear you cry. It’s the command which is used to interact with Kubernetes clusters. It’s not something specific to Couchbase or kind. You interact with different clusters by changing the “context”. Read more about kubectl from Kubernetes themselves.

Diving deeper into this brave new world, we’ll propose a question: If our cluster is called couchbase in kind, then why are we using kind-couchbase with kubectl? That’s because kind-couchbase is the name of the context we use to interact with the cluster.

Running the following command will show you all contexts you have configured:

You should have a * in the current column next to the kind-couchbase entry.

Installing the Couchbase Autonomous Operator on Your Kubernetes Cluster

Now that you have a running Kubernetes cluster, it’s time to install the CAO.

Installation Prerequisites

Run through the prerequisites to download the CAO, navigate to the directory of the Download in your terminal, unzip it, and move into the folder.

Install the Custom Resource Definitions

The next step in the docs is to install the Couchbase Custom Resource Definitions (CRDs). Let’s take a closer look at what these are.

Go ahead and take a look at the crd file crd.yaml in your unzipped folder. You’ll see thousands of lines of defined Couchbase resources. The reason you need to install these is to extend the Kubernetes API and define specific Couchbase resources in order for it to manage them across your Kubernetes applications.

For example, you would use these resources to validate a CAO deployment config. Here’s the docs from Kubernetes on Custom Resources.

To install the CRDs which come with the operator, use the following command:

Install the Operator

The operator consists of two components. I want to give you a bit more of an overview here so that you know exactly what you’re installing and why.

The Dynamic Admission Controller (DAC)

Because we’re using custom resources, Kubernetes has no idea which values are acceptable, as opposed to native resource types.

The Dynamic Admission Controller (DAC) is a gatekeeper which checks the validity of resources and applies necessary defaults before being committed to etcd (a key-value store for your cluster data.)

The Couchbase Docs team has done a fantastic job of explaining the many benefits to using the Dynamic Admission Controller here.

Here is an excerpt from the Couchbase Documentation with a graphic on how the DAC interrogates requests:

Couchbase  Dynamic Admission Controller architecture diagram

  1. A client connects to the Kubernetes API and sends a request to create a resource. The resource specification is encoded as JSON.
  2. The API forwards the JSON to the mutating endpoint of the Dynamic Admission Controller. A mutating webhook is responsible for altering the resource (applying default values, for example). It may optionally choose to accept or reject the create request.
  3. The API forwards the JSON to the validating endpoint of the Dynamic Admission Controller. A validating webhook is responsible for validating specification constraints above and beyond those offered by JSON schema validation provided by the custom resource definition. It may optionally choose to accept or reject the create request.
  4. Once all admission checks have passed, the resource is persisted in the database (etcd).
  5. The API responds to the client that the create request has been accepted.

If either of the admission checks in stages 2 and 3 respond that the resource is not acceptable, the API will go directly to stage 5 and return any errors returned by the DAC.

Install the Dynamic Admission Controller with the following command:

The Operator

I’ll quote the Couchbase Documentation again, since I can’t express it better myself:

During the lifetime of the Couchbase cluster the Operator continually compares the state of Kubernetes resources with what is requested in the CouchbaseCluster resource, reconciling as necessary to make reality match what was requested.

Let’s pick at this further. The Operator lets you declare the cluster state you want, and it will take care of the rest. When the state of the cluster needs to change, e.g., adding Couchbase nodes, expanding available services etc., you can simply declare this and the Operator achieves this new state.

These are complex operations which require precision and expertise to manage all of the moving parts. You could perform all of these tasks manually, but the Operator automates all of this and performs all of the operations with Couchbase’s best practices in mind.

To wrap up this section, you now know a little bit more about what makes up a CAO deployment – rather than just blindly installing the components. This is knowledge you’ll need when you’re running a multi-cloud Couchbase cluster using the CAO in a few months time.

Now that you know what you’re installing, use the following command to install the operator:

Verifying the DAC

You can check the status of the Couchbase Autonomous Operator by getting the deployments, and you can also specifically check the status of your CouchbaseCluster deployment by running:

You should see output similar to the above. Now you can move on to actually deploying a Couchbase cluster(!).

Alternative Deployment Methods

Helm is a package manager for Kubernetes, somewhat similar to brew/apt, etc.

According to Matt Faina, one of Helm’s co-founders, a package manager is:

“Tooling that enables someone who has knowledge of an application and a platform to package up an application so that someone else who has neither extensive knowledge of the platform or the way it needs to be run on the platform can use it.”

Packages in Helm are referred to as charts. They are deployable units for Kubernetes-bound applications.

You can use Helm to easily set up the Couchbase Autonomous Operator and deploy Couchbase clusters following this documentation. By default, the official Couchbase Helm chart deploys the Couchbase Autonomous Operator, the Dynamic Admission Controller, and a fully configured Couchbase cluster.

Deploying Your Couchbase Cluster on the CAO

I’ll be using the documentation on how to create a Couchbase Deployment as the source of truth for this section, but I’ll break it down step by step.

Couchbase clusters are defined against the Operator – as we discussed above – and this definition is used to check the current status of the CouchbaseCluster resource.

This YAML definition is derived from the docs, but I’ve made a few changes so that things are a bit easier on your kind nodes. (Too many containers on a laptop leads to Badness™.) Note the changes include only deploying the data service, but still keeping the node count at three in order to provide high availability and performance, and changing the name to data_service to avoid code rot.

Create a file called data_cluster.yaml and copy this text into it:

Deploy the configuration using the following command:

You can watch as the Operator creates pods and provisions your cluster as per your specification by running the following soon after creating your deployment (above). This will show you the operator creating pods:

Note that the pod cb-example-0000 isn’t marked as ready (0/1) and has the status ContainerCreating. Once deployment has been carried out, make sure you verify it.

Keep running kubectl get pods until you see three cb-example-**** pods with their status as Running and 1/1 under the Ready column. Do not progress until this state is satisfied. This is the state you’ve defined in your data_cluster.yaml.

Use the following command to further verify that your data service is available on your Cluster:

Note you should receive similar output to this example above, but depending on your cluster deployment, results will differ.

Port Forwarding and Accessing the Couchbase GUI

In order to access other Couchbase services for your PoC, you’ll need access to the Couchbase GUI.

This guide runs through how to set up port forwarding. Port forwarding is helpful as you’ll need to access the Couchbase GUI in your Proof of Concept. It might also come in handy when you need to use cbc-pillowfight for load testing or cbimport for getting some sample docs into the cluster.

Using the output from the previous command provides you with a pod which is running the data service. This pod name can then be used to forward the port for the Couchbase GUI.

Run the following command:

This command should provide you with output similar to what’s listed above. After running the command, you can access the Couchbase GUI through http:localhost:8091.

Modifying Your Couchbase Deployment

One thing you’ll definitely want to include in your PoC is the ability to modify your Couchbase cluster through the YAML file. This gives you the flexibility to shape and scale your cluster.

Make note that you aren’t using kubectl create anymore. Replace the previous definition with a new one using kubectl apply or kubectl replace.

One test to run through would be to add another Couchbase service to your current cluster. Since I’m just using my laptop, I’m only going to add an additional service: eventing.

Once you’ve made the change you can deploy your config to the operator: kubectl apply -f <path to updated config>. Verify that the new service has been added using the verbose get pods listing. Finally follow the steps to forward the port for the GUI again and check that the new service is included in the cluster.

At this point it’s important to note that the incremental addition of features to an operator config is somewhat of a best practice. With iterative addition of features and configurations to your deployment, you can test the cluster at each stage, confirming that your configuration is valid.

Conclusion

To conclude, in this article you’ve learned more about the makeup of the Couchbase Autonomous Operator and how you can orchestrate it to provision a Couchbase cluster, particularly for a Proof of Concept (PoC) project.

The CAO consistently checks the state of your Couchbase cluster ensuring that it meets your defined specification. Furthermore, you can deploy the CAO specification across any Kubernetes environment. This gives you a fantastic level of freedom and removes public cloud vendor lock-in. You can rely on the Operator to maintain cluster health as per your spec, and when you need to perform functions like cluster upgrades, you can easily do so through your YAML file.

In the future, I’ll publish more blog posts that explain how to deploy even more use cases of the Couchbase Autonomous Operator. If you can’t wait till then, dig into the CAO documentation to start exploring. I can’t wait to hear what you build.


Author

Posted by Sam Redman, Solutions Engineer

Sam Redman is a Solutions Engineer at Couchbase. Sam previously worked in development and SRE environments before joining Couchbase.

Leave a reply