
One of the most asked questions we receive from new Couchbase Capella cluster users is how do I set up and connect to the fully managed service. Communication between your application and the internet-hosted cluster is trivial, but connecting over a private network is more challenging. The need to connect over a private network from your AWS VPC to Couchbase’s VPC will become ever more critical for high-performing mission-critical applications.
Setting up VPC Peering requires a small amount of work on both sides of the network. There is detailed documentation on the Couchbase website. However, we hope this step-by-step walkthrough will make things a little easier for the first-time user. We will go from having neither of the VPCs set up and building from scratch. Understandably, an application’s VPC may already be configured and not follow all these steps, but the walkthrough should at least give you some insight into the process.
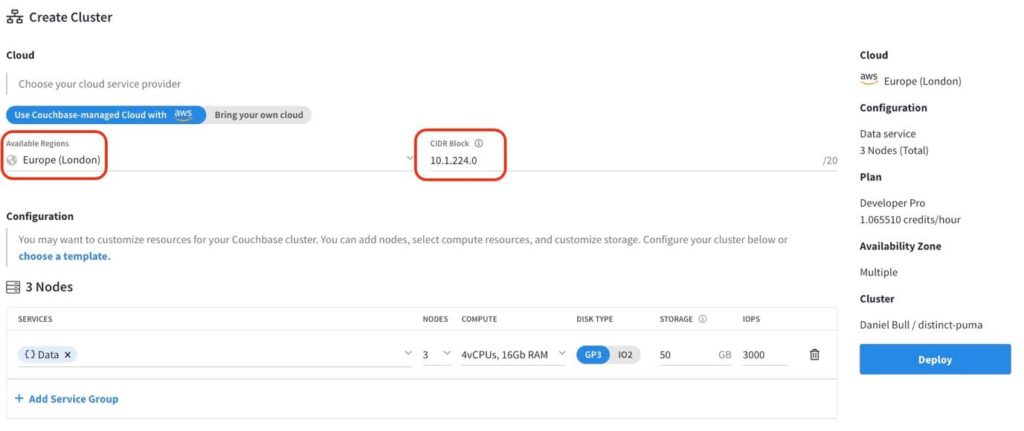
Creating a Couchbase Capella cluster on AWS
Ideally, people would already have experience spinning up a Couchbase Capella database at this point. If not, head to cloud.couchbase.com and either sign up for a free trial or launch a new cluster with whichever specifications you need.
There are two essential aspects to bear in mind when creating your cluster. First, the region where you deploy your cluster should match the VPS AWS region you are using.
Next, the CIDR Block of your deployed cluster MUST be different from the AWS VPC. Take note of the CIDR block before you click Deploy. If your AWS VPC already exists with a CIDR block, you can customize Capella to avoid duplication.
Creating a VPC in AWS
We will create a new VPC from scratch in this walkthrough; however, as stated before, your VPC may already exist. If so, then just ensure that it follows these guidelines.
Head over to the VPC section of the AWS management console and select Create VPC.
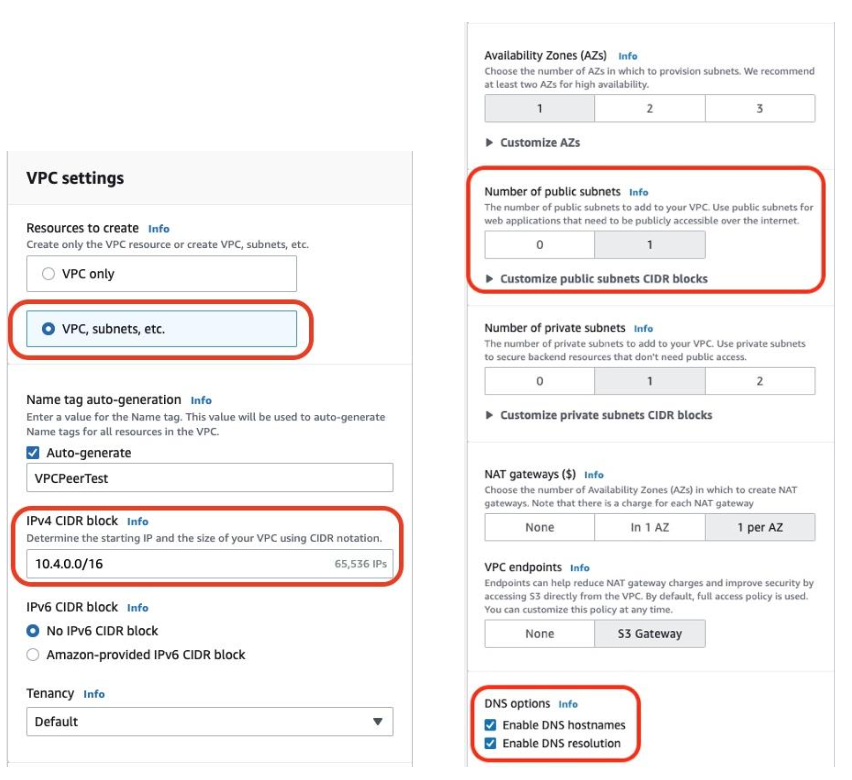
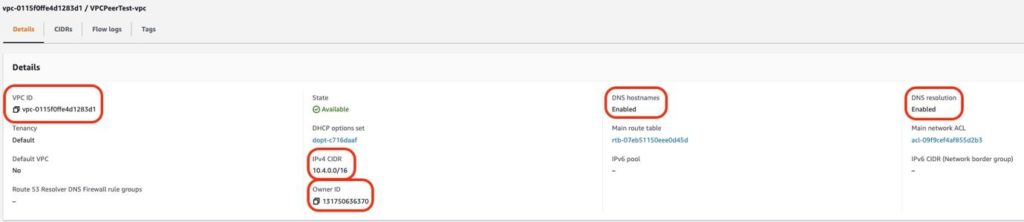
VPS setting requirements for Couchbase Capella on AWS
- VPC must exist in the same region as your Capella Cluster
- VPC requires a public subnet
- IPv4 CIDR Block must be different from the Capella Cluster
- DNS Hostnames must be enabled
- DNS Resolution must be enabled
For an example deployment, you can see the configuration I have created below.
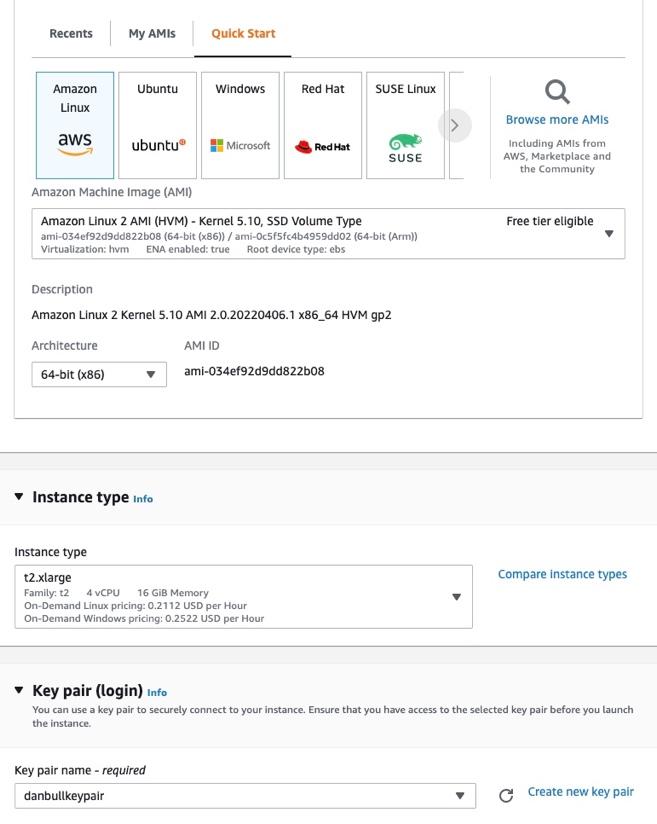
Creating an EC2 instance in your VPC
Before choosing an appropriate EC2 instance, please review the recommended specifications and best practices for server configurations in the Couchbase documentation.
Head over to the EC2 section of the AWS Management Console and select Launch Instance.
- We choose the Amazon Linux image for this example.
- Select an appropriate Instance Type.
- Create a new Key Pair and download it, or select an existing credential if you have one that already exists.
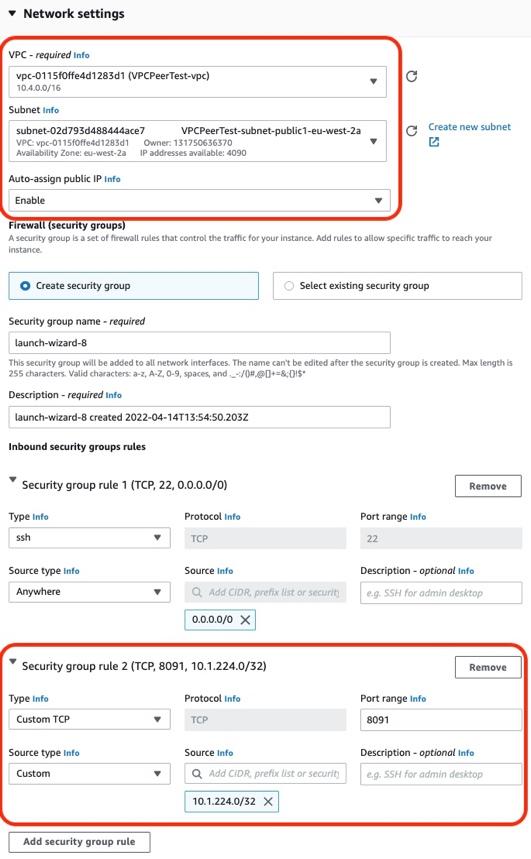
- Ensure that you select the VPC that has been created.
- Choose a PUBLIC subnet from that VPC.
- Enable Auto-Assign IP Address.
- Add a new Custom TCP Rule in Security Groups for Port Range 8091. Unencrypted connections to the Couchbase Server for Administration traffic use this port.
- Create or select a Key Pair, allowing you access to the machine when it has been created.
Test the Connection to Couchbase (Public)
We can check that we have public access to the cluster once the EC2 instance is deployed. Later on, we can compare the IP Address we receive from nslookup to see that private networking has been properly configured.
- After downloading the Key Pair, modify the .pem file permissions with the chmod command:
- chmod 400 mykeypair.pem
- Grab the public IPv4 address of your EC2 instance.
- SSH into the machine.
- ssh -i mykeypair.pem ec2-user@0.0.0.0

- Head over to the Capella Cluster’s Connect tab and copy the DNS SRV record.

- Run nslookup on the Capella Cluster’s SRV DNS record for a list of the hostnames
- nslookup -type=SRV _couchbases._tcp.cb.xxxxxxxxxxxxxxxx.cloud.couchbase.com

- Run nslookup on one of the hostnames to view the (public) IP address that we are connecting to.
- nslookup xxxxxxxxxxxxxxxx.xxxxxxxxxxxxxxxx.cloud.couchbase.com
- Take Note of this Public IP Address, it should change when VPC Peering has been set up and we are using Private.

Creating the peering connection
A lot of the previous steps were precursors to preparing private networking. In the real world, you likely already have clusters and EC2 instances up and running. In that case, follow the steps from here on. However, it is worth checking your configuration against the previous steps to ensure that everything required is set up.
- Verify that DNS Hostname and DNS Resolution are enabled in your AWS VPC
- Actions > Edit DNS Hostname – Enabled
- Actions > Edit DNS Resolution – Enabled
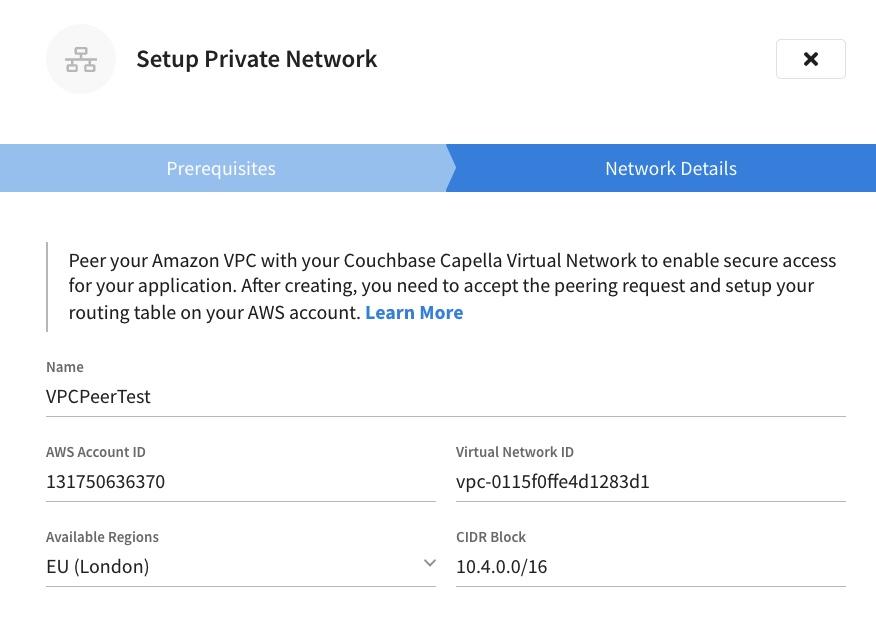
- Within the Couchbase Capella Cluster, go to the Connect tab and select Manage Private Networks > Setup Private Network
- Check both requirements and continue.
- Fill out the information for your peering connection:
- A Name for the connection
- AWS Account ID = Owner ID
- Virtual Network ID = VPC ID
- Available Regions = VPC Region
- CIDR Block = IPv4 CIDR Block
- Click Link to start the connection
After clicking the Link button, Capella will configure and create a peering connection request to your AWS VPC.
AWS VPC final configuration
To facilitate communication through the new private network, we need to configure a few settings in your AWS VPC.
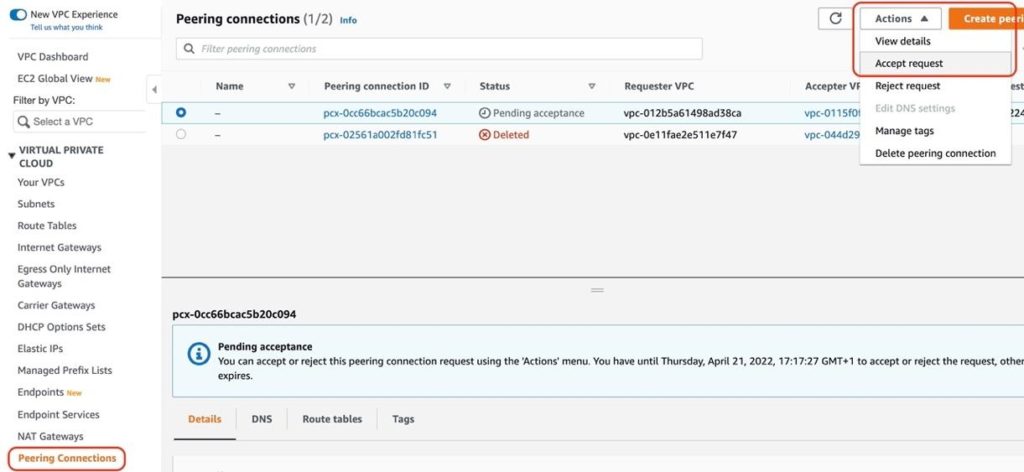
Accept the Peering Request
- Go to VPC > Peering Connections in AWS and find the pending connection from the Capella Cluster. It may take a few minutes to appear after you initiated the original link from Capella.
- Select Actions > Accept Request.
- Take note of the Peering Connection ID and Requester’s CIDR Block values.
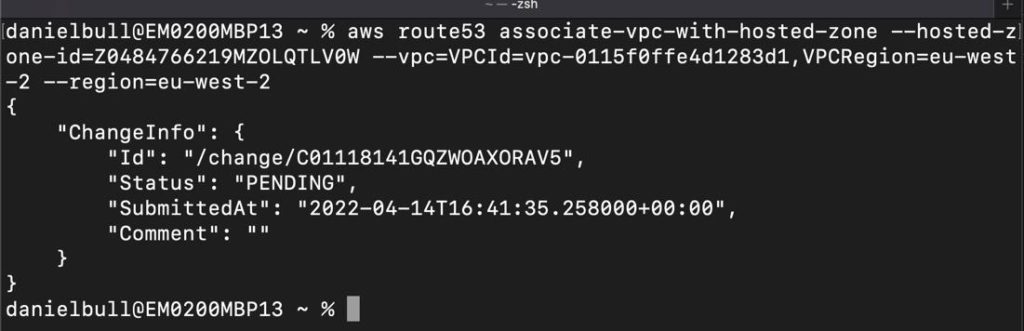
Associate VPC with Hosted Zone
For the next step, use the AWS CLI tool (advice on setting that up on your local machine can be found here). Be sure to configure the AWS CLI to use the credentials of an AWS Identity and Access Management (IAM) user that has Route 53 access.
- On the Capella Cluster, goto Connect > Private Networks.
- Click on the private network that has just been set up.
- Copy the second command.

- Paste the command onto a machine with the AWS CLI setup.
- Execute the command, which associates the hosted zones between the VPCs.
Modify the Route Tables
- Goto VPC > Route Tables in AWS.
- For each of the Route Tables associated with your VPC, complete the following steps:
- Actions > Edit Routes
- Add Route
- Paste the Requester CIDR Block from your peering request
- In the Target box, select Peering Connection
- Select from the dropdown the value that matches your Peering Connection ID.
- Save Changes.
- Repeat the process for other route tables in use.

Test the Connection to Couchbase (Private)
At this point, VPC Peering is successfully set up between the Couchbase Cluster and your AWS VPC. To verify that your EC2 instance is now talking privately to the cluster, rerun the nslookup command on the same hostname we had executed in the public connection test.
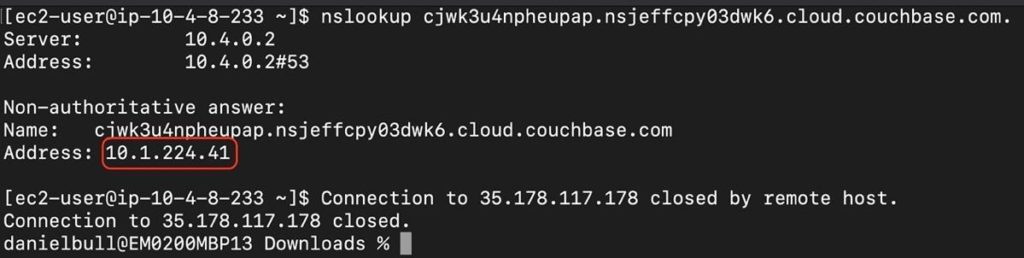
The response should show us that we are communicating to the machine’s private IP address instead of the public one. This validates that DNS resolution is working correctly.
To further validate this, we can check the network connectivity between the application node and the Capella cluster using traceroute.

If the response is fast and successful, we can be assured that the routing is set up correctly as we touch the encrypted Port of Couchbase.
What next?
We covered several steps in getting the cluster and AWS set up before diving into VPC peering. If you already had the cluster and AWS setting in place, you would only need to follow the final couple of sections we shared above.
This post covers one of many approaches for VPC peering. Since everyone has different AWS environments and restrictions, there may be other issues to address in your particular use case. Hopefully this helps get you started in your VPC Peering quest going forward.
Access the following resources to learn more about Couchbase Capella and how to get the help you need:
- Review the comprehensive Capella documentation.
- Ask questions on the Couchbase Forums.
- Join us on Discord to collaborate with others.
- Get official support for Couchbase products.
Leave a comment
You must be logged in to post a comment.