코맥 호건은 VMware의 스토리지 및 가용성 사업부(SABU) CTO실의 이사 겸 최고 기술 책임자입니다.
바이오: 저는 2005년 4월에 VMware에 입사했으며, 이전에는 VMware의 엔지니어링, 기술 마케팅, 기술 지원 조직에서 근무했습니다. 스토리지 관련 백서를 다수 집필했으며 스토리지 모범 사례와 vSphere 스토리지 기능에 대한 프레젠테이션을 여러 차례 진행했습니다. 또한 "Essential Virtual SAN" 및 "vSAN 6.7 심층 분석" 책의 공동 저자이기도 합니다.
카우치베이스 자율 운영자에 대한 첫 번째 살펴보기
몇 주 전의 일입니다, 아크라고 알려진 헵티오 벨레로를 살펴봤습니다.. Velero는 클라우드 네이티브 애플리케이션을 위한 백업 및 복원 기능을 제공합니다. 이 연구를 하는 동안 저는 백업/복원을 위해 선택한 애플리케이션으로 Couchbase 데이터베이스를 사용했습니다. 이 블로그 게시물과 관련하여 Couchbase 팀과 이야기를 나눈 후, 그들은 제가 애플리케이션에 사용하던 StatefulSet 방식이 아닌 새로운 Couchbase Autonomous Operator를 사용해 볼 것을 강력히 추천했습니다. Couchbase 이야기 스테이트풀셋에 비해 오퍼레이터 접근 방식의 장점은 여기에서 확인할 수 있습니다..
이제 Couchbase는 운영자와 함께 Couchbase를 배포하는 방법에 대한 단계를 제공하지만 기본 K8s 네임스페이스에 생성합니다. 제 테스트에서는 Couchbase를 자체 네임스페이스에 배치하려고 합니다. 여기에 제공된 단계는 자체 Kubernetes 네임스페이스에서 vSphere 및 vSAN 인프라에서 실행되는 새로운 Couchbase Operator를 시작하기 위해 제공됩니다. 또한 베개싸움이라는 번들 로드 생성 도구의 몇 가지 문제에 대해서도 설명합니다.
카우치베이스는 다음에 대한 규범적인 지침을 제공합니다. 여기에서 운영자와 함께 시작하는 방법. 여기에는 필요한 모든 구성 파일이 포함되어 있습니다. 운영자에 대한 몇 가지 사항:
- 로드되면, 오퍼레이터 도커 이미지는 operator.yaml 파일을 생성한다. 이 파일은 배포 구조를 사용하므로 실행 중인 파드가 죽으면 다시 시작할 수 있습니다.
- CouchbaseCluster 사용자 정의 리소스 정의(CRD)를 생성합니다.
- 카우치베이스클러스터 이벤트를 수신하기 시작합니다.
Couchbase를 자체 네임스페이스에서 실행할 수 있도록 몇 가지 수정 작업을 수행했습니다:
- 우선 (당연히) couchbase라는 새로운 네임스페이스를 만들었습니다.
- 클러스터 역할이 생성되었을 때 새 카우치베이스 네임스페이스에 서비스 계정을 만든 다음 클러스터 역할 바인딩을 사용하여 해당 서비스 계정에 클러스터 역할을 할당했습니다.
- 나는 operator.yaml 파일을 포함하도록 메타데이터.네임스페이스=카우치베이스 설정을 변경하여 카우치베이스 네임스페이스에 적용하도록 합니다.
카우치베이스 운영자 파드의 로그를 모니터링하면 다음과 같은 시작 메시지를 관찰할 수 있습니다:
|
1 2 3 4 5 6 7 8 9 10 |
$ kubectl logs couchbase-operator-6fcfbd8599-zqsh2 -n couchbase time="2019-03-20T09:27:41Z" level=info msg="couchbase-operator v1.1.0 (release)" module=main time="2019-03-20T09:27:41Z" level=info msg="Obtaining resource lock" module=main time="2019-03-20T09:27:41Z" level=info msg="Starting event recorder" module=main time="2019-03-20T09:27:41Z" level=info msg="Attempting to be elected the couchbase-operator leader" module=main time="2019-03-20T09:27:41Z" level=info msg="Event(v1.ObjectReference{Kind:\"Endpoints\", Namespace:\"couchbase\", Name:\"couchbase-operator\", UID:\"68fece18-4af2-11e9-be9b-005056a24d92\", APIVersion:\"v1\", ResourceVersion:\"1596774\", FieldPath:\"\"}): type: 'Normal' reason: 'LeaderElection' couchbase-operator-6fcfbd8599-zqsh2 became leader" module=event_recorder time="2019-03-20T09:27:41Z" level=info msg="I'm the leader, attempt to start the operator" module=main time="2019-03-20T09:27:41Z" level=info msg="Creating the couchbase-operator controller" module=main time="2019-03-20T09:27:46Z" level=info msg="CRD initialized, listening for events..." module=controller time="2019-03-20T09:27:46Z" level=info msg="starting couchbaseclusters controller" |
- 저는 이것을 카우치베이스 네임스페이스에 배치하고 메타데이터.네임스페이스 항목
- 설정했습니다. spec.disableBucketManagement 를 true로 설정하면 UI/CLI를 통해 버킷을 변경할 수 있습니다(그렇지 않으면 YAML 파일을 편집하여 모든 변경을 수행해야 합니다).
- 기본 및 데이터 마운트를 위해 퍼시스턴트 볼륨을 추가했습니다(이를 위해 볼륨클레임템플릿에 사용할 StorageClass를 새로 만들어야 했습니다 - 아래 참조).
|
1 2 3 4 5 6 7 8 9 10 11 12 13 14 15 16 17 18 19 20 21 22 23 24 25 26 27 28 29 30 31 32 33 34 35 36 37 38 39 40 41 42 43 44 45 46 47 48 49 50 51 52 53 54 55 56 57 58 59 60 |
apiVersion: couchbase.com/v1 kind: CouchbaseCluster metadata: name: cb-example namespace: couchbase spec: securityContext: fsGroup: 1000 baseImage: couchbase/server version: enterprise-5.5.2 authSecret: cb-example-auth exposeAdminConsole: true disableBucketManagement: true adminConsoleServices: - data cluster: dataServiceMemoryQuota: 256 indexServiceMemoryQuota: 256 searchServiceMemoryQuota: 256 eventingServiceMemoryQuota: 256 analyticsServiceMemoryQuota: 1024 indexStorageSetting: memory_optimized autoFailoverTimeout: 120 autoFailoverMaxCount: 3 autoFailoverOnDataDiskIssues: true autoFailoverOnDataDiskIssuesTimePeriod: 120 autoFailoverServerGroup: false buckets: - name: default type: couchbase memoryQuota: 128 replicas: 1 ioPriority: high evictionPolicy: fullEviction conflictResolution: seqno enableFlush: true enableIndexReplica: false servers: - size: 3 name: all_services services: - index - query - search - eventing - analytics - <strong>data pod: volumeMounts: default: couchbase data: couchbase volumeClaimTemplates: - metadata: name: couchbase spec: storageClassName: "couchbasesc" resources: requests: storage: 1Gi </strong> |
인증 및 사용자 요구 사항은 모두 Couchbase 사이트에 문서화되어 있으므로 생략하겠습니다. 그러나 애플리케이션이 배포되면 Couchbase 운영자 포드 로그에서 다음을 볼 수 있습니다:
|
1 2 3 4 5 6 7 8 9 10 |
$ kubectl logs couchbase-operator-6fcfbd8599-zqsh2 -n couchbase . . time="2019-03-20T09:48:34Z" level=info msg="Watching new cluster" cluster-name=cb-example module=cluster time="2019-03-20T09:48:34Z" level=info msg="Janitor process starting" cluster-name=cb-example module=cluster time="2019-03-20T09:48:34Z" level=info msg="Setting up client for operator communication with the cluster" cluster-name=cb-example module=cluster time="2019-03-20T09:48:34Z" level=info msg="Cluster does not exist so the operator is attempting to create it" cluster-name=cb-example module=cluster time="2019-03-20T09:48:34Z" level=info msg="Creating headless service for data nodes" cluster-name=cb-example module=cluster time="2019-03-20T09:48:34Z" level=info msg="Creating NodePort UI service (cb-example-ui) for data nodes" cluster-name=cb-example module=cluster time="2019-03-20T09:48:34Z" level=info msg="Creating a pod (cb-example-0000) running Couchbase enterprise-5.5.2" cluster-name=cb-example module=cluster |
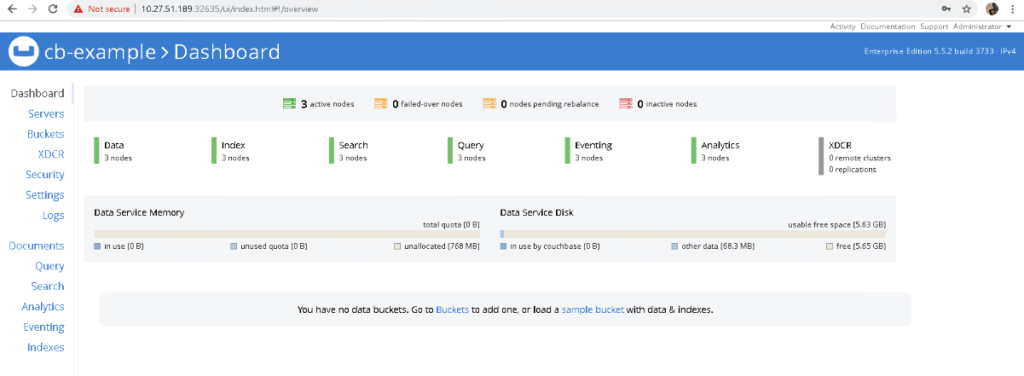
그리고 모든 것이 성공적으로 작동하면 초기화할 때 파드, 퍼시스턴트 볼륨 및 서비스를 쿼리할 수 있습니다.
|
1 2 3 4 5 6 7 8 9 10 11 12 13 14 15 16 17 18 19 20 |
$ kubectl get po -n couchbase NAME READY STATUS RESTARTS AGE cb-example-0000 1/1 Running 0 7m8s cb-example-0001 1/1 Running 0 6m7s cb-example-0002 1/1 Running 0 5m14s couchbase-operator-6fcfbd8599-zqsh2 1/1 Running 0 28m $ kubectl get pv -n couchbase NAME CAPACITY ACCESS MODES RECLAIM POLICY STATUS CLAIM STORAGECLASS REASON AGE pvc-100e3c17-40e3-11e9-be9b-005056a24d92 10Gi RWO Delete Bound velero/minio-pv-claim-1 minio-sc 12d pvc-53c6962f-4af5-11e9-be9b-005056a24d92 1Gi RWO Delete Bound couchbase/pvc-couchbase-cb-example-0000-00-default couchbasesc 7m51s pvc-5b30f298-4af5-11e9-be9b-005056a24d92 1Gi RWO Delete Bound couchbase/pvc-couchbase-cb-example-0000-01-data couchbasesc 7m44s pvc-795bcf7b-4af5-11e9-be9b-005056a24d92 1Gi RWO Delete Bound couchbase/pvc-couchbase-cb-example-0001-00-default couchbasesc 6m51s pvc-7edc6a4d-4af5-11e9-be9b-005056a24d92 1Gi RWO Delete Bound couchbase/pvc-couchbase-cb-example-0001-01-data couchbasesc 6m43s pvc-97e9f6a9-4af5-11e9-be9b-005056a24d92 1Gi RWO Delete Bound couchbase/pvc-couchbase-cb-example-0002-00-data couchbasesc 6m2s pvc-9bcc3d4d-4af5-11e9-be9b-005056a24d92 1Gi RWO Delete Bound couchbase/pvc-couchbase-cb-example-0002-01-default couchbasesc 5m50s $ kubectl get svc -n couchbase NAME TYPE CLUSTER-IP EXTERNAL-IP PORT(S) AGE cb-example ClusterIP None 8091/TCP,18091/TCP 8m55s |
- 문서화된 단계에 따라 카우치베이스 ClusterRole을 설정하세요.
- 카우치베이스 네임스페이스 만들기 - -. kubectl NS 카우치베이스 생성
- 카우치베이스 네임스페이스에서 카우치베이스 운영자 서비스 계정을 만듭니다. kubectl 서비스 계정 생성 -네임스페이스 카우치베이스 운영자 -네임스페이스 카우치베이스
- 오퍼레이터 생성(카우치베이스 네임스페이스에 맞게 수정) - kubectl create -f operator.yaml
- 필요한 비밀 생성(카우치베이스 네임스팩에 맞게 수정됨) - - kubectl create -f secret.yaml
- cbopctl을 사용하여 카우치베이스 클러스터를 생성합니다. cbopctl create -f couchbase-cluster-sc.yaml
|
1 2 3 4 5 6 7 8 9 10 11 12 13 14 15 16 17 |
apiVersion: batch/v1 kind: Job metadata: name: pillowfight namespace: couchbase spec: template: metadata: name: pillowfight spec: containers: - name: pillowfight image: couchbaseutils/pillowfight:v2.9.3 command: ["cbc-pillowfight", "-U", "couchbase://cb-example-0000.cb-example.couchbase.svc.cluster.local/default?select_bucket=true", "-I", "10000", "-B", "1000", "-c", "10", "-t", "1", "-P", "password"] restartPolicy: Never |
유일한 차이점은 cormac 버킷은 명령 구문이 약간 다릅니다:
|
1 2 3 4 5 6 7 8 9 |
$ kubectl get po -n couchbase NAME READY STATUS RESTARTS AGE cb-example-0000 1/1 Running 0 20m cb-example-0001 1/1 Running 0 19m cb-example-0002 1/1 Running 0 18m couchbase-operator-6fcfbd8599-ggv98 1/1 Running 0 24m create-user-dk6xg 0/1 Completed 0 89s pillowfight-fqvgp 0/1 Completed 0 70s pillowfightcormac-dmqnf 0/1 Completed 0 7s |
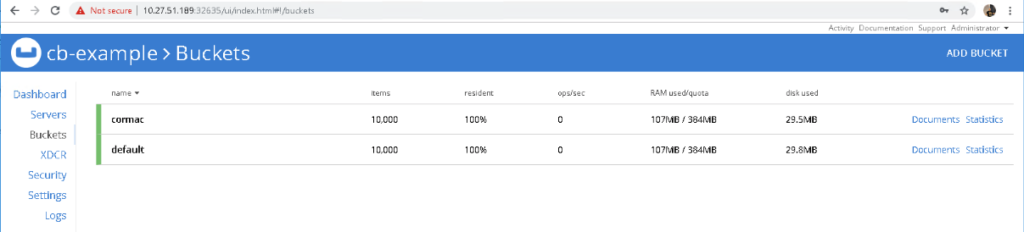
더 중요한 것은 Couchbase UI를 살펴보면 각 버킷에 1,000개의 항목이 있다는 것을 알 수 있습니다:
여기까지입니다. 이제 Couchbase 운영자가 가동되고 실행됩니다. 마지막으로, 이는 VMware PKS, vSphere 및 vSAN 인프라 위에 K8s 클러스터에서 프로비저닝되었습니다. 참고로 베개 싸움 문제는 여기에서 보고되었습니다(문제 해결).