

소개
Couchbase Kafka Connector 1.2.0 just shipped. Along with the various bug fixes, there is new sample code for a Kafka consumer in addition to the Kafka producer that was previously available. To quickly review the terms:
- A Kafka producer writes data to Kafka, so it’s a source of messages from Kafka’s perspective.
- A consumer in Kafka terminology is a process that subscribes to topics and then does something with the feed of published messages that are emitted from a Kafka cluster. It’s basically a sink.
In this blog, you’ll get up and running with a “Hello World!”-style sample Kafka consumer that writes to Couchbase. Along the way, you’ll also get a sandbox environment with a Kafka broker and a single node Couchbase Server so that you can actually run and modify the sample consumer and producer.
Installing Prerequisites
그 samples are part of the Couchbase Kafka Connector source tree. To get them, just clone the whole repository:
|
1 |
$ 깃 복제 깃://깃허브.com/카우치베이스/카우치베이스–kafka–커넥터.git /tmp/kafka–커넥터 |
Now, let’s setup your testing environment using pre-configured Kafka and Couchbase Server images. You have to install Vagrant, VirtualBox, and Ansible in order to set them up locally. If you have these services installed somewhere else, make sure you adjust the host addresses throughout this guide appropriately.
|
1 |
$ cd /tmp/kafka–커넥터/환경 |
Check versions of dependencies:
|
1 2 3 |
$ ansible —버전 $ vboxmanage —버전 $ vagrant –v |
You can assign human readable names to the boxes by using the plugin for Vagrant. If you don’t already have it installed, use the following command:
|
1 |
$ vagrant 플러그인 설치 vagrant–hostsupdater |
Now you’re ready to provision the servers and get running:
$ vagrant upNote: If a server fails to install due to timeouts, retry “vagrant up” after a few minutes and it may work.
Verify that the hosts are responding:
|
1 2 |
$ ping couchbase1.vagrant $ ping kafka1.vagrant |
If you navigate to you should be able to see your single-node Couchbase Server configured with credentials 관리자/비밀번호.
Building the Samples
To avoid any classpath issues, use maven to create a self-contained JAR file for each sample application.
The generator application is a minimal CLI application. It uses the Couchbase Java SDK to wrap input lines from STDIN into JSON documents and sends them to the “default” bucket on Couchbase Server:
|
1 2 |
$ cd /tmp/kafka–커넥터/samples/generator $ mvn assembly:assembly |
The producer attaches to Couchbase Server and transmits all mutations to Kafka. This application uses the couchbase-kafka-connector project behind the scenes.
|
1 2 |
$ cd /tmp/kafka–커넥터/samples/producer $ mvn assembly:assembly |
Consumer is a typical Kafka consumer, which by default just outputs any incoming message in the topic “default” to STDOUT.
|
1 2 |
$ cd /tmp/kafka–커넥터/samples/consumer $ mvn assembly:assembly |
Running the Samples
Now that you have everything prepared, it’s time to run all the samples. You’ll need three different shell sessions because each of them runs a process until stopped. We’ll assume that you are in the /tmp/kafka-connector/samples 디렉토리.
First, start your generator:
|
1 |
$ java –jar generator/목표/kafka–samples–generator–1.0–SNAPSHOT–jar–~와 함께–dependencies.jar |
It should output the connection settings and then fall to a command prompt <. You can type anything there and verify that it’s being created properly by looking in the Couchbase Server Admin UI:
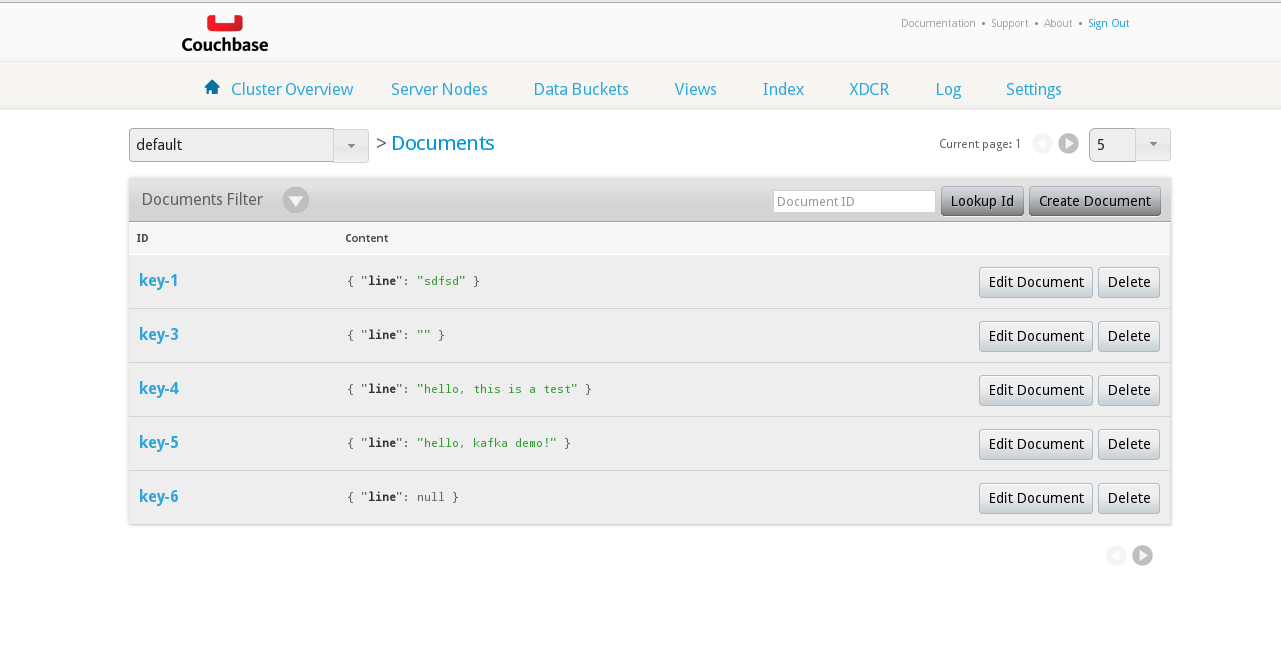
Documents from generator in the bucket
|
1 2 3 4 |
... INFO: Opened 양동이 기본값 < hello, kafka demo! >> 열쇠=열쇠–5, 가치={“line”:“hello, kafka demo!”} |
At this moment you can run the connector example
|
1 |
$ java –jar producer/목표/kafka–samples–producer–1.0–SNAPSHOT–jar–~와 함께–dependencies.jar |
For every line you type in the generator, you will see a line from the producer like this:
|
1 |
RECEIVED: com.couchbase.kafka.DCPEvent@4e44cb88 |
The sample writes it just before sending the payload to Kafka, in the filter class implementation. Let’s check how the Kafka receives these messages.
|
1 2 3 |
$ java –jar consumer/목표/kafka–samples–consumer–1.0–SNAPSHOT–jar–~와 함께–dependencies.jar 1: {“line”:“hello, kafka demo!”} 2: {“line”:“hello, this is a test”} |
You can continue playing with it as long as all three services are running.
Developing with Couchbase Kafka Connector
Let’s move on and take a look at the code. All three applications are pretty friendly for experiments, for example, the generator fits in just a few lines:
|
1 2 3 4 5 6 7 8 9 10 11 12 13 14 15 16 17 18 19 20 |
공공의 클래스 예시 { 공공의 정적 무효 메인(문자열 인수[]) throws IOException { Random 무작위의 = 새로운 Random(); 클러스터 클러스터 = CouchbaseCluster.만들다(“couchbase1.vagrant”); 양동이 양동이 = 클러스터.버킷 열기(); BufferedReader input = 새로운 BufferedReader(새로운 InputStreamReader(시스템.안으로)); 문자열 선; 하다 { 시스템.밖으로.print(“> “); 선 = input.readLine(); 만약 (선 == null) { break; } 문자열 열쇠 = “key-“ + 무작위의.nextInt(10); JsonObject 가치 = JsonObject.만들다().넣다(“line”, 선); 양동이.업서트(JsonDocument.만들다(열쇠, 가치)); 시스템.밖으로.printf(“>> key=%s, value=%sn”, 열쇠, 가치); } while (참인); } } |
Basically, generator opens a connection to bucket “default” on your “couchbase1.vagrant” instance and writes your messages to random keys. You can extend it to send other types of events. Another thing you might want to try to do is to remove keys.
By default, Couchbase Connector for Kafka runs in server mode, where it borrows active thread and actively listens to Couchbase Server for new events. There are several points where you can apply your ideas or changes. The most obvious one is configuration builder, where you not only specify the credentials and addresses of the services you are connecting to, but you can also specify various serializer and filter classes.
The sample application implements several of them. Filter class is the simplest:
|
1 2 3 4 5 6 7 |
공공의 클래스 SampleFilter 구현한다 Filter { @Override 공공의 boolean pass(DCPEvent dcpEvent) { 시스템.밖으로.println(“RECEIVED: “ + dcpEvent); 반환 참인; } } |
Here you can put in any custom checks you want, and if pass() 반품 거짓, the connector discards the message and won’t send it on to Kafka.
Default Encoder, which comes with the connector distribution, tries to represent every message as JSON, but that probably is not what you need, so you can apply and conversion to DCPEvent instance and return byte array, which will be stored in Kafka. In this example, we just convert events to their string representation.
|
1 2 3 4 5 6 7 8 9 10 11 12 13 14 15 16 |
공공의 클래스 SampleEncoder 확장합니다 AbstractEncoder { 공공의 SampleEncoder(final VerifiableProperties properties) { super(properties); } @Override 공공의 byte[] toBytes(final DCPEvent dcpEvent) { 만약 (dcpEvent.message() instanceof MutationMessage) { MutationMessage message = (MutationMessage) dcpEvent.message(); 반환 message.콘텐츠().문자열로변환(CharsetUtil.UTF_8).getBytes(); } 그 외 { 반환 dcpEvent.message().문자열로변환().getBytes(); } } } |
A more advanced setting is StateSerializer interface. By implementing it, you can control how the library will track stream cursors (i.e. the sequence numbers for every partition inside Couchbase Server), and whether it will resume after connector restart. There is a Zookeeper implementation of state serializer in the distribution. Here in the sample, we’ve implemented NullStateSerializer which doesn’t persist anything, but it does show a minimal implementation.
|
1 2 3 4 5 6 7 8 9 10 11 12 13 14 15 16 17 18 19 20 21 22 |
공공의 클래스 NullStateSerializer 구현한다 StateSerializer { 공공의 NullStateSerializer(final CouchbaseKafkaEnvironment 환경) { } @Override 공공의 무효 dump(BucketStreamAggregatorState aggregatorState) { } @Override 공공의 무효 dump(BucketStreamAggregatorState aggregatorState, short partition) { } @Override 공공의 BucketStreamAggregatorState load(BucketStreamAggregatorState aggregatorState) { 반환 새로운 BucketStreamAggregatorState(aggregatorState.이름()); } @Override 공공의 BucketStreamState load(BucketStreamAggregatorState aggregatorState, short partition) { 반환 새로운 BucketStreamState(partition, 0, 0, 0xffffffff, 0, 0xffffffff); } } |
The last component of your demo cluster is the Kafka consumer AbstractConsumer, which is a pretty typical instance of a consumer. It consists of two parts: , which implements bootstrap and positioning on the Kafka topic, and PrintConsumer, which carries your “business logic”, or just outputs every message it gets passed by AbstractConsumer:
|
1 2 3 4 5 6 7 8 9 10 11 12 13 14 15 16 |
공공의 클래스 PrintConsumer 확장합니다 AbstractConsumer { 공공의 PrintConsumer(문자열[] seedBrokers, int port) { super(seedBrokers, port); } 공공의 PrintConsumer(문자열 seedBroker, int port) { super(seedBroker, port); } @Override 공공의 무효 handleMessage(long offset, byte[] bytes) { 시스템.밖으로.println(문자열.valueOf(offset) + “: “ + 새로운 문자열(bytes)); } } |
As in the other examples here, you can play around with modifying the sample consumer. You can even close the circuit by sending everything back to Couchbase Server. Kafka is distributed software, just like Couchbase Server, so keep that in mind when running on your own cluster and adjust the main() function accordingly. In our sample, we have only a single partition, partition (0) in Kafka, so our main looks like this:
|
1 2 3 4 5 6 |
공공의 클래스 예시 { 공공의 정적 무효 메인(문자열 인수[]) { PrintConsumer example = 새로운 PrintConsumer(“kafka1.vagrant”, 9092); example.실행(“default”, 0); } } |
Of course, in a production cluster you’ll be running more than one partition.
결론
I hope this helps you get off to a good start with Couchbase and Kafka. Cheers!

댓글 남기기
댓글을 달기 위해서는 로그인해야합니다.