
In just a few lines of code you can start using Couchbase with Node.js to build your next JavaScript application.
This hello world tutorial walks you through the basic first steps of using the Node.js SDK with the latest features of Couchbase 7.0. It assumes you have at least some familiarity with both JavaScript and NoSQL databases – but expertise isn’t required.
Install & Prepare Couchbase
Before you dive into developing an application, start by setting up the latest version of Couchbase Server or sign up for free a Couchbase Cloud account.
After installation, set up the `travel-sample` Bucket which creates a set of sample documents with flights, hotels, landmarks and more. You’ll find this data handy for testing a range of different kinds of applications.
Set Up a Basic Node.js Application
For the rest of this post, I’ll assume you already have Node.js installed along with your favorite code editing tools. (First-time developers should look up some basic tutorials to get a working environment.)
Your first step is to create a project folder and initialize the package template with npm init -y, as shown below:
tyler@local:~/src/cb-node$ npm init -y
Wrote to /home/tyler/src/cb-node/package.json:

{
"name": "cb-node",
"version": "1.0.0",
"description": "",
"main": "index.js",
"scripts": {
"test": "echo "Error: no test specified" && exit 1"
},
"keywords": [],
"author": "",
"license": "ISC"
}
Add the Couchbase Node.js Module Dependency
Next, add the Couchbase Node.js module to the dependencies in package.json by running the npm install command with the --save option, like so:
$ npm install couchbase --save
> couchbase@3.2.0 install /home/tyler/src/cb-node/node_modules/couchbase
> prebuild-install || node-gyp rebuild

...

npm WARN cb-node@1.0.0 No description
npm WARN cb-node@1.0.0 No repository field.

+ couchbase@3.2.0
The package.json file now has the dependency section:
"dependencies": {
"couchbase": "^3.2.0"
}
Connect to a Couchbase Cluster
To test that the modules are all installed properly – and that you can connect to the cluster – you need to know the Bucket name in order to connect to and add a user that can access the Couchbase Bucket.
var couchbase = require("couchbase");
For the most simplistic usage, wrap the rest of the example in a connect function:
couchbase.connect(
  'couchbase://127.0.0.1',
  {
    username: 'Administrator',
    password: 'Administrator'
  },
...)
You also need to select the keyspace – i.e., Scope or Collection(s) – you want to access, if applicable. In this initial test case, we’ll use a default Collection which ignores Scopes and Collections altogether:
...
(err, cluster) => {
  var bucket = cluster.bucket('travel-sample')
  var coll = bucket.defaultCollection()
...
Get a JSON Document
There are thousands of sample JSON documents in the travel-sample Bucket.
To request a document using basic key-value operations, use the get function and supply a document ID. You can use the web console to browse for a given hotel document to get the ID, as pictured below.
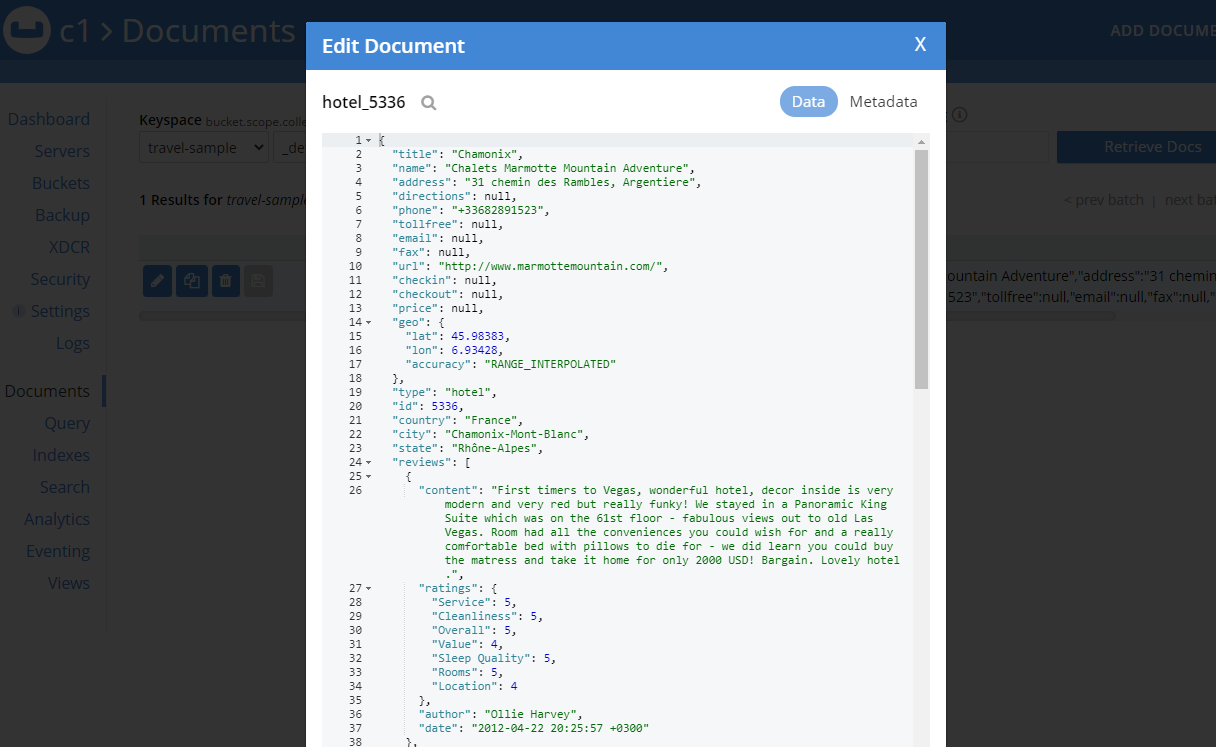
Catch the response and error, then print to console to see if it is successful.
coll.get('hotel_5336', (err, res) => {
  if (err) throw err
  console.log(res.value)
If you made it this far and it’s your first Node.js app, congratulations! You now know how to get a document from Couchbase with the most simple syntax. The full code sample is below:
var couchbase = require('couchbase')

couchbase.connect(
  'couchbase://127.0.0.1',
  {
    username: 'Administrator',
    password: 'Administrator'
  },
  (err, cluster) => {
    var bucket = cluster.bucket('travel-sample')
    var coll = bucket.defaultCollection()

    coll.get('hotel_5336', (err, res) => {
      if (err) throw err
      console.log(res.value)
    })
  }
)
Keep in mind this is a basic example that includes blocking code. In a future article, I’ll cover an example that shows non-blocking async examples instead.
Create or Upsert a Document Using JavaScript
To create a new document you can use the upsert function. It’s called upsert because it acts like an insert (for new documents) or if there is already a document with the same ID, it will simply update it.
Ensure that the user you specify has adequate write privileges before trying an `upsert`. The examples below assume full Bucket administrative access to keep things simple.
At this point, copy your script into a new file for testing the upsert functionality independent from the get function.
Upsert requires a document ID and a JSON object with the document data. You provide the ID when pushing it to the database. Create the variable to hold the JSON data and add some elements to it.
newdoc = {
  type: "hotel",
  id: 2,
  name: "Le Grande",
  city: "Paris, France"
}
Next, call the upsert function along with the new document ID.
coll.upsert('hotel_2', newdoc, (err, res) => {
  console.log(res)
})
Print the output to show that a mutation/transaction has completed. The CAS value is used in other contexts to compare vintage of the data for tracking/locking different data versions.
Running the script produces the following transaction summary:
$ node app.js

MutationResult {
cas: CbCas<1628915917601505280>,
token: CbMutationToken<4:251812459673841:85:travel-sample> }
Now you can go back to your original `get` script and drop in the new document ID to test that it can now be retrieved.
Here is the full script for doing the simple `upsert` in a standalone Node.js script.
var couchbase = require('couchbase')

couchbase.connect(
  'couchbase://127.0.0.1',
  {
    username: 'Administrator',
    password: 'Administrator'
  },
  (err, cluster) => {
    var bucket = cluster.bucket('travel-sample')
    var coll = bucket.defaultCollection()

    newdoc = {
      type: "hotel",
      id: 2,
      name: "Le Grande",
      city: "Paris, France"
    }

    coll.upsert('hotel_2', newdoc, (err, res) => {
      console.log("Hotel added")
      console.log(res)
    })
  }
)
Conclusion
Thank you for following along with these basic JavaScript with Couchbase examples. I hope this gets you started with building a NoSQL application using Node.js.
For more SDK-related examples check out the Node.js SDK documentation. In future posts, we’ll explore using the functions asynchronously and dig into other Couchbase functions like query and search.
Catch up with the rest of the Node.js + Couchbase how-to series:
- How to Get Started with the Node.js SDK for Couchbase
- How to Create Async Get/Upsert Calls with Node.js and Couchbase
- Build a REST-Based Application with Node.js, Express and Couchbase
- How to Query JSON Data Using N1QL for Node.js and Couchbase
- How to Add Full-Text Search Functionality to Your JavaScript App
Want to try out these examples for yourself?<br/ >Sign Up for Couchbase Cloud Today
Author
1 Comment
-
[…] post continues my introductory series on using Node.js with Couchbase (including last week’s post on async […]
Leave a comment
You must be logged in to post a comment.