

Container technologies such as 도커 have vastly simplified the software development, test and deployment process by allowing you to package applications along with their complete runtime environment that abstract away differences in infrastructure and OSes. This post is a primer on how you can use Docker to set up your 코우치베이스 모바일 development environment and offers some troubleshooting tips.
Everything discussed in this post applies to a simple development environment with the goal of expediting the development process so you can quickly and easily start building mobile apps using Couchbase Mobile.
In a related 게시물, we discuss how you can leverage 쿠버네티스 to scale out and manage the deployment of Couchbase Mobile cluster in production environments. The 카우치베이스 오토노머스 오퍼레이터 greatly simplifies the task of deploying and managing your cluster.
배경
At a high level, the full 코우치베이스 모바일 stack comprises of the following components
– The Couchbase Lite, which is the NoSQL embedded database integrated into your mobile apps
– The Sync Gateway, which is the gateway responsible for data synchronization across the clients and Couchbase Server
– The Couchbase Server, responsible for data persistence
To get started with development using Couchbase Mobile, you need an instance of Couchbase Server and Sync Gateway. You will integrate Couchbase Lite framework into your apps.
In this post, we will learn how to use Docker to deploy an instance of a 싱크 게이트웨이 node and a single node 카우치베이스 서버 cluster on a desktop environment suited for development purposes.
Installing Docker
If you haven’t done so already, please install Docker per the install guide for your desktop environment.
You can verify your docker install by typing the following command in a terminal window.
|
1 |
도커 —버전 |
You should see a response similar to below
|
1 |
도커 버전 18.03.0–ce, 빌드 0520e24 |
Installing Couchbase Server
Couchbase Server is available on Docker Hub ~에서 카우치베이스 repo. At time of writing this post, this version is 6.0.1.
- You will first get the docker image from Docker Hub. Open a terminal window and run the following command
|
1 |
도커 pull 카우치베이스/서버 |
- Create a local docker network named “cbnetwork” (or any name) if one does not exist already. Open a terminal window and run the following command. If you use a network name other than “cbnetwork” then remember to update the corresponding use of the name in the remaining instructions.
|
1 2 |
도커 network ls 도커 network 만들다 –d bridge cbnetwork |
Configuring Couchbase Server
Once your Couchbase Server is installed and running, you will have to configure it before you can start using it with your Sync Gateway
Here are the minimal set of the things you will have to do :-
- Create a cluster with appropriate services. A single node cluster is sufficient for development needs
- Configure Adminstrator Account for server access
- Configure cluster
- Create a default bucket
- Create a RBAC user with appropriate bucket level access. The RBAC user credentials is used by the Sync Gateway to authenticate with the Couchbase Server
You have two options on how to configure the Couchbase Server – Manual 그리고 Automated. Jump to the appropriate section depending on your choice.
Option 1: Configuration using the Admin UI
You can configure the Couchbase Server manually via the Couchbase Admin Console UI
In order access the Admin UI, we must run the docker image that we pulled earlier.
- Run Couchbase Server with the following command. This runs the Couchbase Server as a daemon process.
|
1 |
도커 실행 –d —이름 씨비–서버 —network cbnetwork –p 8091–8094:8091–8094 –p 11210:11210 카우치베이스/서버 |
- You can view the logs at any time by running the following command
|
1 |
도커 logs –f 씨비–서버 |
- If your server has succesfully launched, you should see something like this in your output
|
1 |
Starting 카우치베이스 서버 — Web UI available at https://<IP<:8091 그리고 logs available 안으로 /opt/카우치베이스/변수/lib/카우치베이스/logs |
- It may take a few seconds for the server to startup. Verify that the docker image is running with following command
|
1 |
도커 ps |
- Once the server is up and running, access it by opening the URL
https://localhost:8091in your browser - 지침을 따르세요 setup guide to configure the Administrator account and to create a single node cluster.
- Follow the intructions 여기 to create a bucket
- Next, create a RBAC user for the Sync Gateway to connect. This user will be created with “with “Application Access” role as specified in instructions 여기
- Once your Couchbase Server is setup, be sure to make note of
- The name of the bucket that you created
- The RBAC user credentials that you used for setup
The RBAC credentials and name of bucket will be required when you are ready to configure your Sync Gateway
The manual process is fine but can get tedious if you have to repeat this process a number of times on each of your development setups. Wouldn’t it be great if the configuration steps could be automated. If you are interested in learning about that, proceed to the next section, else just skip ahead to the section on setting up the Sync Gateway.
Option 2: Configuration using the CLI
I have generated a custom docker image from the Couchbase Server 6.0.1 image that will allow you to launch the container with appropriate configuration values via the command line. This will be particularly useful if you want to automate/ script the installation/automation process.
While 6.0.1 is the latest version at the time of writing the post, it is probably not the latest release when you are reading it. So follow steps under “Building Custom Configurable Docker Image” to build custom image with a different server version.
- Download this custom development version of the Couchbase Server image based on Couchbase Server 6.0.1.
|
1 |
도커 pull priyacouch/카우치베이스–개발자–6.0<code 클래스=“width-set:true lang:sh wrap:true”<</code<<code 클래스=“width-set:true lang:sh wrap:true”< |
- Once you have succesfully downloaded the custom image, you can launch it by providing it with the appropriate configuration values as part of the launch command. Make sure you record the RBAC user credentials and name of bucket. These will be relevant during Sync Gateway configuration
- COUCHBASE_ADMINISTRATOR_USERNAME is the name of Couchbase Administrator
- COUCHBASE_ADMINISTRATOR_PASSWORD is Couchbase Administrator password
- COUCHBASE_BUCKET is the name of the database bucket that you would like to create
- COUCHBASE_RBAC_USERNAME is the name of the Sycn Gateway RBAC user with Application Level bucket access
- COUCHBASE_RBAC_PASSWORD is the password of the RBAC user
- COUCHBASE_RBAC_NAME is a user friendly name for the RBAC user
- CLUSTER_NAME the name of the Couchbase Server cluster
Open a terminal window and type the following command. You can provide suitable values for each of the configurable parameters.
|
1 |
도커 실행 –d —이름 씨비–서버 —network cbnetwork –p 8091–8094:8091–8094 –p 11210:11210 –e COUCHBASE_ADMINISTRATOR_USERNAME=관리자 –e COUCHBASE_ADMINISTRATOR_PASSWORD=비밀번호 –e COUCHBASE_BUCKET=demobucket –e COUCHBASE_RBAC_USERNAME=admin –e COUCHBASE_RBAC_PASSWORD=비밀번호 –e COUCHBASE_RBAC_NAME=“admin” –e CLUSTER_NAME=demo–클러스터 priyacouch/카우치베이스–개발자–6.0 |
- You can view the logs at any time by running the following command
0
- You have to be patient. It takes a few minutes for the server to get up and running. If succesful, your output should look something like this
1
- That’s it! Now you can test out your installation.
Access it by opening the URLhttps://localhost:8091in your browser and verify that your configuration is as specified
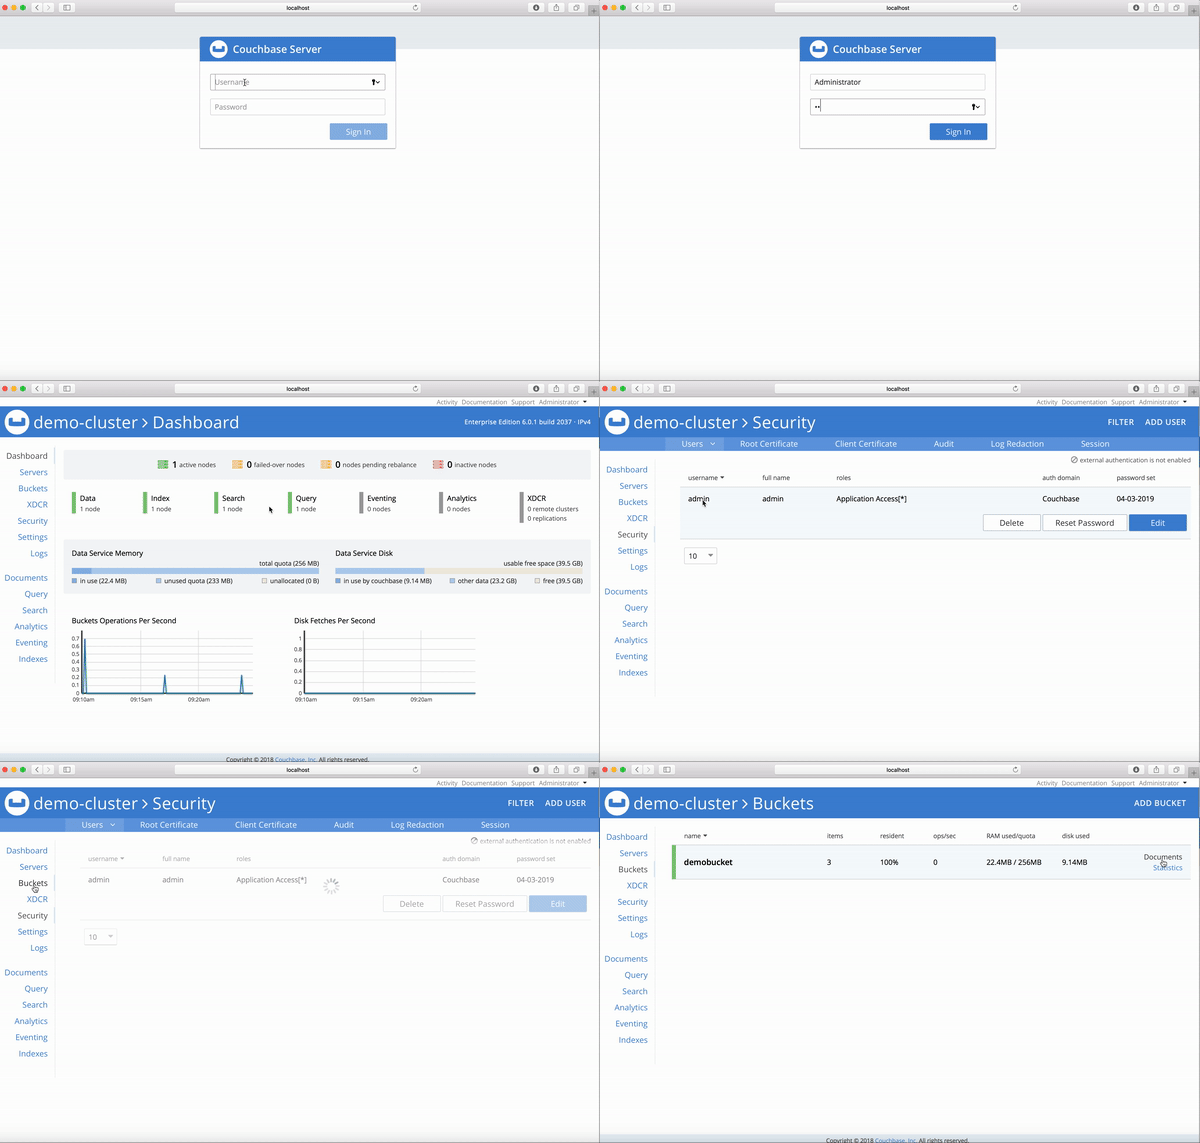
Building Custom Configurable Docker Image
If you are wondering how I generated the custom image with configurable options, there are couple of ways to do that. But I took an approach inspired by the tutorial. I essentially built a custom docker image from the base Coucbase server image and configured it for our development needs!
There are a tonne of custom configurable values as described in the couchbase CLI 그리고 REST interface specs. In my custom docker image, I allowed configuration of a few critical parameters ones and left the others to defaults.
If you would like to generate your own image based on a different version of Couchbase Server and/or if you would like to customize the configurable parameters, you can do so by following the steps specified in this guide
Installing Sync Gateway
Now that you have the Couchbase Server configured and up and running, we will install the Sync Gateway. It is important that the Couchbase Server is up and running before you get started with the Sync Gateway.
The Sync Gateway is available on Docker Hub ~에서 카우치베이스 repo.
- You will first get the docker image from Docker Hub. Open a new terminal window and run the following.
2
- The Sync Gateway must be launched with a configuration file where you specify among other things, the URL of the Couchbase Server to connect to, the bucket to access and the RBAC credentials to use for bucket access. The config file determines that runtime behavior of the sync gateway.
The docker image that you pulled is built with a default configuration file. If you specify none, that’s what will be used (and that’s probably not going to work for you).
- If you have a configuration that you would like to use, open it in an editor of your choice. If not, create a new config file named
sync-gateway-config.jsonand copy the following configuration setup.
3
- You can add an appropriate
syncfunction or any of the other configuration properties. We will focus on the key ones that are essential for our development environment. You should make appropriate edits to the config file as specified below. - 그
서버URL specifies the name of the Couchbase Server container. In thedocker runcommand used to launch the Couchbase Server, we specified the name using the--nameoption. - 그
데이터베이스그리고양동이must correspond to the$COUCHBASE_BUCKETvalue that you used when you configured the Couchbase Server. In our example, that was specified to bedemobucket. - 그
사용자 이름corresponds to the username of the RBAC account that you created for bucket access as specifed by the$COUCHBASE_RBAC_USERNAMEvalue that you used for when you configured the Couchbase Server. In our example, that was specified to beadmin. - 그
비밀번호corresponds to the password of the RBAC account that you created for bucket access as specified by the$COUCHBASE_RBAC_PASSWORDvalue that you used for when you configured the Couchbase Server. In our example, that was specified to be password. - Once the configuration file is setup, you will launch the Sync Gateway with the file. For this, open a terminal and run the following commands
4
- You can view the logs at any time by running the following command
5
- It may take a few seconds for the sync gateway to startup. Verify that the docker image is running with following command
6
- Verify that your sync gateway is running by opening the URL
https://localhost:4984in your browser.
You should see the following output
7
- Verify that the sync gateway is talking to the Couchbase Server bucket by opening the URL
https://localhost:4985/demobucket/in your browser. Heredemobucketis the name of the database bucket that we created.
You should see output similar to one below indicating the version of sync gateway
8
That’s it! You have your docker instance of sync gateway talking to the Couchbase Server
Managing your environment
In this section, we go over some basic docker commands that will be help manage your environment.
Stopping/ Starting Containers
- You can stop and restart the docker containers at any point using the
stop그리고startdocker commands as follows.- Stopping Containers
9
- Starting Containers
0
Note that if you stop the Couchbase Server, the Sync Gateway will attempt to reconnect with the server for a few minutes before giving up. So if the server is stopped for an extended period of time, you will need to stop and restart the Sync Gateway container as well or use the _online API to bring it back online again.
Updating Sync Gatway Configuration
- If you want to update the sync gateway configuration, you will need to re-run the Sync Gateway with an updated sync gateway config file. For this, you will need to stop and remove the sync gateway container.
1
If you do not remove the sync-gateway image , you will see a “name conflict error” similar to one below if you try to start the sync-gateway again with updated config.
2
Updating Couchbase Server Configuration
- Similarly, if you want to re-run the Couchbase server with an updated configuration, you will need to stop and remove the couchbase server.
3
However, depending on the server configuration that is changed, you may also need to stop and remove sync gateway container and relaunch it with updated sync gateway config file. For instance, if you changed the RBAC credentials for the bucket or if you changed the name of the bucket that.
Running commands in the container
Sometimes, you may want to run commands directly on the running container. For this you can use the docker exec command to open up a shell into the container. This is extremely useful for debugging and such. You will need root privileges to be able to run the command.
- couchbase server
4
- sync gateway
5
Next Steps
As you probably gathered from this post, docker containers make it extremely convenient to get you up and going with a Couchbase Server and Sync Gateway cluster in your development environment. With the backend setup out of the way, you can focus on building your awesome mobile apps with Couchbase Lite.
As a next step, you can use docker-compose to install both Couchbase Server and Sync Gateway containers. Bear in mind that the Sync Gateway depends on Couchbase Server to be up and running.
This post discussed setting up docker container in a development environment. In a real world production environment, you would probably never deploy a single-node cluster. You would likely want to have multiple nodes for high availability. You can use an orchestration technology like 쿠버네티스 to simplify the deployment and management of your Couchbase Mobile cluster.
If you have questions or feedback, please leave a comment below . The 카우치베이스 포럼 are another good place to reach out with questions.
작가

6개의 응답
-
mistake in config file. duplicate parameters of — “enable_shared_bucket_access”:true,
-
Looking for the way to upload new config file, any ideas?
-
-
Duplicate config entry will not cause any issues. Its benign but I will fix it. You will have to restart your docker container with updated file.
-
It did not seem benign because it would not start sync gateway and the error stated duplicate entries. I have restarted the server and Sync gateway and get this error.
2021-01-11T18:01:08.890Z [ERR] Error reading config file /etc/sync_gateway/: read /etc/sync_gateway/: is a directory — rest.ServerMain() at config.go:1091
-
-
Please use the Couchbase dev Forums for discussing and debugging issues. It is more appropriate channel for the such topics.
Also, you indicated that the sync gateway wouldn’t start when you provided dup config entries so please share the logs that indicate the issue. The error you show up is unrelated.
-
ddsfsdf


댓글 남기기
댓글을 달기 위해서는 로그인해야합니다.