
A few months back I had written about creating a continuous deployment pipeline with Node.js and Jenkins, where the Node.js application was using 카우치베이스 in some fashion. Essentially, it took a project from GitHub, installed the dependencies, ran the tests, and then ran the application on some server, where some server was the same machine that Jenkins was on.
Jenkins is great, but it is a lot of work to get set up with and to keep going. Instead there are hosted continuous integration (CI) and continuous deployment (CD) solutions that exist, such as CircleCI.
We’re going to see how to take a Node.js project that is version controlled on GitHub and continuously deploy it to some remote server using CircleCI every time a push is made.
Before continuing, you should already have created a CircleCI account, have a remote server available, and have a Node.js project available on GitHub.
In this example, I’m using a Droplet that I’ve created on 디지털오션 그리고 Node.js user profile store project I had written about a while back. Feel free to use whatever you’d like.
Preparing the Remote Server for SSH Connections
The goal in continuous deployment is to be able to automatically deploy a stable project to your server seamlessly.
When using CircleCI, during the deployment step, we want our project to be copied after our testing workflow succeeds. This can happen via an SCP or a Git Checkout with a series of commands on the remote server. Whatever best meets your needs.
Since we are using Node.js, it makes to use the latter because we’ll need to install dependencies, and restart the Node.js service. It has a little more depth than just copying files over. For this reason, we’ll need CircleCI to be able to connect to our remote instance via SSH.
The safest way to do this is to create an SSH private key for CircleCI. From your server, assuming it is Linux, execute the following:
|
1 |
ssh–keygen –t rsa –C “circleci” |
You’ll be asked a series of questions regarding the key. It is important that this SSH key does not contain a password since CircleCI does not support key passwords as of right now.
Once the key is generated, execute the following:
|
1 |
cat ~/.ssh/id_rsa.pub >> ~/.ssh/authorized_keys |
The above command assumes that you’ve named your key id_rsa. It will append the public key to the end of the authorized_keys 파일.
The contents of the id_rsa private key file needs to be copied to our CircleCI dashboard later in this guide.
Before designing the workflow, we need to clone the GitHub project to our server. Take the following for example:
|
1 |
깃 복제 https://github.com/my-example-project ./profile-store |
It is important to remember where you cloned the project to because it will be used by the deployment script in our workflow. CircleCI will SSH into our server and do a git pull inside the project directory.
Designing the Workflow Steps
Before the project will be picked up by CircleCI, it needs to be altered a bit on GitHub. CircleCI, like many other CI / CD solutions, requires a configuration file to be placed in the project.
Assuming that you’re looking at the user profile store project, we need to create a directory called .circleci at the root with a file called config.yml.
Open this .circleci/config.yml file and add the following:
|
1 2 3 4 5 6 7 8 9 10 11 12 13 14 15 16 |
버전: 2 jobs: 빌드: 도커: – image: circleci/node:7 단계: – checkout – 실행: 이름: 설치–dependencies command: npm 설치 – 실행: 이름: tests command: npm test – deploy: 이름: digital–ocean command: ssh –o “StrictHostKeyChecking no” 사용자@hostname “cd ~/profile-store; git pull; npm install; forever start app.js” |
So what is happening in the above configuration?
We’re saying that we want to spin up a Docker container running Node 7.x to perform our tests and other workflow tests. In regards to the steps, first the project is checked out from GitHub into the container. Then we install all dependencies into the project as they are not committed into GitHub. The package.json of our project has a script called test which in theory would run our tests. Our project doesn’t have any real tests.
Provided the previous three steps were successful, a deployment happens. This command will SSH into our server, navigate to the directory of our choosing, pull changes to the project, install any potentially new dependencies, and start the forever process.
We are able to deploy our project through SSH because at this point we’re sure the previous local steps had succeeded on the container.
Commit the project changes to GitHub so we can configure the project in the CircleCI dashboard.
Configuring the Project within the CircleCI Dashboard
A few things need to be configured within CircleCI to get the CI / CD pipeline functional for the project. Within your CircleCI dashboard find the GitHub project that you wish to manage. If you’ve linked GitHub with CircleCI, there is a good chance it will show up already because of the configuration file addition.
Within the project settings, find the SSH Permissions section.
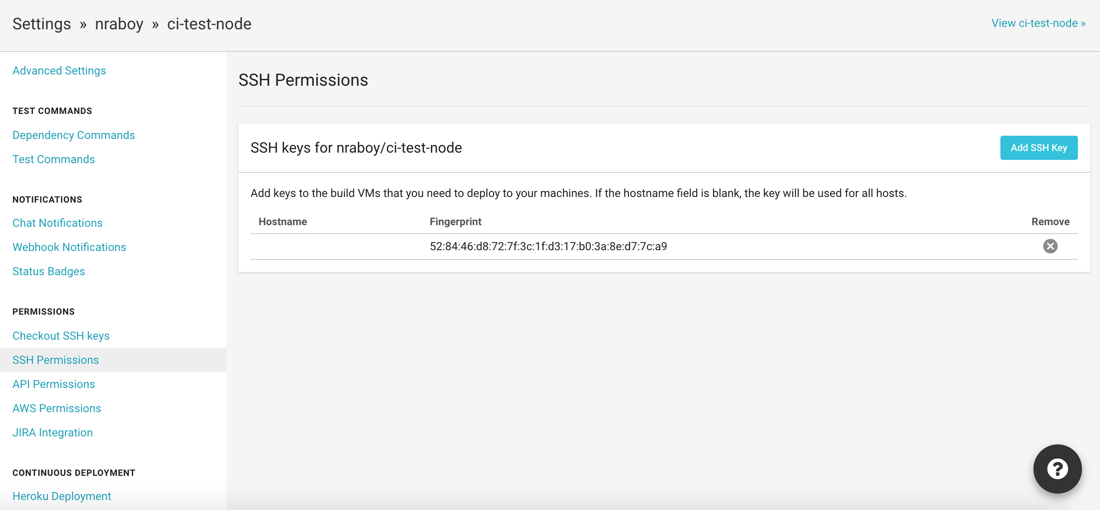
You’ll want to copy the private key created earlier into this section. This will allow CircleCI to connect to your server for deployment. Remember, as of right now, the SSH key must be passwordless.
At this point, any future pushes to GitHub should result in the pipeline starting. If everything passes, you should be able to access the changes as they happen on your server running Node.js.
Where is the NoSQL Benefit?
Let’s say that your code changes involve changes to your data model. If you were using an RDBMS, you would likely have to push a SQL script with a bunch of ALTER statements every time you make a change. While possible, it definitely isn’t convenient.
Let’s get a little more specific here.
Say I wanted to include address information in each of my user profiles, something that wasn’t previously being collected. With NoSQL and a flexible JSON model, I could just add the information to my JavaScript objects being saved and complete the save. No need to create any migration scripts.
결론
You just saw how to use CircleCI for continuous deployment of a Node.js web application. We had used a user profile store application from a previous example, and deployed it to a server via SSH whenever new changes were pushed to GitHub.
There are many continuous integration and continuous deployment solutions available. If you want to host your own solution, you can check out a variation of this tutorial that uses Jenkins called, Create a Continuous Deployment Pipeline with Node.js and Jenkins.
작가

1개의 응답
-
Nice, thanks!

댓글 남기기
댓글을 달기 위해서는 로그인해야합니다.