

NoSQL doesn’t have to be difficult. Generally speaking, it isn’t. But admittedly, and especially on Windows, it’s not always as clean as it could be. Each database has its challenges. Some are difficult to install. Some are difficult to configure. Some have poor server admin tools. Some lack strong client library support. One of the NoSQL offerings that really gets things right is Couchbase Server. OK, full disclosure, this is my first post to dllHell (where this post originally appeared) as a Developer Advocate for Couchbase!
Couchbase was formed when Membase and CouchOne merged. Couchbase Server 2.0 is going to be a hybrid NoSQL database, combining features from both distributed key/value stores and document oriented databases. The 2.0 product will be released in 2012. In January 2012, an interim 1.8 release will be the first official release of the merged Couchbase Server, formerly Membase Server. As part of my responsibilities at Couchbase, I’m working on the .NET client library for Couchbase Server 1.8. Below is a preview of what’s coming. If you’ve used Membase Server with .NET, you should be familiar with the code below. If you’re new to Couchbase Server, I’m going to start from the beginning.
Installing Couchbase Server
Most NoSQL databases have Windows installers, though sometimes these aren’t kept up to date. In the case of CouchDB, there are a couple of different MSI packages available, but only one works (at least as of October 2011). MongoDB has a command line installer for its service. Couchbase Server, fortunately, has an officially supported Windows installer. You can download the latest installer here. As I write this, the latest server version is 1.7.2. Check back later in January for 1.8. Grab the Community Edition of Membase Server, which is appropriate for development purposes. Membase Server will be renamed Couchbase Server with the 1.8 release. You can also grab the 2.0 Developer Preview, which already sports the new name.
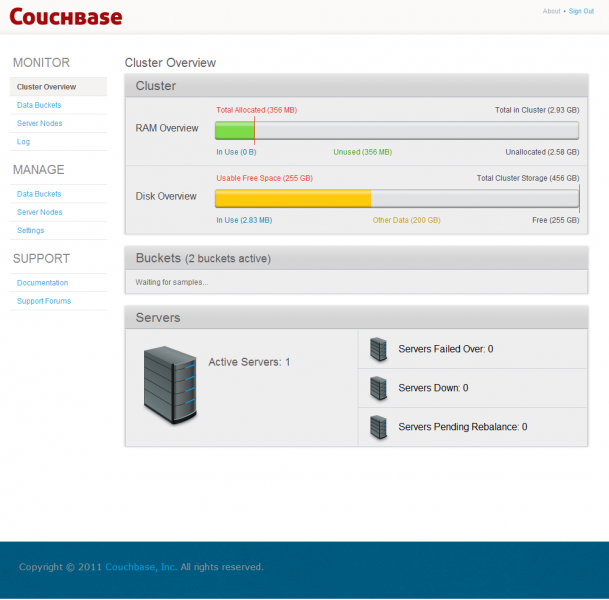
After you run the installer, you’ll be taken the web based admin console. The admin console is where you’ll be able to configure your cluster and manage the nodes within that cluster. In local development, you’ll likely have a single node cluster (e.g., your dev machine).
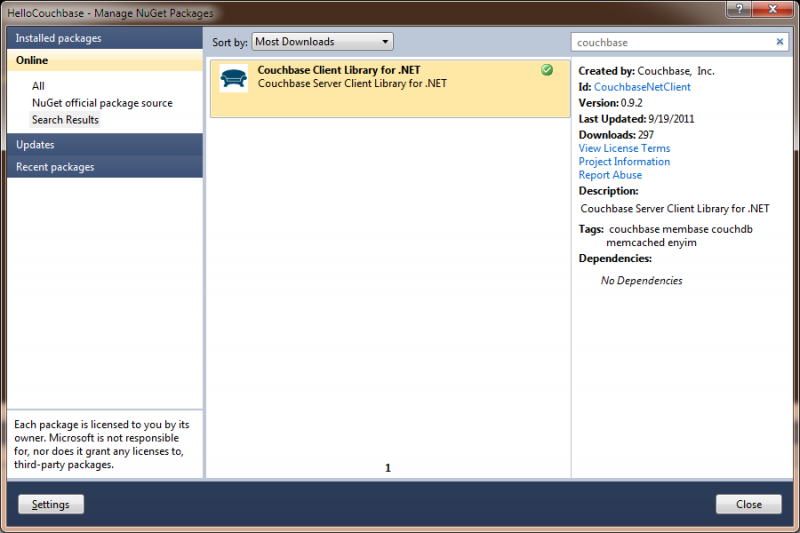
Once you’ve gotten the server up and running, it’s time to write some code. If you create a simple console app, the easiest way to include the Couchbase .NET client library in your app is to use Nuget. After you add the reference, add the following using statement:
using 카우치베이스;
Then add the following line to your Main method:
정적 무효 Main(문자열[] 인수) {
var client =새로운 CouchbaseClient();
}
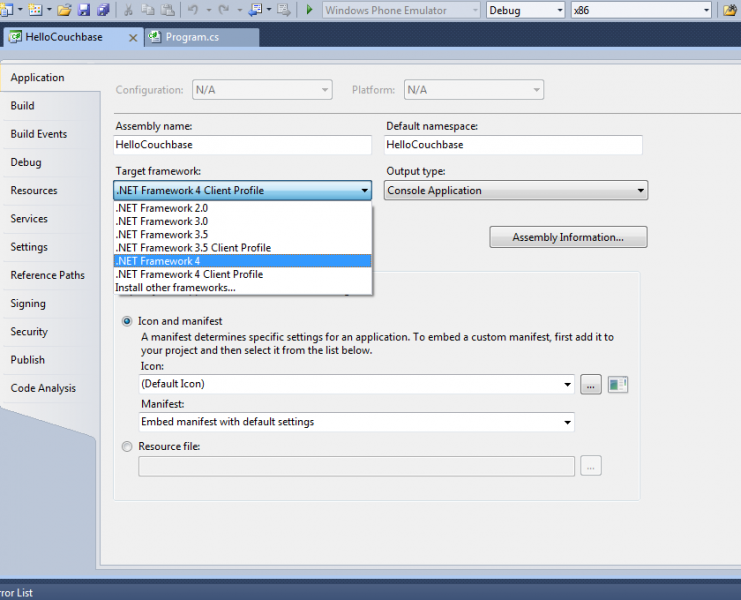
After you add these lines, compile the app. You’ll probably get a strange compilation error that the namespace ‘Couchbase’ can’t be found. The reason you’ll see this error is that Visual Studio 2010 (I’ve made the assumption that you’re using 2010) defaults console projects to use the .NET 4 Client Profile, which is a subset of .NET 4. You’ll need to update the .NET version to .NET 4.0 (or 3.5). After making this change, you’ll be able to build.
Next, you’ll need to add some configuration info to your app.config. The entire file should look as follows:
<configuration<
<configSections<
<section 이름=“membase” 유형=“Couchbase.Configuration.CouchbaseClientSection, Couchbase”/>
<
<membase<
<servers 양동이=“default” bucketPassword=“”<
<add uri=“https://127.0.0.1:8091/pools/default”/>
<
<
<
In the config section, you provide the client details on how to connect and to where data will be written. To tell the CouchbaseClient to use the app.config section, update the declaration as follows:
var client =새로운 CouchbaseClient(“membase”);
Saving and reading primitive data types is just as easy as saving and reading user defined types. So I’ll create a couple of classes Brewery and Beer (intentionally simplified).
[Serializable]
공공의 클래스 Brewery {
공공의 문자열 이름 { 얻다; 설정; }
공공의 문자열 City { 얻다; 설정; }
공공의 문자열 State { 얻다; 설정; }
}
[Serializable]
공공의 클래스 Beer {
공공의 문자열 이름 { 얻다; 설정; }
공공의 Brewery Brewery { 얻다; 설정; }
공공의 decimal ABV { 얻다; 설정; }
}
These classes are just POCOs (Plain Old CLR Objects) that have been marked Serializable. I’ll new up an instance of each in my Main method.
var brewery =새로운 Brewery {
City = “Hartford”,
State = “CT”,
이름 = “Thomas Hooker Brewery”
};
var beer =새로운 Beer {
Brewery = brewery,
이름 = “American Pale Ale”,
ABV = 5.3m
};
Next, I’ll persist the Beer instance by calling the client’s Store method. Note that the StoreMode requires the additional using statement be added for Enyim.Caching.Memcached.
client.Store(StoreMode.Set, beer.Name, beer);
After storing, I’ll read the Beer back out and display its name.
var savedBeer = 클라이언트.Get<Beer<(“beer”); Console.WriteLine(savedBeer.이름);
And that’s it, wicked easy, right? Admitedly, this is a very simplified introduction to Couchbase Server. As I’m now taking over the .NET client library, I’ll be posting more detailed tutorials and samples.
작가

8개의 응답
-
Looking forward to CBS 2.0. Is this client library based on the Enyim code or completely new?
-
Hi Claus,
The client will continue to make use of the Enyim codebase. With CBS 2.0, the client will evolve to support the new server functionality, such as views. When CBS 1.8 is released, we’lll have updated docs covering the near term changes to the client.
— John
-
-
You would need to do a client.Get<beer>(“American Pale Ale”), right?
-
yes but….the example is invalid because you cant have ” ” spaces in the key
-
-
How would one configure different buckets so they could be accessed from the same .net client?
-
Hi Brad,
Unfortunately, that isn’t supported in the client today. You’d have to create a second instance of the client. There’s one configuration per client and each configuration supports only a single bucket.
— John
-
Just to clarify: are you saying one would need another instance of the client application running or you would need to create another instance of the CouchbaseClient class? The second option is acceptable to me, but it’s not clear to me how to setup my buckets and instantiate the CouchbaseClient instances to use the correct bucket.
-
You’d need a second instance of the CouchbaseClient – each instance is bound to a single bucket. There are a couple of options for config…
The easiest would be to use programmatic configuration. I have a sample at – https://github.com/couchbase/c…. Note this config is for Couchbase Server DP3+, so if you’re using 1.8 server with the 1.0 client the settings after the Urls don’t apply.
The other option is to create two config sections in app.config (or web.config). You’d have to do something like the config below. You’d have to configure your clients with section names in the constructor.
Let me know if that helps…
var clientA = new CouchbaseClient(“bucketA”);
var clientB = new CouchbaseClient(“bucketB”);<configuration>
<configsections>
<section name=”bucketA” type=”Couchbase.Configuration.CouchbaseClientSection, Couchbase”/>
<section name=”bucketB” type=”Couchbase.Configuration.CouchbaseClientSection, Couchbase”/>
</configsections>
<bucketa>
<servers bucket=”default” bucketpassword=””>
<add uri=”https://192.168.0.2:8091/pools/default”/>
<add uri=”https://192.168.0.3:8091/pools/default”/>
</servers> </bucketa> <bucketb>
<servers bucket=”otherBucket” bucketpassword=””>
<add uri=”https://192.168.0.2:8091/pools/default”/>
<add uri=”https://192.168.0.3:8091/pools/default”/>
</servers>
</bucketb>
</configuration>
-
-
-


댓글 남기기
댓글을 달기 위해서는 로그인해야합니다.