As web applications grow in complexity, ensuring that only the right users have access to your Couchbase data is essential.
Without a well-defined access control system, unauthorized users may access sensitive information or perform harmful actions.
Integrating Permit with Couchbase provides a robust solution for managing access control in applications leveraging Couchbase as the database. Permit is designed to streamline the authorization process, enabling developers to implement fine-grained access control while leveraging the advanced data management capabilities of Couchbase.
In this guide, we walk through building a simple request system where we pass a Couchbase query and check whether the relevant user has access to run that query based on rule-based format checks. If the user lacks permission, they’ll be denied from running the query, if they have permission, they can proceed.
카우치베이스(Couchbase)는 무엇인가요?
Couchbase is a robust NoSQL database, optimized for storing and managing JSON documents. Its ability to handle JSON objects is what sets it apart from traditional key value stores. This flexibility allows developers to be able to store, retrieve, and manage unstructured or semi-structured data easily, making it extremely useful for applications with evolving data models.
One of the key strengths of Couchbase is its SQL++ querying capability which provides a familiar SQL-like syntax for JSON documents (formerly known as N1QL). This enables developers to perform powerful queries on their JSON data such as being able to add common table expressions, joins, and much more. This Couchbase query layer allows data to be stored in JSON format while also supporting sophisticated queries.
What is RBAC?
Role-Based Access Control (RBAC) is a model that helps simplify permission management inside of applications by organizing the system permissions around roles rather than specific individuals. It provides an approach to manage and restrict access to specific resources within a particular application or organization.
To implement external Role-Based Access Control with Couchbase, we will leverage Permit.io, an end-to-end solution for managing user permissions and roles with a simple UI. We will create a React application with the Express packet where the user passes the SQL++ query with the help of Couchbase. Then, we will see whether the user has the relevant permission. If they don’t, we’ll send out a message. If they do, we can modify the request.
Set up a Couchbase Cluster
The first step is to create a free Capella account. To do this, navigate to cloud.couchbase.com and choose Create Account, use an email and password combination. You can also sign up with your GitHub or Google account.
Once you have created your account on Capella, you can proceed with creating your database cluster. You can choose the Free tier option for the cluster.

From the home page of your account, after logging in, click the + Create Database button in the top right corner and fill in the required details, including the name you chose for the database.
When you are ready, go ahead and click on the final Create Database button.

You have now created a cluster. The next step is to add a bucket to hold your data. A bucket is similar to a database table, but with significant differences. Since you are working with unstructured and semi-structured JSON data, a single bucket can hold diverse types of data.
Head over to the Data Tools section, where you will find a pre-imported dataset known as the 여행 샘플 dataset.

You can insert more documents or create completely new buckets if needed. But for this demo we will use the 여행 샘플 dataset.
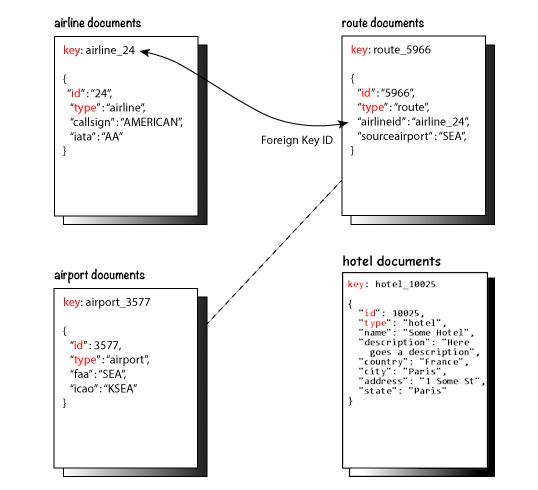
The following figure illustrates the relationship between the different kinds of documents in the travel-sample dataset. It shows the primary key, ID, and type fields that each document has, along with some other representative fields in each type of document.
We will use this dataset for our demo. In order to interact with your data on Capella from your application, you need to know the connection string and create access credentials.
You can find the connection string by clicking the Connect button in the top navigation bar of the dashboard.
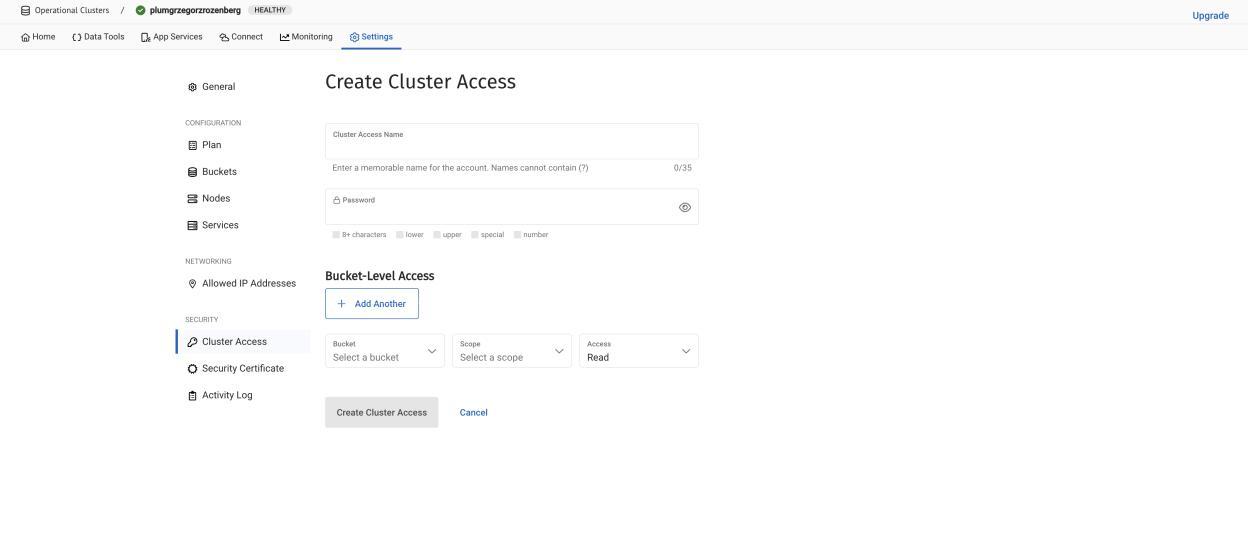
To add access credentials, navigate to this page in your Capella settings, as shown below, and click the + Create Database Access button. Provide a name and password, then click Save. Make sure to immediately add the credentials to an .env file, as you won’t be able to retrieve the password again after this.
After creating your credentials, your Capella setup is complete. Let’s move to the RBAC part!
Set up RBAC Permissions in Permit.io
Ensure you have set up your account on Permit.io and created a project. In this demo, we will use the default project that was created.
Head over to the Policy Editor section, and within the Resources section, add the relevant resources corresponding to the 여행 샘플 dataset.

In this case, we will add the resources as Route, Airport, Hotel, 그리고 Airline.
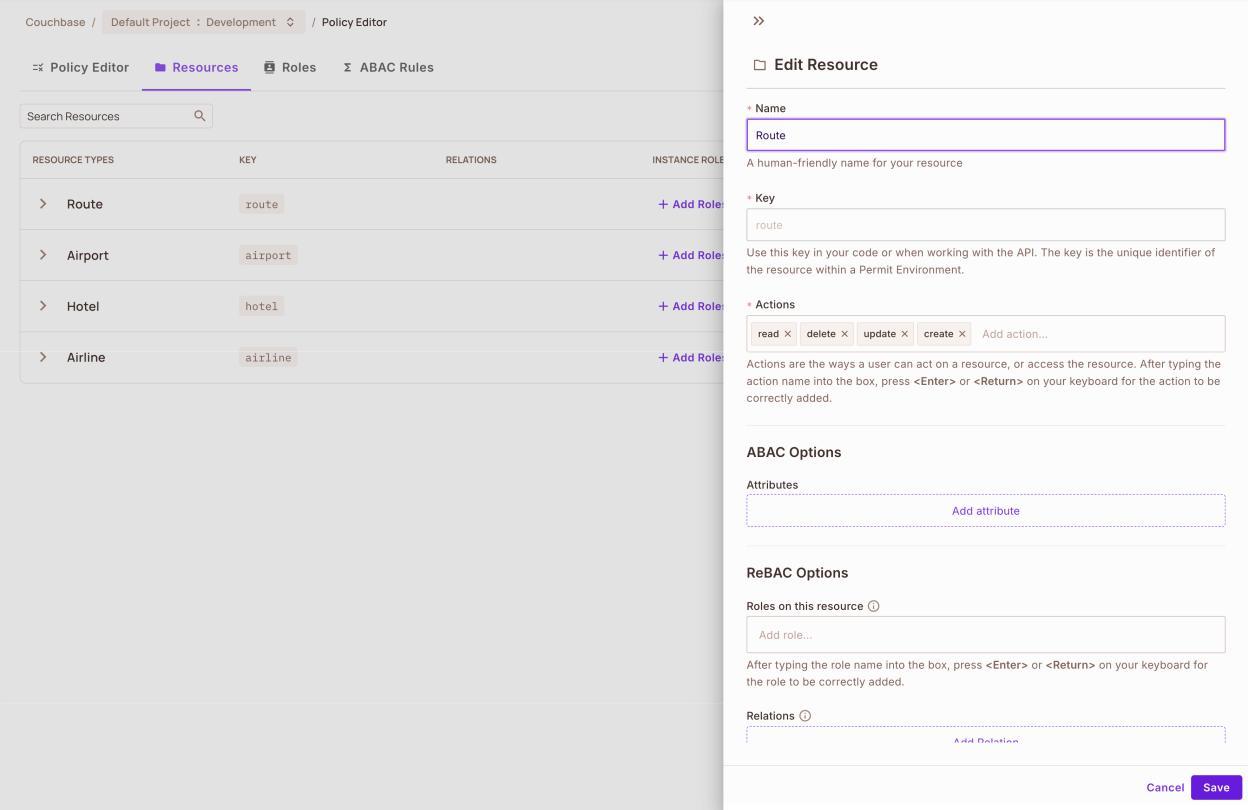
Ensure that you have added the relevant actions.
Next, head over to the Roles section to add the specific user roles associated with the travel sample dataset.
For the dataset we’re using, you will need to add the following roles: Traveler, Travel Agent, Airline Staff 그리고 Hotel Staff.
 Now, head over to the Policy Editor section and define the relevant role-based access control definitions for each specific role corresponding to the resources defined. You can refer to the image below for the specific attributes to help create the policies. Then, go to the Policy Editor, check all the checkboxes as shown below, and save your changes.
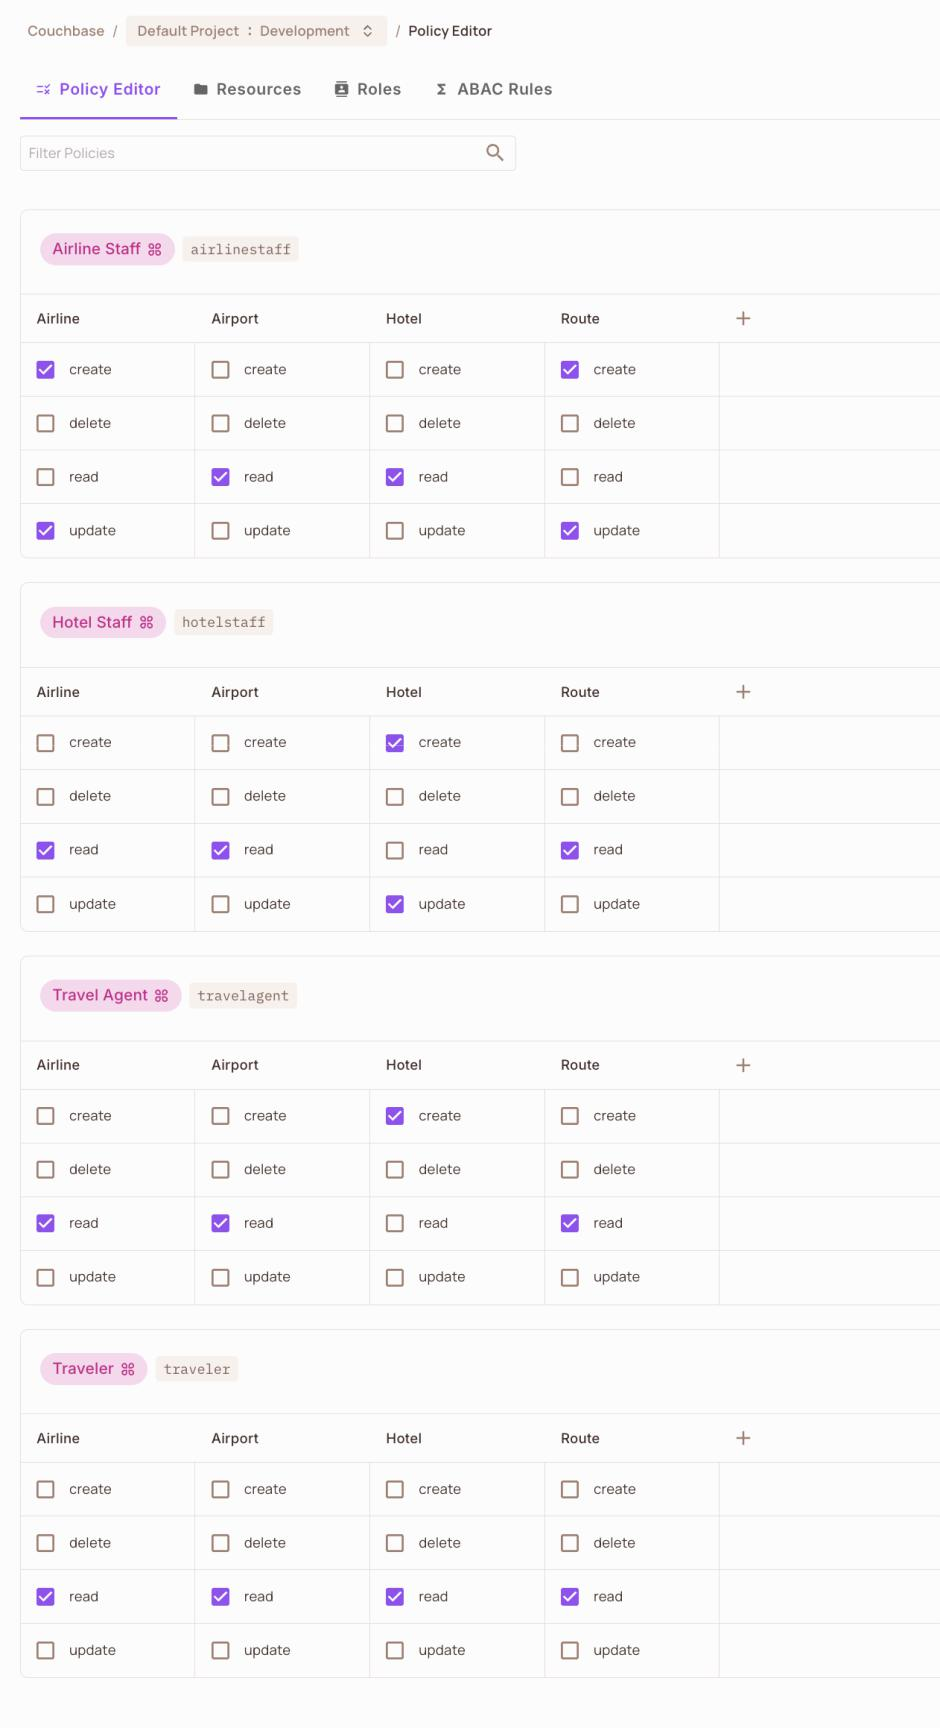
Next, head to the directory section to create a new tenant. Once you have created the tenant, add users based on their roles.
We will create new users for hotel staff, travel agents, and travelers.

For each user, add their email, first name, last name, and specific role in the top-level access section.
That’s all it took to create a Role-Based Access Control (RBAC) model for the travel sample dataset using Permit UI.
Implementing Fine-Grained RBAC for Couchbase with Permit.io
Now let’s implement our Couchbase SQL++ query parser with Permit.
First, we’ll set up a Node.js project with Express for our backend server. We’ll use the Couchbase SDK for Node.js and the Permit.io SDK.
Here’s our package.json file with the necessary dependencies:
|
1 2 3 4 5 6 7 8 9 10 11 12 13 14 15 16 17 18 19 |
{ “이름”: “backend”, “version”: “1.0.0”, “main”: “index.js”, “scripts”: { “test”: “echo “오류: 아니요 test specified” && exit 1″ }, “keywords”: [], “author”: “”, “license”: “ISC”, “설명”: “”, “dependencies”: { “cors”: “^2.8.5”, “카우치베이스”: “^4.4.3”, “dotenv”: “^16.4.5”, “express”: “^4.21.1”, “permitio”: “^2.6.1” } } |
Implementing the Server
Let’s break it down into key components:
Initialization
We start by setting up our Express server and initializing the Permit.io client:
|
1 2 3 4 5 6 7 8 9 10 11 12 13 14 15 16 |
상수 급행 = 요구하다(‘표현하다’); 상수 cors = 요구하다(‘cors’); 상수 { Permit } = 요구하다(‘permitio’); 상수 카우치베이스 = 요구하다(‘couchbase’); 요구하다(‘dotenv’).설정(); 상수 앱 = 급행(); 상수 port = 과정.환경.PORT || 3001; 앱.사용하다(cors({ origin: ‘https://localhost:5173’, 방법들: [‘POST’], allowedHeaders: [‘Content-Type’], })); // Initialize Permit client 상수 permit = 새로운 Permit({ 토큰: 과정.환경.PERMIT_SDK_TOKEN, pdp: “https://cloudpdp.api.permit.io” }); |
Parsing SQL++ Queries
To work with the incoming Couchbase queries, we need to parse them. We’ve implemented a simple parser that extracts the SELECT, FROM, and WHERE clauses from the input query.
Let’s look at the core components of our parser:
Query Parser
The QueryParser class is the foundation of our security implementation. It handles two critical tasks:
- Query Analysis: Parses SQL++ queries to determine:
- Operation type SELECT, UPDATE, DELETE, INSERT
- Resource being accessed
- Query structure validation
|
1 2 3 4 5 6 7 8 9 10 11 12 13 14 15 16 17 18 19 20 21 22 23 24 25 26 27 28 29 30 31 32 33 34 35 36 37 38 39 40 |
정적 parseQuery(질의) { // Extract resource from SELECT statement (word before t const selectResourcePattern = /SELECTs+(w+)./i; // Basic regex patterns for SQL operations 상수 patterns = { 선택: /^s*SELECTs+(?:(?!~에서).)*s+FROMs+[`]?( update: /^s*UPDATEs+[`]?(w+)[`]?(?:.`?(w+)`?)?( delete: /^s*DELETEs+FROMs+[`]?(w+)[`]?(?:.`?(w 삽입하다: /^s*INSERTs+INTOs+[`]?(w+)[`]?(?:.`?(w }; // Determine operation type and extract resource let operation = ”; 하다 resource = ”; 만약 (patterns.선택.test(질의)) { operation = ‘read’; 상수 resourceMatch = 질의.match(selectResourcePatt 만약 (resourceMatch && resourceMatch[1]) { resource = resourceMatch[1]; } 그 외 { 던지다 새로운 오류(‘Unable to parse resource from S } } else if (patterns.update.test(query)) { operation = ‘업데이트‘; const matches = query.match(patterns.update); resource = matches[3] || matches[2] || matches[1]; } else if (patterns.delete.test(query)) { operation = ‘삭제‘; const matches = query.match(patterns.delete); resource = matches[3] || matches[2] || matches[1]; } else if (patterns.insert.test(query)) { operation = ‘만들다‘; const matches = query.match(patterns.insert); resource = matches[3] || matches[2] || matches[1]; } if (!operation || !resource) { throw new Error(‘Unable -로 구문 분석하다 질의 operation 또는 } 반환 { 질의, permission: operation, resource: resource.toLowerCase() }; } |
2. Security Validation: Implements security checks to prevent SQL injection and other attacks:
|
1 2 3 4 5 6 7 8 9 10 11 12 13 14 15 16 17 18 19 20 21 22 |
정적 validateQuery(질의) { // Basic security validation 상수 disallowedPatterns = [ /;.*;/i, // Multiple statements /—/, // SQL comments //*/, // Block comments /xp_/i, // Extended stored procedur /EXECUTEs+sp_/i, // Stored procedure executi /EXECs+sp_/i, // Stored procedure executi /INTOs+OUTFILE/i, // File operations /LOAD_FILE/i, // File operations ]; ~를 위해 (상수 pattern 의 disallowedPatterns) { 만약 (pattern.test(질의)) { 던지다 새로운 오류(‘질문 contains potentially harm } } 반환 참인; } |
Permission Management
그 TravelQueryChecker class handles the core permission logic:
- Initialization: Sets up connections to both Permit.io and Couchbase:
|
1 2 3 4 5 6 7 8 9 10 11 12 13 14 15 16 17 18 19 20 21 22 23 24 25 26 27 28 |
클래스 TravelQueryChecker { constructor() { 이것.permit = 새로운 Permit({ 토큰: 과정.환경.PERMIT_SDK_TOKEN, pdp: “https://cloudpdp.api.permit.io” }); 이것.clusterConnStr = ‘couchbases://cb.6gj2r4ygxyjrfcgf this.username = ‘shivay1‘; this.password = ‘Shivay1234!‘; this.bucketName = ‘여행–sample‘; } async init() { try { this.cluster = await couchbase.connect(this.clusterC username: this.username, password: this.password, configProfile: ‘wanDevelopment‘, }); this.bucket = this.cluster.bucket(this.bucketName); this.collection = this.bucket.defaultCollection(); console.log(‘Connected -로 카우치베이스 카펠라‘); } catch (error) { console.error(‘카우치베이스 connection 오류:‘, 오류); 던지다 오류; } } |
- Permission Checking: Verifies user permissions through Permit.io:
|
1 2 3 4 5 6 7 8 9 10 11 12 13 14 15 16 17 18 19 20 21 22 23 24 25 26 |
비동기 checkQueryPermission(userId, queryConfig) { 만약 (!queryConfig) { 반환 { permitted: 거짓, 오류: ‘Invalid query con } try { const permitted = await this.permit.check( String(userId), queryConfig.permission, { type: queryConfig.resource, tenant: “default”, resource: queryConfig.resource } ); return { permitted, query: queryConfig.query, permission: queryConfig.permission, resource: queryConfig.resource }; } catch (error) { console.error(‘Permission check 오류:‘, 오류); 반환 { permitted: 거짓, 오류: 오류.message }; } } |
This function uses the Permit.io SDK to check if a user has permission to perform a specific action on a resource.
3. 쿼리 실행: Handles the complete flow from permission check to query execution:
|
1 2 3 4 5 6 7 8 9 10 11 12 13 14 15 16 17 18 19 20 21 22 23 24 25 26 27 28 29 30 31 32 33 34 35 36 37 |
비동기 executeQuery(userId, rawQuery, params = []) { 시도하다 { //Validate query for security QueryParser.validateQuery(rawQuery); //Parse the query to get permission and resource 상수 queryConfig = QueryParser.parseQuery(rawQuery) 콘솔.로그(‘Parsed query config:’, queryConfig); 상수 permissionCheck = await 이것.checkQueryPermiss 만약 (!permissionCheck.permitted) { 반환 { 상태: ‘not-permitted’, 오류: `User ${userId} 이다 not permitted -로 e }; } 상수 옵션 = { 매개변수: params }; 상수 결과 = await 이것.클러스터.질의(rawQuery, op 반환 { 상태: ‘permitted’, success: 참인, results: 결과.rows, 메타데이터: { 지표: 결과.지표, profile: 결과.profile } }; } catch (오류) { 콘솔.오류(‘Query execution error:’, 오류); 반환 { 상태: ‘error’, 오류: 오류.message }; } } |
API Endpoint
Finally, we expose an API endpoint to handle incoming queries:
|
1 2 3 4 5 6 7 8 9 10 11 12 13 14 |
// Route to handle SQL++ queries 앱.게시물(‘/query’, 비동기 (요청, 응답) =< { 상수 { userId, 질의, params } = 요청.몸; 만약 (!userId || !질의) { 반환 응답.상태(400).JSON({ 오류: ‘userId 그리고 질의 a } 시도하다 { 상수 결과 = await queryChecker.executeQuery(userId, q 응답.JSON(결과); } catch (오류) { 응답.상태(500).JSON({ 오류: 오류.message }); } }); |
Couchbase Connection
We will now define the Couchbase connection code in our backend Express server, which helps us to connect to the Couchbase Cluster:
|
1 2 3 4 5 6 7 8 9 10 11 12 13 14 15 16 17 |
// Connect to Couchbase cluster 비동기 초기화() { 시도하다 { 이것.클러스터 = await 카우치베이스.연결하다(이것.clusterC 사용자 이름: 이것.사용자 이름, 비밀번호: 이것.비밀번호, configProfile: ‘wanDevelopment’, }); 이것.양동이 = 이것.클러스터.양동이(이것.bucketName); 이것.컬렉션 = 이것.양동이.defaultCollection(); 콘솔.로그(‘Connected to Couchbase Capella’); } catch (오류) { 콘솔.오류(‘Couchbase connection error:’, 오류); 던지다 오류; } } |
Frontend Code
To demonstrate the functionality for the integration, we’ve created a simple React frontend that allows users to input queries and see the results.
For setup, you can check this code for the existing UI components:
|
1 2 3 4 5 6 7 8 9 10 11 12 13 14 15 16 17 18 19 20 21 22 23 24 25 26 27 28 29 30 31 32 33 34 35 36 37 38 39 40 41 42 43 44 45 46 47 48 49 50 51 52 53 54 55 56 57 58 59 60 61 62 63 64 65 66 67 68 69 70 71 72 73 74 75 76 77 78 79 80 81 82 83 |
가져오기 리액트, { useState } 에서 ‘react’; 가져오기 { Button } 에서 “@/components/ui/button” 가져오기 { Input } 에서 “@/components/ui/input” 가져오기 { Textarea } 에서 “@/components/ui/textarea” 가져오기 { 카드, CardContent, CardDescription, CardFooter, CardHeader, CardTitle } 에서 “@/components/ui/card” 내보내기 기본값 함수 App() { 상수 [질의, setQuery] = useState(”); 상수 [사용자, setUser] = useState(”); 상수 [결과, setResult] = useState<null | { success: boolean; results?: 아무런[]; 오류?: 문자열 }<(null); 상수 handleSubmit = 비동기 (e: 리액트.FormEvent) =< { e.preventDefault(); 시도하다 { 상수 응답 = await fetch(‘https://localhost:3001/query’, { 방법: ‘POST’, 헤더: { ‘Content-Type’: ‘application/json’, }, 몸: 제이슨.stringify({ 질의, 사용자 }), }); 상수 데이터 = await 응답.JSON(); setResult(데이터); } catch (오류) { 콘솔.오류(‘Error:’, 오류); setResult({ success: 거짓, 오류: ‘An error occurred while processing your request.’ }); } }; 반환 ( <div className=“container mx-auto p-4”< <카드 className=“w-full max-w-2xl mx-auto”< <CardHeader< <CardTitle<Permission 체커</CardTitle< <CardDescription<Enter a 질의 그리고 사용자 -로 check permissions</CardDescription< </CardHeader< <CardContent< <form onSubmit={handleSubmit} className=“space-y-4”< <div< <label htmlFor=“질의” className=“block text-sm font-medium text-gray-700”<질문</label< <Textarea 아이디=“질의” 가치={질의} onChange={(e) =< setQuery(e.목표.가치)} placeholder=“Enter your SQL++ query here” className=“mt-1” rows={4} /< </div< <div< <label htmlFor=“user” className=“block text-sm font-medium text-gray-700”<User</label< <Input 아이디=“user” 유형=“text” 가치={사용자} onChange={(e) =< setUser(e.목표.가치)} placeholder=“Enter user email” className=“mt-1” /< </div< <Button 유형=“submit” className=“w-full”<Check Permissions</Button< </form< </CardContent< <CardFooter< {결과 && ( <div className={`mt-4 p-4 rounded ${result.success ? ‘bg-green-100’ : ‘bg-red-100’}`}< {결과.success ? ( <div< <h3 className=“font-bold text-green-800”<Permission Granted</h3< <pre className=“mt-2 whitespace-pre-wrap”<{제이슨.stringify(결과.results, null, 2)}</pre< </div< ) : ( <div< <h3 className=“font-bold text-red-800”<Permission Denied</h3< <p<{결과.오류}</p< </div< )} </div< )} </CardFooter< </카드< </div< ); } |
This given React component allows users to enter a query and their user identifier, then displays the results or any permission-related errors.
For the complete code, check out the Permit-Demo GitHub repository.
Demo
With everything in place, you can run the backend Express server and the React application separately. Once both are running, you will see a UI like the one below. Add the query and the corresponding user, then click the Check Permissions button.

In the example above, you can see the user who has permission and the user who does not have permission to access the resource.
결론
In this tutorial, we explored how to set up and configure Permit to add RBAC settings for the Couchbase travel-sample dataset and how to check for permissions for a given SQL++ query.
What if you want a more granular level of control than user roles, focusing on user-specific identities? For that and more, we recommend continuing to explore our learning materials, such as the difference between RBAC and ABAC 그리고 adding ABAC to your application with Permit.
Want to learn more about implementing authorization? Got questions? Reach out to us in our Slack community.

댓글 남기기
댓글을 달기 위해서는 로그인해야합니다.