



Containers are meant to be ephemeral and so scale pretty well for stateless applications. Stateful containers, such as Couchbase, need to be treated differently. Managing Persistence for Docker Containers provide a great overview of how to manage persistence for stateful containers.
This blog will explain how to use Docker Volume Plugins y Portworx to create a stateful container.
Why Portworx?
Portworx is an easy-to-deploy container data services that provide persistence, replication, snapshots, encryption, secure RBAC and much more. Some of the benefits are:
- Container granular volumes – Portworx can take multiple EBS volumes per host and aggregate the capacity and derive container granular virtual (soft) volumes per container.
- Cross Availability Zone HA – Portworx will protect the data, at block level, across multiple compute instances across availability zones. As replication controllers restart pods on different nodes, the data will still be highly available on those nodes.
- Support for enterprise data operations – Portworx implements container granular snapshots, class of service, tiering on top of the available physical volumes.
- Ease of deployment and provisioning – Portworx itself is deployed as a container and integrated with the orchestration tools. DevOps can programmatically provision container granular storage with any property such as size, class of service, encryption key etc.
Setup AWS EC2 Instance
Portworx runs only on Linux or CoreOS. Setup an Ubuntu instance on AWS EC2:
- Start Ubuntu 14.04 instance with
m3.mediuminstance type. Make sure to add port 8091 to inbound security rules. This allows Consola web de Couchbase to be accessible afterwards. - Login to the EC2 instance using the command:
ssh -i ~/.ssh/arun-cb-west1.pem ubuntu@<public-ip> - Update the Ubuntu instance:
sudo apt-get update - Install Docker:
curl -sSL https://get.docker.com/ | sh. More detailed instructions are available at Get Docker for Ubuntu. - Enable non-root access for the docker command:
sudo usermod -aG docker ubuntu - Logout from the EC2 instance and log back in
Create AWS EBS Volume
- Create an EBS volume for 10GB using EC2 console as explained in documentos.
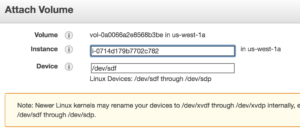
- Get the instance id from the EC2 console. Attach this volume to EC2 instance using this instance id, use the default device name
/dev/sdf.
- Usar
lsblkcommand in EC2 instance to verify that the volume is attached to the instance:NAME MAJ:MIN RM SIZE RO TYPE MOUNTPOINT xvda 202:0 0 8G 0 disk └─xvda1 202:1 0 8G 0 part / xvdb 202:16 0 30G 0 disk /mnt xvdf 202:80 0 10G 0 disk
Portworx Container
- Physical storage makeup of each node, all the provisioned volumes in the cluster as well as their container mappings is stored in an etcd cluster. Start an etcd cluster:
- By default root mounted volumes are not allowed to be shared. Enable this using the command:
This is explained more at Ubuntu Configuration and Shared Mounts.
- PX-Developer (px-dev) container on a server with Docker Engine turns that server into a scale-out storage node. PX-Enterprise, on the other hand, provides multi-cluster and multi-cloud support, where storage under management can be on-premise or in a public cloud like AWS.
For this blog, we’ll start a px-dev container:Complete details about this command are available at Run PX with Docker.
- Look for logs using
docker container logs -f pxand watch out for the following statements: - Check the status of attached volumes that are available to Portworx using
sudo /opt/pwx/bin/pxctl statusto see the output:It shows the total capacity available and used.
Docker Volume
- Let’s create a Docker volume:
More details about this command are at Create Volumes with Docker.
- Check the list of volumes available using
docker volume lscommand:As shown,
cbvolis created withpxddriver.
Couchbase with Portworx Volume
- Create a Couchbase container using the Portworx volume:
Notice how
/opt/couchbase/varwhere all Couchbase data is stored in the container is mapped to thecbvolvolume on the host. This volume is mapped by Portworx. - Login to Couchbase Web Console at https://<public-ip>:8091, use the login
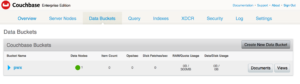
Administradorycontraseñaas password. - Go to Data Buckets and create a new data bucket pwx:
- In EC2 instance, see the list of containers:
etcd,px-devybdcontainers are running. - Kill the
bdcontainer: - Restart the database container as:
0
Now, because
cbvolis mapped to/opt/couchbase/varagain, the data is preserved across restarts. This can be verified by accessing the Couchbase Web Consoleand checking on thepwxbucket created earlier.
Another interesting perspective is also at why database are not for containers?. Just because there is Docker, does not mean all your database needs should be Dockerized. But if you need to, then there are plenty of options and can be used in production-grade applications.
Want to learn more about running Couchbase in containers?
Autor

Una respuesta
-
[…] Source: blog.couchbase.com/stateful-docker-containers-portworx-couchbase/ […]
Deja un comentario
Lo siento, debes estar conectado para publicar un comentario.