
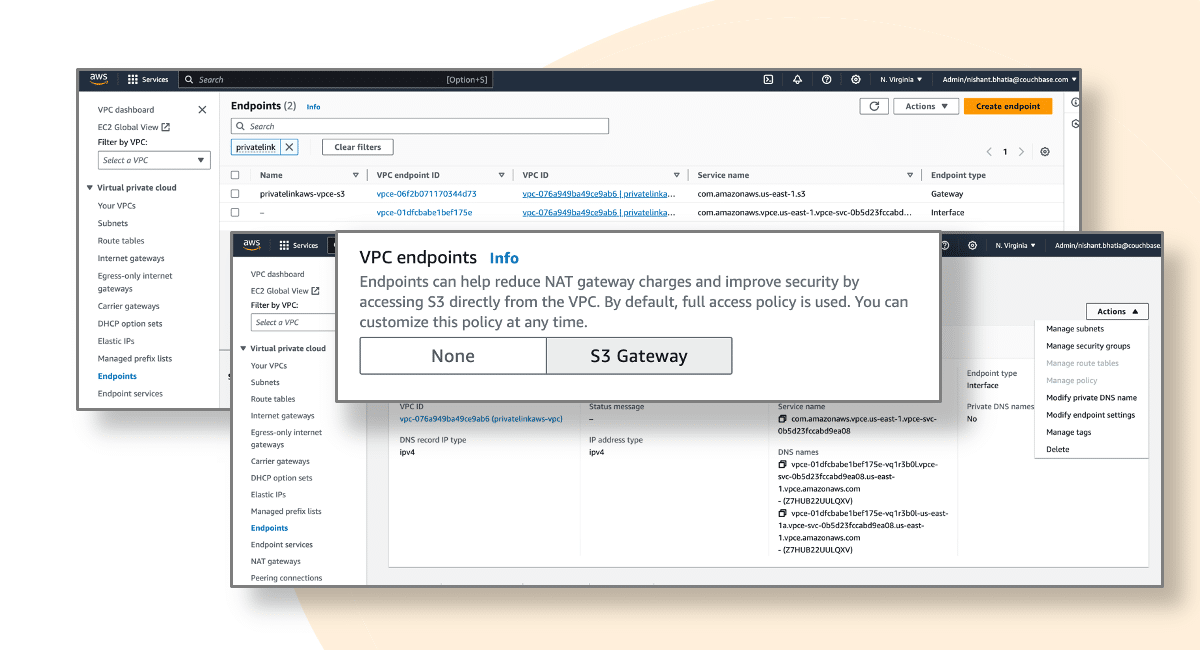
¿Qué son los PrivateLinks?
PrivateLinks es un servicio de red que permite la conexión privada entre un servicio en la nube y su red virtual. Esta conexión se realiza sin exponer sus datos a la internet pública, lo que mejora la seguridad al mantener el tráfico de red dentro de la red del proveedor de la nube. Al utilizar PrivateLinks, puede garantizar un acceso más seguro y confiable a los recursos en la nube, minimizando el riesgo de amenazas externas y reduciendo la latencia al mantener el tráfico interno dentro de la red del proveedor de la nube.
Los PrivateLinks facilitan la comunicación unidireccional, lo que mejora la seguridad de las conexiones de red al garantizar que el tráfico solo pueda fluir en una sola dirección. Este diseño ayuda a prevenir el acceso no autorizado y la exfiltración de datos, consolidando aún más los beneficios de seguridad de utilizar PrivateLinks para redes en la nube.
Nota: XDCR no es compatible con Private Links por el momento.
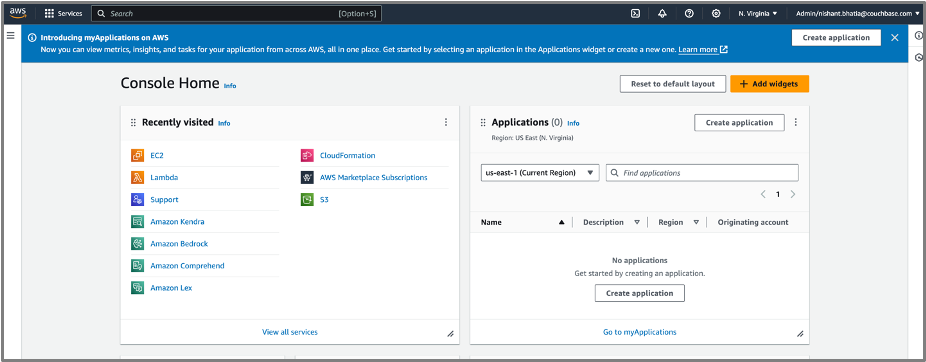
1. Inicie sesión en la Consola de Administración de AWS
- Inicia sesión en tu AWS Consola de administración
- Debe llegar a la siguiente página:
2. Crear una VPC en AWS
- En la barra de búsqueda, ingrese VPC:
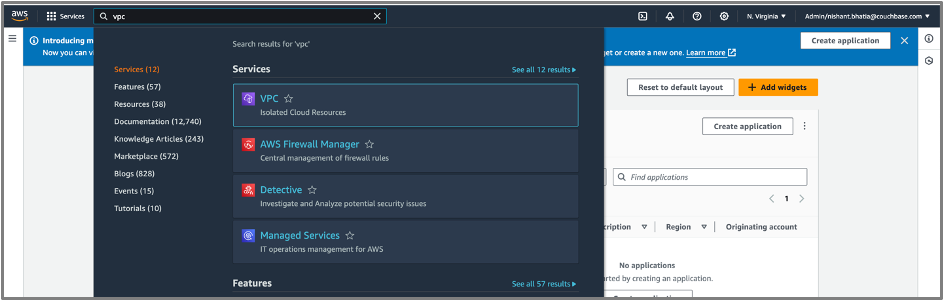
- Debe llegar a la siguiente página:
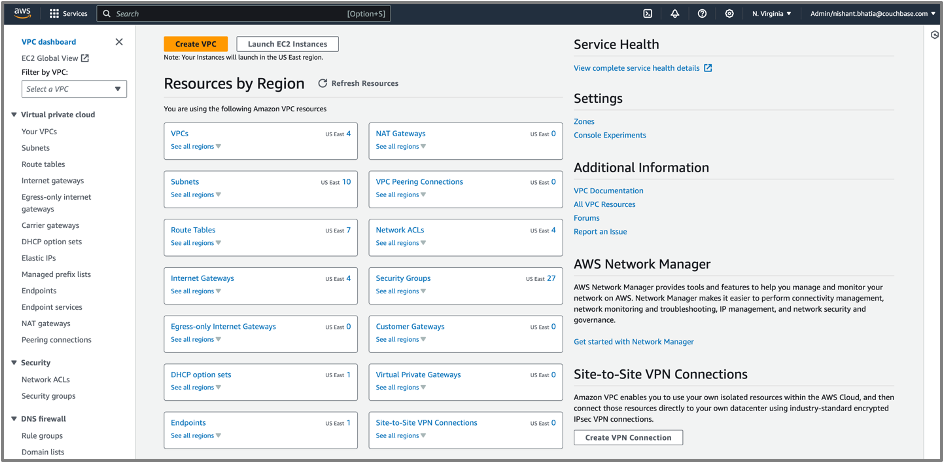
- Esto debería abrir el Panel de VPC:
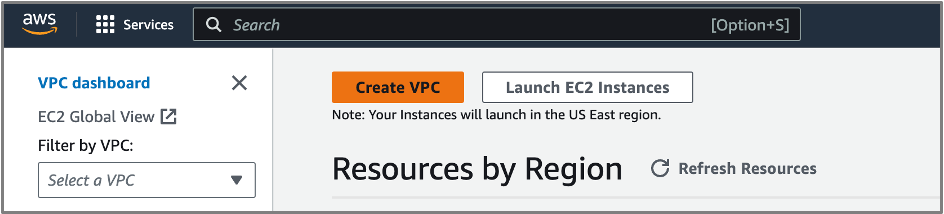
- Elija su región en la barra de la aplicación negra. En este ejemplo, estamos usando: Este de EE. UU. (N. Virginia) – us-east-1

- Haga clic en Crear VPC. Esto abre una página con la configuración de tu VPC.
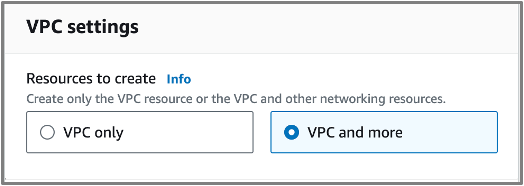
- Recursos para crearSeleccionar VPC y más.
- Generación automática de gafetes: Asigne un nombre a su VPC.
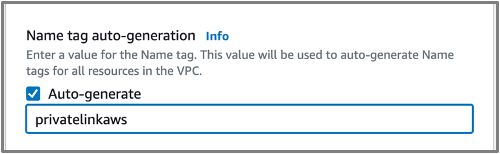
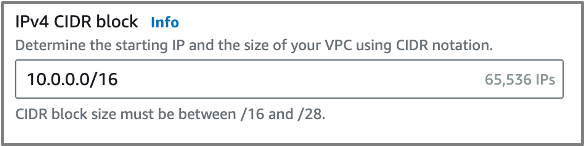
NotaLa recomendación es utilizar un nombre significativo para que pueda identificar fácilmente cuál es su VPC más adelante en el laboratorio. En este ejemplo, utilizamos AWS PrivateLink pero recomendamos usar un nombre más personalizado para sus pruebas. - Bloque CIDR IPv4Aceptar predeterminado.
- Bloque CIDR IPv6: Ninguno.
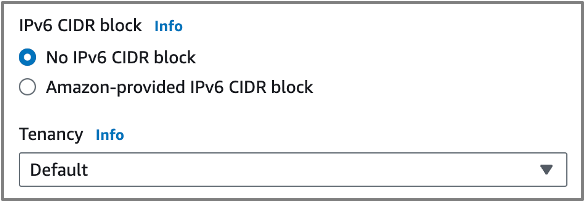
- TenenciaPredeterminado

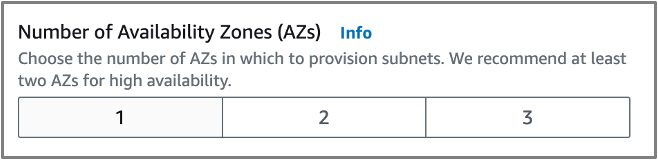
- Número de ZAs: 1
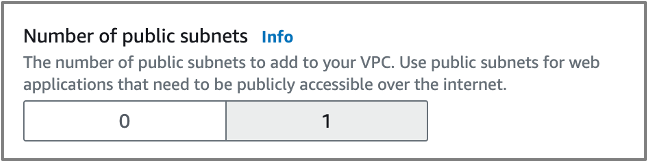
- Número de subredes públicas: 1
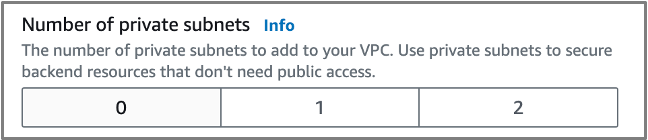
- Número de subredes privadas: 0
- Pasarelas NAT: 0
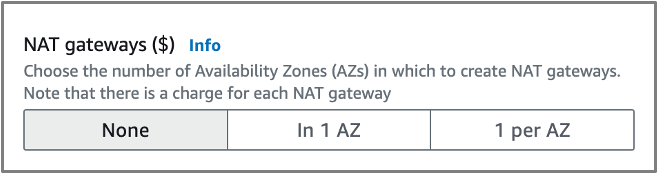
- Puntos de conexión de VPCPasarela S3
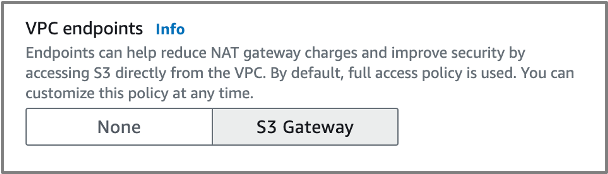
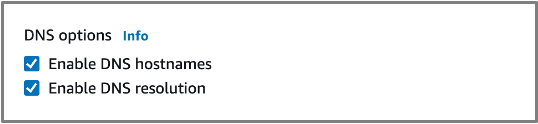
- Opciones de DNS
- Habilitar nombres de host DNS – Verificar
- Habilitar la resolución de DNS – Verificado
- Recursos para crearSeleccionar VPC y más.
- Consulte la vista previa en el lado derecho de la página. Una vez que esté satisfecho, hacer clic Crear VPC.
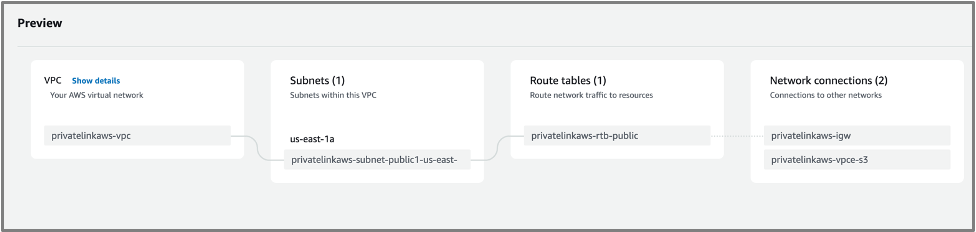
- La VPC se está creando ahora. Puede ver el progreso en la página siguiente.
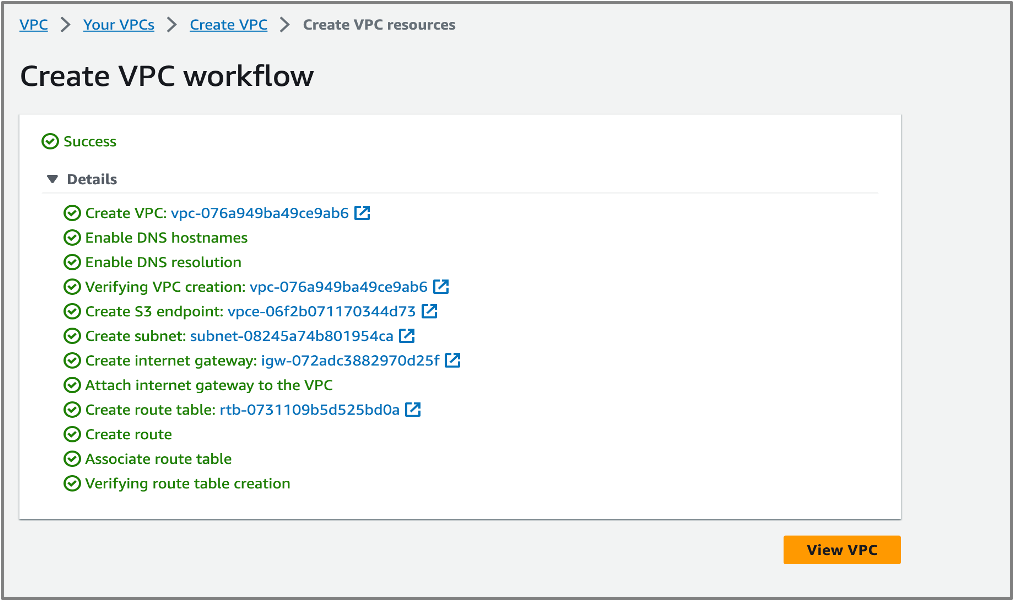
- Anote el ID de la VPC y el ID de la subred. Lo necesitarás más adelante. En este caso:
- ID de VPC = vpc-076a949ba49ce9ab6
- ID de subred = subnet-08245a74b801954ca
3. Crear instancia de AWS EC2
- En la barra de búsqueda, ingrese EC2.

- You should land into the EC2 Dashboard.
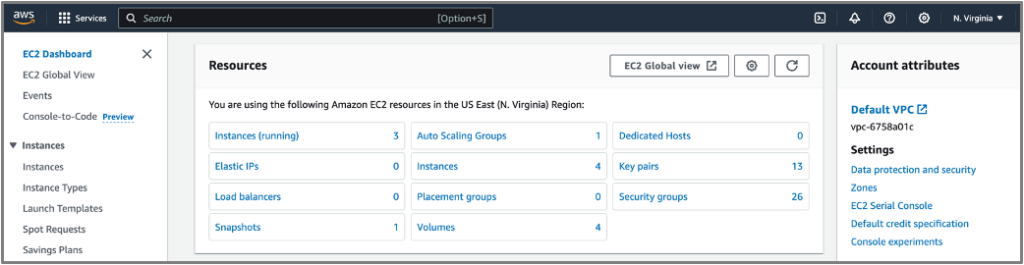
- Make sure that you are in the correct region, like the one where you created your VPC.

- Hacer clic Launch Instance.
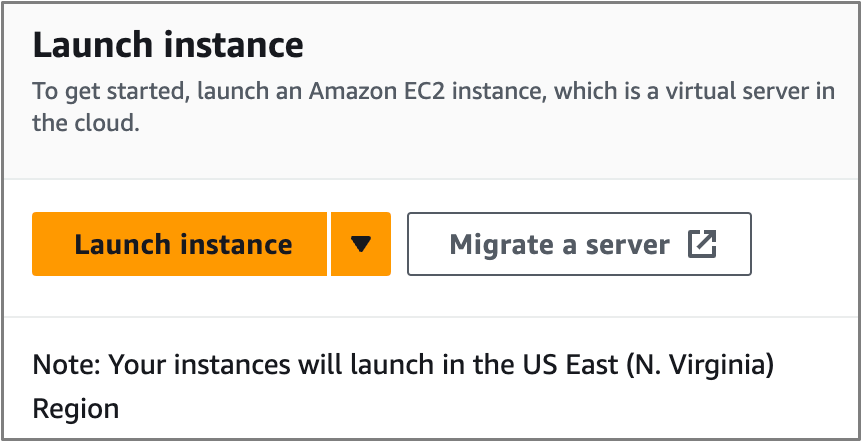
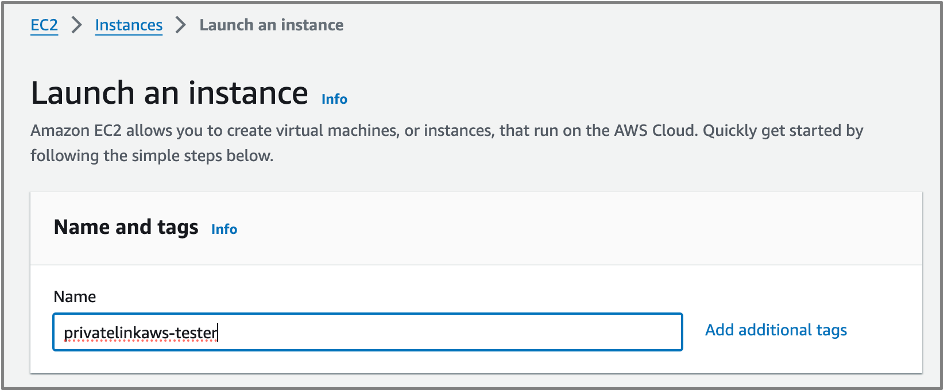
- This will open a page with your EC2 settings.
- Nombre: Choose name (eg. Privatelink-tester). Same as before, please choose a more meaningful name.
- Application and OS Image: Amazon Linux
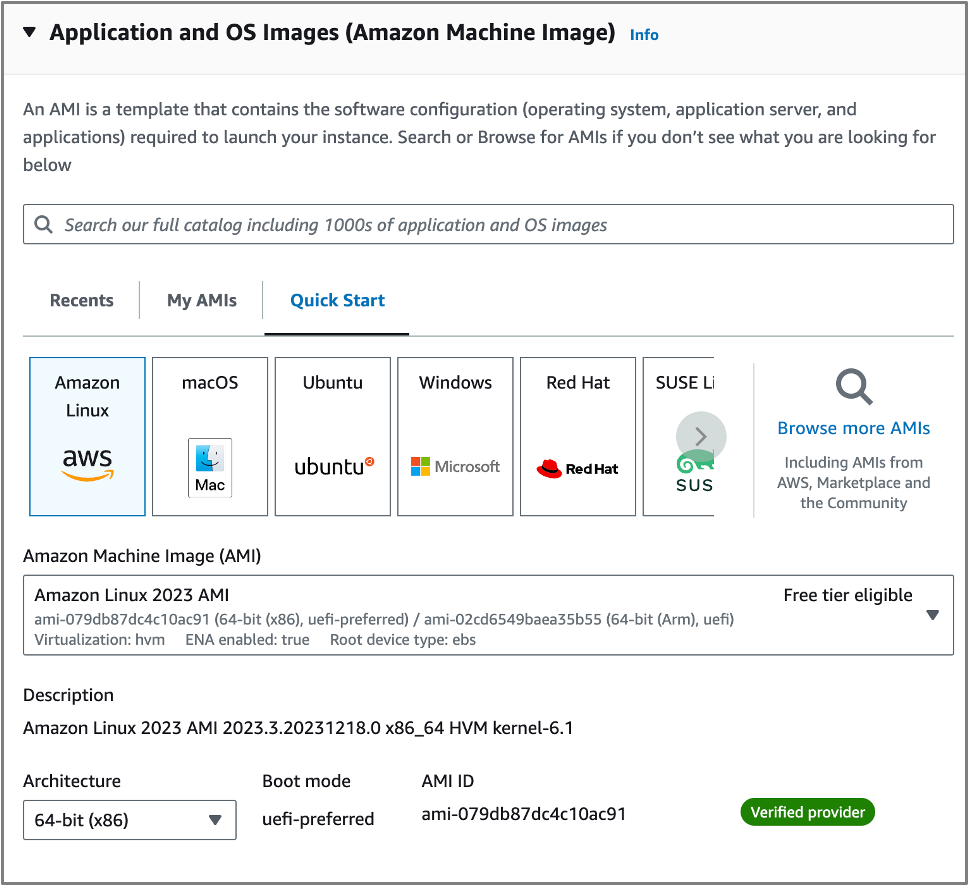
- Instance Type: t2.micro (free)
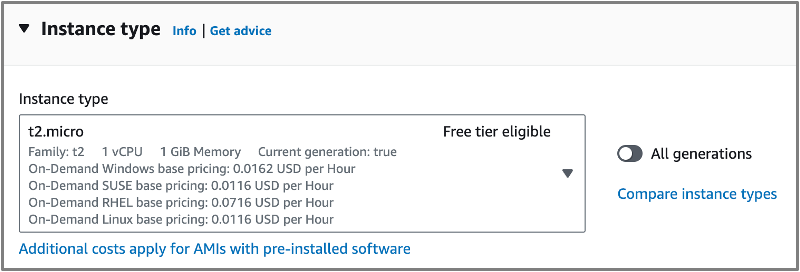
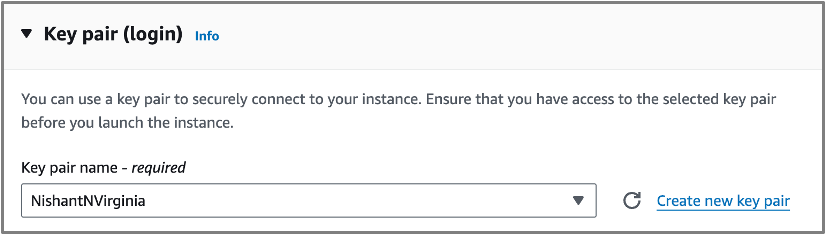
- Key pair login: click on Create a new key pair.
- Enter a name for your Key Pair. (e.g. <Yourname>.<Region>)
- Hacer clic Create Key Pair
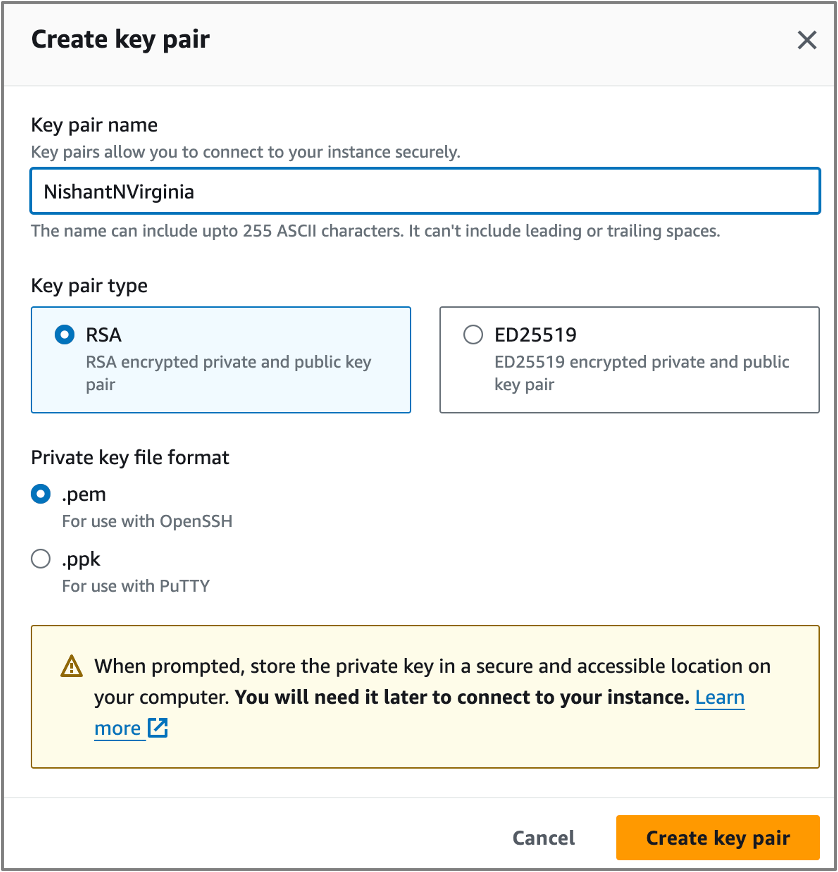
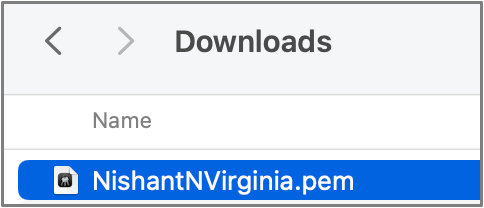
- This will download a .pem file that you must store in a secure location.
- Your Key Pair is now selected and available to reuse in the same region.
- Network settings
- Hacer clic Edit

- VPC: choose the same VPC as the one you’ve created previously. You can filter using your VPC name or using the VPC ID.

- Subnet: choose the subnet you created previously. It should be selected automatically as you created only 1 subnet for this VPC.

- Auto-assign public IP: Enable

- Firewall security group: Create Security Group should be selected

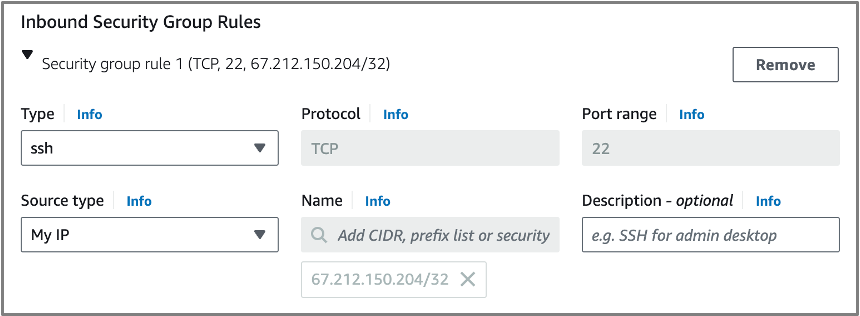
- Inbound security group rules: in the Source type, select MY IP. This will automatically add your IP.
- Hacer clic Edit
- Configure Storage: default.

- Application and OS Image: Amazon Linux
- Nombre: Choose name (eg. Privatelink-tester). Same as before, please choose a more meaningful name.
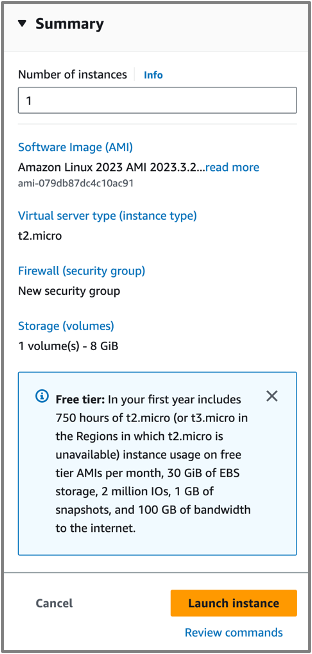
- Check the summary and click Launch instance.
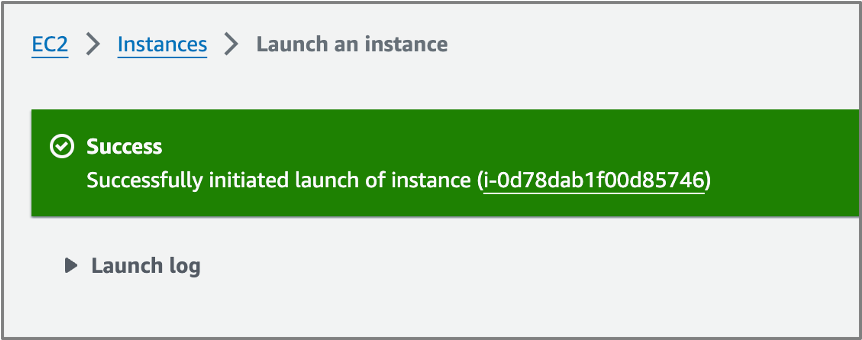
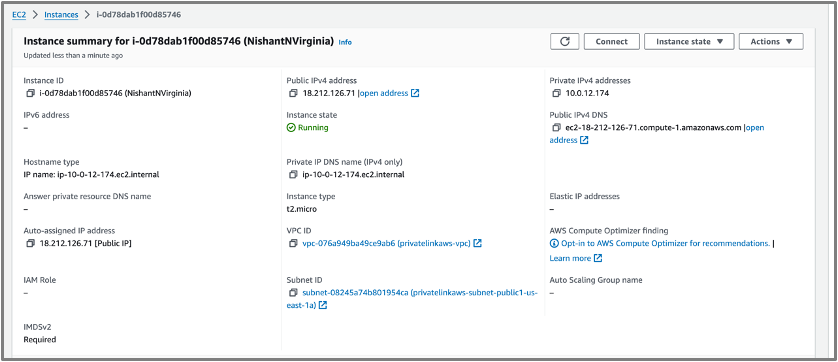
- After a few seconds, you should see that the instance has been successfully launched. Note the EC2 instance ID. In this example: i-0d78dab1f00d85746. Click on the EC2 instance ID.


- You should land on the Instances page of the region with your instance filtered out. Click on your instance ID. The instance page should be as follows:
4. Install AWS CLI Tool
- To use the AWS CLI Tool, please follow the documentation.
- You should get temporary credentials.
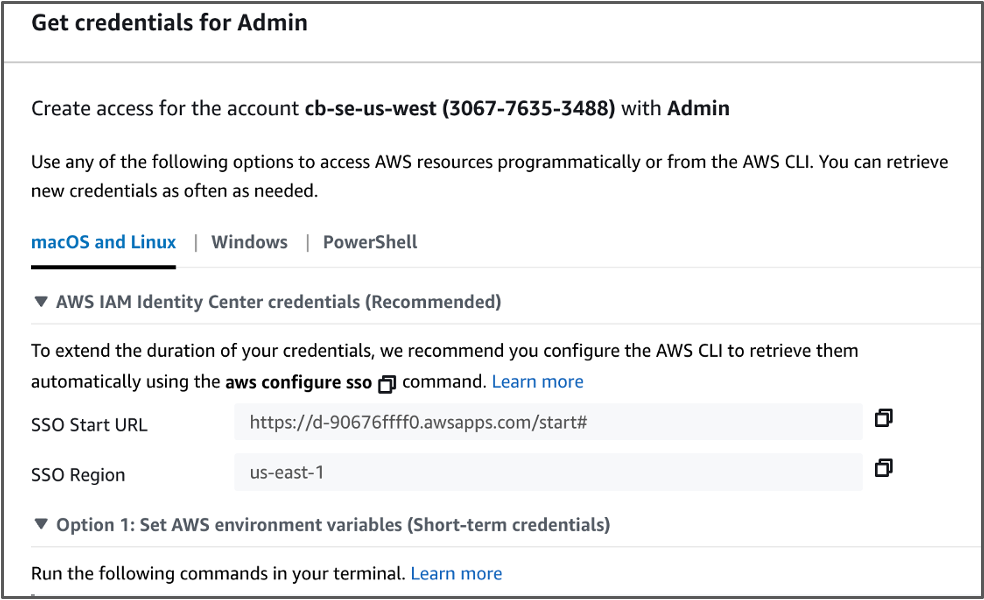
- To configure the AWS CLI Tool, simply copy the Option 1, Short-Term Credentials command to set the AWS environment variables and paste it in your terminal. (The below is an example – please paste in your own credentials.)
|
1 2 3 |
$ exportar AWS_ACCESS_KEY_ID=“XXXXXXXXXXXXXXXXXXXXX” $ exportar AWS_SECRET_ACCESS_KEY=“XXXXXXXXXXXXXXXXXXXXXX” $ exportar AWS_SESSION_TOKEN=“XXXXXXXXXXXXXXXXXXXXXXXXXXXXXXXXXXXX” |
5. Create a Capella Database
- Login into Capella with your corporate email and credentials.
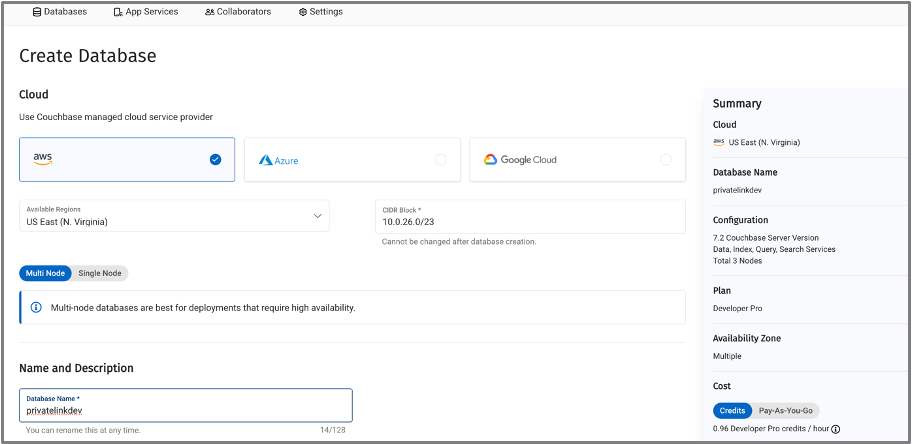
- Within your project, create a database with the following configuration:
- Nube: AWS
- Región: same as the region where you created your VPC and EC2 instance
- Nombre of your choice. Here Privatelinkdev
-
- Services groups: default is data, index, query and search services. Add the analytics service as well, used later in the lab and keep the of the topology as is.
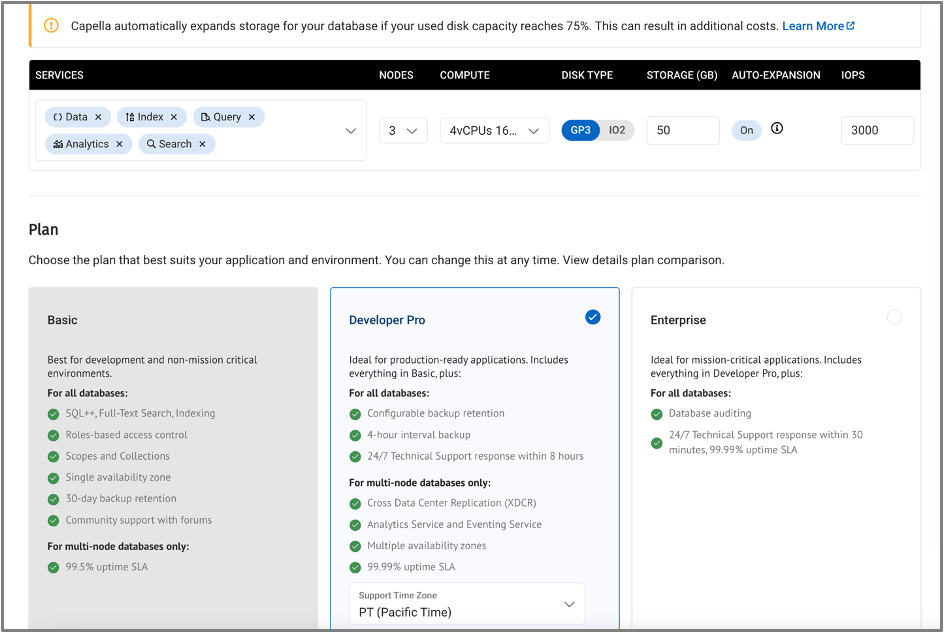
- All other settings can stay as default.
- Services groups: default is data, index, query and search services. Add the analytics service as well, used later in the lab and keep the of the topology as is.
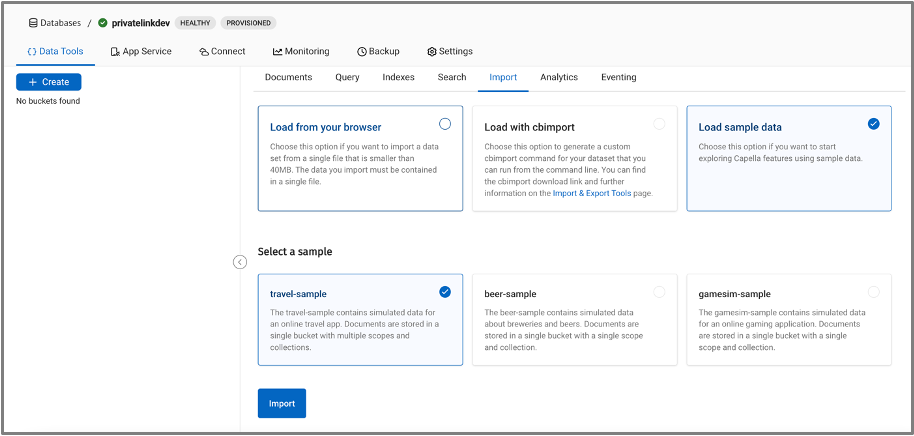
- Una vez que la base de datos Healthy, deploy travel-sample cubeta
- Open the database
- Navegue a Herramientas de datos tab
- En el Importar página, clic Importar bajo el / debajo de travel-sample azulejo.
B. Stage 1
In this section, you will learn how to:
|
1. Enable Private Endpoint
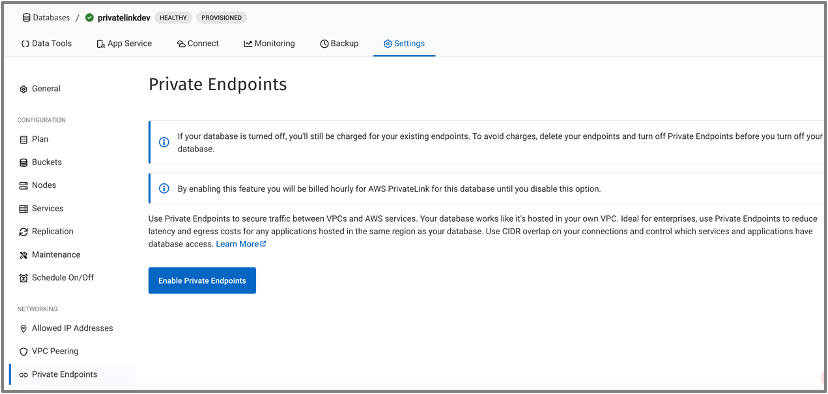
- In your Capella database, open the Configuración page, navigate to Private Endpoint y hacer clic Enable Private Endpoint.
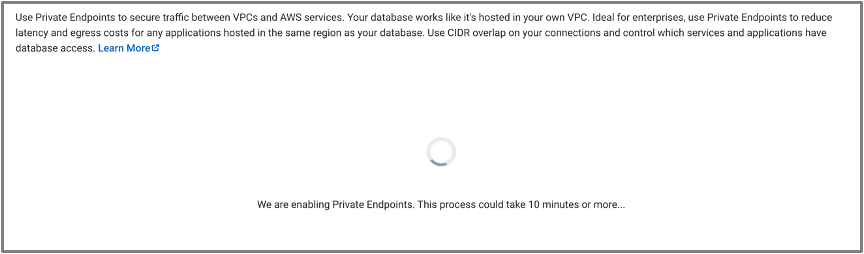
- This action will usually take around 10 minutes to enable Private Endpoint.
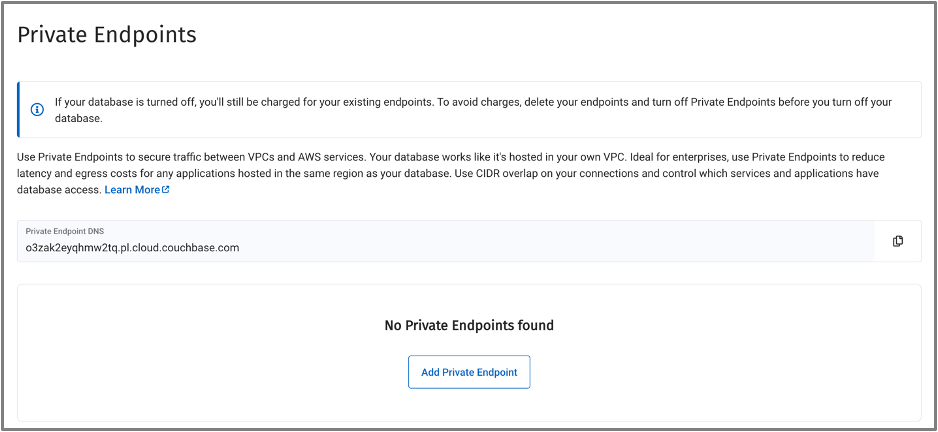
- When ready, you should see that the Private Endpoint DNS is now available in the Capella UI. Also notice that Private Endpoints are billed hourly for AWS Private Endpoints for this database until you disable this option.
2. Add Private Endpoint
- Hacer clic Add Private Endpoint.

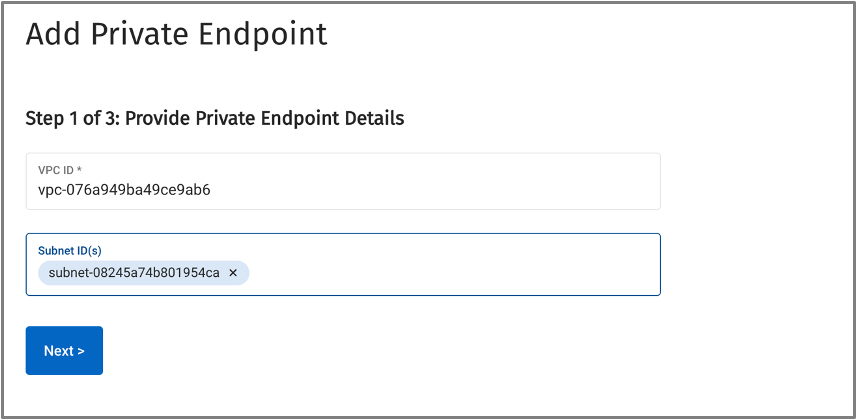
- Enter the VPC ID and Subnet ID from Step 2 of the Prerequisites section. Click Next.
3. Create VPC Endpoint on AWS from CLI
- Copy the Run Command.
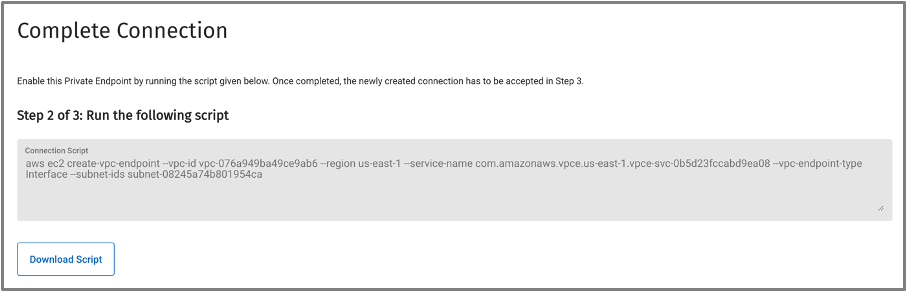
- Open a terminal and run the command:
|
1 2 3 4 5 6 7 8 9 10 11 12 13 14 15 16 17 18 19 20 21 22 23 24 25 26 27 28 29 30 31 32 33 34 35 36 37 38 39 40 41 |
(base) nishant.bhatia@macbook ~ % aws ec2 crear–VPC–endpoint —VPC–identificación VPC–076a939ba49ce9ab6 —región nosotros–este–1 —service–nombre com.amazonaws.vpce.nosotros–este–1.vpce–svc–0b4d23fccabd9ea08 —VPC–endpoint–tipo Interface —subnet–ids subnet–08245a74b701954ca { “VpcEndpoint”: { “VpcEndpointId”: “<strong>vpce-01dfcbabe2bef175e</strong>”, “VpcEndpointType”: “Interface”, “VpcId”: “vpc-076a939ba49ce9ab6”, “ServiceName”: “com.amazonaws.vpce.us-east-1.vpce-svc-0b4d23fccabd9ea08”, “State”: “pendingAcceptance”, “RouteTableIds”: [], “SubnetIds”: [ “subnet-08245a74b701954ca” ], “Groups”: [ { “GroupId”: “sg-0231c72bc71c7753c”, “GroupName”: “predeterminado” } ], “IpAddressType”: “ipv4”, “DnsOptions”: { “DnsRecordIpType”: “ipv4” }, “PrivateDnsEnabled”: falso, “RequesterManaged”: falso, “NetworkInterfaceIds”: [ “eni-0cdc0c23ab3760c13” ], “DnsEntries”: [ { “DnsName”: “vpce-01dfcbabe1bef165e-vq1r3b0l.vpce-svc-0b5d22fccabd9ea08.us-east-1.vpce.amazonaws.com”, “HostedZoneId”: “Z7HUB22XULQXV” }, { “DnsName”: “vpce-01dfcbabe1aef175e-vq1r3b0l-us-east-1a.vpce-svc-0b5d23fccaad9ea08.us-east-1.vpce.amazonaws.com”, “HostedZoneId”: “Z7HUB22UULQYV” } ], “CreationTimestamp”: “2024-01-04T16:29:47.138Z”, “OwnerId”: “306776352488” } } |
- Note down VPCEndpointId (highlighted) and accept the Endpoint ID in Capella.

4. Complete Connection
- Hacer clic Finish. Your Endpoint is now being created and in Pending status.
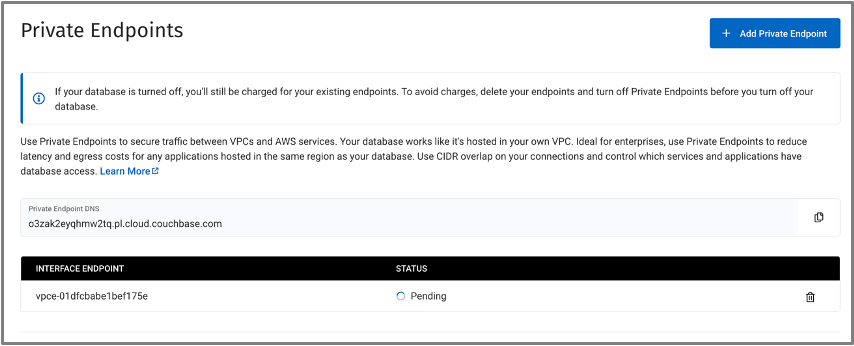
- After a minute or 2, the status should be Linked.

C. Stage 2
In this section, you will learn how to:
|
1. Enable Private DNS on AWS
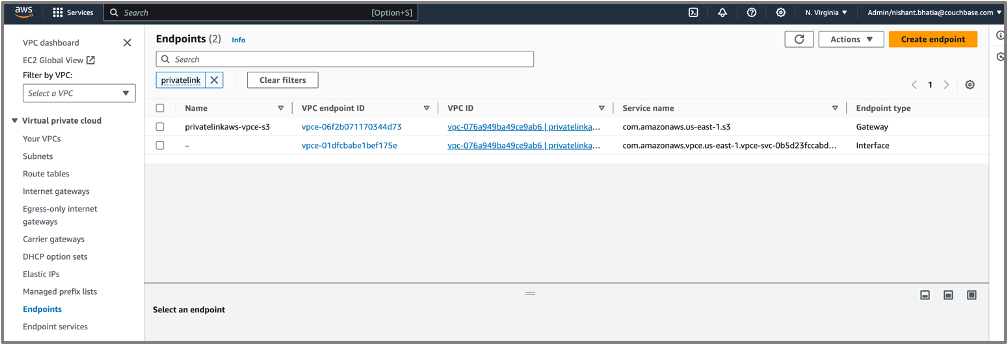
- Navigate to the VPC Dashboard, click Endpoints in the left menu y filter on your VPC Name. You will see at least 2 endpoints:
- The S3 endpoint created by AWS
- An unnamed Endpoint, created by the CLI command
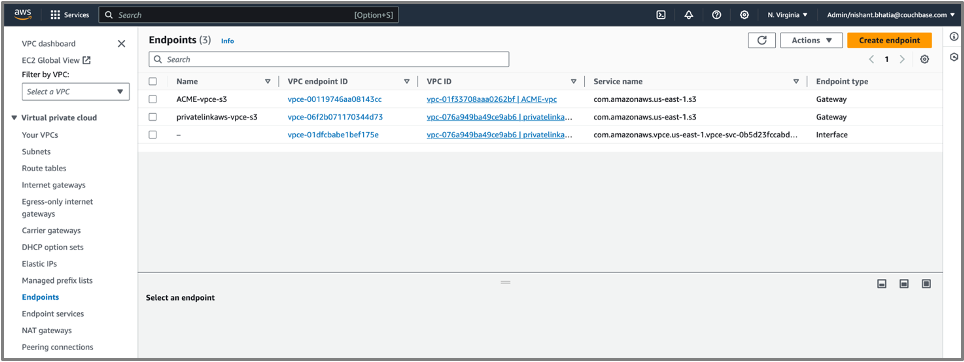
- Open the unnamed Endpoint (in this case vpce-01dfcbabe1bef175e) and from the Acciones drop-down, with the same ID as the one provided in the Capella Private Endpoint Interface Endpoint list. Select Modify private DNS name.
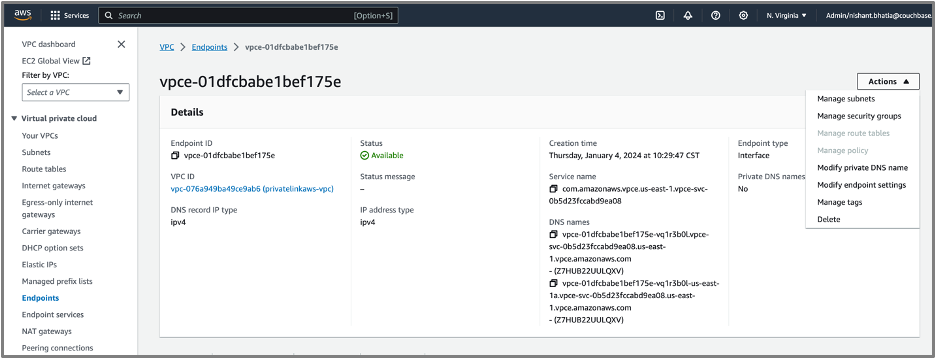
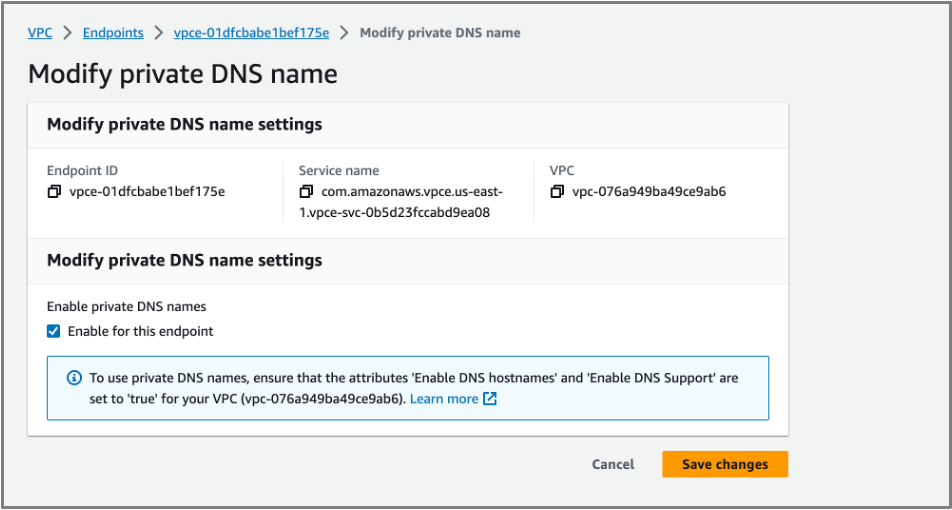
- Check Enable for this endpoint y hacer clic Save Changes.
2. Edit Ingress Rules for Private Endpoint on AWS
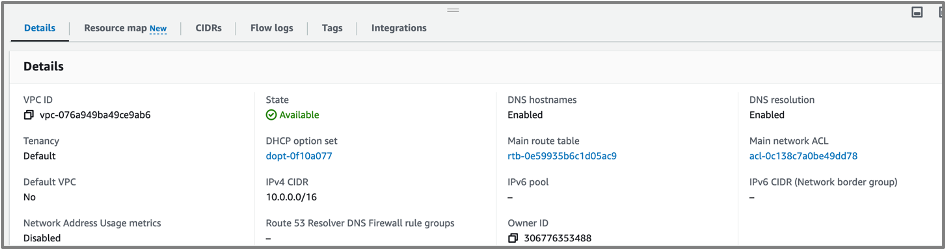
- Let’s first get the CIDR Block of your VPC.
- Hacer clic Your VPCs in the VPC Dashboard
- Filter on your VPC Name.

- In the bottom main panel, note the IPV4 CIDR. It should be 10.0.0.0/16
- Let’s now get the Security Group of Endpoint
- Haga clic en Endpoints in the VPC Dashboard
- Filter on your VPC Name. You will see at least 2:
- The S3 endpoint created by AWS
- An unnamed Endpoint, created by the CLI command
- Choose the unnamed Endpoint
- At panel bottom navigate to Security Groups Tab
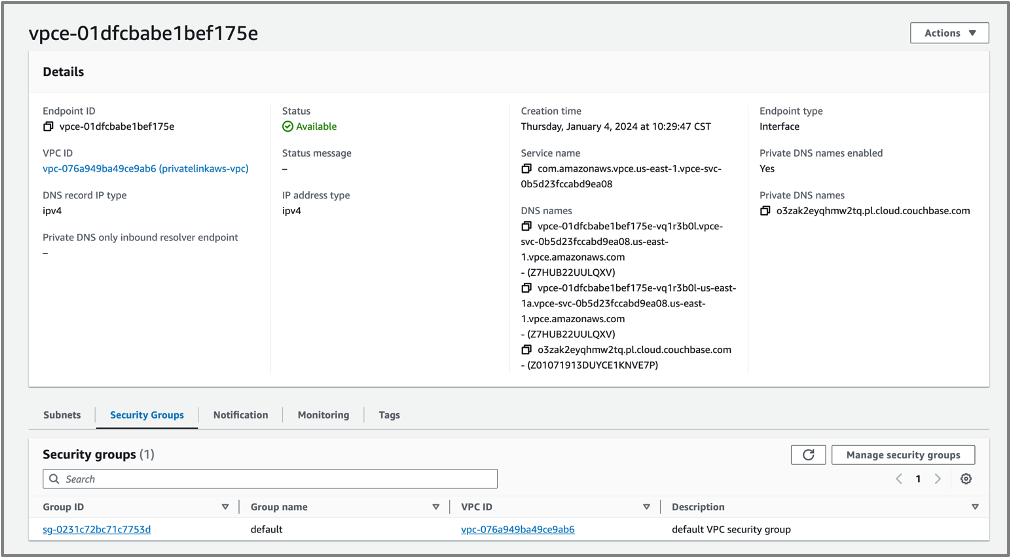
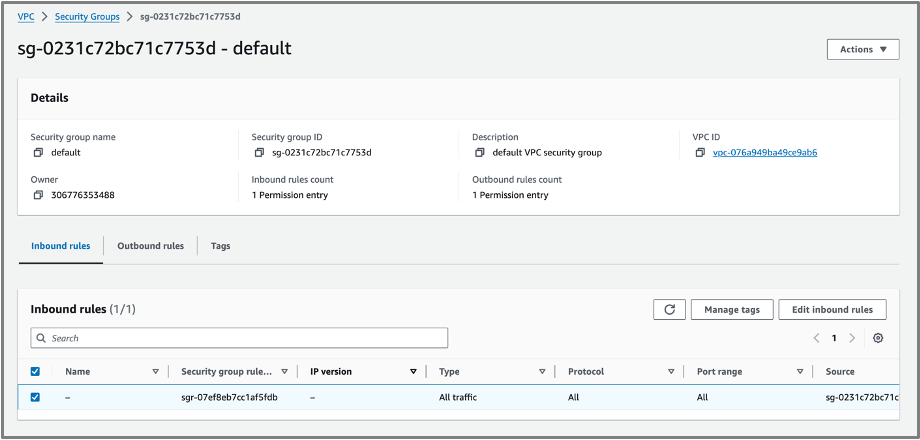
- Click the Group ID Link and locate Inbound Rule. There will be one Inbound Rule which will be chosen by default. Click Edit Inbound rules.
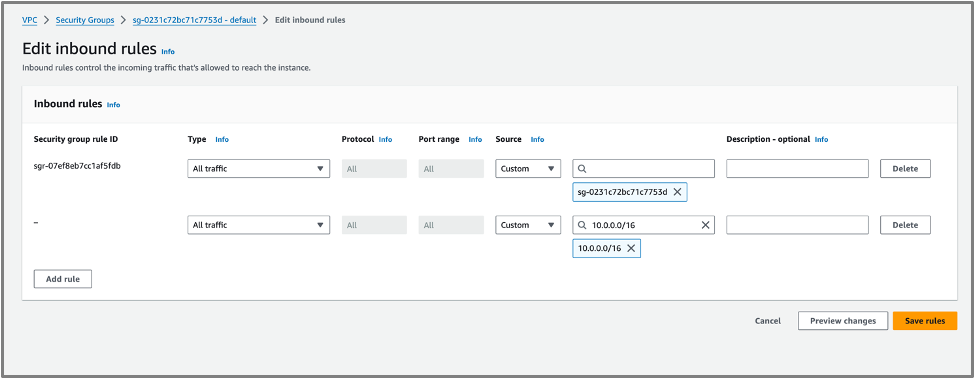
- Hacer clic Add Rule
- Escribir: Todo el tráfico
- Fuente: Custom
- Source Value: VPC CIDR from Item 1) – e.g. 10.0.0.0/16
- Hacer clic Save rules.
3. Edit Network ACL for Private Endpoint on AWS
- Let’s now access VPC Dashboard Network ACLs
- Hacer clic Network ACLs in VPC Dashboard
- Filter on your VPC Name.
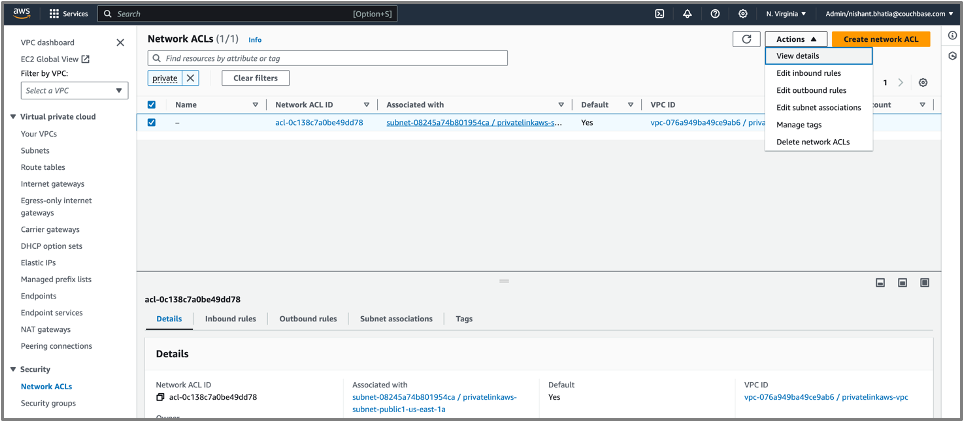
- There will be one unnamed Network ACL chosen by default
- From the Actions drop-down menu, select Edit Inbound rules
- Let’s now add an Inbound rule.
- Hacer clic Add new rule.
- Rule number: 101
- Escribir: All traffic
- Fuente: the IPv4 CIDR which was obtained from the previous steps (e.g. 10.0.0.0/16).
- Hacer clic Save changes.
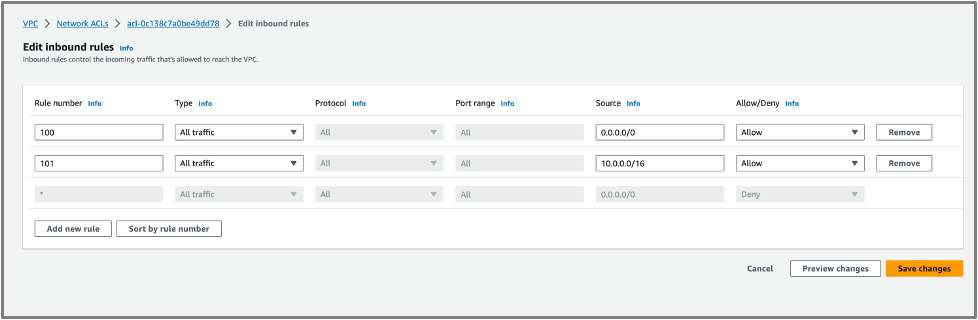
- Let’s now add an Outbound rule.
- From the Actions drop-down menu, select Edit Outbound rules
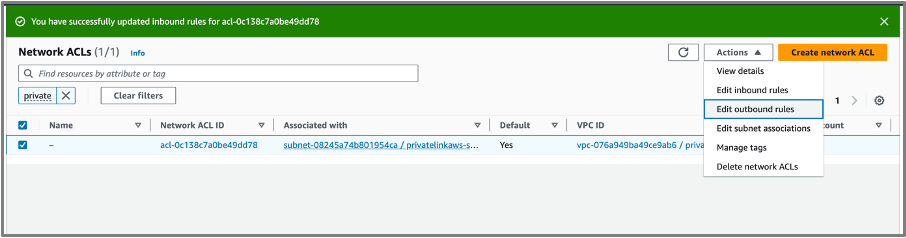
- Hacer clic Add new rule.
- Rule number: 101
- Type: Custom TCP
- Port range: 1024-65535
- Fuente: the IPv4 CIDR which was obtained from the previous steps (e.g. 10.0.0.0/16).
- Hacer clic Save changes.
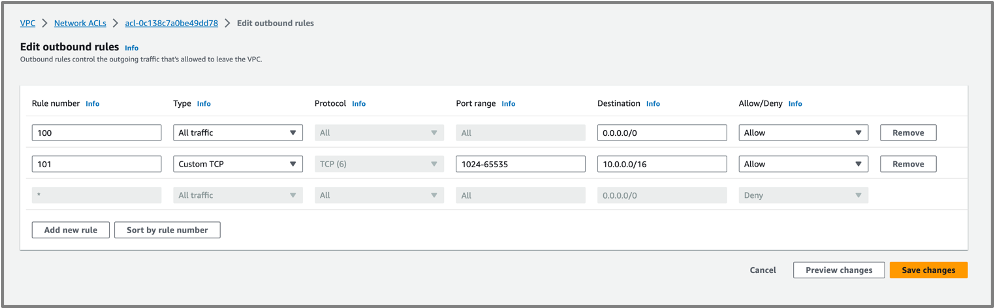
- From the Actions drop-down menu, select Edit Outbound rules
D. Test Private Endpoint with an Application
In this section, you will learn how to:
|
1. Add Capella Security Prerequisites
-
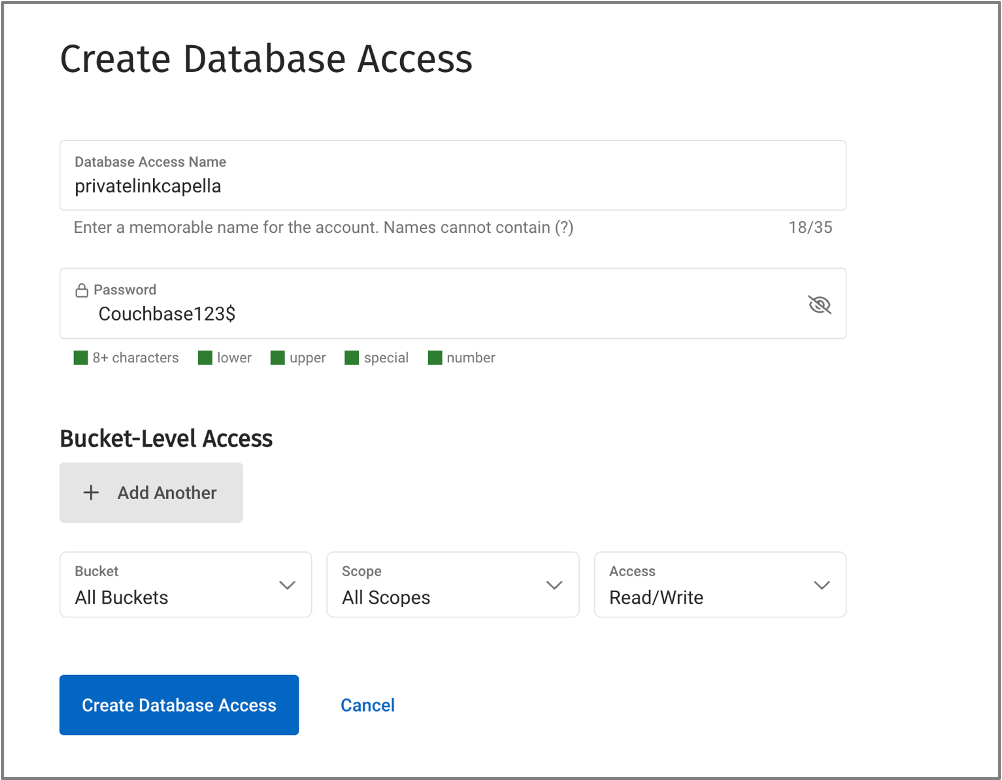
- In your Capella database, create Database Credentials. Example: privatelinkcapella/Couchbase123$
- Abrir Configuración page of your database
- En el Acceso a la base de datos page, click Create Acceso a la base de datos
- This access must have Read + Write privileges on travel-sample cubeta
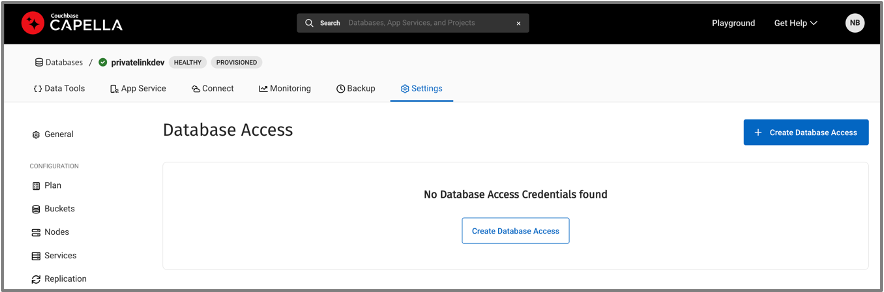
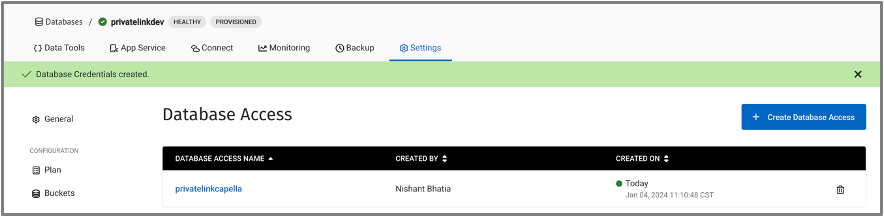
- You should see that your database credentials have been created.
- In your Capella database, create Database Credentials. Example: privatelinkcapella/Couchbase123$
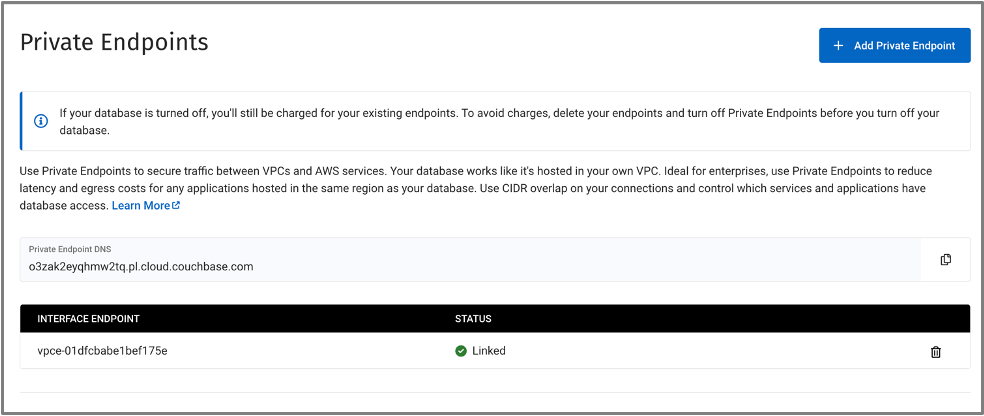
- In Capella, copy the private Endpoint. In this example, this is o3bak2eyqhmw2tq.pl.cloud.couchbase.com
- In the Capella Configuración of your database, open the Security Certificate page and download the certificate.
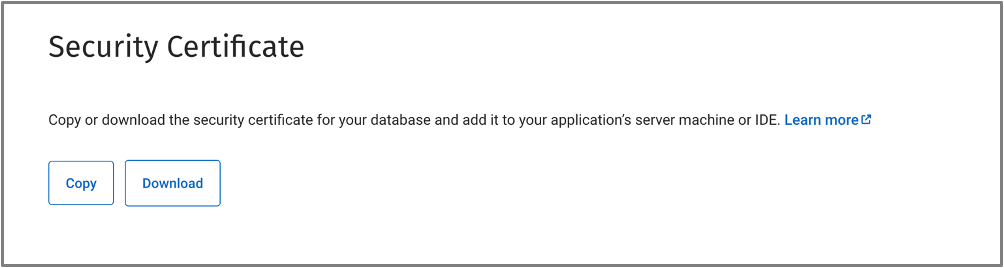
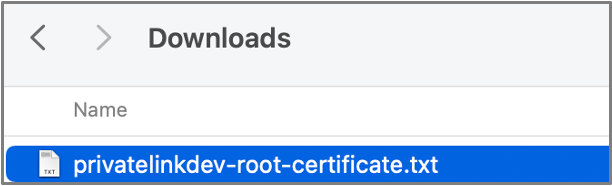
- You should get an privatelinkdev-root-certificate.txt file or similar depending on your database name.
2. Install Python in your AWS EC2 instance
- Let’s now SSH into EC2 Instance.
- Navigate to EC2 Dashboard

- Abrir Instances page
- Filter on your EC2 Instance name and select your instance.
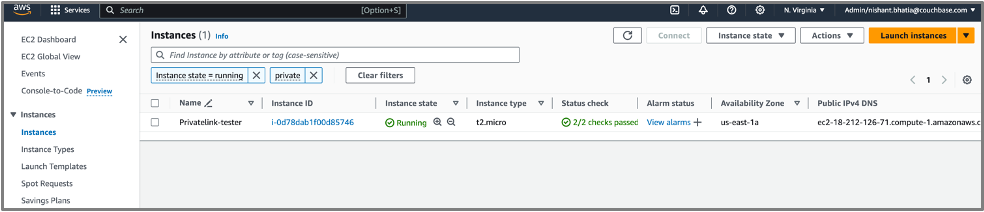
- Hacer clic Conectar

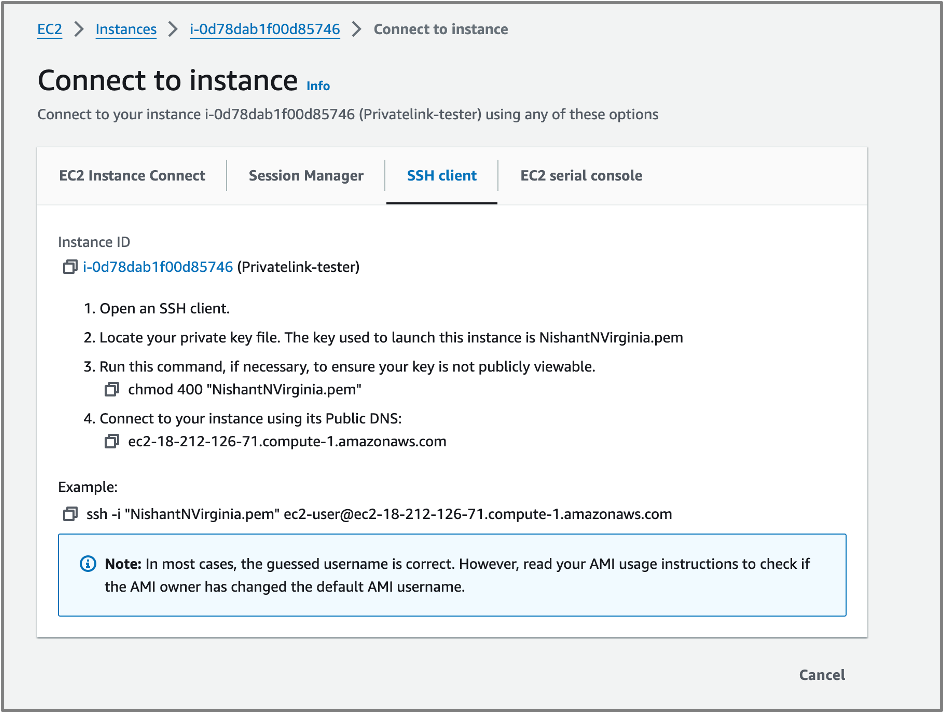
- This should open a Connect to Instance page.
- Navigate to EC2 Dashboard
- Let’s now connect to the instance from your laptop.
- Hacer clic SSH client Tab and follow the instructions to make sure your private key is accessible from your terminal and not publicly viewable.
- Hacer clic SSH client Tab and follow the instructions to make sure your private key is accessible from your terminal and not publicly viewable.

|
1 |
chmod 400 NishantNVirginia.pem |
- Locate the ssh Ejemplo command at the bottom and run it in your terminal.
|
1 2 3 4 5 6 7 8 9 10 11 12 13 14 15 16 17 |
$ ssh –i “NishantNVirginia.pem” ec2–usuario@ec2–18–212–116–71.compute–1.amazonaws.com nishant.bhatia@JGWXHT4VFM downloads % ssh –i “NishantNVirginia.pem” ec2–usuario@ec2–18–212–126–71.compute–1.amazonaws.com El authenticity de host ‘ec2-18-212-126-71.compute-1.amazonaws.com (18.212.126.71)’ lata‘t be established. ED25519 key fingerprint is SHA256:RJorms+Tb2vpQxACTE7gcafmFpeP6xQSm3/Ny0WZYJg. This key is not known by any other names Are you sure you want to continue connecting (yes/no/[fingerprint])? yes Warning: Permanently added ‘ec2–18–212–116–71.compute–1.amazonaws.com‘ (ED25519) to the list of known hosts. , #_ ~_ ####_ Amazon Linux 2023 ~~ _##### ~~ ####| ~~ #/ ___ https://aws.amazon.com/linux/amazon-linux-2023 ~~ V~’ ‘-> ~~~ / ~~._. _/ _/ _/ _/m/’ |
- Let’s now install the Python SDK in the instance. Note: the following installation is composed of 3 commands. Make sure you run each of those commands separately in your terminal. Each command will also interactively ask for confirmation of package installation.
|
1 2 3 4 5 |
sudo yum update sudo yum Instalar gcc gcc–c++ git python3–devel python3–pip openssl–devel sudo yum Instalar openssl–devel sudo yum Instalar openssl python3 –m pip Instalar Couchbase |
- For the lib, you can also execute the following command.
|
1 2 3 |
sudo yum Instalar openssl11 #it’s okay if this does not execute as the lib are added in openssl-devel |
3. Test a python app connecting to the Capella Private Endpoint
- Exit ssh to get back to your local laptop or you can open a new shell window
|
1 |
exit |
- Rename the Capella Security .txt certificate you downloaded before as privatelink-cert.pem. Replace the name of the root certificate with your own.
- Let’s copy privatelink-cert.pem into your EC2 instance. In the command below:
- Replace the name of your certificate with your own.
- Replace the Key Pair file with the one you used to create your VPC.
- Replace the ec2 name with your own (reuse the same as the one provided in the SSH Client example).
- Execute the command.
Note that the following scp command is a soltero command.
|
1 2 3 |
cd downloads chmod 400 “NishantNVirginia.pem” scp –i “NishantNVirginia.pem” privatelink–cert.pem ec2–usuario@ec2–18–212–126–71.compute–1.amazonaws.com:/home/ec2–usuario |
- Copy the following simple python code in your preferred IDE.
- Replace the private endpoint with the one you created before
- Replace the credentials with the Capella database credentials you created before
- Replace the privatelink-cert.pem with your certificate name.
- Save the file as example.py.
|
1 2 3 4 5 6 7 8 9 10 11 12 13 14 15 |
importar sys desde Couchbase.clúster importar Clúster desde Couchbase.Opciones importar OpcionesDeClúster desde Couchbase.auth importar AutenticadorDeContraseñas clúster = Clúster(‘couchbases://o3zak2eyqhmw2tq.pl.cloud.couchbase.com’, OpcionesDeClúster(AutenticadorDeContraseñas(“privatelinkcapella”,“Couchbase123$”,cert_path=“/home/ec2-user/privatelink-cert.pem”))) cubeta = clúster.cubeta(‘travel-sample’) colección = cubeta.alcance(‘inventory’).colección(‘airline’) Intentar: resultado = colección.conseguir(‘airline_10’) imprimir(resultado.content_as[dict]) except: imprimir(“exception:”, sys.exc_info()[0]) |
- Copy the example.py file into your ec2 instance. Same as previously, replace the certificate with your own, as well as the ec2 name with your own.
0
-
- SSH into your EC2 instance again.
-
1
- Check that both your acme-cert.pem and your example.py file are there.
2
- Run your Python script. You should get the JSON document airline_10.
3
4. Test curl commands connecting to the Capella Private Endpoint
- Still in the EC2 instance, try a SQL++ query using Server REST APIs. Replace the private endpoint with yours.
4
- Still in the EC2 instance, try an Analytics query using Server REST APIs.
|
You have now established a private connection between your AWS VPC and Couchbase Capella using a Private Link!
Conclusión
Implementing AWS Private Link for Couchbase Capella is crucial for enhancing the security and reliability of your data communication. By establishing a private connection between your VPC and Couchbase Capella, you effectively isolate traffic from the public internet, reducing the risk of exposure to potential threats. This approach ensures that data remains within your secure network boundaries, utilizing AWS’s robust infrastructure to maintain low latency and high throughput. AWS Private Link provides only uni-directional communication, ensuring that data flows securely from your resources to Couchbase Capella without any reverse path. This makes AWS Private Link a highly secure and efficient solution for enterprise-grade database connectivity.

Deja un comentario
Lo siento, debes estar conectado para publicar un comentario.