

Continuing down the path of user profile stores, we had previously seen how to create one with Node.js and Couchbase NoSQL as well as a web client front-end for it using Angular. What if we wanted to take this into a mobile application, which is the norm for all applications as of now.
There are many different mobile frameworks out there and we’re lucky that some even support Angular, which is what we had used in the previous example. We’re going to see how to convert our client front-end to mobile using NativeScript and Angular.
Before going forward, the assumption is that you’ve completely both of the two previous tutorials, one on creating the profile store backend and the other on creating the profile store web front-end. We’re also going to assume that your development environment is property configured for mobile development, whether that be Android, iOS, or both.
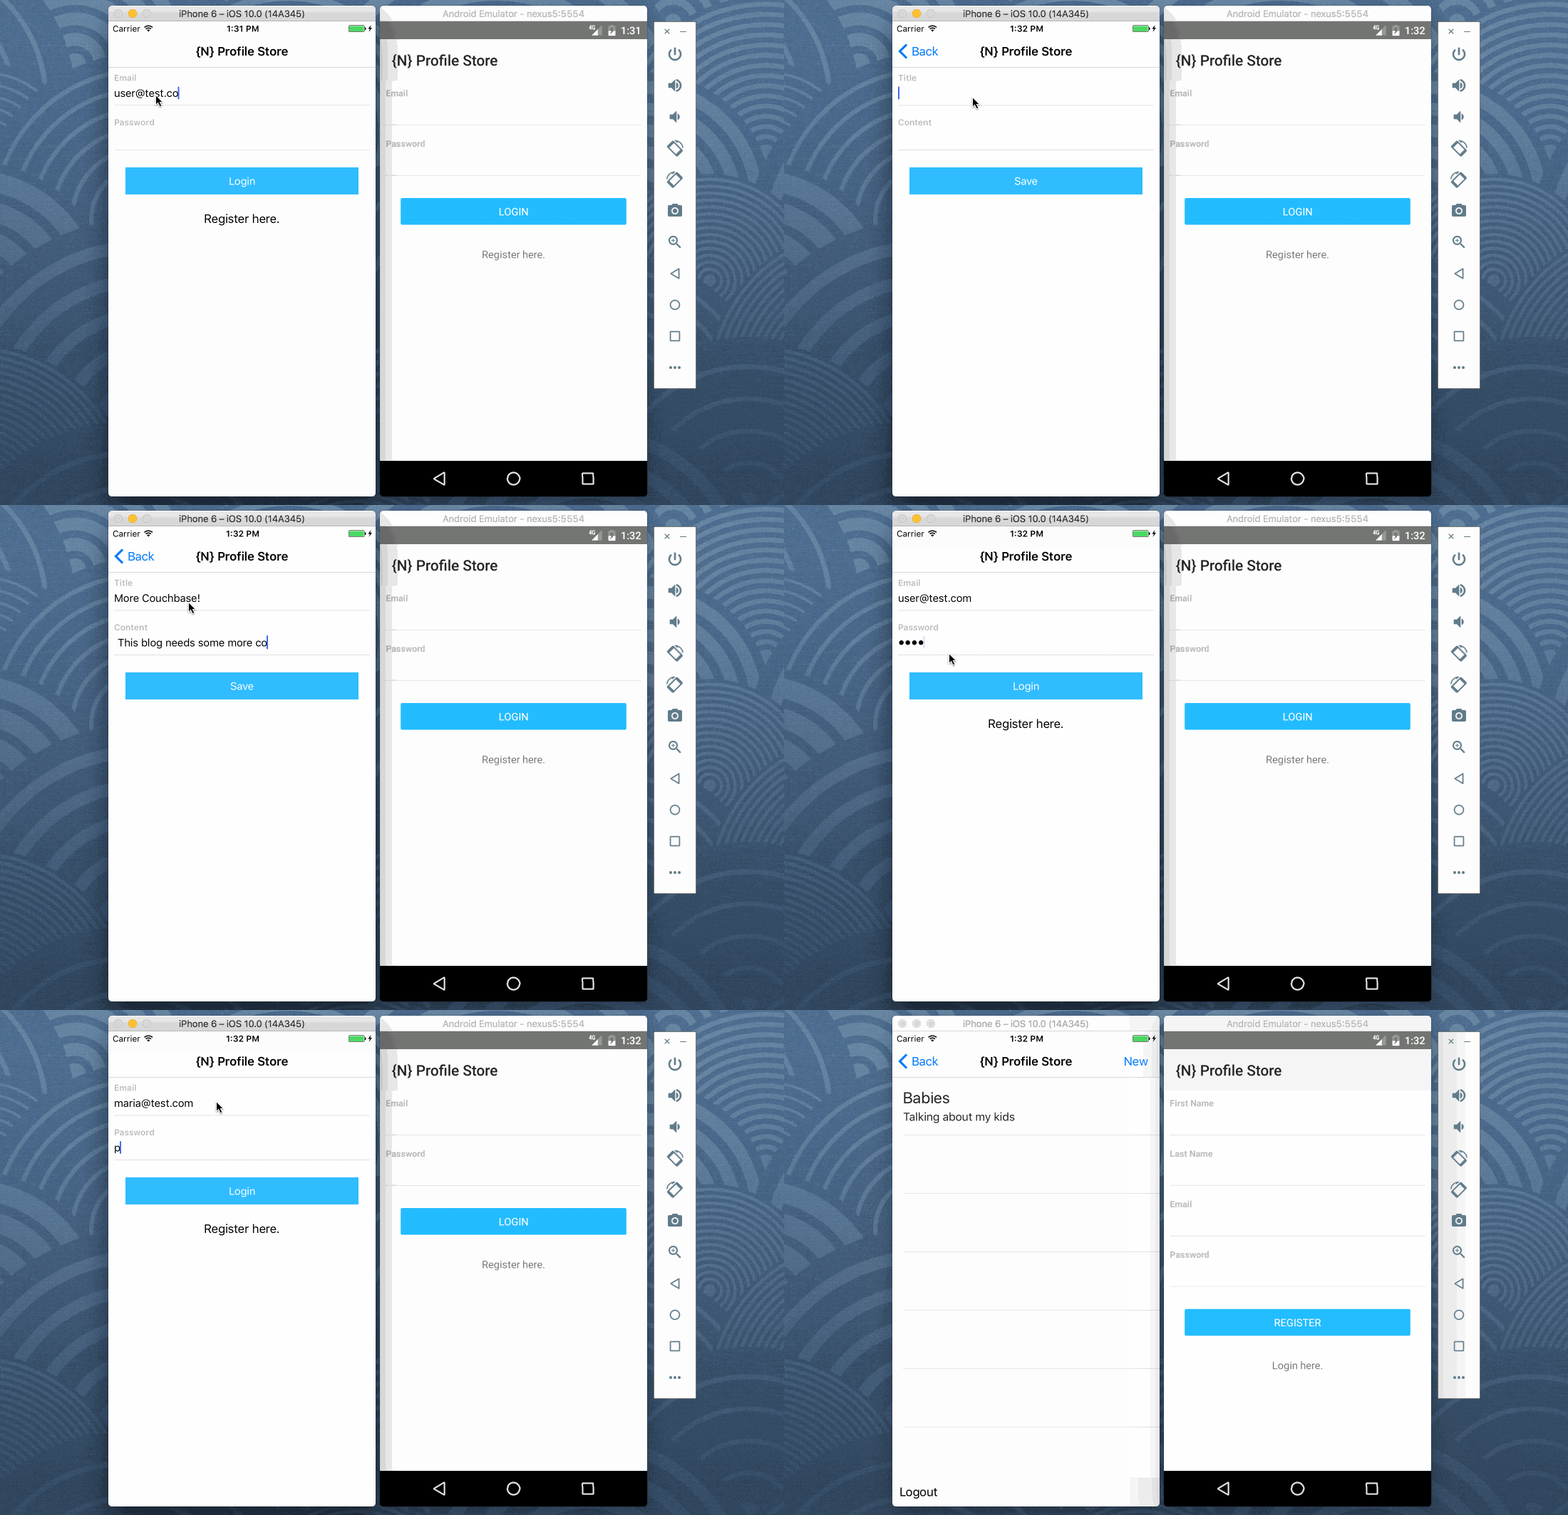
The flow of events in this application will match what we saw in the web version.
Create a New NativeScript with Angular Project
Assuming that you’ve gotten the NativeScript CLI installed and configured, execute the following to create a new project:
|
1 |
tns crear perfil–project–ns —ng |
El --ng flag in the above command is important because it means we are creating an Angular project rather than a NativeScript Core project.
As of right now, the NativeScript CLI doesn’t share the Angular CLI capabilities of generating components. For this reason, we’re going to have to create each of the HTML and TypeScript files manually.
If you’re on Mac or Linux, execute the following from within the NativeScript project:
|
1 2 3 4 5 6 7 8 9 10 11 12 |
mkdir –p aplicación/login mkdir –p aplicación/register mkdir –p aplicación/blogs mkdir –p aplicación/blog touch aplicación/login/login.component.html touch aplicación/login/login.component.ts touch aplicación/register/register.component.html touch aplicación/register/register.component.ts touch aplicación/blogs/blogs.component.html touch aplicación/blogs/blogs.component.ts touch aplicación/blog/blog.component.html touch aplicación/blog/blog.component.ts |
If you’re on Windows, just create those directories and files manually. If you really wanted to, you could copy these directories and files from your web project from the previous tutorial.
Defining the Components to Represent Each Screen
Starting in the same direction as the web version, we’re going to focus on user login. Open the project’s app/login/login.component.ts file and include the following code:
|
1 2 3 4 5 6 7 8 9 10 11 12 13 14 15 16 17 18 19 20 21 22 23 24 25 26 27 28 29 30 31 32 33 34 |
importar { Component } desde ‘@angular/core’; importar { Http, Headers, RequestOptions } desde “@angular/http”; importar { Enrutador } desde “@angular/router”; importar “rxjs/Rx”; @Component({ moduleId: module.identificación, selector: ‘app-login’, templateUrl: ‘./login.component.html’ }) exportar clase LoginComponent { público input: any; constructor(privado http: Http, privado router: Enrutador) { este.input = { “email”: “”, “contraseña”: “” }; } público login() { si(este.input.correo electrónico && este.input.contraseña) { dejar headers = nuevo Headers({ “content-type”: “application/json” }); dejar Opciones = nuevo RequestOptions({ headers: headers }); este.http.post(“https://localhost:3000/login”, JSON.serializar(este.input), Opciones) .mapa(resultado =El resultado de tu pregunta se muestra a continuación: resultado.json()) .subscribe(resultado =El resultado de tu pregunta se muestra a continuación: { este.router.navigate([“/blogs”], { “queryParams”: resultado }); }); } } } |
The above code is exactly what we saw in the web version with two exceptions. I’ve removed the CSS reference since we did not create a CSS file on a component basis. I’ve also added a moduleId so relative paths could work with our component. These are both Angular related items with nothing to do with NativeScript.
The HTML is where things are different. Open the project’s app/login/login.component.html archivar e incluir el siguiente marcado XML:
|
1 2 3 4 5 6 7 8 9 10 11 12 13 14 15 16 17 18 19 |
<ActionBar title=“{N} Profile Store”El resultado de tu pregunta se muestra a continuación:</ActionBarEl resultado de tu pregunta se muestra a continuación: <StackLayout clase=“form”El resultado de tu pregunta se muestra a continuación: <StackLayout clase=“input-field”El resultado de tu pregunta se muestra a continuación: <Label texto=“Email” clase=“label font-weight-bold m-b-5”El resultado de tu pregunta se muestra a continuación:</LabelEl resultado de tu pregunta se muestra a continuación: <TextField clase=“input” [(ngModel)]=“input.email” autocapitalizationType=“none”El resultado de tu pregunta se muestra a continuación:</TextFieldEl resultado de tu pregunta se muestra a continuación: <StackLayout clase=“hr-light”El resultado de tu pregunta se muestra a continuación:</StackLayoutEl resultado de tu pregunta se muestra a continuación: </StackLayoutEl resultado de tu pregunta se muestra a continuación: <StackLayout clase=“input-field”El resultado de tu pregunta se muestra a continuación: <Label texto=“Password” clase=“label font-weight-bold m-b-5”El resultado de tu pregunta se muestra a continuación:</LabelEl resultado de tu pregunta se muestra a continuación: <TextField clase=“input” secure=“true” [(ngModel)]=“input.password” autocapitalizationType=“none”El resultado de tu pregunta se muestra a continuación:</TextFieldEl resultado de tu pregunta se muestra a continuación: <StackLayout clase=“hr-light”El resultado de tu pregunta se muestra a continuación:</StackLayoutEl resultado de tu pregunta se muestra a continuación: </StackLayoutEl resultado de tu pregunta se muestra a continuación: <StackLayout clase=“input-field”El resultado de tu pregunta se muestra a continuación: <Button clase=“btn btn-primary” texto=“Login” (tap)=“login()”El resultado de tu pregunta se muestra a continuación:</ButtonEl resultado de tu pregunta se muestra a continuación: </StackLayoutEl resultado de tu pregunta se muestra a continuación: <StackLayout clase=“input-field”El resultado de tu pregunta se muestra a continuación: <Label texto=“Register here.” [nsRouterLink]=“[‘/register’]” clase=“text-center”El resultado de tu pregunta se muestra a continuación:</LabelEl resultado de tu pregunta se muestra a continuación: </StackLayoutEl resultado de tu pregunta se muestra a continuación: </StackLayoutEl resultado de tu pregunta se muestra a continuación: |
NativeScript has its own markup for the UI. The same rules apply in terms of Angular, but creating UI components is just a bit different.
For example, we are still using the [(ngModel)] attributes, but instead of div tags, we have StackLayout tags.
Now let’s take a look at the registration component. Open the project’s app/register/register.component.ts file and include the following TypeScript:
|
1 2 3 4 5 6 7 8 9 10 11 12 13 14 15 16 17 18 19 20 21 22 23 24 25 26 27 28 29 30 31 32 33 34 35 36 |
importar { Component } desde ‘@angular/core’; importar { Http, Headers, RequestOptions } desde “@angular/http”; importar { Enrutador } desde “@angular/router”; importar “rxjs/Rx”; @Component({ moduleId: module.identificación, selector: ‘app-register’, templateUrl: ‘./register.component.html’ }) exportar clase RegisterComponent { público input: any; público constructor(privado http: Http, privado router: Enrutador) { este.input = { “firstname”: “”, “lastname”: “”, “email”: “”, “contraseña”: “” }; } público register() { si(este.input.correo electrónico && este.input.contraseña) { dejar headers = nuevo Headers({ “content-type”: “application/json” }); dejar Opciones = nuevo RequestOptions({ headers: headers }); este.http.post(“https://localhost:3000/account”, JSON.serializar(este.input), Opciones) .mapa(resultado =El resultado de tu pregunta se muestra a continuación: resultado.json()) .subscribe(resultado =El resultado de tu pregunta se muestra a continuación: { este.router.navigate([“/login”]); }); } } } |
Again, the only changes we made in the above code, compared to the previous example, is in the CSS removal and moduleId addition.
Not bad when it comes to creating cross platform web and mobile applications right?
The HTML for the UI that powers the TypeScript logic is found in the app/register/register.component.html file and it looks like this:
|
1 2 3 4 5 6 7 8 9 10 11 12 13 14 15 16 17 18 19 20 21 22 23 24 25 26 27 28 29 |
<ActionBar title=“{N} Profile Store”El resultado de tu pregunta se muestra a continuación:</ActionBarEl resultado de tu pregunta se muestra a continuación: <StackLayout clase=“form”El resultado de tu pregunta se muestra a continuación: <StackLayout clase=“input-field”El resultado de tu pregunta se muestra a continuación: <Label texto=“First Name” clase=“label font-weight-bold m-b-5”El resultado de tu pregunta se muestra a continuación:</LabelEl resultado de tu pregunta se muestra a continuación: <TextField clase=“input” [(ngModel)]=“input.firstname” autocapitalizationType=“none”El resultado de tu pregunta se muestra a continuación:</TextFieldEl resultado de tu pregunta se muestra a continuación: <StackLayout clase=“hr-light”El resultado de tu pregunta se muestra a continuación:</StackLayoutEl resultado de tu pregunta se muestra a continuación: </StackLayoutEl resultado de tu pregunta se muestra a continuación: <StackLayout clase=“input-field”El resultado de tu pregunta se muestra a continuación: <Label texto=“Last Name” clase=“label font-weight-bold m-b-5”El resultado de tu pregunta se muestra a continuación:</LabelEl resultado de tu pregunta se muestra a continuación: <TextField clase=“input” [(ngModel)]=“input.lastname” autocapitalizationType=“none”El resultado de tu pregunta se muestra a continuación:</TextFieldEl resultado de tu pregunta se muestra a continuación: <StackLayout clase=“hr-light”El resultado de tu pregunta se muestra a continuación:</StackLayoutEl resultado de tu pregunta se muestra a continuación: </StackLayoutEl resultado de tu pregunta se muestra a continuación: <StackLayout clase=“input-field”El resultado de tu pregunta se muestra a continuación: <Label texto=“Email” clase=“label font-weight-bold m-b-5”El resultado de tu pregunta se muestra a continuación:</LabelEl resultado de tu pregunta se muestra a continuación: <TextField clase=“input” [(ngModel)]=“input.email” autocapitalizationType=“none”El resultado de tu pregunta se muestra a continuación:</TextFieldEl resultado de tu pregunta se muestra a continuación: <StackLayout clase=“hr-light”El resultado de tu pregunta se muestra a continuación:</StackLayoutEl resultado de tu pregunta se muestra a continuación: </StackLayoutEl resultado de tu pregunta se muestra a continuación: <StackLayout clase=“input-field”El resultado de tu pregunta se muestra a continuación: <Label texto=“Password” clase=“label font-weight-bold m-b-5”El resultado de tu pregunta se muestra a continuación:</LabelEl resultado de tu pregunta se muestra a continuación: <TextField clase=“input” secure=“true” [(ngModel)]=“input.password” autocapitalizationType=“none”El resultado de tu pregunta se muestra a continuación:</TextFieldEl resultado de tu pregunta se muestra a continuación: <StackLayout clase=“hr-light”El resultado de tu pregunta se muestra a continuación:</StackLayoutEl resultado de tu pregunta se muestra a continuación: </StackLayoutEl resultado de tu pregunta se muestra a continuación: <StackLayout clase=“input-field”El resultado de tu pregunta se muestra a continuación: <Button clase=“btn btn-primary” texto=“Register” (tap)=“register()”El resultado de tu pregunta se muestra a continuación:</ButtonEl resultado de tu pregunta se muestra a continuación: </StackLayoutEl resultado de tu pregunta se muestra a continuación: <StackLayout clase=“input-field”El resultado de tu pregunta se muestra a continuación: <Label texto=“Login here.” [nsRouterLink]=“[‘/login’]” clase=“text-center”El resultado de tu pregunta se muestra a continuación:</LabelEl resultado de tu pregunta se muestra a continuación: </StackLayoutEl resultado de tu pregunta se muestra a continuación: </StackLayoutEl resultado de tu pregunta se muestra a continuación: |
The final two components are going to be no different from what we’re already experiencing.
Abrir el del proyecto app/blogs/blogs.component.ts file and include the following TypeScript code:
|
1 2 3 4 5 6 7 8 9 10 11 12 13 14 15 16 17 18 19 20 21 22 23 24 25 26 27 28 29 30 31 32 33 34 35 36 37 38 39 40 41 42 43 44 45 46 47 |
importar { Component, OnInit } desde ‘@angular/core’; importar { Http, Headers, RequestOptions } desde “@angular/http”; importar { Enrutador, ActivatedRoute } desde “@angular/router”; importar { Ubicación } desde “@angular/common”; importar “rxjs/Rx”; @Component({ moduleId: module.identificación, selector: ‘app-blogs’, templateUrl: ‘./blogs.component.html’ }) exportar clase BlogsComponent implementa OnInit { privado sid: cadena; público entries: Array<anyEl resultado de tu pregunta se muestra a continuación:; público constructor(privado http: Http, privado router: Enrutador, privado route: ActivatedRoute, privado location: Ubicación) { este.entries = []; } público ngOnInit() { este.location.subscribe(() =El resultado de tu pregunta se muestra a continuación: { dejar headers = nuevo Headers({ “authorization”: “Bearer “ + este.sid }); dejar Opciones = nuevo RequestOptions({ headers: headers }); este.http.conseguir(“https://localhost:3000/blogs”, Opciones) .mapa(resultado =El resultado de tu pregunta se muestra a continuación: resultado.json()) .subscribe(resultado =El resultado de tu pregunta se muestra a continuación: { este.entries = resultado; }); }); este.route.queryParams.subscribe(params =El resultado de tu pregunta se muestra a continuación: { este.sid = params[“sid”]; dejar headers = nuevo Headers({ “authorization”: “Bearer “ + params[“sid”] }); dejar Opciones = nuevo RequestOptions({ headers: headers }); este.http.conseguir(“https://localhost:3000/blogs”, Opciones) .mapa(resultado =El resultado de tu pregunta se muestra a continuación: resultado.json()) .subscribe(resultado =El resultado de tu pregunta se muestra a continuación: { este.entries = resultado; }); }); } público crear() { este.router.navigate([“/blog”], { “queryParams”: { “sid”: este.sid } }); } } |
No changes to see in the above other than the two previously mentioned, so we can move into our HTML for the page.
Abrir el del proyecto app/blogs/blogs.component.html file and include the following HTML markup:
|
1 2 3 4 5 6 7 8 9 10 11 12 13 14 15 16 17 |
<ActionBar title=“{N} Profile Store”El resultado de tu pregunta se muestra a continuación: <ActionItem texto=“New” iOS.position=“right” (tap)=“create()”El resultado de tu pregunta se muestra a continuación:</ActionItemEl resultado de tu pregunta se muestra a continuación: <NavigationButton texto=“Back”El resultado de tu pregunta se muestra a continuación:</NavigationButtonEl resultado de tu pregunta se muestra a continuación: </ActionBarEl resultado de tu pregunta se muestra a continuación: <GridLayout filas=“*, auto” columns=“*”El resultado de tu pregunta se muestra a continuación: <ListView [elementos]=“entries” clase=“list-group” fila=“0” col=“0”El resultado de tu pregunta se muestra a continuación: <ng–template dejar–entry=“artículo”El resultado de tu pregunta se muestra a continuación: <StackLayout clase=“list-group-item”El resultado de tu pregunta se muestra a continuación: <Label texto=“{{ entry.title }}” clase=“h2”El resultado de tu pregunta se muestra a continuación:</LabelEl resultado de tu pregunta se muestra a continuación: <Label texto=“{{ entry.content }}”El resultado de tu pregunta se muestra a continuación:</LabelEl resultado de tu pregunta se muestra a continuación: </StackLayoutEl resultado de tu pregunta se muestra a continuación: </ng–templateEl resultado de tu pregunta se muestra a continuación: </ListViewEl resultado de tu pregunta se muestra a continuación: <StackLayout fila=“1” col=“0” padding=“10” backgroundColor=“#F0F0F0”El resultado de tu pregunta se muestra a continuación: <Label texto=“Logout” [nsRouterLink]=“[‘/login’]”El resultado de tu pregunta se muestra a continuación:</LabelEl resultado de tu pregunta se muestra a continuación: </StackLayoutEl resultado de tu pregunta se muestra a continuación: </GridLayoutEl resultado de tu pregunta se muestra a continuación: |
Let’s wrap this application up with the final component that our profile store API and web front-end has to offer.
Abrir el del proyecto app/blog/blog.component.ts file and include this:
|
1 2 3 4 5 6 7 8 9 10 11 12 13 14 15 16 17 18 19 20 21 22 23 24 25 26 27 28 29 30 31 32 33 34 35 36 37 38 39 40 41 42 43 44 45 |
importar { Component, OnInit } desde ‘@angular/core’; importar { Http, Headers, RequestOptions } desde “@angular/http”; importar { ActivatedRoute } desde “@angular/router”; importar { Ubicación } desde “@angular/common”; importar “rxjs/Rx”; @Component({ moduleId: module.identificación, selector: ‘app-blog’, templateUrl: ‘./blog.component.html’ }) exportar clase BlogComponent implementa OnInit { privado sid: cadena; público input: any; público constructor(privado http: Http, privado route: ActivatedRoute, privado location: Ubicación) { este.input = { “title”: “”, “contenido”: “” }; } público ngOnInit() { este.route.queryParams.subscribe(params =El resultado de tu pregunta se muestra a continuación: { este.sid = params[“sid”]; }); } público guardar() { si(este.input.title && este.input.contenido) { dejar headers = nuevo Headers({ “content-type”: “application/json”, “authorization”: “Bearer “ + este.sid }); dejar Opciones = nuevo RequestOptions({ headers: headers }); este.http.post(“https://localhost:3000/blog”, JSON.serializar(este.input), Opciones) .mapa(resultado =El resultado de tu pregunta se muestra a continuación: resultado.json()) .subscribe(resultado =El resultado de tu pregunta se muestra a continuación: { este.location.back(); }); } } } |
If you didn’t copy over your CSS file, don’t forget to remove it from the @Component block as seen in the previous components.
The HTML UI to go with this TypeScript is found in the project’s app/blog/blog.component.html file and it looks like the following:
|
1 2 3 4 5 6 7 8 9 10 11 12 13 14 15 16 17 18 |
<ActionBar title=“{N} Profile Store”El resultado de tu pregunta se muestra a continuación: <NavigationButton texto=“Back”El resultado de tu pregunta se muestra a continuación:</NavigationButtonEl resultado de tu pregunta se muestra a continuación: </ActionBarEl resultado de tu pregunta se muestra a continuación: <StackLayout clase=“form”El resultado de tu pregunta se muestra a continuación: <StackLayout clase=“input-field”El resultado de tu pregunta se muestra a continuación: <Label texto=“Title” clase=“label font-weight-bold m-b-5”El resultado de tu pregunta se muestra a continuación:</LabelEl resultado de tu pregunta se muestra a continuación: <TextField clase=“input” [(ngModel)]=“input.title” autocapitalizationType=“none”El resultado de tu pregunta se muestra a continuación:</TextFieldEl resultado de tu pregunta se muestra a continuación: <StackLayout clase=“hr-light”El resultado de tu pregunta se muestra a continuación:</StackLayoutEl resultado de tu pregunta se muestra a continuación: </StackLayoutEl resultado de tu pregunta se muestra a continuación: <StackLayout clase=“input-field”El resultado de tu pregunta se muestra a continuación: <Label texto=“Content” clase=“label font-weight-bold m-b-5”El resultado de tu pregunta se muestra a continuación:</LabelEl resultado de tu pregunta se muestra a continuación: <TextView clase=“input” [(ngModel)]=“input.content” autocapitalizationType=“none”El resultado de tu pregunta se muestra a continuación:</TextViewEl resultado de tu pregunta se muestra a continuación: <StackLayout clase=“hr-light”El resultado de tu pregunta se muestra a continuación:</StackLayoutEl resultado de tu pregunta se muestra a continuación: </StackLayoutEl resultado de tu pregunta se muestra a continuación: <StackLayout clase=“input-field”El resultado de tu pregunta se muestra a continuación: <Button clase=“btn btn-primary” texto=“Save” (tap)=“save()”El resultado de tu pregunta se muestra a continuación:</ButtonEl resultado de tu pregunta se muestra a continuación: </StackLayoutEl resultado de tu pregunta se muestra a continuación: </StackLayoutEl resultado de tu pregunta se muestra a continuación: |
As of right now you may be scratching your head on all this NativeScript XML markup. How Angular works with the UI hasn’t changed, but if you’re interested in learning about the NativeScript markup, check out their documentación oficial. Get familiar with the StackLayout, GridLayout and individual UI component tags.
Bringing it Together
We’ve created all these Angular components for NativeScript, but we haven’t brought them together via the Angular Router.
In the web version of this guide, the route information was in the app.module.ts file. While we could do that, NativeScript broke it out into a separate file.
Abrir el del proyecto app/app.routing.ts archivo e incluir lo siguiente:
0
A lot of the above code came with our new project template. We imported each of our components, and created a route for them.
Likewise, the components need to be imported in the project’s app/app.module.ts file. Open this file and include the following:
1
In addition to importing each component and adding them to the declaraciones array, we also imported a few modules such as the NativeScriptHttpModule y NativeScriptFormsModule. In pure Angular, these are called the HttpModule y FormsModule.
In theory, the application is ready to go.
Resolving App Transport Security Issues (ATS) for iOS
Because the Node.js and Couchbase API is running locally, we are using HTTP rather than HTTPS. iOS will throw errors if we try to access HTTP resources.
This is easily fixable by adding an ATS policy.
Abrir el del proyecto app/App_Resources/iOS/Info.plist and add the following alongside the other XML:
2
The above essentially whitelists all HTTP endpoints. It is not safe for production, but safe for testing.
More information on ATS in NativeScript applications can be read about in a previous article I wrote titled, Fix iOS 9 App Transport Security Issues in NativeScript.
Conclusión
You just saw how easy it was to take your web client front-end and convert it to mobile using NativeScript and Angular. The user profile store example quickly became a full stack example using the JavaScript stack. We had a Node.js with Servidor Couchbase backend, Angular web front-end, and NativeScript mobile front-end.
The next step, or option, would be to use the Couchbase Mobile components rather than HTTP calls against the API.
Autor

Una respuesta
-
Hello,
I tried to run this code but POST is not working. When I try to register I’m getting the error below. From online I notice that https://localhost is not working on android sdk. I use the IP address both 10.0.2.2 and 127.0.0.1 but still getting the same error.
JS: ERROR Response with status: 200 for URL: null

Deja un comentario
Lo siento, debes estar conectado para publicar un comentario.