Many relational or even non-relation database solutions treat mobile and backend as two separate problems therefore building offline-first applications with these point-solutions is next to impossible.<\/p>\r\n\r\n\r\n\r\n
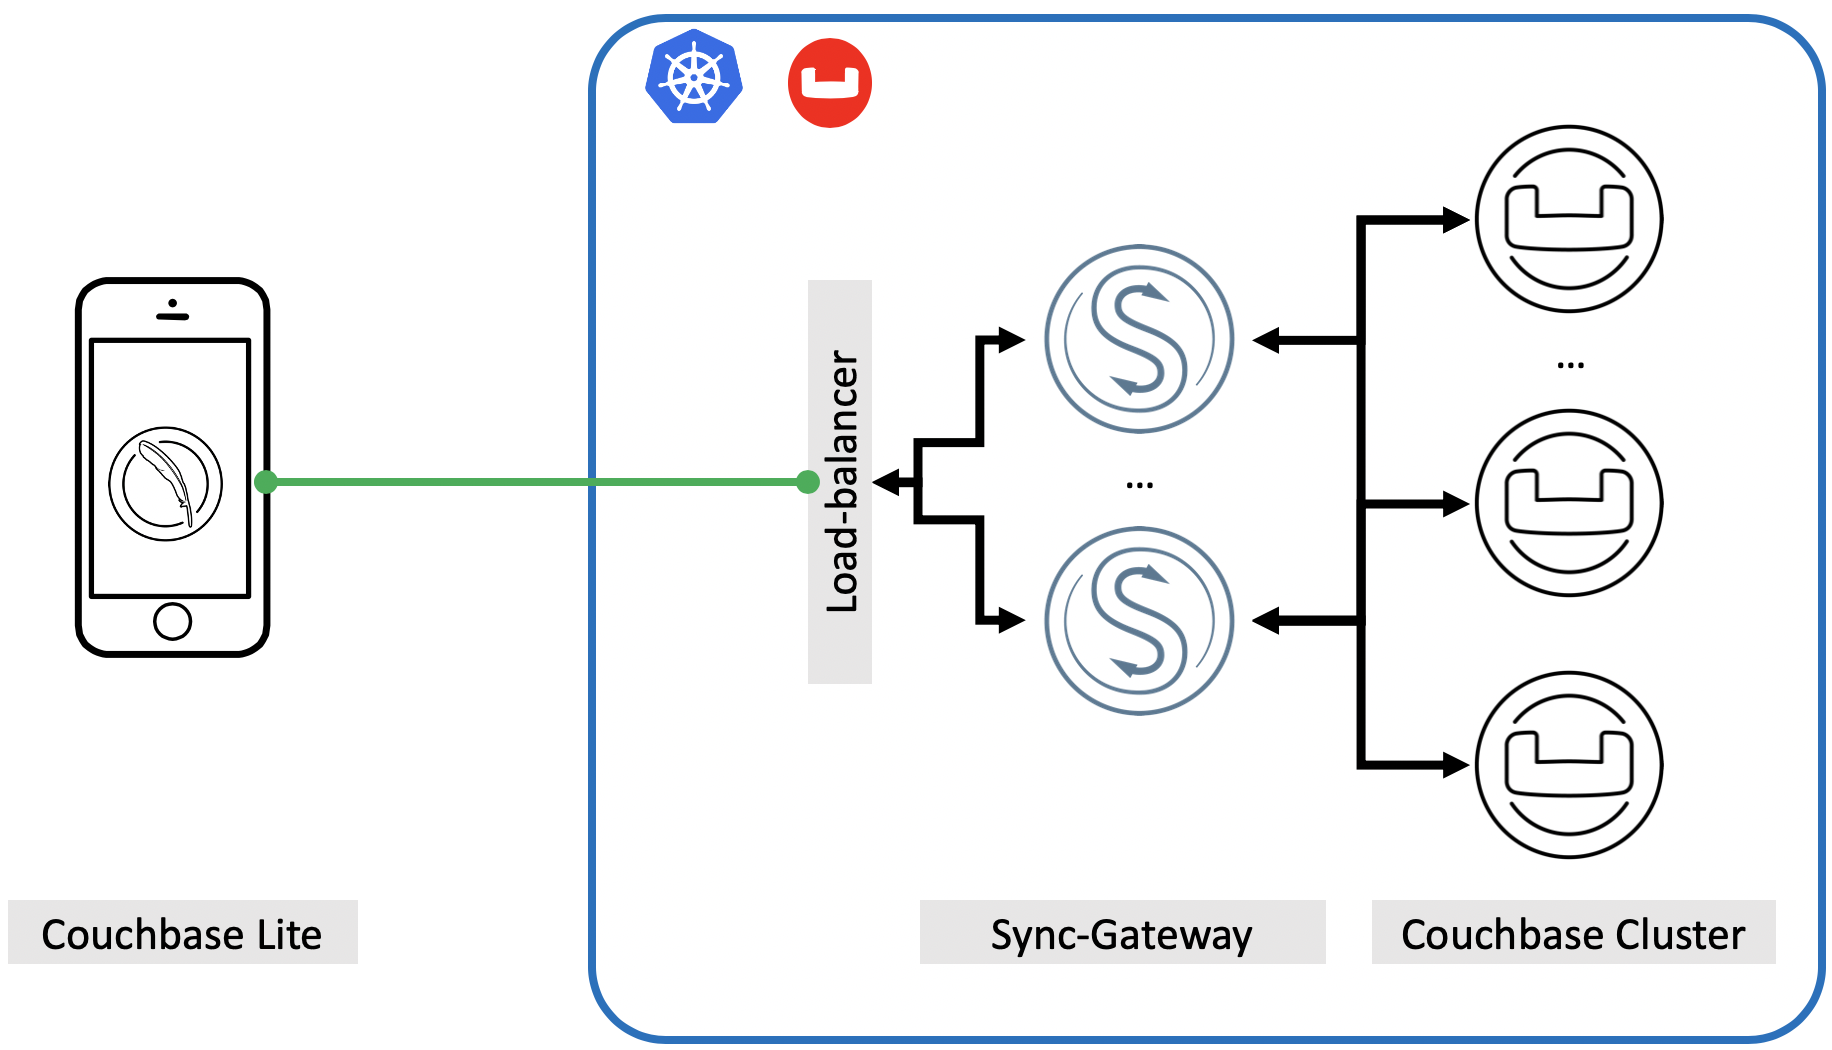
<\/p>\r\n\r\n\r\n\r\n <\/p>\r\n\r\n\r\n\r\n Couchbase on the other hand is the leading provider of a fully integrated edge to the cloud solution. Couchbase Lite<\/a> product is the embedded database for the edge devices (where you can run declarative queries locally on the device), Sync Gateway<\/a> is the gel technology which enables data synchronization from the edge devices to the Couchbase Cluster<\/a>.<\/p>\r\n\r\n\r\n\r\n In this article, we will focus on deploying Couchabse Cluster and Sync Gateway on the Kubernetes platform. The goal is that you get first-hand experience working with these technologies and you understand mechanics behind each one.<\/p>\r\n\r\n\r\n\r\n One more take away I would like you to have from this article is some of the best practices while deploying this solution in your own private or public cloud.<\/p>\r\n\r\n\r\n\r\n As I hear these questions from many of my enterprise customers, I decided to address these first by talking about some of the best practices when it comes to deploying Couchbase on the Kubernetes platform.<\/p>\r\n\r\n\r\n\r\n NOTE:<\/em><\/strong> In the example below we will use Make sure you have an AWS account setup (instructions out of scope from this blog) and all the tools you would need to successfully try these instructions are ready. Here is the list of things you would need:<\/p>\r\n\r\n\r\n\r\n Once you have Kubernetes (K8s) provides us the flexibility to provision different sizes (vCPU, RAM, Disk size) compute machines into one single Kubernetes cluster so resource requirements of various managed services can be satisfied from a single K8s cluster.<\/p>\r\n\r\n\r\n\r\n We are going to leverage the same flexibility and provision three First, let’s deploy a K8s cluster in Lets’ create To host Last but not least we will use Once all three We have picked three different types of EC2 machines to host In this example we will be hosting In a real production environment, we understand you may have a different type of machine but not essentially one type dedicated to one specific type of Couchbase service. In that case, you can create mutually exclusive labels for each node type.<\/p>\r\n\r\n\r\n\r\n You would use Same way to label all the index (query or another) nodes:<\/p>\r\n\r\n\r\n\r\n Once you label all the nodes, you are ready to move to the next section.<\/p>\r\n\r\n\r\n\r\n NOTE:<\/em><\/strong> We are using The first step in installing the Operator is to install the custom resource definition (CRD) that describes the Namespaces are a way to divide cluster resources between multiple users.<\/p>\r\n\r\n\r\n\r\n Namespaces are a way to divide cluster resources between multiple users.<\/p>\r\n\r\n\r\n\r\n The operator is composed of two components: a The DAC allows custom resources to be modified and interrogated before a resource is accepted and committed to etcd. Running the DAC allows us to add sensible defaults to Couchbase cluster configurations thus minimizing the size of specifications. It also allows us to maintain backward compatibility when new attributes are added and must be populated. This makes the experience of using Couchbase resources similar to that of native resource types.<\/p>\r\n\r\n\r\n\r\n Lets now install the Dynamic Admission Controller.<\/p>\r\n\r\n\r\n\r\n Now lets deploy the Operator in the Running the above command downloads the Operator Docker image and creates a deployment<\/a>, which manages a single instance of the Operator. The Operator uses a deployment so that it can restart the pod if it dies.<\/p>\r\n\r\n\r\n\r\n After you run the You can use the following command to check on the status of the deployment:<\/p>\r\n\r\n\r\n\r\n Run the following command to verify that the Operator has started successfully:<\/p>\r\n\r\n\r\n\r\n If the Operator is up and running, the command returns an output where the READY<\/strong> field shows 1\/1<\/strong>, such as:<\/p>\r\n\r\n\r\n\r\n In a production environment where performance and SLA of the system matter most, we should always plan on deploying Couchbase cluster using persistent volumes because it helps in:<\/p>\r\n\r\n\r\n\r\n The first thing we need to do is create a secret credential that will be used by the administrative web console during login. For convenience, a sample secret is provided in the Operator package. When you push it to your Kubernetes cluster, the secret sets the username to the Administrator and the password to password.<\/p>\r\n\r\n\r\n\r\n To push the secret.yaml<\/a> into your Kubernetes cluster, run the following command:<\/p>\r\n\r\n\r\n\r\n In order to use PersistentVolume for Couchbase services (data, index, search, etc.), we need to create Storage Classes (sc-nas.yaml<\/a>). Run kubectl to create a new SSD based storage class:<\/p>\r\n\r\n\r\n\r\n The full spec for deploying the Couchbase cluster across 3 different zones using persistent volumes can be seen in the couchbase-cluster.yaml<\/a> file. This file along with other sample YAML files used in this article can be downloaded from this git repo.<\/p>\r\n\r\n\r\n\r\n Open the YAML file you just downloaded and notice how we are using Now use This will start deploying the Couchbase cluster and if all goes fine then we will have four Couchbase cluster pods hosting the services as per the configuration file above. To check the progress run this command, which will watch (-w argument) the progress of pods creating:<\/p>\r\n\r\n\r\n\r\n To view which pod is running on which node you can run:<\/p>\r\n\r\n\r\n\r\n You would notice that At this point you can do the port forwarding like this:<\/p>\r\n\r\n\r\n\r\n And access web-console by typing https:\/\/localhost:18091 on the browser.<\/p>\r\n\r\n\r\n\r\n Great progress so far deploying multi-zone, highly-available Couchbase cluster using persistent storage volumes. Now before we begin deploying Sync Gateway, we need to make sure of two more things:<\/p>\r\n\r\n\r\n\r\n NOTE:<\/em><\/strong> We used 2GB of RAM for this bucket but in the production environment you would be assigning RAM based on the sizing estimates that you or Couchbase Solutions Architect have done for your business use case.<\/p>\r\n<\/blockquote>\r\n\r\n\r\n\r\n We can simply create a If you like to connect to a different LDAP server you can simply update ldap<\/a> server details in the couchbase-cluster.yaml<\/a> and apply the changes. Alright back to creating a user and assigning the bucket level So far so good. Bucket and RBAC user is ready so we can go ahead with configuring the In order for One thing I would highlight that with \r\n
 <\/figure>\r\n<\/li>\r\n<\/ul>\r\n
Best practices<\/h2>\r\n\r\n\r\n\r\n
\r\n
However, do remember that in K8s we are doing the sizing for Kubernetes Nodes, where Couchbase pods are going to run. That is where the second best-practice comes into the picture.<\/li>\r\nspec.antiAffinity=true<\/code> in couchbase-cluster.yaml<\/a> file during cluster deployment in production. This field specifies whether or not two pods in this cluster can be deployed on the same Kubernetes node. From the high-availability perspective, we don’t want to place more than one pod on each of the K8s nodes, so that single node failure brings down a single pod only.<\/li>\r\nspec.servers[].pod.spec.nodeSelector<\/code> field (as mentioned in couchbase-cluster<\/a>.yaml<\/a>), which specifies a key-value map of the constraints on node placement for pods. For a pod to be eligible to run on a node, the node must have each of the indicated key-value pairs as labels.<\/li>\r\nnode selector<\/code> method to determine the pod placement, then use spec.servers[].resources<\/a> to define requests<\/code> and limits<\/code>. Again this will help to place pods with a predefined pool of resources.<\/li>\r\n<\/ol>\r\n\r\n\r\n\r\n\r\n
nodeSelector<\/code> technique to place respective pod types on the nodegroups<\/code> to guarantee the desired resources.<\/p>\r\n<\/blockquote>\r\n\r\n\r\n\r\nPrerequisites<\/h2>\r\n\r\n\r\n\r\n
\r\n
aws cli<\/code> setup with your account credentials you can move on to creating a Kubernetes cluster section.<\/p>\r\n\r\n\r\n\r\nStep 1: Create Multi-Nodegroup K8s Cluster<\/h2>\r\n\r\n\r\n\r\n
NodeGroups<\/code>, which we will later use to host a specific set of Couchbase services.<\/p>\r\n\r\n\r\n\r\n1.1. Create an EKS cluster in the region of your choice<\/h3>\r\n\r\n\r\n\r\n
us-west-2<\/code> region and across two availability zones us-west-2a\/b<\/code>. You can mention a different vpc-cidr<\/code> block as per your needs but in this example we will be using 172.16.0.0\/20<\/code>, providing us a range of over 4K (212<\/sup>) IP addresses, which should be more than enough for us.<\/p>\r\n\r\n\r\n\r\n$ eksctl create cluster --name k8sEKS \\\r\n --version 1.18 \\\r\n --region us-west-2 \\\r\n --zones us-west-2a,us-west-2b \\\r\n --vpc-cidr 172.16.0.0\/20 \\\r\n --without-nodegroup<\/code><\/pre>\r\n\r\n\r\n\r\n1.2. Create separate Node Groups<\/h3>\r\n\r\n\r\n\r\n
nodegroup<\/code> within the EKS cluster so we can host Couchbase Data<\/code> service instances. In this example, we will be using m5.large (2 vCPU & 8GB RAM)<\/code> EC2 machines as node-type<\/code>, but the actual size of the EC2 node will depend on the capacity and performance planning based on your workload. So make sure you pick the right kind of nodes in your production deployment.<\/p>\r\n\r\n\r\n\r\n$ eksctl create nodegroup --cluster=k8sEKS \\\r\n --name=m5l-pool \\\r\n --node-type m5.large \\\r\n --region us-west-2 \\\r\n --nodes 2 \\\r\n --nodes-min 2 \\\r\n --nodes-max 4 \\\r\n --node-ami auto<\/code><\/pre>\r\n\r\n\r\n\r\nIndex\/Query<\/code> services we will create a separate nodegroup with more compute and RAM. In this example we will be using r5.large (2 vCPU & 16GB RAM)<\/code> machines.<\/p>\r\n\r\n\r\n\r\n$ eksctl create nodegroup --cluster=k8sEKS \\\r\n --name=r5l-pool \\\r\n --node-type r5.large \\\r\n --region us-west-2 \\\r\n --nodes 2 \\\r\n --nodes-min 2 \\\r\n --nodes-max 4 \\\r\n --node-ami auto<\/code><\/pre>\r\n\r\n\r\n\r\nt2.xlarge (4 vCP & 16GB RAM)<\/code> to host Sync-Gateway<\/code> instance.<\/p>\r\n\r\n\r\n\r\n$ eksctl create nodegroup --cluster=k8sEKS \\\r\n --name=t2xl-pool \\\r\n --node-type t2.xlarge \\\r\n --region us-west-2 \\\r\n --nodes 1 \\\r\n --nodes-min 1 \\\r\n --nodes-max 2 \\\r\n --node-ami auto<\/code><\/pre>\r\n\r\n\r\n\r\nnodegroups<\/code> are ready we can start labeling each node in the nodegroup or use pre-existing label but first confirm all nodegroups<\/code> are ready:<\/p>\r\n\r\n\r\n\r\n$ eksctl get nodegroups --cluster=k8sEKS --region=us-west-2\r\n\r\nLUSTER NODEGROUP CREATED MIN SIZE MAX SIZE DESIRED CAPACITY INSTANCE TYPE IMAGE ID\r\nk8sEKS m5l-pool 2020-07-24T18:58:02Z 2 4 2 m5.largeami-04387c277e83865b2\r\nk8sEKS r5l-pool 2020-07-24T18:58:09Z 2 4 2 r5.largeami-04387c277e83865b2\r\nk8sEKS t2xl-pool 2020-07-24T19:09:09Z 1 2 1 t2.xlargeami-04387c277e83865b2<\/code><\/pre>\r\n\r\n\r\n\r\n1.3. Label EKS nodes<\/h3>\r\n\r\n\r\n\r\n
data<\/code>, Index\/Query<\/code>, and sync-gateway<\/code> machines just to dedicate Couchbase services to a specific nodegroup<\/code> type. We are going to use an existing label called beta.kubernetes.io\/instance-type<\/code> for node selection. This label is going to be available by default so we don’t have to create a new label. You can simply see node labels by running this cmd:<\/p>\r\n\r\n\r\n\r\n$ kubectl get nodes --show-labels\r\n\r\nNAME STATUS ROLES AGE VERSION LABELS\r\nip-172-16-0-12.us-west-2.compute.internal Ready <none> 21m v1.14.9-eks-a0a484 ...,beta.kubernetes.io\/instance-type=t2.xlarge,...\r\nip-172-16-0-127.us-west-2.compute.internal Ready <none> 32m v1.14.9-eks-a0a484 ...,beta.kubernetes.io\/instance-type=m5.large,...\r\nip-172-16-3-234.us-west-2.compute.internal Ready <none> 32m v1.14.9-eks-a0a484 ...,beta.kubernetes.io\/instance-type=m5.large,...\r\nip-172-16-1-29.us-west-2.compute.internal Ready <none> 32m v1.14.9-eks-a0a484 ...,beta.kubernetes.io\/instance-type=r5.large,...\r\nip-172-16-3-119.us-west-2.compute.internal Ready <none> 32m v1.14.9-eks-a0a484 ...,beta.kubernetes.io\/instance-type=r5.large,...<\/code><\/pre>\r\n\r\n\r\n\r\ndata<\/code> service on m5.large<\/code> machines, index\/query<\/code> on r5.large<\/code> machines and sync-gateway<\/code> on t2.xlarge<\/code> machine.<\/p>\r\n\r\n\r\n\r\nkubectl label<\/code> cmd to label all the nodes that you want to use for data nodes only like this:<\/p>\r\n\r\n\r\n\r\n$ kubectl label nodes 'ec2-node-ip' instanceType=data<\/code><\/pre>\r\n\r\n\r\n\r\n$ kubectl label nodes 'ec2-node-ip' instanceType=index<\/code><\/pre>\r\n\r\n\r\n\r\nbeta.kubernetes.io\/instance-type<\/code> as the label, therefore we don’t have to create any new label for the nodes.<\/p>\r\n\r\n\r\n\r\nStep 2: Install the Custom Resource Definition<\/h2>\r\n\r\n\r\n\r\n
Couchbase<\/code> resource types. This can be achieved by running the below command from the Operator package directory:<\/p>\r\n\r\n\r\n\r\nkubectl create -f crd.yaml<\/code><\/pre>\r\n\r\n\r\n\r\nStep 3: Create a Namespace<\/h2>\r\n\r\n\r\n\r\n
\r\n
$ kubectl create namespace cbdb\r\n\r\n namespace\/cbdb created<\/code><\/pre>\r\n\r\n\r\n\r\n\r\n
$ kubectl get namespaces\r\n\r\n NAME STATUS AGE\r\n cbdb Active 34s\r\n default Active 5h20m<\/code><\/pre>\r\n\r\n\r\n\r\nStep 4: Install the Operator<\/h2>\r\n\r\n\r\n\r\n
per-cluster dynamic admission controller<\/code> (DAC) and a per-namespace Operator<\/code>. Refer to the operator architecture<\/a> for additional information on what is required and security considerations.<\/p>\r\n\r\n\r\n\r\n4.1. Install the Dynamic Admission Controller (DAC)<\/h3>\r\n\r\n\r\n\r\n
\r\n
default<\/code> namespace.<\/li>\r\n<\/ul>\r\n\r\n\r\n\r\n$ bin\/cbopcfg generate admission --namespace default | kubectl create -f -\r\n\r\n\r\nserviceaccount\/couchbase-operator-admission created\r\nclusterrole.rbac.authorization.k8s.io\/couchbase-operator-admission created\r\nclusterrolebinding.rbac.authorization.k8s.io\/couchbase-operator-admission created\r\nsecret\/couchbase-operator-admission created\r\ndeployment.apps\/couchbase-operator-admission created\r\nservice\/couchbase-operator-admission created\r\nmutatingwebhookconfiguration.admissionregistration.k8s.io\/couchbase-operator-admission created\r\nvalidatingwebhookconfiguration.admissionregistration.k8s.io\/couchbase-operator-admission created<\/code><\/pre>\r\n\r\n\r\n\r\n\r\n
$ kubectl get deployments\r\n\r\nNAME READY UP-TO-DATE AVAILABLE AGE\r\ncouchbase-operator-admission 1\/1 1 1 48s<\/code><\/pre>\r\n\r\n\r\n\r\n4.2. Install the Couchbase Operator<\/h3>\r\n\r\n\r\n\r\n
workshop<\/code> namespace by running the following command.<\/p>\r\n\r\n\r\n\r\n$ bin\/cbopcfg generate operator --namespace cbdb | kubectl create -f -\r\n\r\nserviceaccount\/couchbase-operator created\r\nrole.rbac.authorization.k8s.io\/couchbase-operator created\r\nrolebinding.rbac.authorization.k8s.io\/couchbase-operator created\r\ndeployment.apps\/couchbase-operator created\r\nservice\/couchbase-operator created<\/code><\/pre>\r\n\r\n\r\n\r\nkubectl create<\/code> command, it generally takes less than a minute for Kubernetes to deploy the Operator and for the Operator to be ready to run.<\/p>\r\n\r\n\r\n\r\n4.3. Check the status of the Deployment<\/h3>\r\n\r\n\r\n\r\n
$ kubectl get deployments -n cbdb\r\n\r\nNAME READY UP-TO-DATE AVAILABLE AGE\r\ncouchbase-operator 1\/1 1 1 73s<\/code><\/pre>\r\n\r\n\r\n\r\n4.4. Check the status of the Operator<\/h3>\r\n\r\n\r\n\r\n
$ kubectl get pods -l app=couchbase-operator -n cbdb\r\n\r\nNAME READY STATUS RESTARTS AGE\r\ncouchbase-operator-558fd8486c-788jr 1\/1 Running 0 2m9s<\/code><\/pre>\r\n\r\n\r\n\r\nStep 5. Deploy Couchbase Cluster<\/h2>\r\n\r\n\r\n\r\n
\r\n
5.1. Create Secret for Couchbase Admin Console<\/h3>\r\n\r\n\r\n\r\n
$ kubectl create -f secret.yaml -n cbdb\r\n\r\nSecret\/cb-admin-auth created<\/code><\/pre>\r\n\r\n\r\n\r\n5.2 Create storage class for the k8s cluster<\/h3>\r\n\r\n\r\n\r\n
$ kubectl create -f sc-nas.yaml -n cbdb\r\n\r\n\r\nstorageclass.storage.k8s.io\/nas created<\/code><\/pre>\r\n\r\n\r\n\r\n5.3. Deploy Couchbase Cluster<\/h3>\r\n\r\n\r\n\r\n
nodeSelector<\/code> for placing the pods on the nodes that have the specific value of beta.kubernetes.io\/instance-type<\/code> label.<\/p>\r\n\r\n\r\n\r\nservers:\r\n - name: data-service-2a\r\n size: 1\r\n services:\r\n - data\r\n volumeMounts:\r\n default: pvc-default # \/opt\/couchbase\/var\/lib\/couchbase\r\n data: pvc-data # \/mnt\/data\r\n pod:\r\n spec:\r\n nodeSelector:\r\n beta.kubernetes.io\/instance-type: m5.large\r\n - name: index-quer-service-2a\r\n size: 1\r\n services:\r\n - index\r\n - query\r\n volumeMounts:\r\n default: pvc-default\r\n index: pvc-index\r\n pod:\r\n spec:\r\n nodeSelector:\r\n beta.kubernetes.io\/instance-type: r5.large<\/code><\/pre>\r\n\r\n\r\n\r\nkubectl<\/code> to deploy the cluster but make sure you are using couchbase-cluster.yaml<\/a> file from the git, not the same name file present in the current working directory.<\/p>\r\n\r\n\r\n\r\n$ kubectl create -f couchbase-cluster.yaml -n cbdb --save-config\r\n\r\ncouchbasecluster.couchbase.com\/cbdemo created<\/code><\/pre>\r\n\r\n\r\n\r\n$ kubectl get pods -n cbdb -w\r\n\r\nNAME READY STATUS RESTARTS AGE\r\ncbdemo-0000 0\/1 Running 0 1m\r\ncbdemo-0001 0\/1 Running 0 53s\r\ncbdemo-0002 0\/1 Running 0 20s\r\ncouchbase-operator-558fd8486c-788jr 1\/1 Running 0 21m\r\ncbdemo-0003 0\/1 Pending 0 3s\r\ncbdemo-0003 0\/1 Pending 0 3s\r\ncbdemo-0003 0\/1 ContainerCreating 0 3s\r\ncbdemo-0003 0\/1 Running 0 18s\r\ncbdemo-0001 1\/1 Running 0 2m\r\ncbdemo-0000 1\/1 Running 0 2m\r\ncbdemo-0002 1\/1 Running 0 1m\r\ncbdemo-0003 1\/1 Running 0 1m<\/code><\/pre>\r\n\r\n\r\n\r\n$ kubectl get pods -owide -n cbdb\r\n\r\nNAME READY STATUS RESTARTS AGE IP NODE NOMINATED NODE READINESS GATES\r\ncbdemo-0000 1\/1 Running 0 10m 172.16.2.134 ip-172-16-3-234.us-west-2.compute.internal <none> <none>\r\ncbdemo-0001 1\/1 Running 0 10m 172.16.1.116 ip-172-16-0-127.us-west-2.compute.internal <none> <none>\r\ncbdemo-0002 1\/1 Running 0 9m51s 172.16.1.5 ip-172-16-1-29.us-west-2.compute.internal <none> <none>\r\ncbdemo-0003 1\/1 Running 0 9m3s 172.16.2.98 ip-172-16-3-119.us-west-2.compute.internal <none> <none>\r\ncouchbase-operator-558fd8486c-r2tcc 1\/1 Running 0 31m 172.16.1.230 ip-172-16-0-12.us-west-2.compute.internal <none> <none><\/code><\/pre>\r\n\r\n\r\n\r\nIndex\/Query<\/code> service is running on pod cbdemo-0002<\/code> and cbdemo-0003<\/code> which is hosted on the EKS nodes with label beta.kubernetes.io\/instance-type: r5.large<\/code> and data<\/code> service pods (cbdemo-0000<\/code>, cbdemo-0001<\/code>) are placed on EKS nodes with label beta.kubernetes.io\/instance-type: m5.large<\/code>. This means nodeSelector<\/code> defined in couchbase-cluster.yaml<\/a> has successfully enforced the placement of pods on the nodes with desired resources.<\/p>\r\n\r\n\r\n\r\n$ kubectl port-forward cbdemo-0000 18091:18091 -n cbdb\r\n\r\nForwarding from 127.0.0.1:18091 -> 18091\r\nForwarding from [::1]:18091 -> 18091<\/code><\/pre>\r\n\r\n\r\n\r\nStep 6. Deploying a Sync Gateway Cluster<\/h2>\r\n\r\n\r\n\r\n
6.1 Sync Gateway Prerequisites<\/h3>\r\n\r\n\r\n\r\n
\r\n
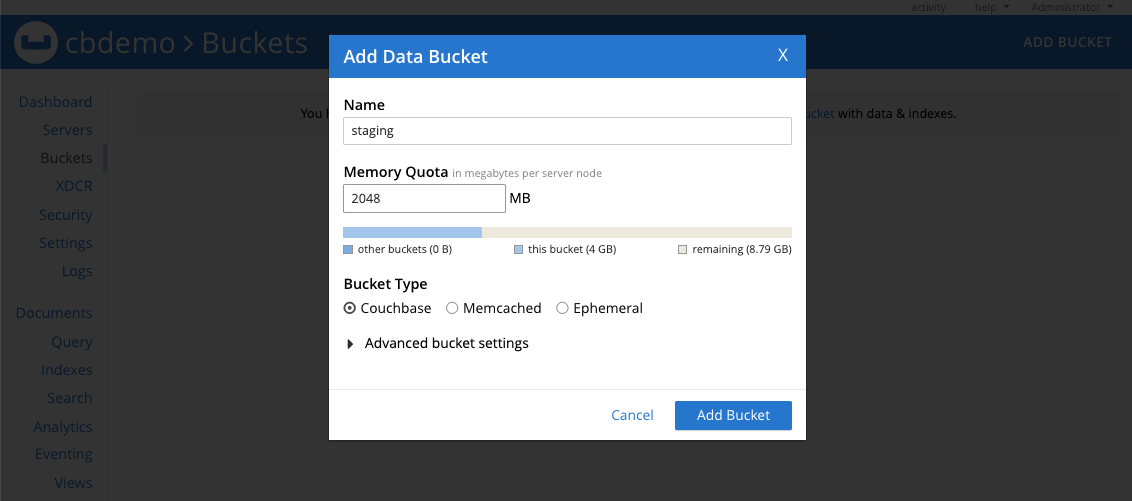
staging<\/code> bucket from the Web Console<\/code>.<\/li>\r\n<\/ul>\r\n\r\n\r\n\r\n\r\n
 <\/figure>\r\n<\/li>\r\n<\/ul>\r\n<\/figure>\r\n\r\n\r\n\r\n
Figure 2: Staging<\/code> bucket created with 2GB space.<\/p>\r\n\r\n\r\n\r\n\r\n
\r\n
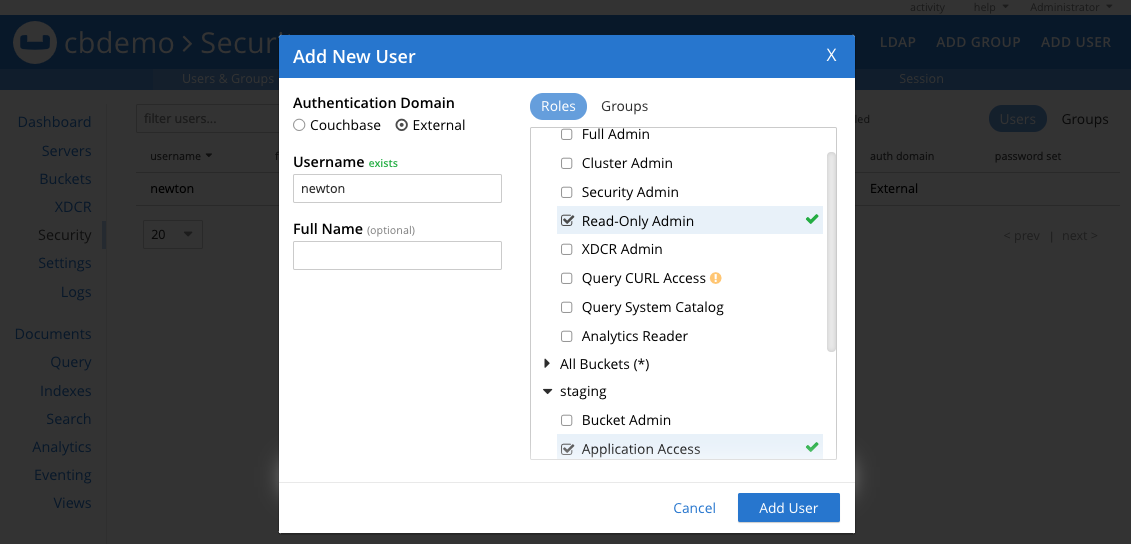
Application Access<\/code> role at the bucket level.<\/li>\r\n<\/ul>\r\n\r\n\r\n\r\nCouchbase<\/code> User as we generally do, but to make this little more interesting we are going to use an external<\/code> (aka LDAP) user. In the couchbase-cluster.yaml<\/a> you can find details of a third party LDAP test server<\/a> that we have used in this example.<\/p>\r\n\r\n\r\n\r\nsecurity:\r\n adminSecret: cb-admin-auth\r\n rbac:\r\n managed: false\r\n ldap:\r\n hosts:\r\n - ldap.forumsys.com\r\n port: 389\r\n bindDN: \"cn=read-only-admin,dc=example,dc=com\"\r\n bindSecret: cb-admin-auth\r\n authenticationEnabled: true\r\n userDNMapping:\r\n template: \"uid=%u,dc=example,dc=com\"\r\n authorizationEnabled: false<\/code><\/pre>\r\n\r\n\r\n\r\nApplication Access<\/code> role.<\/p>\r\n\r\n\r\n\r\n\r\n
 <\/figure>\r\n<\/li>\r\n<\/ul>\r\n<\/figure>\r\n\r\n\r\n\r\n
Figure 3: Using newton<\/code> as the external user which will automatically be confirmed as exists<\/code>.<\/p>\r\n\r\n\r\n\r\n\r\n
 <\/figure>\r\n<\/li>\r\n<\/ul>\r\n<\/figure>\r\n\r\n\r\n\r\n
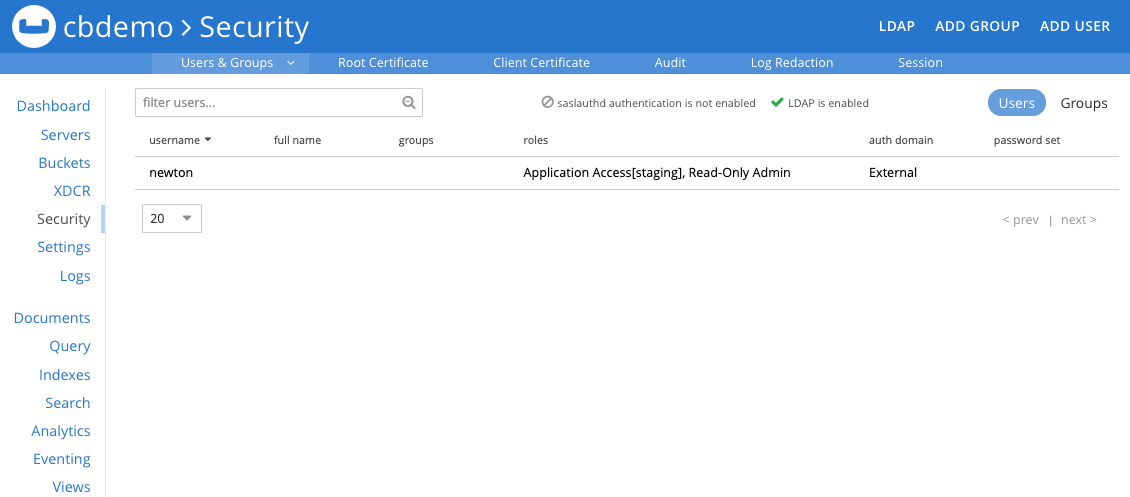
Figure 4: User details after hitting the Add User<\/code> button.<\/p>\r\n\r\n\r\n\r\nSync Gateway<\/code>.<\/p>\r\n\r\n\r\n\r\n6.2 Sync Gateway Configuration<\/h3>\r\n\r\n\r\n\r\n
Sync Gateway<\/code> to communicate with Couchbase Cluster, we need to provide database, bucket, and credential details. We will use database<\/code> connection string as couchbase:\/\/cbdemo-srv.cbdb.svc.cluster.local<\/code> as can be seen in the snippet below:<\/p>\r\n\r\n\r\n\r\n...\r\n },\r\n \"databases\": {\r\n \"cbdemo\": {\r\n \"server\": \"couchbase:\/\/cbdemo-srv.cbdb.svc.cluster.local\",\r\n \"bucket\": \"staging\",\r\n \"username\": \"newton\",\r\n \"password\": \"password\",\r\n \"allow_conflicts\": false,\r\n \"revs_limit\": 20,\r\n \"enable_shared_bucket_access\": true,\r\n \"import_docs\": true,\r\n \"sync\": `function(doc, oldDoc) {\r\n channel(doc.channels);\r\n }`,\r\n }\r\n ...<\/code><\/pre>\r\n\r\n\r\n\r\nSync Gateway 2.7<\/code> (or above) enterprise customers can now designate multiple Sync Gateway nodes as Import nodes (to handle Couchbase Server writes), which provides added resiliency. Therefore we are using import_docs: true<\/code> in the configuration file.<\/p>\r\n\r\n\r\n\r\n