Figure 9<\/strong>: Source bucket with some sample data<\/p>\r\n\r\n\r\n\r\nWe are going to replicate this travel-sample bucket to the target cluster in the Green (aka Ohio) region.<\/p>\r\n\r\n\r\n\r\n
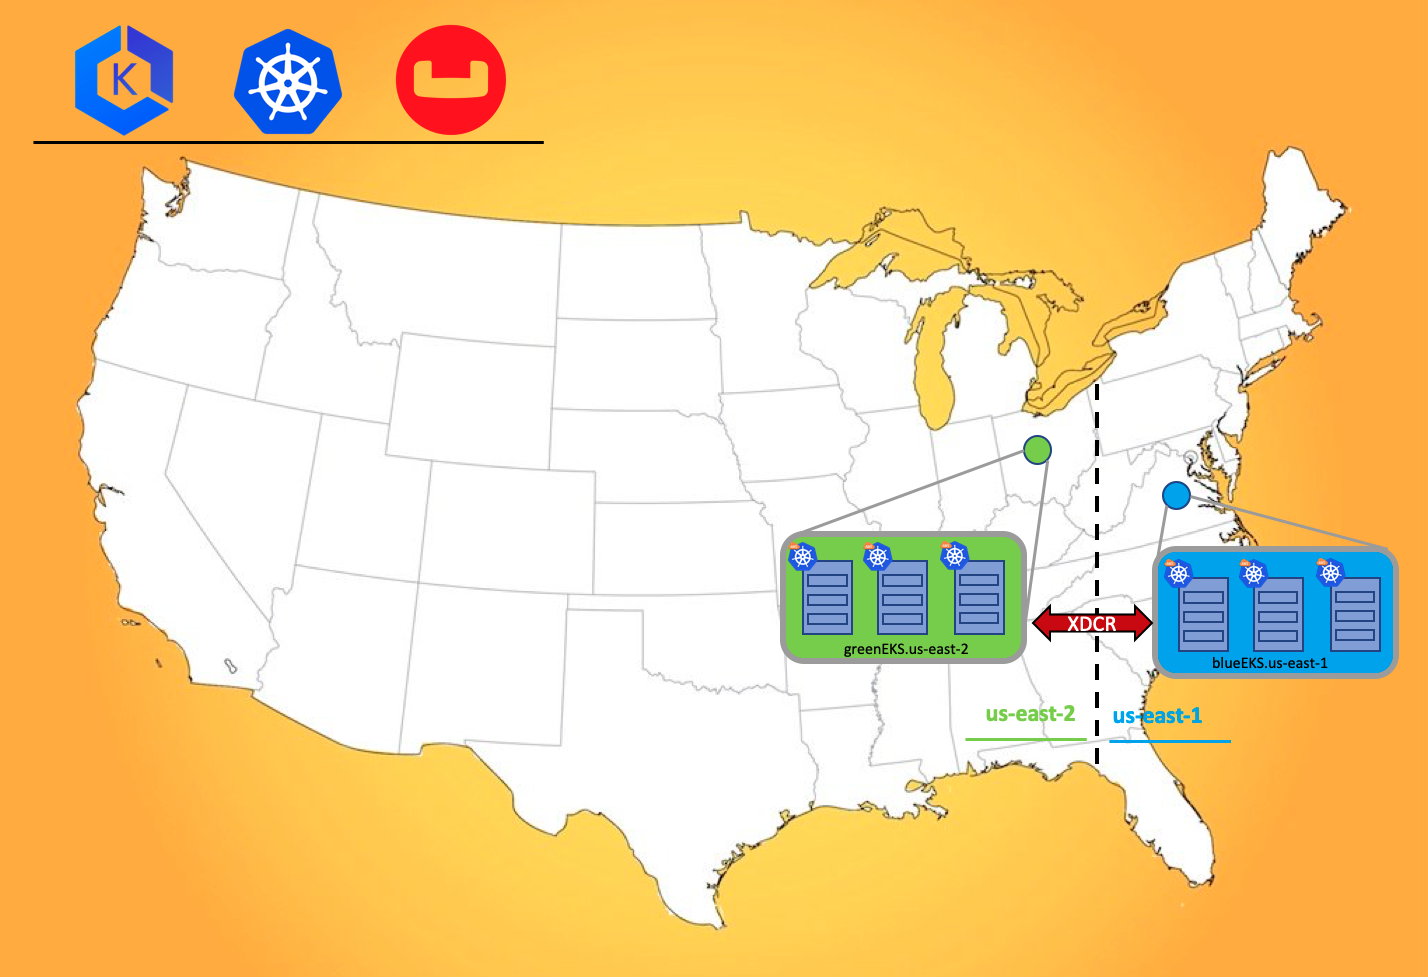
5. Network Configuration<\/h2>\r\n\r\n\r\n\r\n The fun begins with the network configuration section. If you have already used AWS Console to set up VPC peering between two regions or two separate VPCs then this section is going to breeze. And if you want to learn how to configure VPC peering this is the going to be a great learning experience.<\/p>\r\n\r\n\r\n\r\n
5.1 Setup VPC Peering<\/h3>\r\n\r\n\r\n\r\n The first step in the three steps process is to establish VPC peering from the requester VPC to the accepter VPC. In this step, we are going to login to the Virginia region using the AWS console and initiate the peering request. We will then login to the Ohio region to accept this request.<\/p>\r\n\r\n\r\n\r\n
5.1.1 Initiate VPC request from Blue region<\/h4>\r\n\r\n\r\n\r\n Let’s begin the VPC peering initiation process by connecting to the Virginia region.<\/p>\r\n\r\n\r\n\r\nFigure 10<\/strong>: AWS console displaying resource summary in the Virginia region<\/p>\r\n\r\n\r\n\r\n\r\nMake sure you have selected the requester region from the AWS console, which in our case in Virginia.<\/li>\r\n Bring up the VPC dashboard page.<\/li>\r\n<\/ol>\r\n\r\n\r\n\r\nFigure 11<\/strong>: VPC peering option under the VPC Dashboard<\/p>\r\n\r\n\r\n\r\n\r\nSelect the Peering Connections<\/code> option from the left pane.<\/li>\r\nClick Create Peering Connection<\/code> button from the page.<\/li>\r\n<\/ol>\r\n\r\n\r\n\r\nOnce you click the button you are going to be presented with a dialog page where we have to:<\/p>\r\n\r\n\r\n\r\n
\r\nProvide a unique name to this peering connection. We are going to use blue-to-green-peering<\/code> because the Virginia region is hosting our Blue cluster and Ohio is hosting our Green cluster.<\/li>\r\n<\/ol>\r\n\r\n\r\n\r\nFigure 12<\/strong>: VPC peering requester and acceptor configuration.<\/p>\r\n\r\n\r\n\r\n\r\nSelect the VPC ID of the Blue cluster as that is the requester.<\/li>\r\n Our target cluster is in a different region so we are going to select Another Region<\/code> as the option for Region<\/code>.<\/li>\r\nSelect the target region next, which is Ohio.<\/li>\r\n We have noted down the VPC IDs of both the VPCs in table 2. So we will use VPC ID of the Green cluster.<\/li>\r\n Hit Create Peering Connection<\/code> button.<\/li>\r\n<\/ol>\r\n\r\n\r\n\r\nFigure 13<\/strong>: Peering request established.<\/p>\r\n\r\n\r\n\r\nThis will display the confirmation page. Just click OK<\/code> button and that will display you that request has been initiated.<\/p>\r\n\r\n\r\n\r\n5.1.2 Accept VPC request from Green region<\/h4>\r\n\r\n\r\n\r\n Now from AWS console change the region to Ohio (aka Green region) and then select VPC Dashboard.<\/p>\r\n\r\n\r\n\r\nFigure 14<\/strong>: Select us-east-2 (Ohio) region<\/p>\r\n\r\n\r\n\r\n\r\nSame as before selecting the Peering Connections<\/code> option from the left pane so we can complete the peering request by accepting it.<\/li>\r\n<\/ul>\r\n\r\n\r\n\r\nFigure 15<\/strong>: Select Peering Connections<\/code> options from VPC Dashboard<\/p>\r\n\r\n\r\n\r\n\r\nAs can be seen above, there is one pending request in the list. We will select the request first.<\/li>\r\n<\/ul>\r\n\r\n\r\n\r\nFigure 16<\/strong>: Accept VPC peering request<\/p>\r\n\r\n\r\n\r\n\r\nThen from the Actions<\/code> drop-down button, we will select Accept Request<\/code>.<\/li>\r\n<\/ul>\r\n\r\n\r\n\r\nFigure 17<\/strong>: Confirm VPC peering request from the popup<\/p>\r\n\r\n\r\n\r\n\r\nA confirmation page will popup. Select Yes, Accept<\/code> button.<\/li>\r\n<\/ul>\r\n\r\n\r\n\r\nFigure 18<\/strong>: VPC peering connection from source-target is established<\/p>\r\n\r\n\r\n\r\nThis completes the VPC peering step one as the status of peering is Active<\/code>.<\/p>\r\n\r\n\r\n\r\n5.2 Update Routing-Tables<\/h3>\r\n\r\n\r\n\r\n Step two is to establish the communication channel by adding the CIDR block of the target cluster into the Route Tables. To do that we need to find out which subnets each of three EC2 instances reside.<\/p>\r\n\r\n\r\n\r\n
Once we have the list of subnets in each of three AZs (1a, 1b, 1c) where we have Kubernetes worker nodes running, we need to find out the Routing Table associated with each of the three subnets. For these Routing Tables, we would like to add a routing table entry so it allows traffic coming from other VPC via VPC peering. Let’s take a look at it to step by step.<\/p>\r\n\r\n\r\n\r\n
5.2.1 Subnets used in Blue Cluster<\/h4>\r\n\r\n\r\n\r\n\r\nLogin to AWS console and select the Virginia region (aka Blue region). After that select EC2 service to display all the EC2 instances used as the Kubernetes nodes.<\/li>\r\n<\/ol>\r\n\r\n\r\n\r\nFigure 19<\/strong>: Subnet associated to each of the EC2 instances.<\/p>\r\n\r\n\r\n\r\n\r\nNext select one of the EC2 instances. In the picture above I have selected instances in the us-east-1a region and the description tab would display all the details about this instance.<\/li>\r\n Note down the subnet Name (mentioned within the parenthesis) this instance is residing into. Like the above instance is deployed within eksctl-blueEKS-cluster\/SubnetPublicUSEAST1A<\/code> subnet.<\/li>\r\nRepeat the same process till you have the list of all the subnets used in your cluster. In our case we have these three subnets used within our cluster:<\/li>\r\n<\/ol>\r\n\r\n\r\n\r\n\r\n\r\n\r\n\r\nAttributes<\/th>\r\n us-east-1a<\/th>\r\n us-east-1b<\/th>\r\n us-east-1c<\/th>\r\n<\/tr>\r\n<\/thead>\r\n \r\n\r\nSubnet Name<\/td>\r\n eksctl-blueEKS-cluster\/SubnetPublicUSEAST1A<\/td>\r\n eksctl-blueEKS-cluster\/SubnetPublicUSEAST1B<\/td>\r\n eksctl-blueEKS-cluster\/SubnetPublicUSEAST1C<\/td>\r\n<\/tr>\r\n<\/tbody>\r\n<\/table>\r\n<\/figure>\r\n\r\n\r\n\r\n5.2.2 Routing Table Associated to Subnets<\/h4>\r\n\r\n\r\n\r\n The next step would be to find out the routing table associated with each of the subnets, so we can add the routing rule to it to allow traffic from Green cluster.<\/p>\r\n\r\n\r\n\r\nFigure 20<\/strong>: Routing Tables associated with each subnet in the cluster<\/p>\r\n\r\n\r\n\r\n\r\nIn order to find that Routing Table used, click Subnets<\/code> tab on the left.<\/li>\r\nNext select one of the subnet from the list eksctl-blueEKS-cluster\/SubnetPublicUSEAST1A<\/code><\/li>\r\nMake a note of the Routing Table used by looking under the Description<\/code> tab.<\/li>\r\nRepeat above three steps for each of the subnet and note down the routing table used:<\/li>\r\n<\/ol>\r\n\r\n\r\n\r\n\r\n\r\n\r\n\r\nAttributes<\/th>\r\n us-east-1a<\/th>\r\n us-east-1b<\/th>\r\n us-east-1c<\/th>\r\n<\/tr>\r\n<\/thead>\r\n \r\n\r\nSubnet Name<\/td>\r\n eksctl-blueEKS-cluster\/SubnetPublicUSEAST1A<\/td>\r\n eksctl-blueEKS-cluster\/SubnetPublicUSEAST1B<\/td>\r\n eksctl-blueEKS-cluster\/SubnetPublicUSEAST1C<\/td>\r\n<\/tr>\r\n \r\nRoute Table Name<\/td>\r\n eksctl-blueEKS-cluster\/PublicRouteTable<\/td>\r\n eksctl-blueEKS-cluster\/PublicRouteTable<\/td>\r\n eksctl-blueEKS-cluster\/PublicRouteTable<\/td>\r\n<\/tr>\r\n<\/tbody>\r\n<\/table>\r\n<\/figure>\r\n\r\n\r\n\r\nAs can be noticed that in our case we have one Route Table eksctl-blueEKS-cluster\/PublicRouteTable<\/code> associated with all three subnets, so we are going to update one Route Table only.<\/p>\r\n\r\n\r\n\r\n5.2.3 Add Routing Rule<\/h4>\r\n\r\n\r\n\r\n Now we are going to add 10.0.0.0\/24<\/code> CIDR block of the target region into the allowed routing Routes<\/code> of the source routing table.<\/p>\r\n\r\n\r\n\r\nFigure 21<\/strong>: Route Tables tab showing list of Routing Tables exist in Blue region<\/p>\r\n\r\n\r\n\r\n\r\nClick the Routing Tables<\/code> tab from the left menu of the AWS console.<\/li>\r\nSelect the route table we would like to add the route entry to i.e. eksctl-blueEKS-cluster\/PublicRouteTable<\/code>.<\/li>\r\nThen click the Routes<\/code> button next to the summary tab, where you would see only two route entries.<\/li>\r\nTo allow 10.0.0.0\/24<\/code> CIDR block click the Edit routes<\/code> button.<\/li>\r\n<\/ol>\r\n\r\n\r\n\r\nFigure 22<\/strong>: Edit Routes dialog page.<\/p>\r\n\r\n\r\n\r\n\r\nIn the above dialog, page add the CIDR block of the GREEN cluster and select VPC-Peering as the target. Next hit save routes<\/code> button.<\/li>\r\nYou would see target CIDR block 10.0.0.0\/24<\/code> is now part of the Routes<\/code> available for the selected Route Table: eksctl-blueEKS-cluster\/PublicRouteTable<\/code><\/li>\r\n<\/ol>\r\n\r\n\r\n\r\nFigure 23<\/strong>: Route table showing target CIDR block as the allowed route.<\/p>\r\n\r\n\r\n\r\n\r\nNote:<\/strong> Repeat the same process for Ohio (aka Green) cluster and add CIDR block of Virginia (aka Blue) into the Route Table.<\/p>\r\n<\/blockquote>\r\n\r\n\r\n\r\n
 <\/figure>\r\n\r\n\r\n\r\n
 <\/figure>\r\n\r\n\r\n\r\n
 <\/figure>\r\n\r\n\r\n\r\n
 <\/figure>\r\n\r\n\r\n\r\n
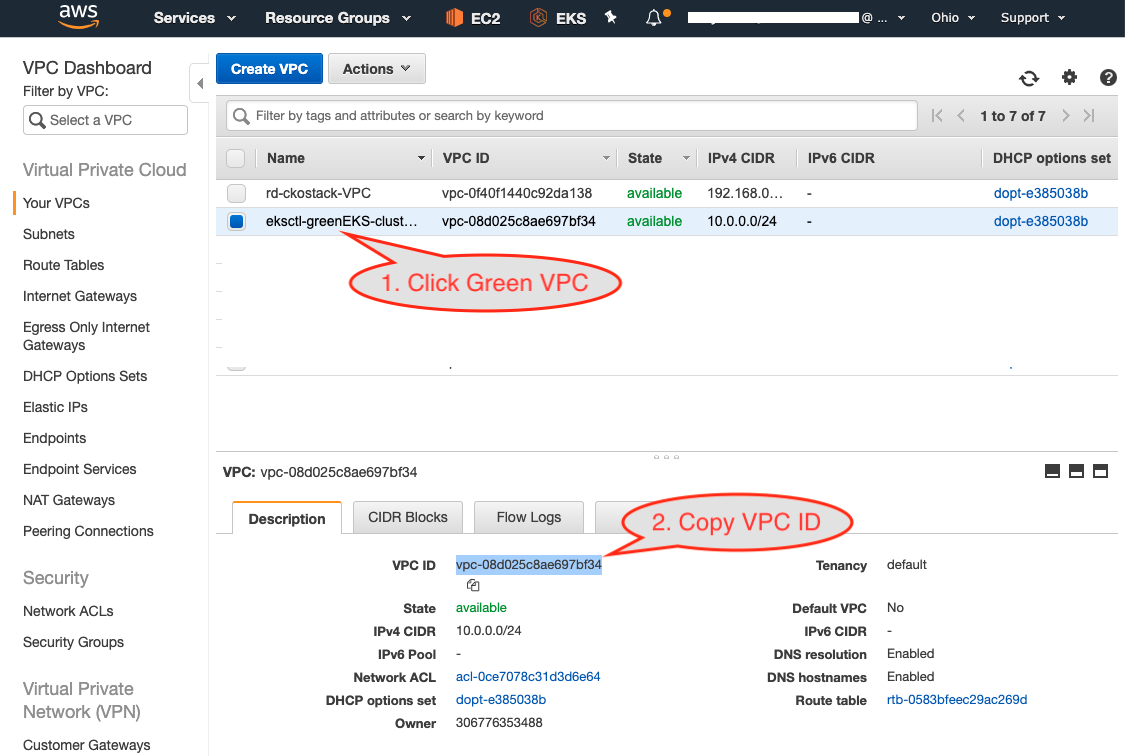 <\/figure>\r\n\r\n\r\n\r\n
 <\/figure>\r\n\r\n\r\n\r\n
 <\/figure>\r\n\r\n\r\n\r\n
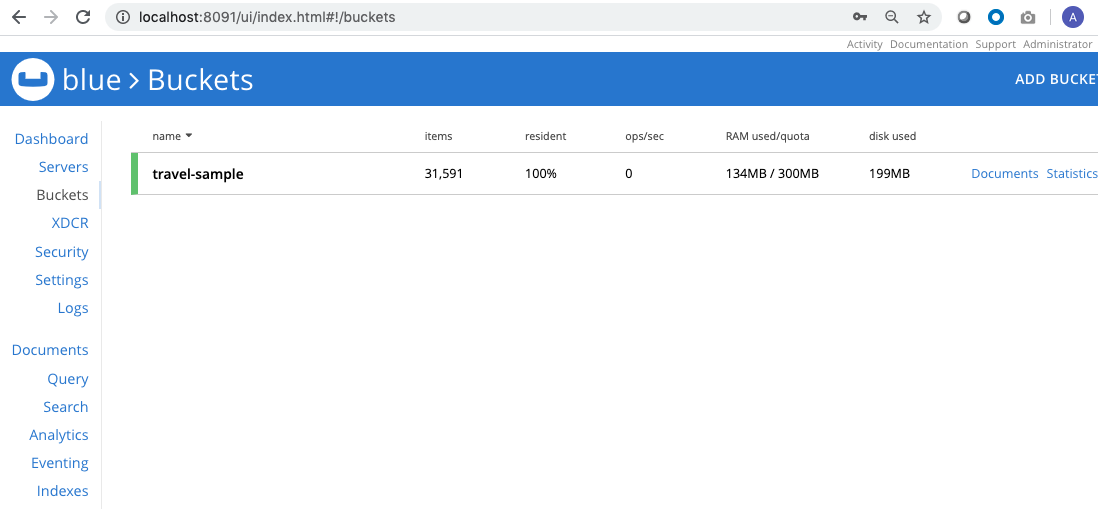 <\/figure>\r\n\r\n\r\n\r\n
 <\/figure>\r\n\r\n\r\n\r\n
 <\/figure>\r\n\r\n\r\n\r\n
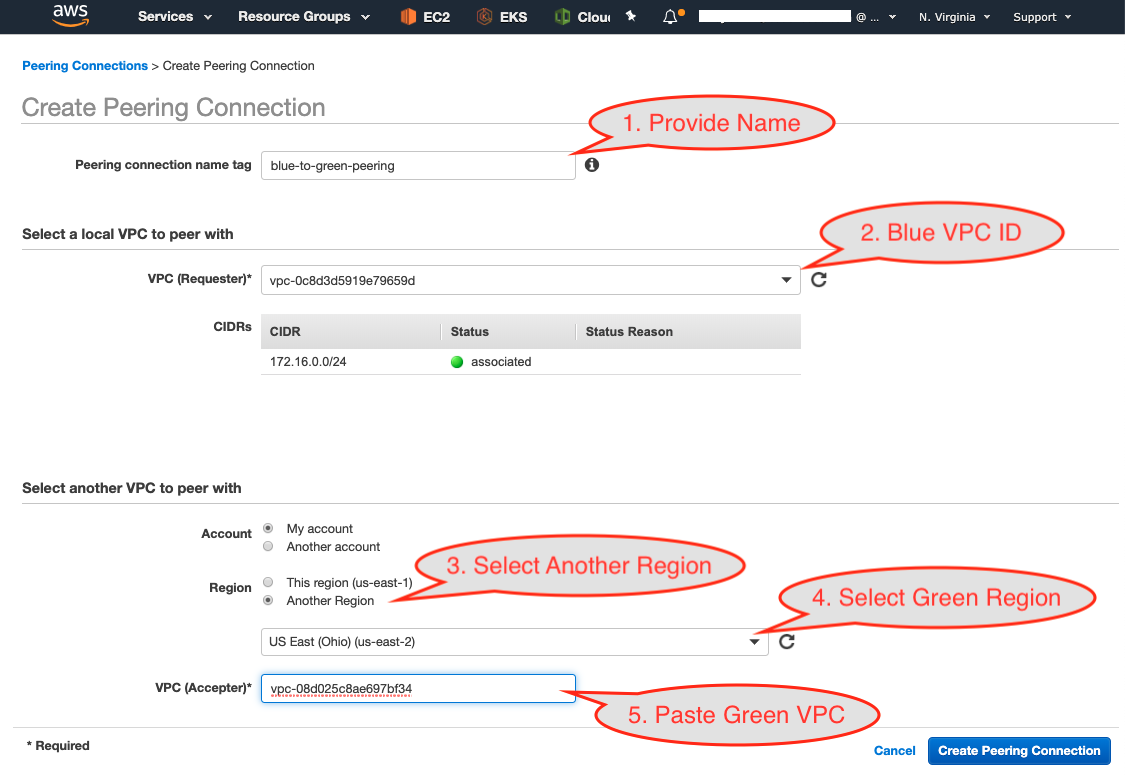 <\/figure>\r\n\r\n\r\n\r\n
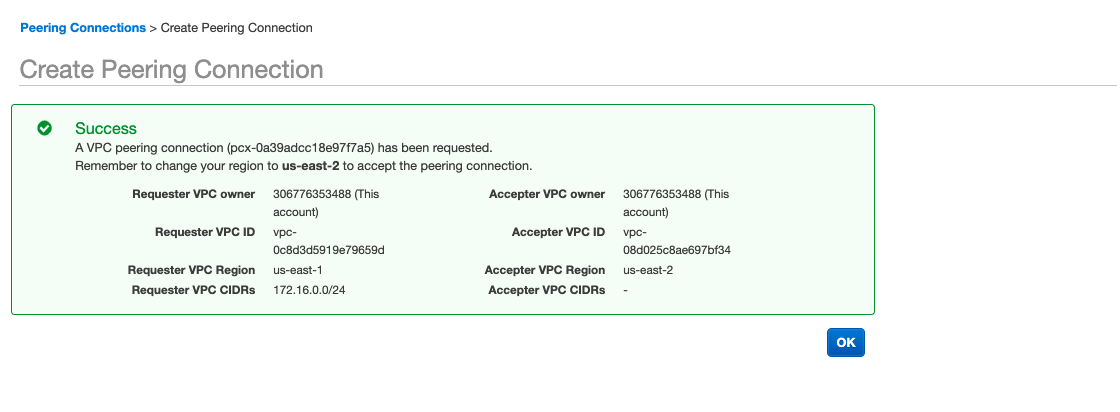 <\/figure>\r\n\r\n\r\n\r\n
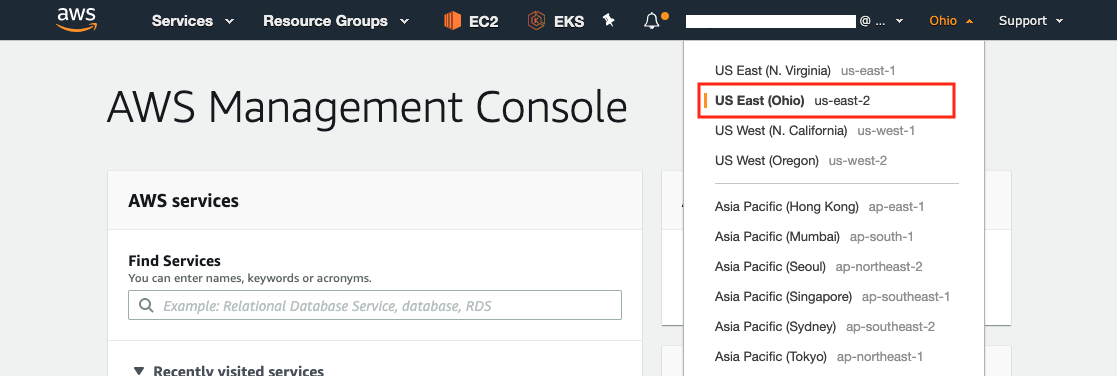 <\/figure>\r\n\r\n\r\n\r\n
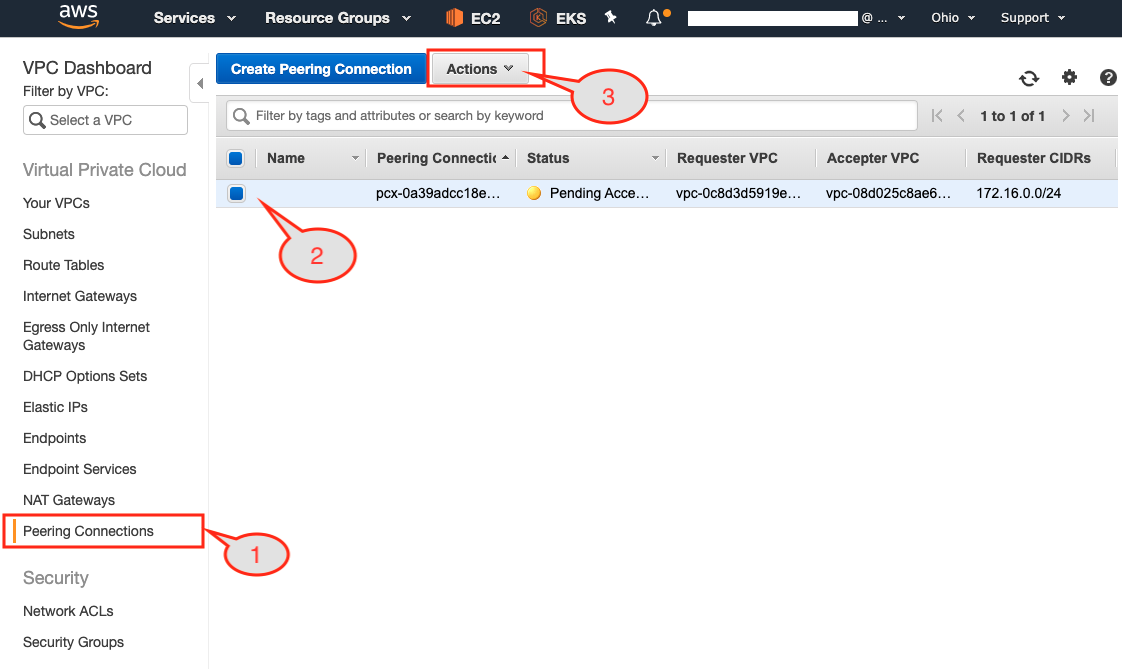 <\/figure>\r\n\r\n\r\n\r\n
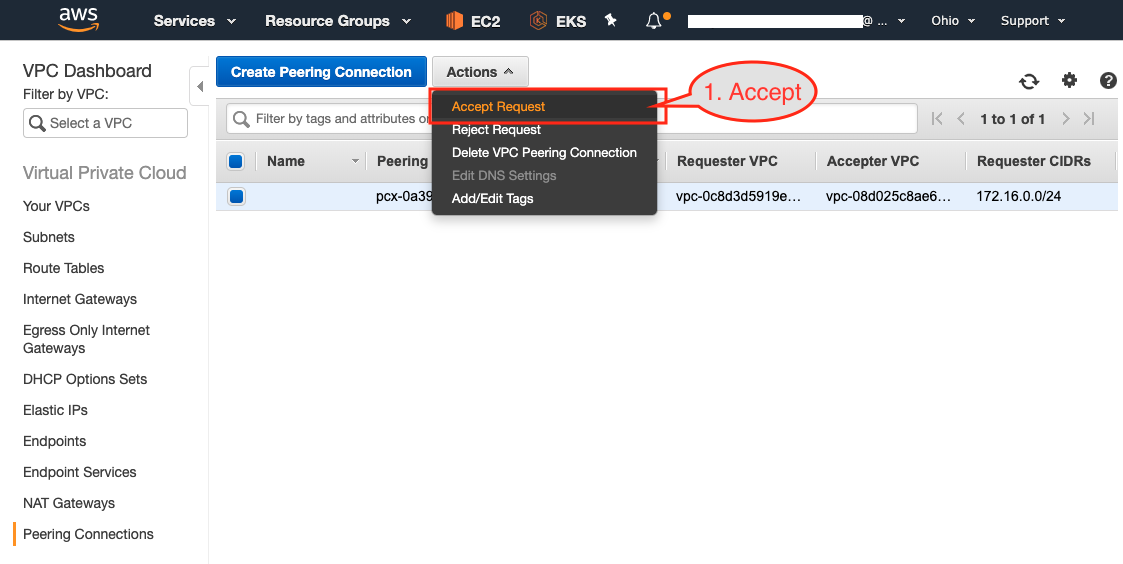 <\/figure>\r\n\r\n\r\n\r\n
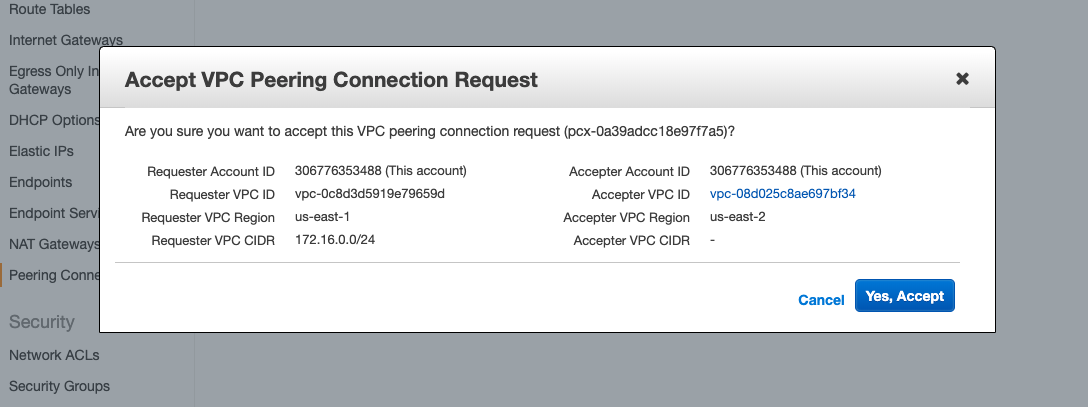 <\/figure>\r\n\r\n\r\n\r\n
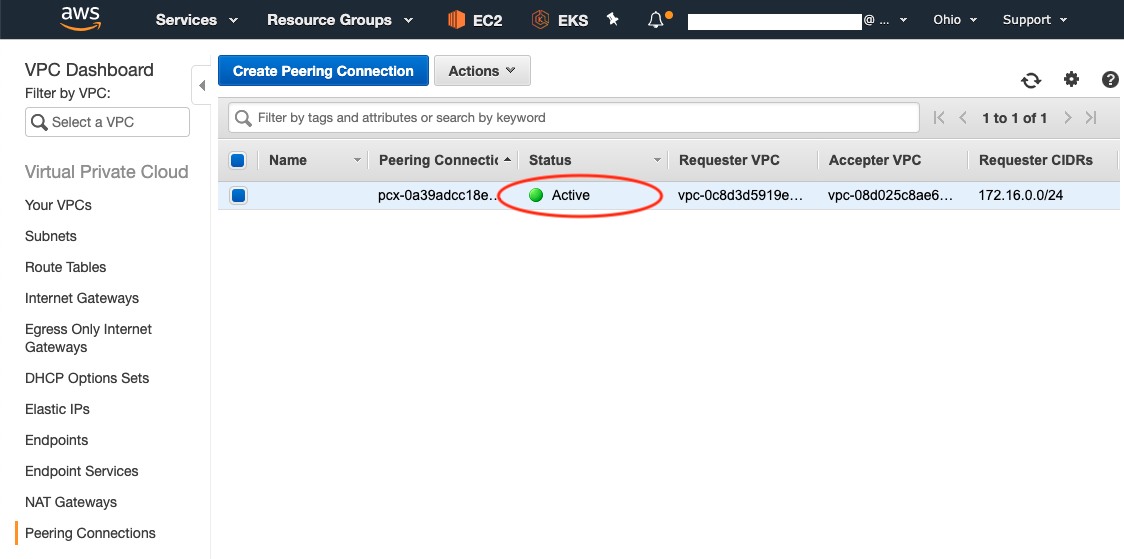 <\/figure>\r\n\r\n\r\n\r\n
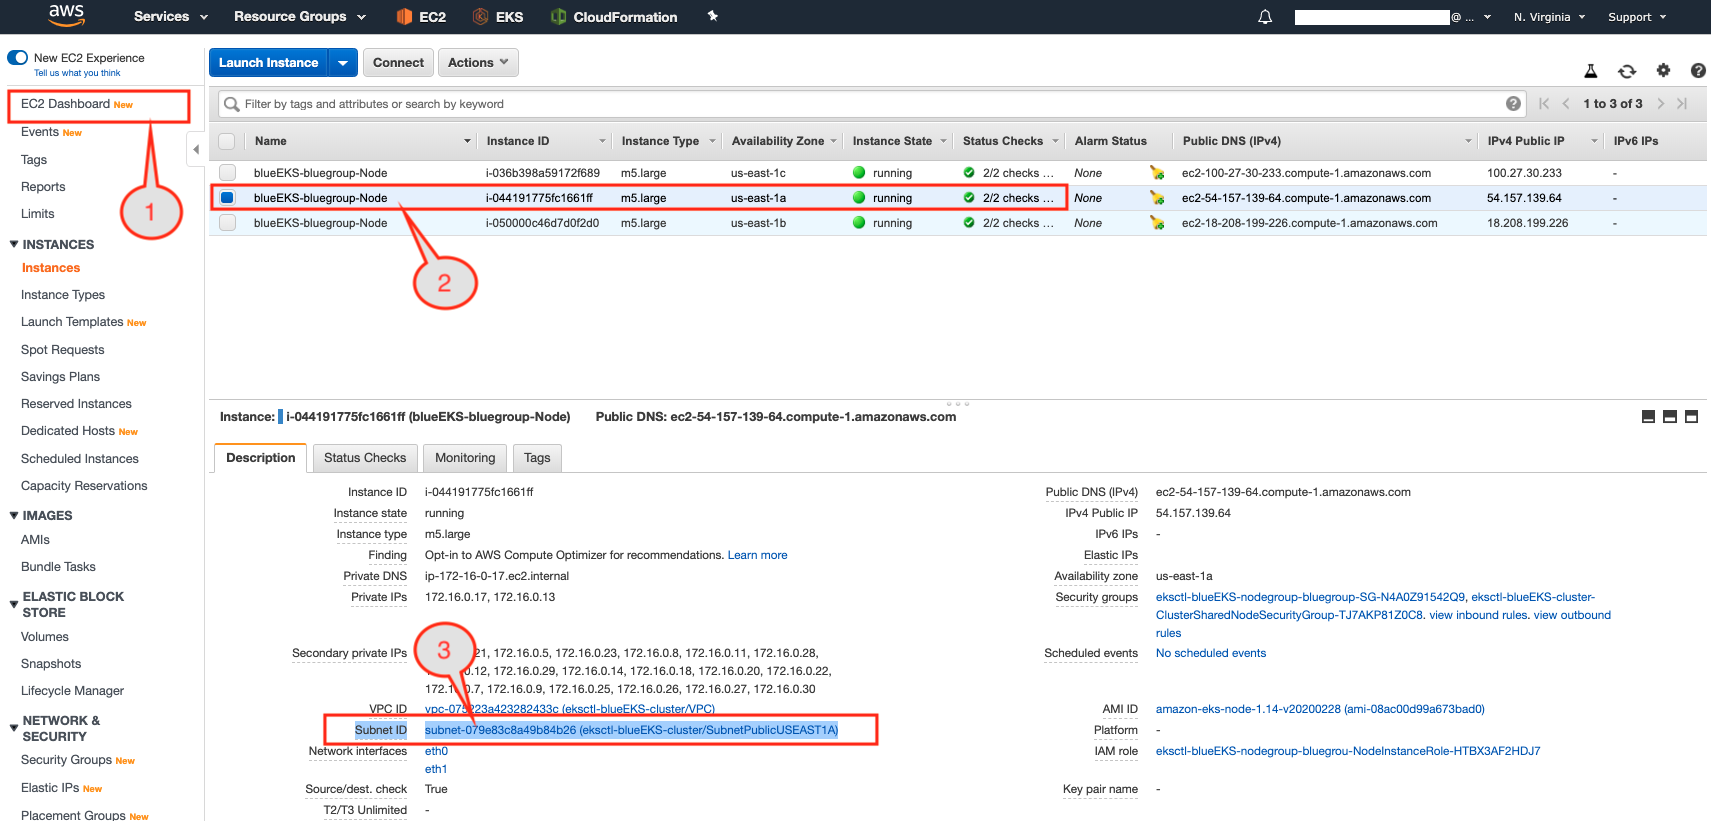 <\/figure>\r\n\r\n\r\n\r\n
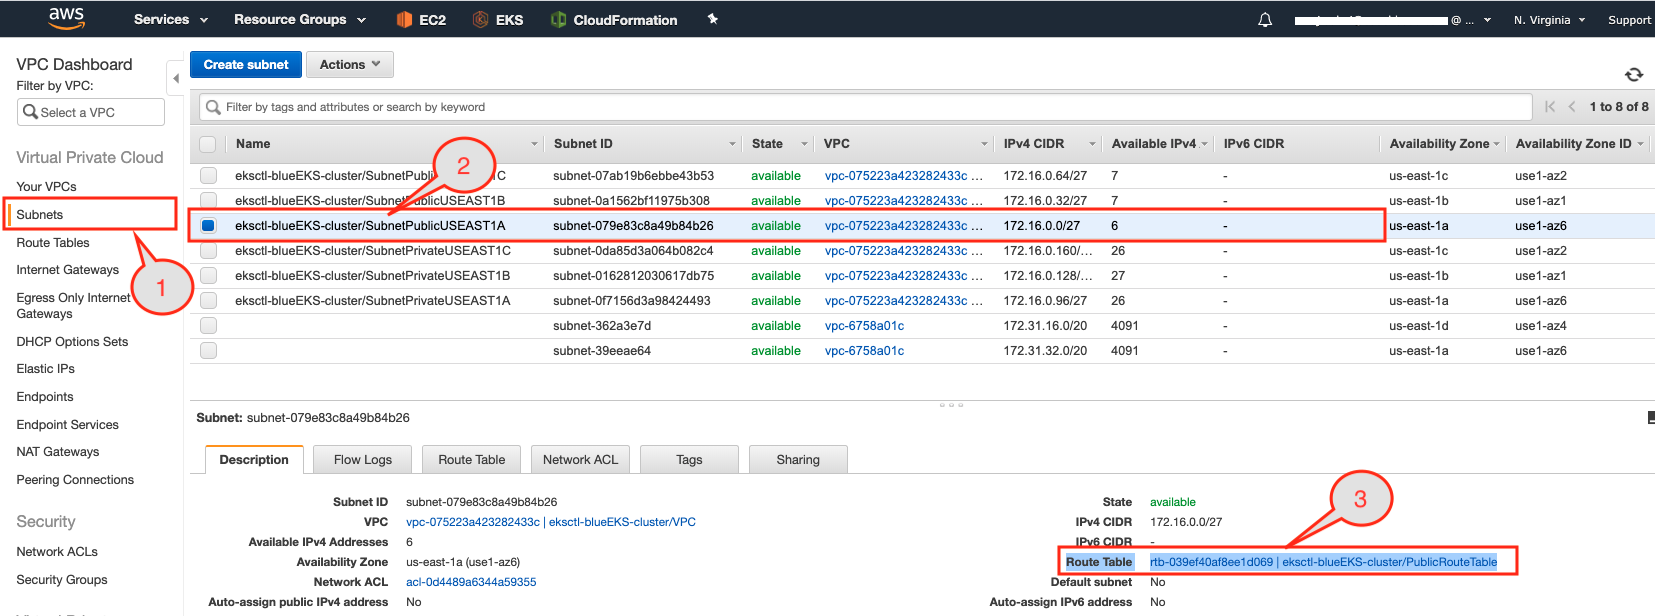 <\/figure>\r\n\r\n\r\n\r\n
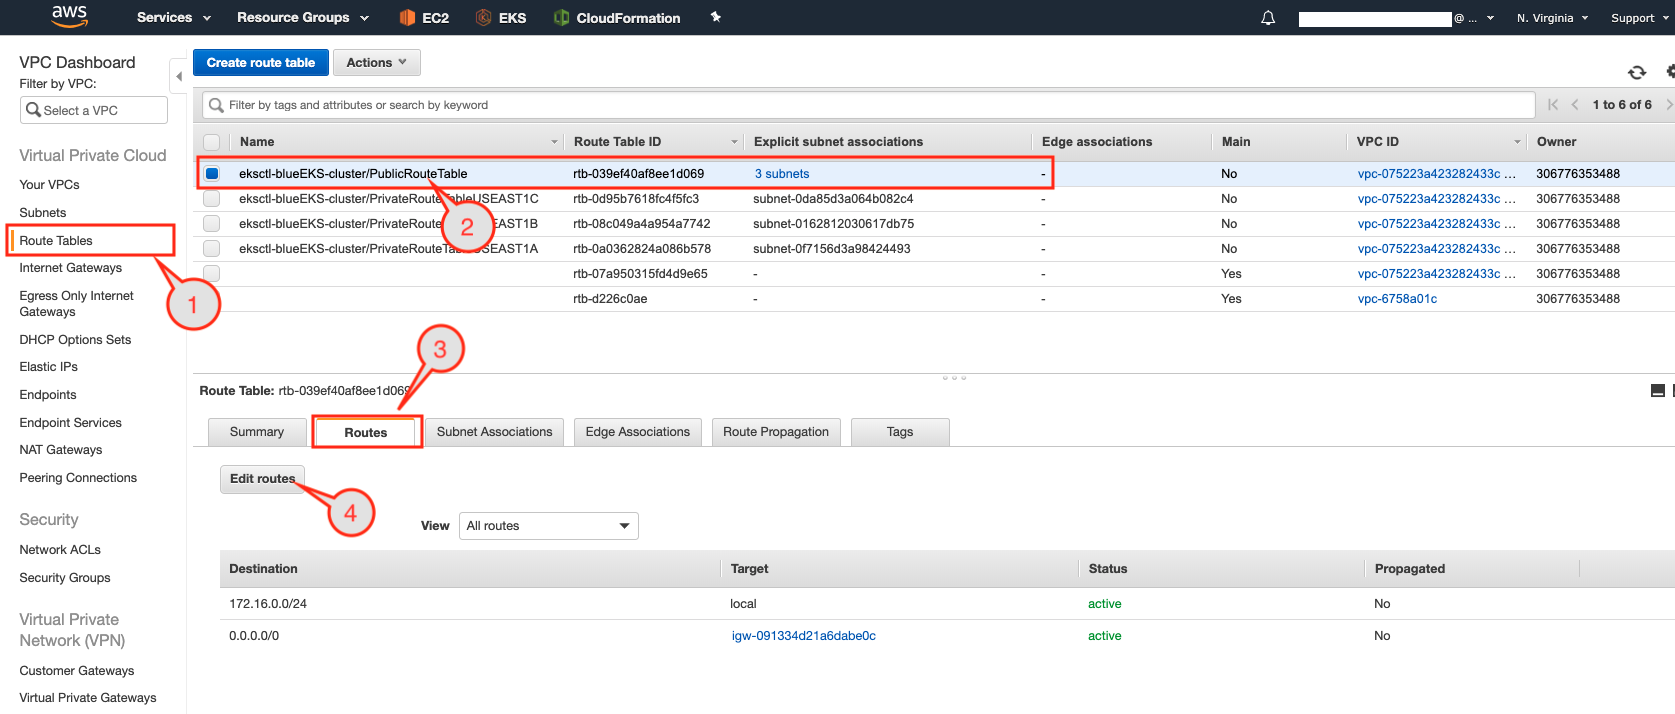 <\/figure>\r\n\r\n\r\n\r\n
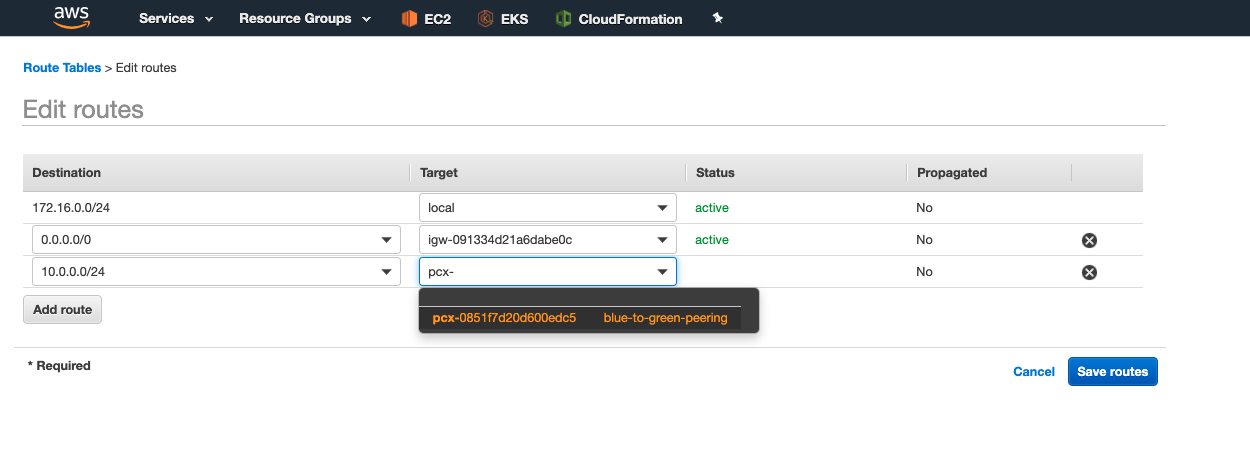 <\/figure>\r\n\r\n\r\n\r\n
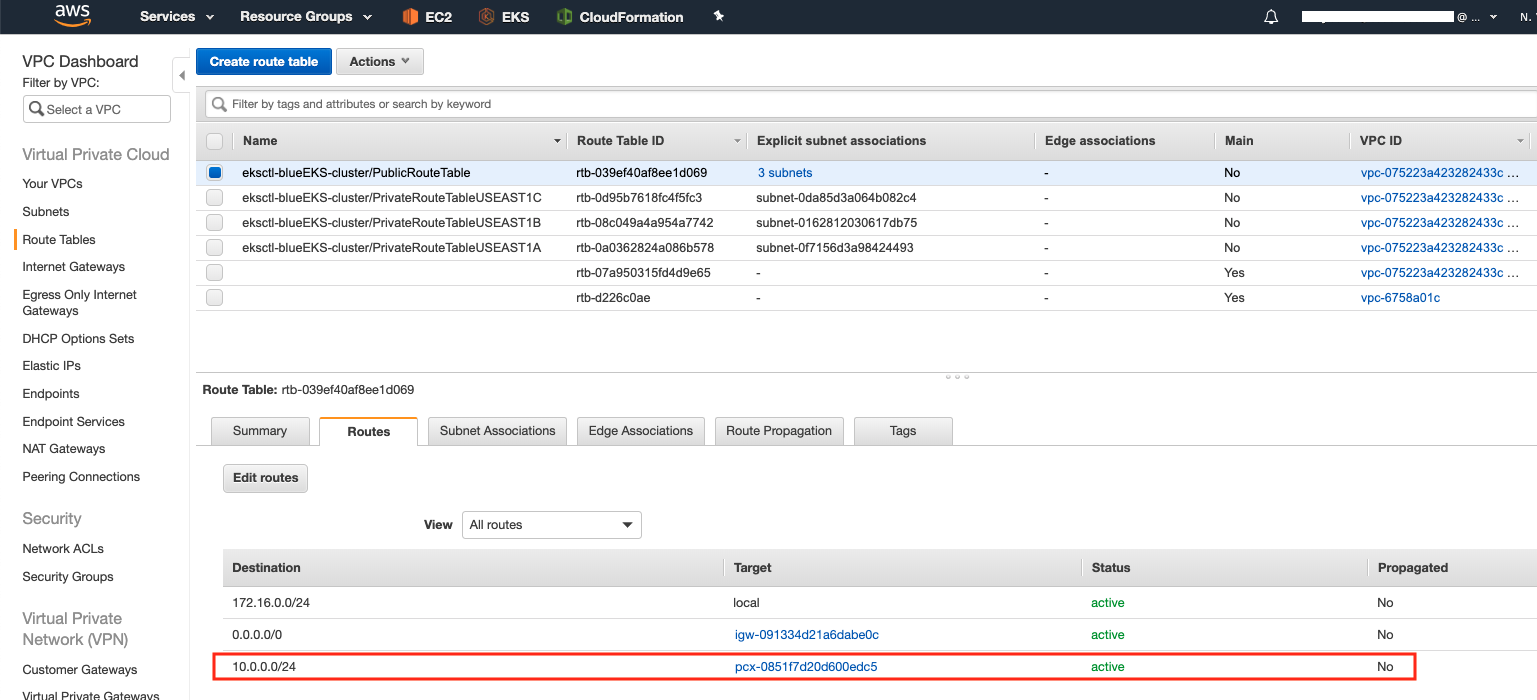 <\/figure>\r\n\r\n\r\n\r\n